Sorry I haven’t posted for a while. The holidays have been crazy and I haven’t had my usual time to experiment in the kitchen. But to keep in the tradition of trying to post at least once a week, I am going to share a cookie recipe from back in the day.
This is a reprint of a blog I did a couple of years ago. It is such a great holiday recipe that I wanted to give it some prime time, especially now that I have more readers and subscribers. I guarantee you, you cannot go wrong with this recipe. It will be a hit in your holiday cookie baking arsenal!

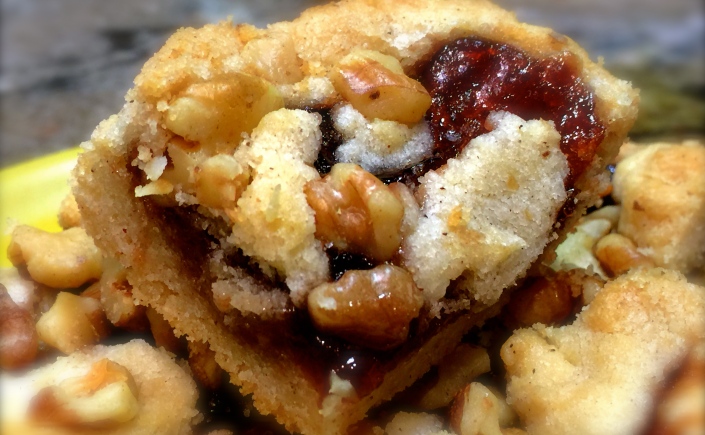
Raspberry Walnut Bars
There’s a lot of reasons for this recipe being so popular. First, and probably foremost, it looks so darn delicious. Second, and not known by those requesting the recipe, it is sinfully easy to make. And third, the recipe turns out perfect first time, every time. I can’t take credit for the recipe, it was one I found a few years ago, I simply can’t remember where I found it. So up front I apologize to whomever I am not giving credit to for the actual recipe.
Lesson Learned 1: The hardest thing about this recipe is preparing the pan. The recipe calls for lining a 8 inch square pan with parchment paper allowing some overhang on both sides. Trying to keep parchment paper from popping back out of the pan when you allow for overhang can be tricky. I found the easiest way to make the parchment paper behave is to take two heavy cans of anything and weigh down the paper in the pan while making the dough. That way when it’s time to spread the dough out on the bottom the paper has been somewhat trained and doesn’t jump around as much.
Lesson Learned 2: It is important to follow the directions of using the parchment paper, having the overhang and spraying the parchment paper with cooking spray. I can’t image what you would wind up with if you didn’t. But if you take the time to do it, it comes out of the pan easily and absolutely nothing sticks to the parchment paper.
Lesson Learned 3: This recipe gives you plenty of dough so don’t worry about using it to fill up the bottom. It says to use two thirds of the dough for the crust and one third to dot the top. I found that gave me way too much dough for the top. You need a lot less dough to dot the top then you think, so don’t be afraid to use more than two thirds of the dough for the crust.
Lesson Learned 4: Avoid the temptation to use too much raspberry jam. A nice even thin coat is all you need. Stick to the amount called for in the recipe.
Lesson Learned 5: Depending on how many bars you want to give out, you may have to make this recipe a couple of times. You can make the bars big or small, but the most you’ll probably get out of this recipe is 24 small bars.
I guarantee these bars will be a hit with your family and friends. You simply must try them!
Raspberry Walnut Bars…
INGREDIENTS:
Non stick baking spray
1 3/4 cups flour
1/2 tsp. kosher salt
1/2 tsp. ground cinnamon
1/8 tsp. nutmeg
3/4 cup unsalted butter, room temperature
1 cup sugar
2 large egg yolks
1 tsp. vanilla
2/3 cup raspberry jam
1 cup chopped walnuts
DIRECTIONS:
Preheat oven to 350. Line an 8 inch square baking pan with parchment paper leaving an overhang on both sides. Spray the parchment paper with cooking spray. (I do this right before I am ready to put the dough into the pan).
In a medium bowl whisk the flour, salt, cinnamon and nutmeg. Set aside. Beat the butter and sugar until fluffy. (This does take a little time, most people do not do this thoroughly enough so make sure to take the time to make the mixture fluffy). Beat in the egg yolks and vanilla. Gradually add the flour mixture until combined. Do not over mix. Transfer two thirds of the dough into the prepared pan and press down evenly. Spread the jam on top. Crumble the remaining dough and dot it over the jam. Sprinkle the top with the walnuts. Bake until golden 35-45 minutes. Cool completely in the pan. (this is very important).
Holding both sides of the parchment paper, lift out of the pan, transfer to a cutting board and cut into rectangles. Store in an airtight container at room temperature for up to 5 days.


That looks so great!!!
LikeLiked by 1 person
Thank you. They are surprisingly easy to make and very delicious!
LikeLike
Reblogged this on Heba vs Reason.
LikeLiked by 1 person
Thank you for the reblog!
LikeLike
These look amazing!! I have to try this recipe!
LikeLiked by 1 person
This is a great recipe. Let me know how yours turns out!
LikeLiked by 1 person