If you’re anything like me, pizza is something you either eat at a restaurant or order for delivery. I never really thought about making homemade pizza until recently. I was wandering around Trader Joes, saw some pizza dough in a bag and thought I should give this a try. So I bought some. After leaving it in the refrigerator for a few days I decided to use it before it went bad. And the rest was just pure joy.

Pizza is pretty elementary. It consists of the dough for your crust, your sauce, your toppings and cheese – yep, that’s pretty much it. But not really. How thinly do you roll out the dough? How much sauce and toppings do you put on? At what temperature do you bake it so the bottom crust gets done before the sides get too brown? What I found is there are some basic things to keep in mind when making pizza so your results will be perfect. So let’s talk making homemade pizza…
 Lesson Learned 1 – Tips for working with pizza dough: Pizza dough, like most other types of dough, likes to rest before you roll it out. One common mistake with using store bought pizza dough is to take it out of the refrigerator and immediately start working with it. Doing that will result in a tough crust. Let the dough rest on your counter for about 20 minutes before you begin rolling it out. That way the glutens in your dough won’t get overworked and you won’t have a tough crust.
The dough that I bought made a 12 inch round pizza about 1/8 inch thick. That’s probably the thinnest you want to go with the crust. I rolled it out on a silpat non stick silicone mat. My mat gives me circular as well as linear dimensions that helps when I’m working with dough that needs to be rolled out to certain specifications. If I have a cookie recipe that says I need to create a 9 inch roll, I can measure that on this mat. I was also able to roll out my pizza dough to a perfect 12 inch round. And even though the mat is considered non-stick, you still need to use flour when working with bread/pizza dough. Most of the time you don’t need it for cookie dough.

Pizza Crisper
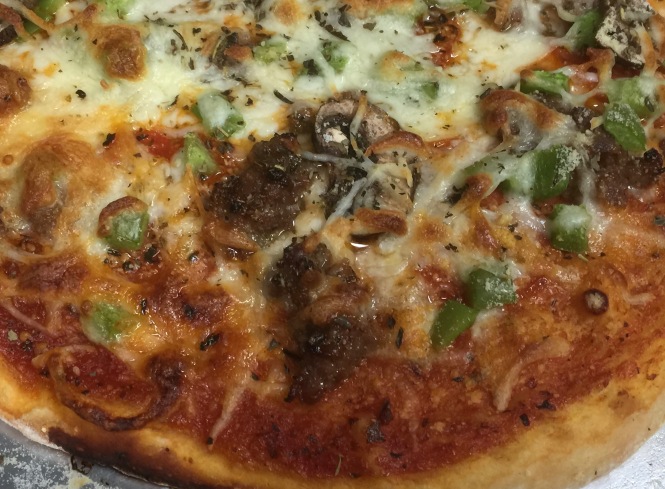
Lesson Learned 2 – If at all possible, use a pizza stone or crisper: Pizza stones are designed to bake pizzas in commercial brick ovens although they also can be used at home. Pizza crispers are designed for “regular” ovens. They are perforated to let air circulate under the crust to cook the bottom of the pizza more evenly. Being that I don’t make homemade pizza on a regular basis I just bought an aluminum pizza crisper at the grocery store. It worked beautifully. Plus I can reuse it a few times before having to get another one. Use either a pizza stone or crisper if you want to ensure that the bottom of your crust is not soggy when the rest of your pizza is fully cooked.
Also when using an aluminum pizza crisper (as shown in the picture) you should lightly oil it before putting the dough on it. I recommend using canola oil because it has a very high smoke point. I also recommend that after you brush on the oil to take a paper towel and go over the crisper and remove any excess. I am very serious about only lightly oiling the bottom. I’d start with about an 1/8 of a teaspoon and go from there. That amount of oil and a paper towel to spread it and soak up any excess should be more than sufficient. You don’t want the bottom of your pizza to be greasy. You just don’t want the dough to stick to the crisper.
 Lesson Learned 3 – Don’t drench the pizza with sauce: I used the smallest jar of marinara I could find, 14 ounces, and I still didn’t use all of it. Now you may ask should I use pizza sauce or pasta sauce. I don’t think it really matters. Some make pizzas with alfredo sauce. I don’t think there is a hard fast rule. It’s really all up to you. What’s more important is to make sure you don’t drown your dough in sauce. Just spread it on to lightly and evenly cover it. You don’t want to create soggy dough.
Lesson Learned 4 – Should toppings be put on cooked or raw: That depends. If you want to have Italian sausage on your pizza definitely cook it beforehand. I cooked mine about 75% done (just a little pink – see below) knowing that the time the pizza cooked in the oven would cover the rest. I did not cook my green peppers ahead of time, but I did cut them into smaller diced pieces. Same thing with my mushrooms. They went on raw but I sliced them thin and they were cooked perfectly in the time allotted. I also put on some pepperoni slices, as is, since they can be eaten right out of the package.

Partially Cooked Italian Sausage
 Another mistake common in making homemade pizza putting the toppings on too thick. Now don’t get me wrong, I like lots of toppings on my pizza. Just be careful not to create a huge mound. What happens when putting too much toppings on is the crust will get done before your toppings are cooked or even warmed through. You don’t want that.
Lesson Learned 5 – Cook your pizza at a high heat: I looked over many different pizza recipes and saw a wide variety of recommended cooking temperatures. One recipe even called for the pizza to be cooked at 350 degrees. With the research I did I found the prevailing thought to be that pizza should be baked at higher temperatures. I baked mine at 450 degrees. It was done in 15 minutes and the crust was perfect. Our local take-and-bake pizza store recommends you bake their pizzas at 425 degrees. You could probably do that as well but it will take a little longer for your pizza to cook. If you pile on your toppings it might be better to bake your pizza at 425 to give more time for the toppings to bake. I would guess baking at 425 might add on an additional 5-10 minutes, depending on your oven. The choice is yours, but I would not go under 425 degrees.

It sounds like a lot but it’s actually pretty simple. If you keep these tips in mind you should have a perfect pizza the very first time. This was my first time making it and it turned out perfectly. And how often can you say that about a recipe you’ve tried only once? I really like the fact that I can control what goes on my pizza and so I will definitely make a homemade pizza again. Try this and let me know what you think…
Easy Homemade Pizza...
INGREDIENTS:
1 bag of pizza dough (I got mine from Trader Joes – Whole Foods also has them)
1 14 ounce jar of pasta or pizza sauce (there will be some leftover)
1/2 pound sweet Italian sausage cooked almost through and crumbled
pepperoni slices, as desired
1/3 cup green pepper, diced small
2-3 medium sized cremini mushrooms, sliced thin
Mozzarella cheese
Parmesan cheese
1/4 tsp. Italian seasoning (you can add more if you like)
1/8 tsp. canola oil
Flour for dough preparation
DIRECTIONS:
Preheat the oven to 450. Take a large pizza crisper and lightly oil the bottom. Remove any excess with a paper towel.
Flour your surface for working the dough. Roll the dough to a 12 inch circle. Wrap the dough around your rolling pin and transfer it to the crisper. Cover the surface of the dough with pizza sauce leaving about a half inch around the edges uncovered. Arrange the pepperoni slices on the dough. Arrange the Italian sausage crumbles on the dough.
Sprinkle the meats with mozzarella and Parmesan cheese. Arrange the mushroom slices and green pepper pieces on the dough. Top them with more mozzarella and Parmesan cheese. Sprinkle the Italian seasoning over the top.
Bake for 15 minutes or until the crust cooked and the cheese is gold brown and bubbly. Slice and serve.