Mashed Potato Cakes…

Give me my druthers and my carb of choice for any meal will always be mashed potatoes. I love potatoes any which way you can make them but when it comes to deciding how to prepare them, mashed potatoes is on the top of the list.

That being said, I obviously make a lot of mashed potatoes and because of that I normally have a fair amount left over. Leftover reheated mashed potatoes are fine, but I wanted to make something with a little more flair. So the other evening I ventured into making mashed potato cakes.

Lesson Learned 1 – Determining the correct consistency can be tricky. Everyone likes their mashed potatoes prepared a certain way. I like mine with a little more body, stiffer and less runny. Some people like their’s softer and “wetter”.  The key to creating a mashed potato cake you can work with is to make sure the consistency of the cake is not overly soft. So you may have to play with the amount of the ingredients a little until you get it right. For me, I beat one egg but only added a little bit at a time. I wound up using about 1/2 of a beaten egg to the potatoes. The same thing with flour. I probably used between 1/6 and 1/8 cup of flour. I added it gradually to make sure I got a good consistency but I also wanted to make sure the flour would not overpower the flavor.

potcakes

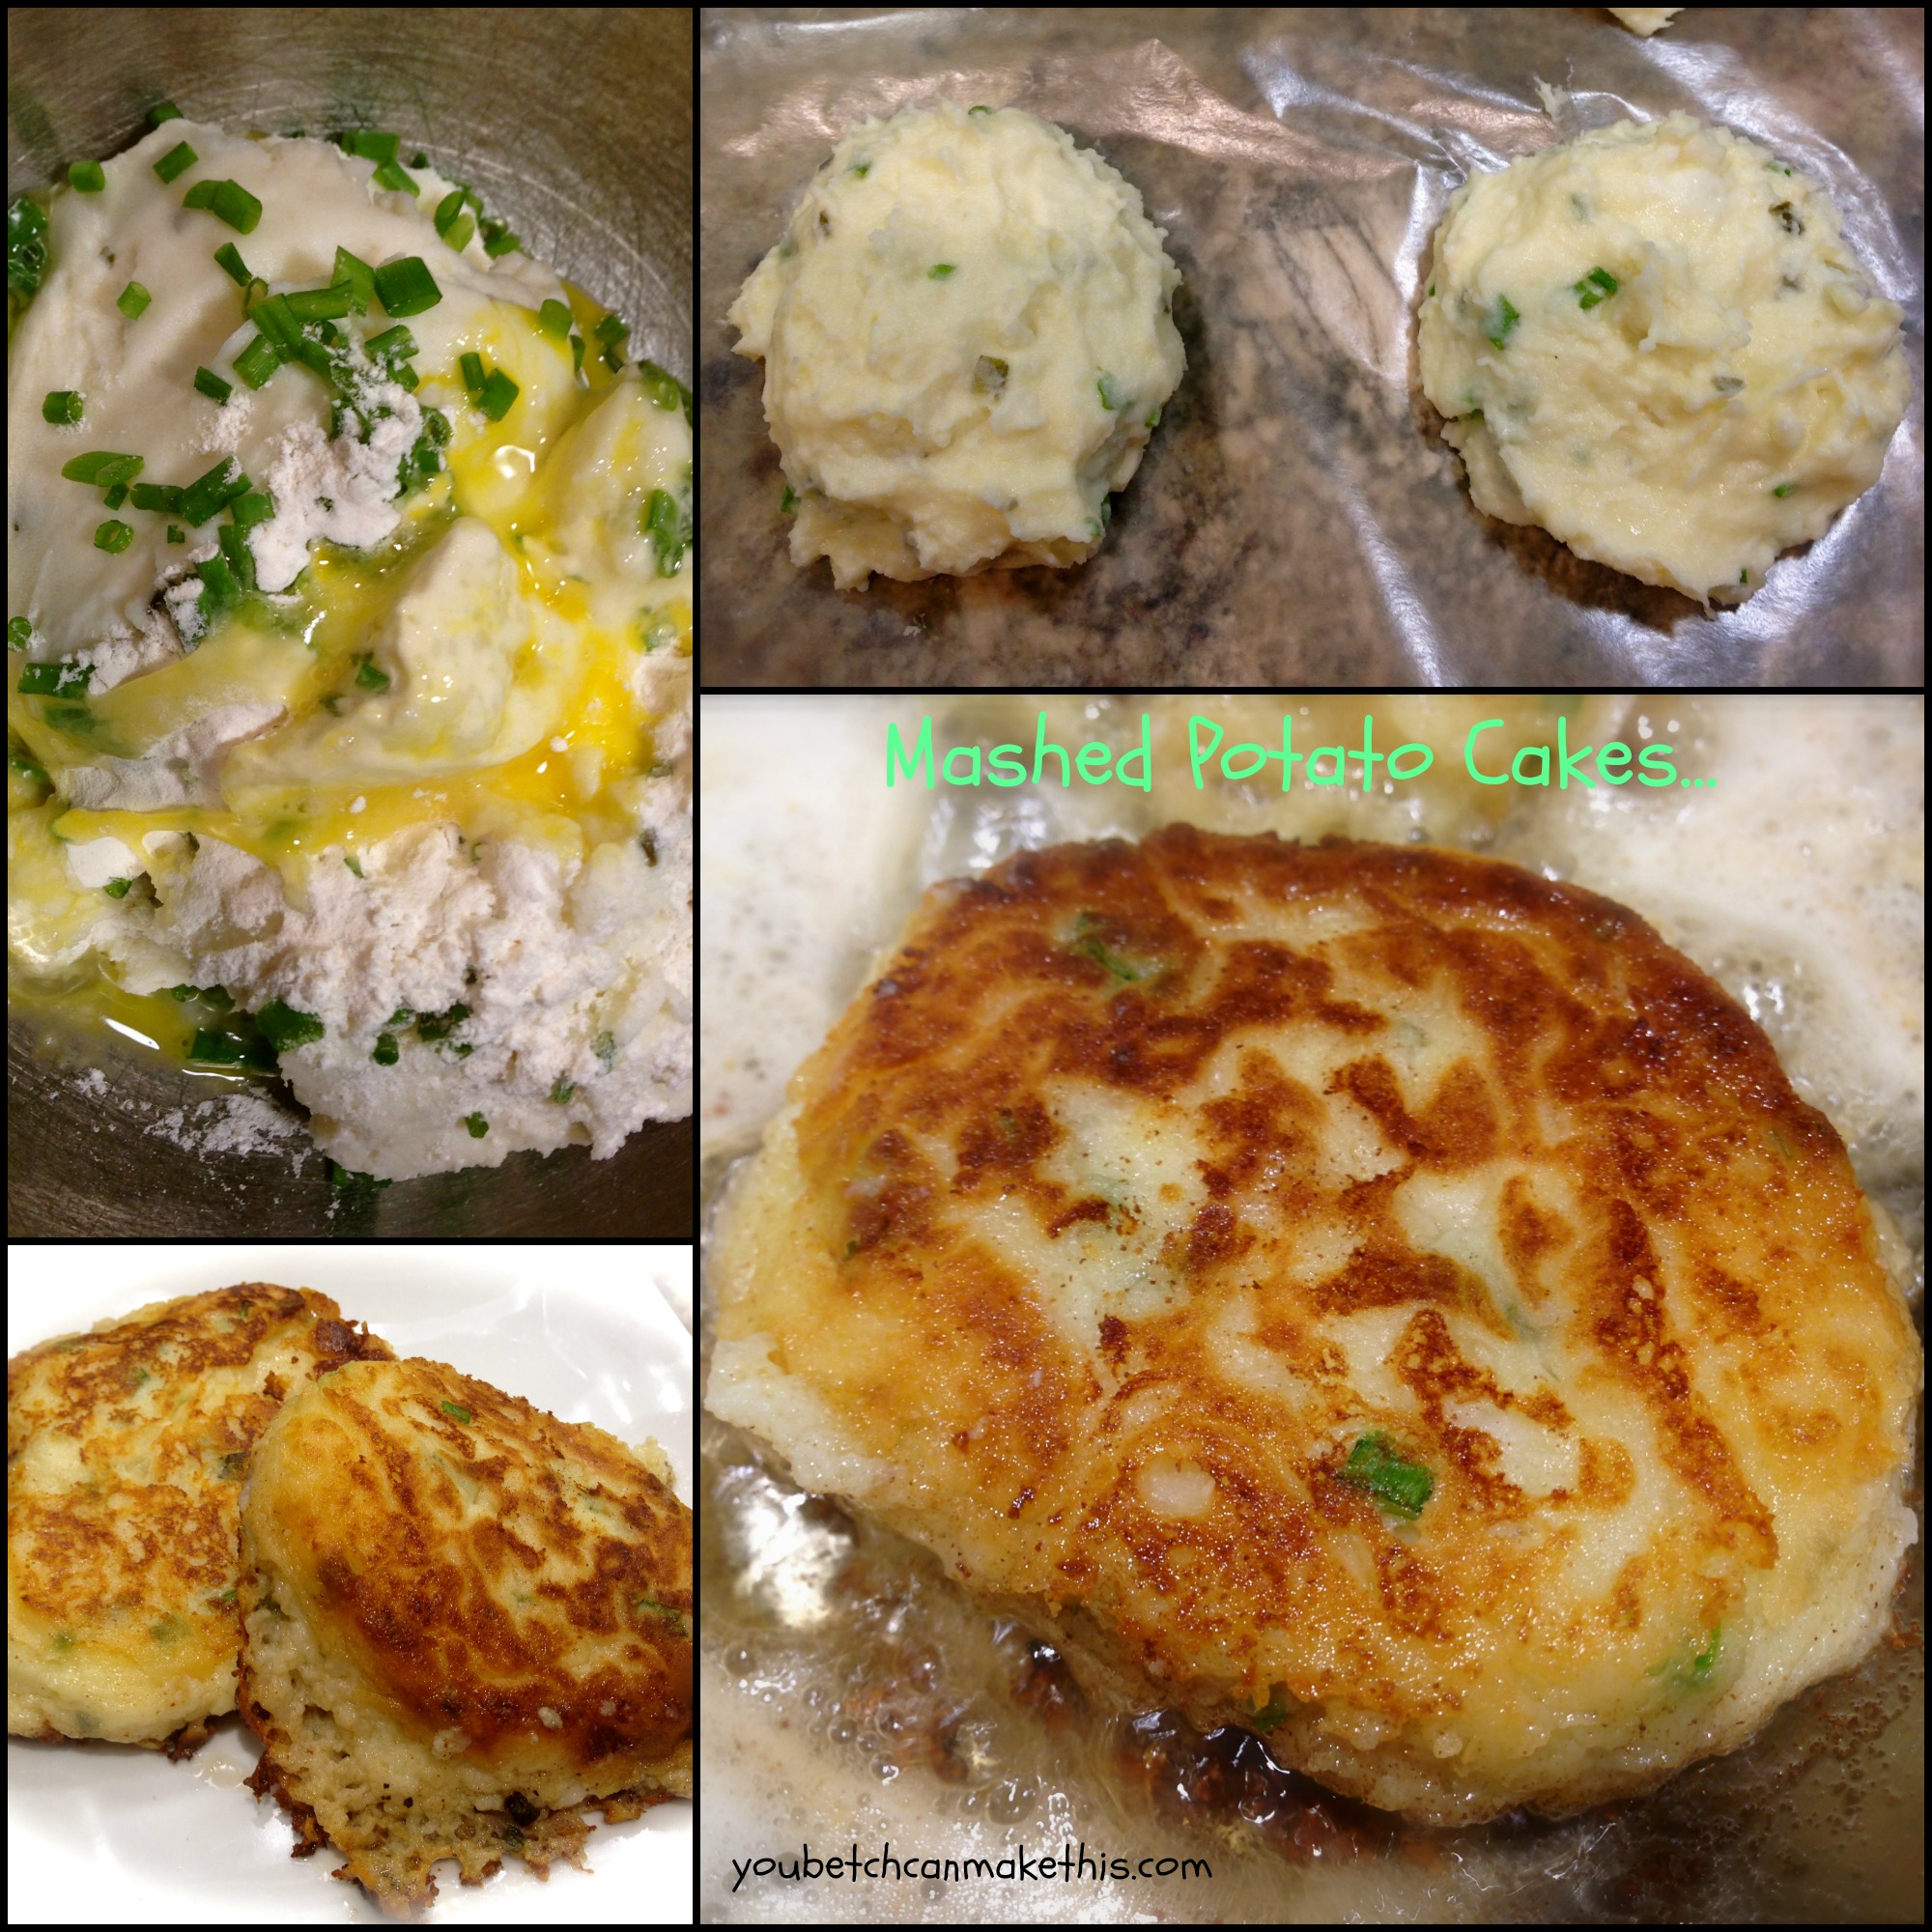
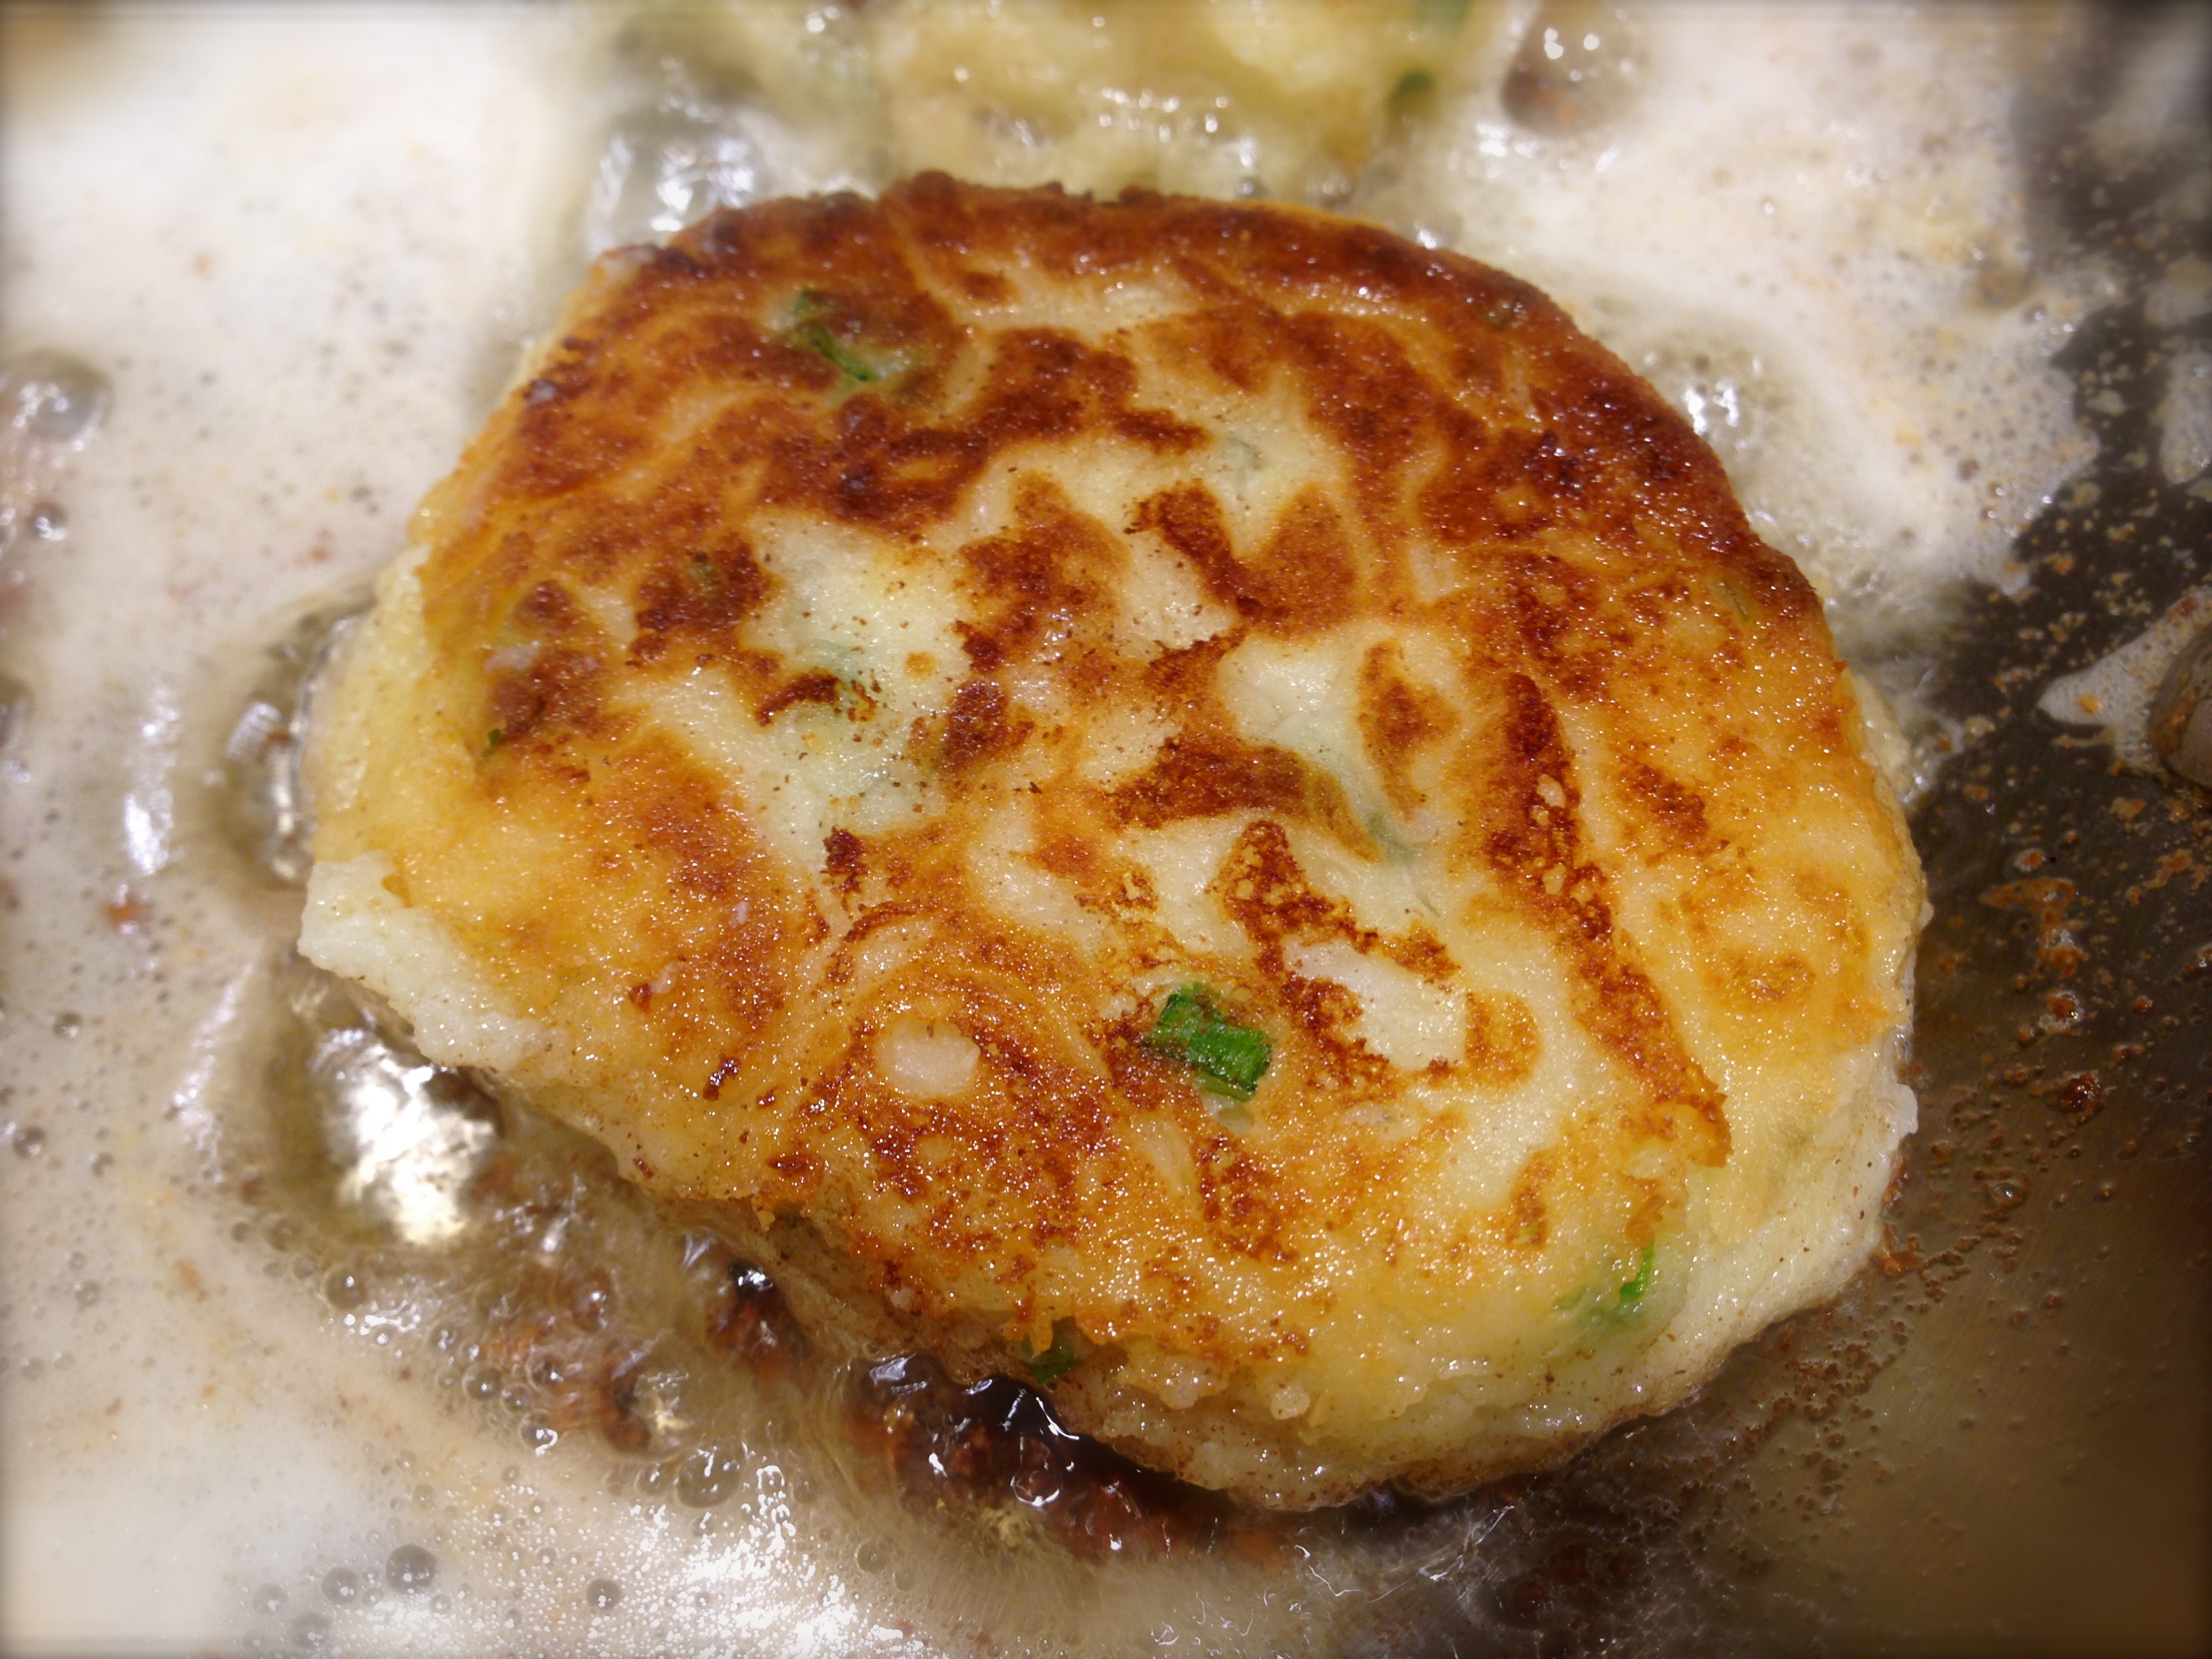
Lesson Learned 2 – Once you get them in the pan leave them alone: You will need the help of a hardened crust on the bottom to help you flip the cakes over. I fried mine over medium high heat for four minutes before flipping them. That could vary for you depending upon your stove and heat source. The good thing is you will be able to see the browning occurring. Give it at least four minutes before you try to flip them over. Then flip them quickly as the top part will be much softer than the bottom.

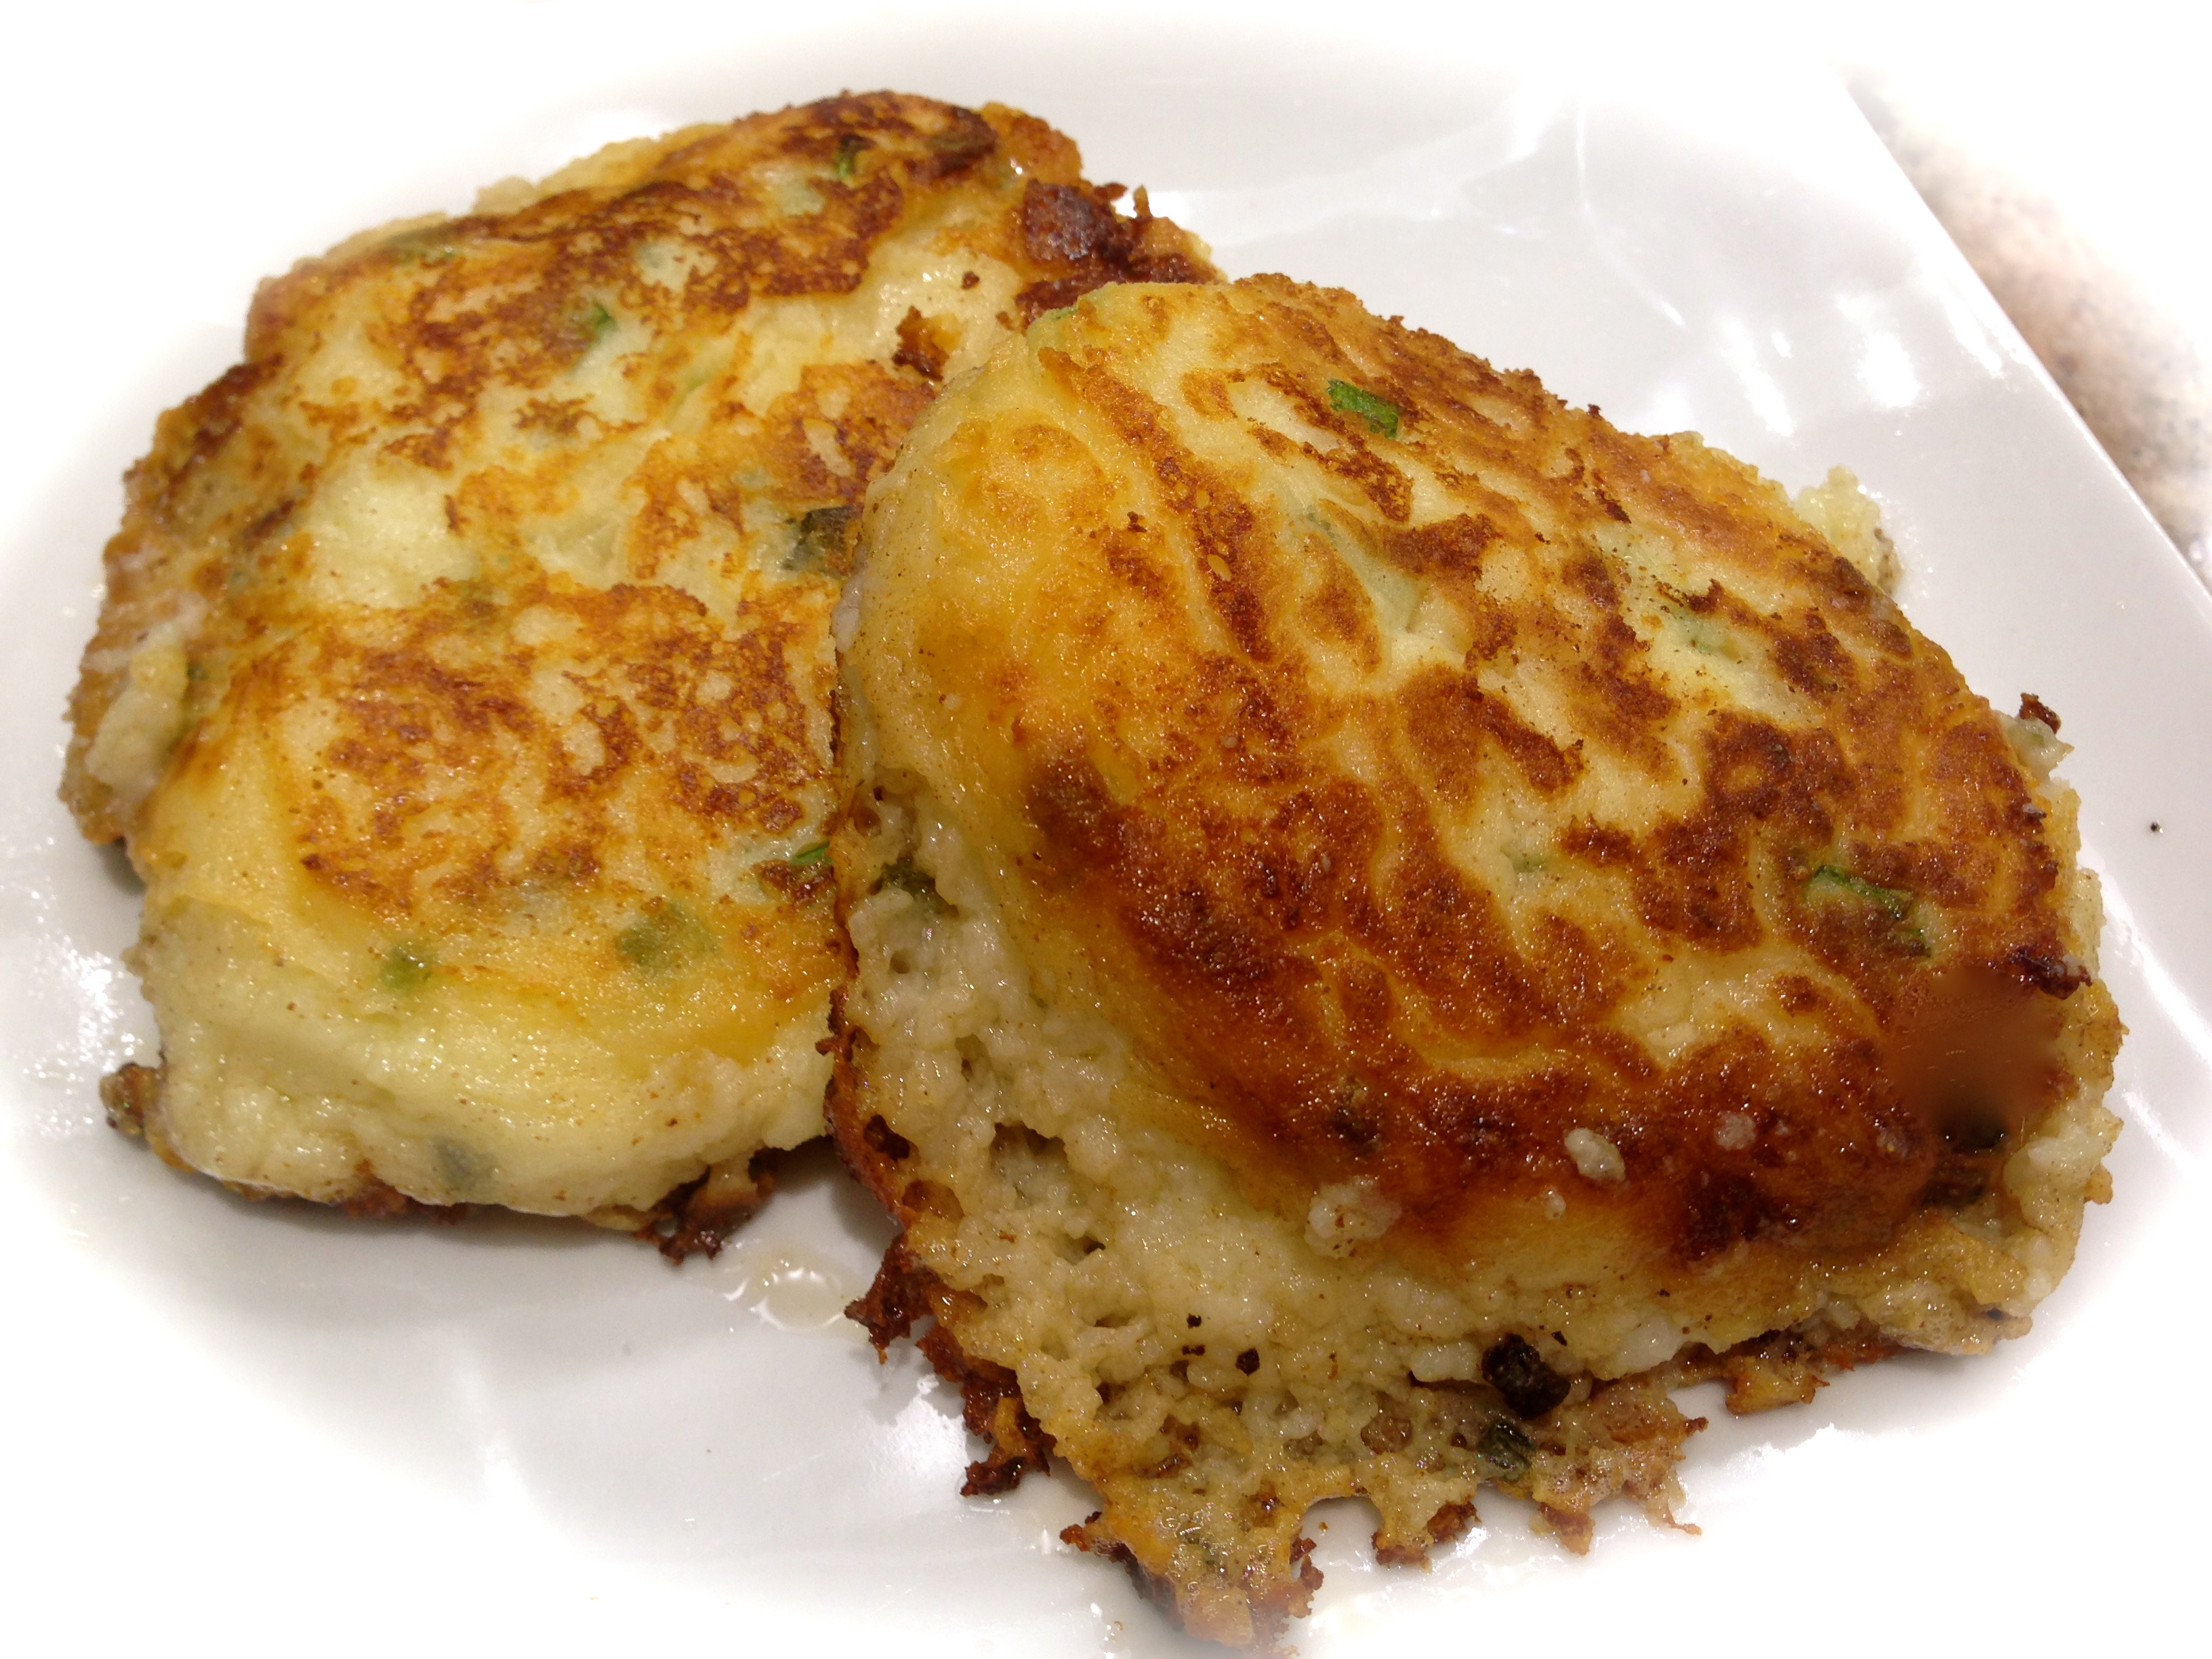
I think there are basically two specific things to keep in mind when making this recipe. First is getting the correct consistency for the cakes. Second is making sure you have a good crust on the bottom and flipping them quickly. But even if they don’t come out picture perfect, I can attest to the fact they are damned delicious!

Mashed Potato Cakes…

  • Servings: 4 Cakes - 2 Servings
  • Difficulty: Medium
  • Print

INGREDIENTS:

3 cups leftover mashed potatoes

1 egg, beaten and added gradually (you may not need the entire amount)

3 Tbs. chopped chives (or more if you like)

1/8 cup flour added gradually (you may not need the entire amount)

4 Tbs. butter

Salt and pepper to taste

Flour for dredging

DIRECTIONS:

Combine mashed potatoes and chives. Slowly add some of the beaten egg, continually checking the consistency of the potatoes to make sure they do not become too runny. Add the flour gradually and mix until the potatoes have a somewhat firm consistency (they will be soft, but you don’t want them runny – they need to be firm enough to hold the shape of a rounded cake).

Form the potatoes into 4 equal sized cakes (about 2 inches in diameter). Put some flour on a plate and dredge the cakes in the flour. Shake off the excess. In a medium size skillet melt the butter over medium high heat. Place the cakes in the skillet and cook for approximately 4 minutes on each side. Serve immediately.

IMG_3827

IMG_3819

Lasagna Roll Ups

I recently came across a recipe for lasagna roll ups. The recipe intrigued me because one of the go-to recipes I regularly make and really enjoy is chicken roll ups, so I thought making a lasagna version might be interesting. I particularly liked the idea of rolling the noodles with a ricotta mixture instead of layering them flat as in traditional lasagna. The original version of this recipe was for veggie lasagna which I knew would probably not be a big hit with my husband so I decided to work with the concept and create a recipe that would appeal to the carnivores of the world. But you can certainly make this a veggie dish and it will be fabulous.

Lesson Learned 1 – There is a lot of prep work to this recipe: If you’re not a prep person, this might not be the recipe for you. I find it cathartic to chop, mince, slice and dice but not everyone feels that way. You also have to cook the lasagna noodles ahead of time and arrange them individually on wax or parchment paper so they remain straight and don’t stick together before you roll them up with the cheese. The key to this recipe is making sure everything is prepped up front, including cooking and separating the noodles. If you do that, assembling it is a breeze. All I can say is that regardless of the work, this recipe is worth it.

IMG_3630Lesson Learned 2 – Cut all the veggies for the sauce to a similar size: This is important so that you don’t overcook or undercook any of them. Don’t throw them all in at the same time. Saute the onions, peppers and mushrooms first, then add the garlic followed by the squash. By the time the squash is crisp tender everything else will be ready as well.

Lesson Learned 3 – Use fresh mozzarella and shred it yourself: I think fresh mozzarella tastes better and it definitely melts better giving you that gooey consistency that we all love. It takes a little extra time but it’s worth it. Then again, if you don’t have the time or want to shorten the prep process you can always use shredded mozzarella.

Lesson Learned 4 – Establish a process for assembling this: You can organize cooking and assembling this recipe any way you want but the key is to be organized when you make it. Think through what process might work the best for you before making this dish. That way you won’t feel overwhelmed by all of the various steps.

Lasagnajpg

Lasagna Roll Ups

This recipe is enough to serve six. And although the lasagna noodles look small when you take them out of the package, they plump substantially when you cook them. One noodle roll up is more than enough for the average appetite.

The original recipe was designed to be frozen once assembled and baked off frozen at a later time. You can certainly do that but if you do make sure to use a meat thermometer to test the temperature of the center of the lasagna to ensure it’s heated all the way through.

My husband REALLY liked this recipe. In order to make it more carnivore friendly I added my homemade meatballs on top when I served it. I cooked the meatballs separately and just heated them through before I served them on top of the lasagna. If you don’t have time to make meatballs you can add partially cooked ground italian sausage to the sauce or just do what I did and use a sauce that already had sausage in it. Or you can simply leave it as a veggie dish. Any way you adapt this recipe, I know you will like it.

Lasagna Roll Ups…

  • Servings: 6
  • Difficulty: Medium
  • Print

INGREDIENTS:

PASTA:

6 lasagna noodles cooked according to packaged instructions

SAUCE:

2 Tbs. olive oil

2 cloves of garlic, minced

1 small onion, diced

1 small sweet pepper, diced

4-6 large cremini mushrooms, chopped small

1/2 medium size zucchini, diced

1/2 cup white wine

1 24 ounce jar of pasta sauce (I used Classico with sausage)

1 6 oz. can of tomato paste

16 oz. shredded mozzarella cheese

Grated parmesan for sprinkling on top

2 tsp. Italian seasoning

Salt and pepper to taste

RICOTTA FILLING:

16 oz. ricotta cheese

1/4 cup grated parmesan

1 egg

1 TBS. flat leaf parsley, chopped

Salt and pepper to taste

DIRECTIONS:

Preheat the oven to 375 degrees. Cook the noodles according to the package instructions. Drain them and place them flat on a wax or parchment paper lined sheet pan. Make layers of individual noodles as needed separating each layer with a sheet of wax or parchment paper. Set aside.

In a large skillet heat the olive oil. Saute the onions, mushrooms and peppers for about 2 minutes. Add the garlic and cook until fragrant (about 30 seconds to a minute). Add the zucchini and cook for a few minutes. Pour in the wine and salt and pepper the mixture to taste. Pour in the jarred sauce. Add a can of tomato paste. Stir until combined and warmed through. Turn off the heat and set aside.

Combine all of the ingredients for the ricotta filling. Taste before adding salt and pepper as the parmesan is salty. Salt and pepper to taste. Line up the flat lasagna noodles and divide the ricotta mixture into six equal portions. Spread the mixture over each flat noodle. Roll each noodle tightly with the filling.

Pour 1/3 of the sauce on the bottom of a 2 quart casserole dish. Sprinkle some mozzarella and parmesan over the sauce and top with a teaspoon of Italian seasoning. Place the rolled lasagna noodles on top making two rows of three each. Pour the remaining sauce over the noodles. Generously top with mozzarella and parmesan. Sprinkle the remaining Italian seasoning on top of the cheese.

Tent the casserole dish with foil and bake for 45 – 50 minutes. Remove foil and bake for additional 5 minutes or until the cheese on top is browned and bubbly. You can also turn on the broiler for the last 3 – 5 minutes and put the casserole dish under the broiler. If using the broiler, keep an eye on the casserole so as not to burn the cheese on top.

Let sit for 5 minutes and serve.

IMG_3724

The Best Ever Meatballs…

You know how some recipes catapult from being just something you try to a family and friends favorite that spans generations? Well this I can assure you is one of them. I first started making this recipe when I was in my twenties. At that time I could barely cook myself out of a paper bag. But I needed to make an appetizer for a family gathering and I decided to make meatballs.

Almost everyone I know has their tried and true meatball recipe and quite a few say to me that theirs is alright but not particularly special. Well search no more. This one is special and it’s been passed down from family to friends and friends of friends for decades. Every time I serve it at least one or more people ask me how to make it. This recipe is now multi-generational!

The first time I made this I was not very adept in the kitchen. I wasn’t learned about certain ingredients, proportions, substitutions, doneness – you name it, I didn’t have a clue. But my naiveté was the factor in making a mistake that kicked this recipe to the next level and made it ever so popular.

IMG_3579The original recipe came from a grocery store bought book, you know the ones you always see at the checkout counter. This one was called Pillsbury’s Cookbook of Family Favorites. You can see how old it is just by looking at the price, $1.25. When was the last time you spent that small of an amount of money on a book or magazine?

When I first read the ingredients there were two things that I did not have on hand. One was cracker crumbs and my husband suggested using bread crumbs instead. The second was sweet pepper flakes. I thought to myself hmm…, that shouldn’t be too hard to find. So off to the store I trudged in search of them.

When I got to the store, lo and behold, there were no sweet pepper flakes to be found. I endlessly looked and looked at the spices and herbs and the only thing I saw with “flakes” labeled on it was red pepper flakes. So I thought to myself, “well green peppers and red peppers are considered sweet peppers so that must be it” (you see what I mean). I bought the red pepper flakes and used them in the recipe.

Now I grew up in a household where very bland food was served. My father was not one for any kind of spices, he totally shied away from garlic and onions, and any kind of “heat” was never put in what we ate. But my husband’s family loves food with a kick, the more heat the better. So little naive me went on to make this recipe substituting red pepper flakes for sweet pepper flakes and it became a huge hit. The first time I made it I used two tablespoons of red pepper flakes and that produced some spicy meatballs, let me tell you. Since then I’ve toned it down to one tablespoon which gives a very nice kick and doesn’t leave you running for something cold to drink. But if you really like to bring on the heat use two tablespoons. It won’t hurt the meatballs that’s for sure.

Meatballs

I’ve been trying to think if I could share any lessons learned in making this recipe but it’s very straightforward even for the novice chef. Just follow the directions and you’ll be able to serve meatballs that will always be a big hit.

The technique is easy. All you need to do is mix the ingredients for the meatballs, form them into one inch rounds and bake them for 30 minutes. Then you put them in a casserole dish, add the sauce, cover and bake them for another hour. Now what’s easier than that?

I know in other blogs I’ve said that you just have to try this recipe, but you really must make this. It’s been tried and true over decades and its popularity came about because I, the cook who never could, made the most advantageous mistake I’ve ever made in the kitchen. Enjoy this one and share it with all of your friends!

The Best Ever Meatballs…

  • Servings: 2-2 1/2 dozen
  • Difficulty: Easy
  • Print

INGREDIENTS:

MEATBALLS:

1 lb. ground beef (I use 85% lean)

2 eggs, slightly beaten

2/3 – 3/4 cup bread crumbs (use a smaller amount and first and see if you will need more)

2 Tbs. organic minced onion flakes

1 Tbs. red pepper flakes (for really spicy meatballs add 2 Tbs)

9 drops Tabasco Sauce (you can add more if you like)

Dash of salt

SAUCE:

3/4 cup catsup

1/2 cup water

1/4 cup white vinegar

1/3 cup light brown sugar, firmly packed

1 1/2 Tbs. organic minced onion flakes

1 tsp. prepared mustard (I use Grey Poupon but you can use yellow mustard)

1 1/2 tsp. kosher salt

4 tsp. Worcestershire Sauce

6 drops Tabasco Sauce (you can use more if you like)

DIRECTIONS:

Preheat the oven to 325 degrees. Mix all of the ingredients for the meatballs. Shape them into one inch balls and layer them in an ungreased jelly roll pan. (You need a sheet pan with a lip on it so the grease does not run off). Bake at 325 for 30 minutes.

Combine all of the ingredients for the sauce. Place the meatballs in a casserole dish that you can cover. Pour the sauce over the meatballs, cover and bake for 1 hour. Enjoy!

IMG_3590

IMG_3610

Serving Suggestion: sprinkle with parsley and parmesan cheese…