Homemade Cranberry Jam…

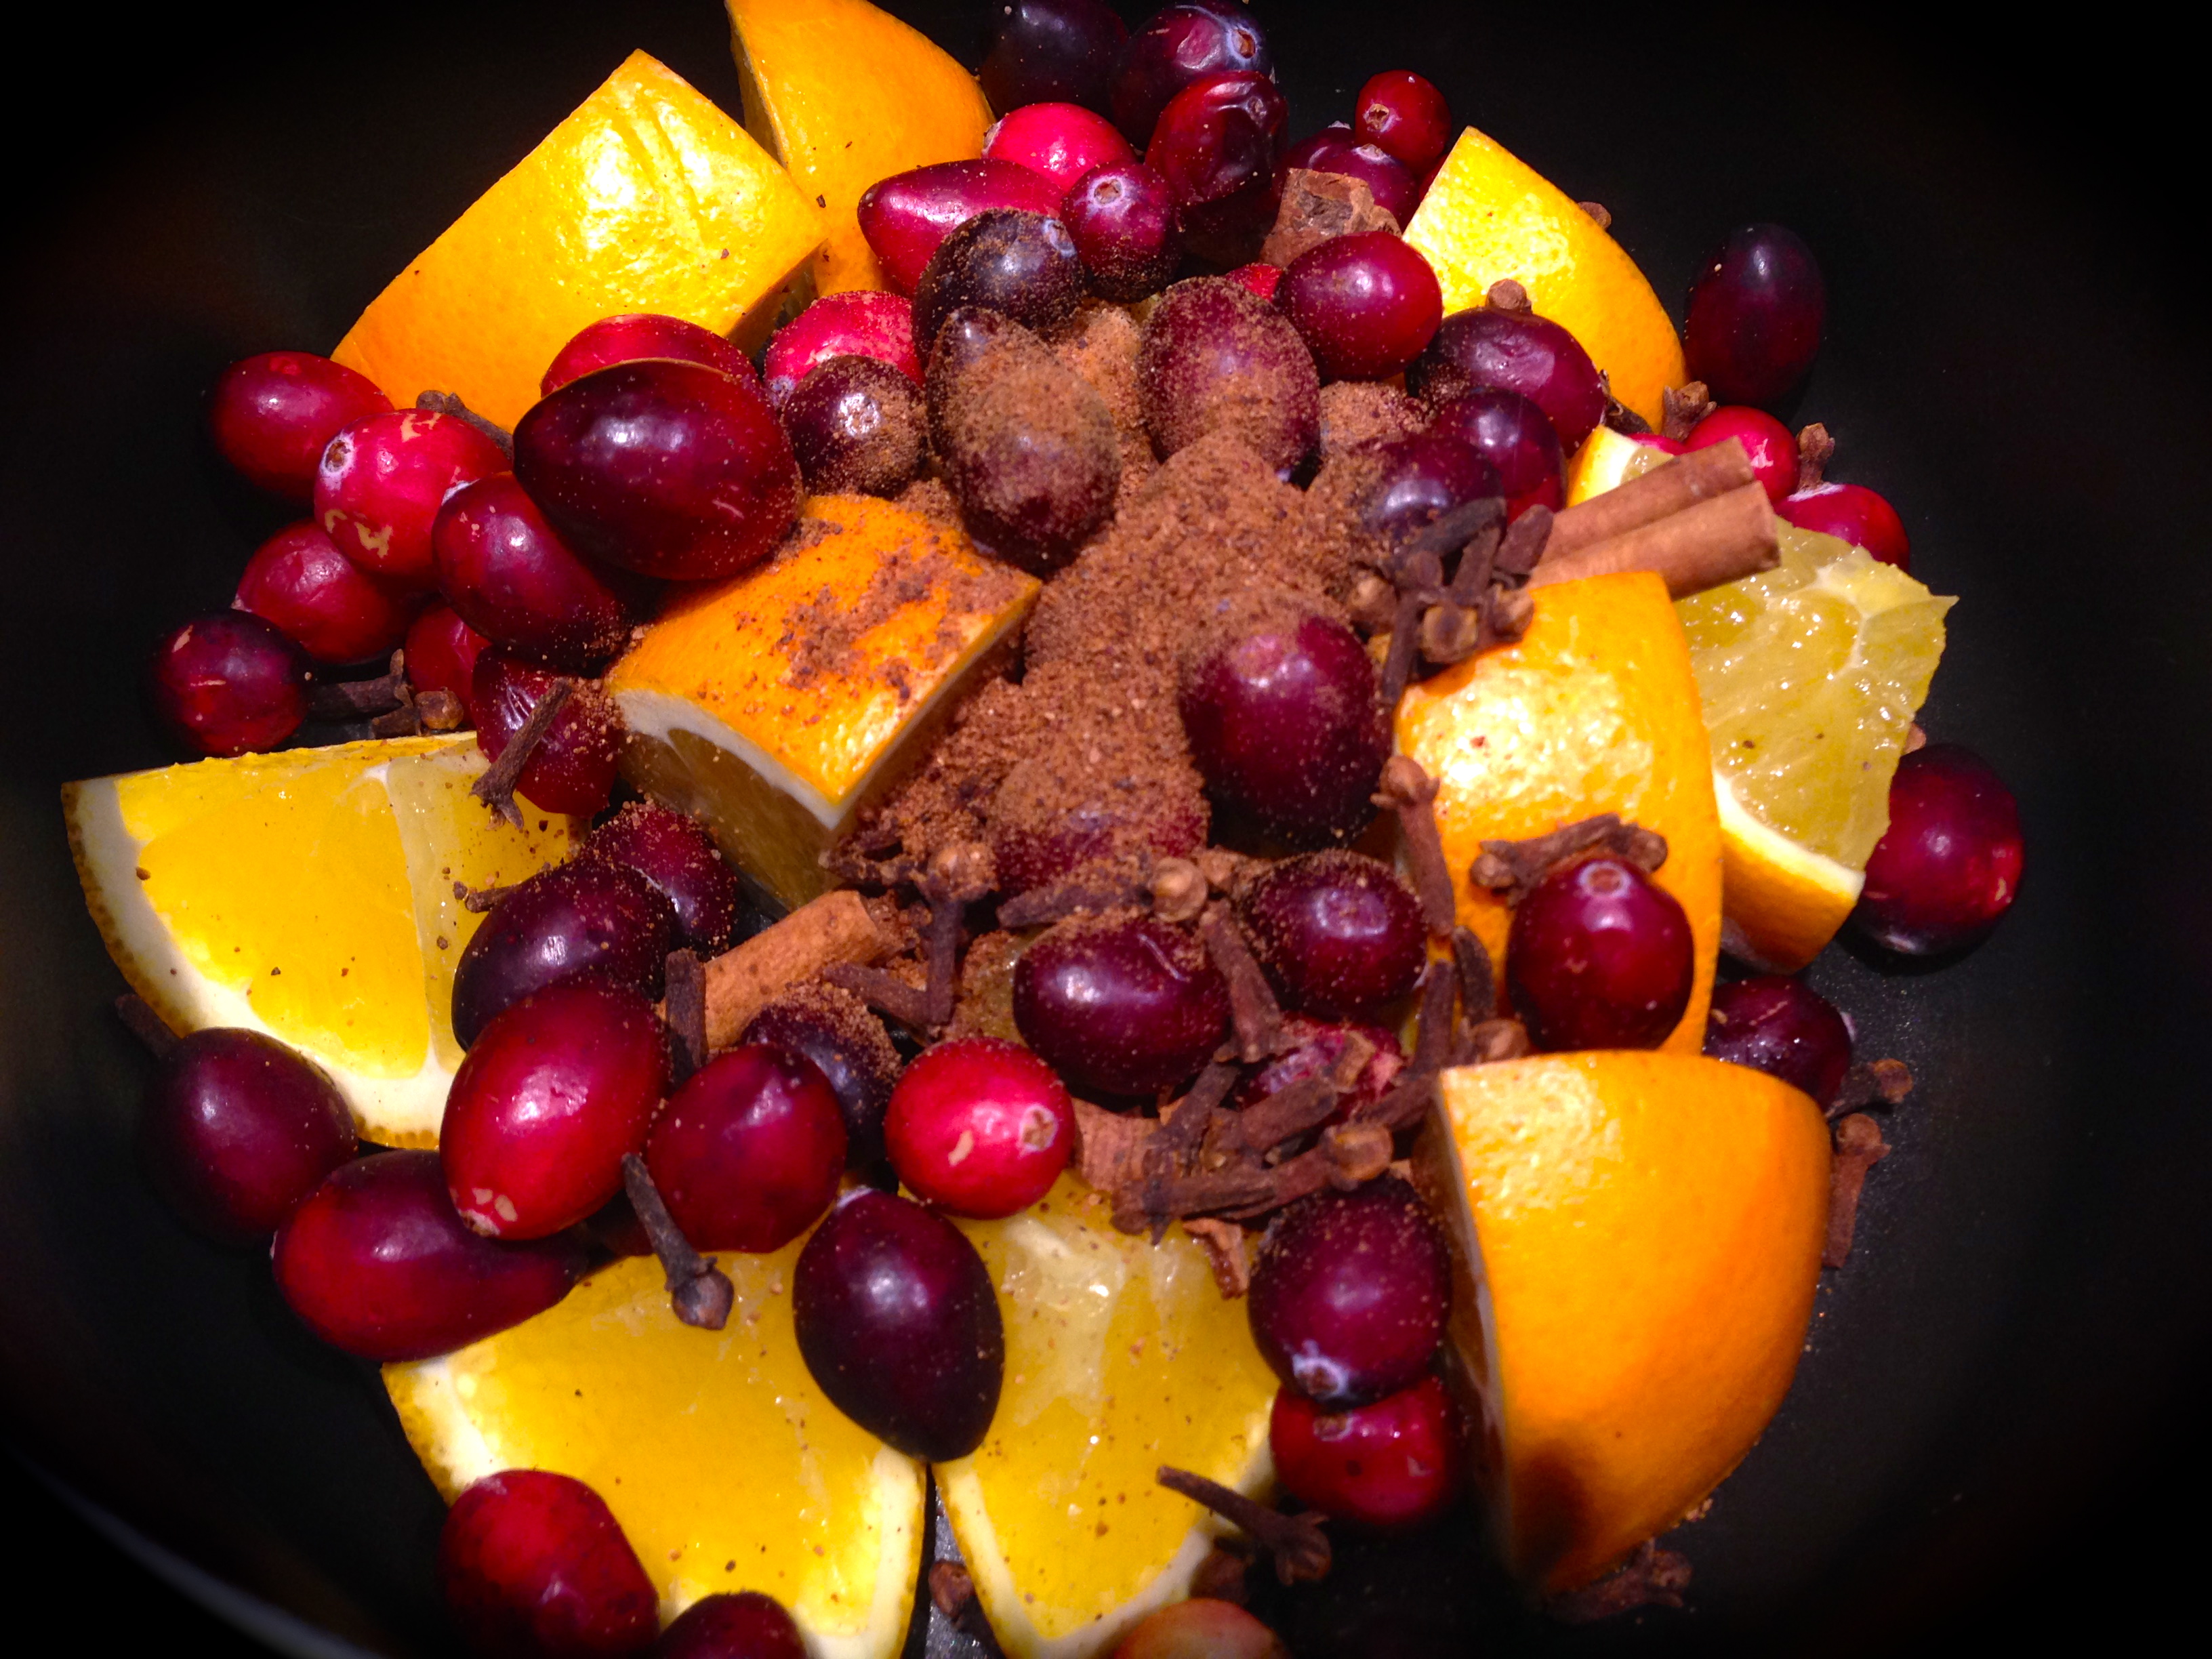
I don’t know about you but it seems after the holidays I always have at least one bag of fresh cranberries that I haven’t used. In the past the bag would jut sit in the refrigerator until I threw it out. I always felt it was such a waste as you can only get fresh cranberries around the holidays. But I finally discovered how to use those cranberries in a way I never considered before. That is, to make a wonderful jam. I tried it on my morning toast the other day and just loved it!

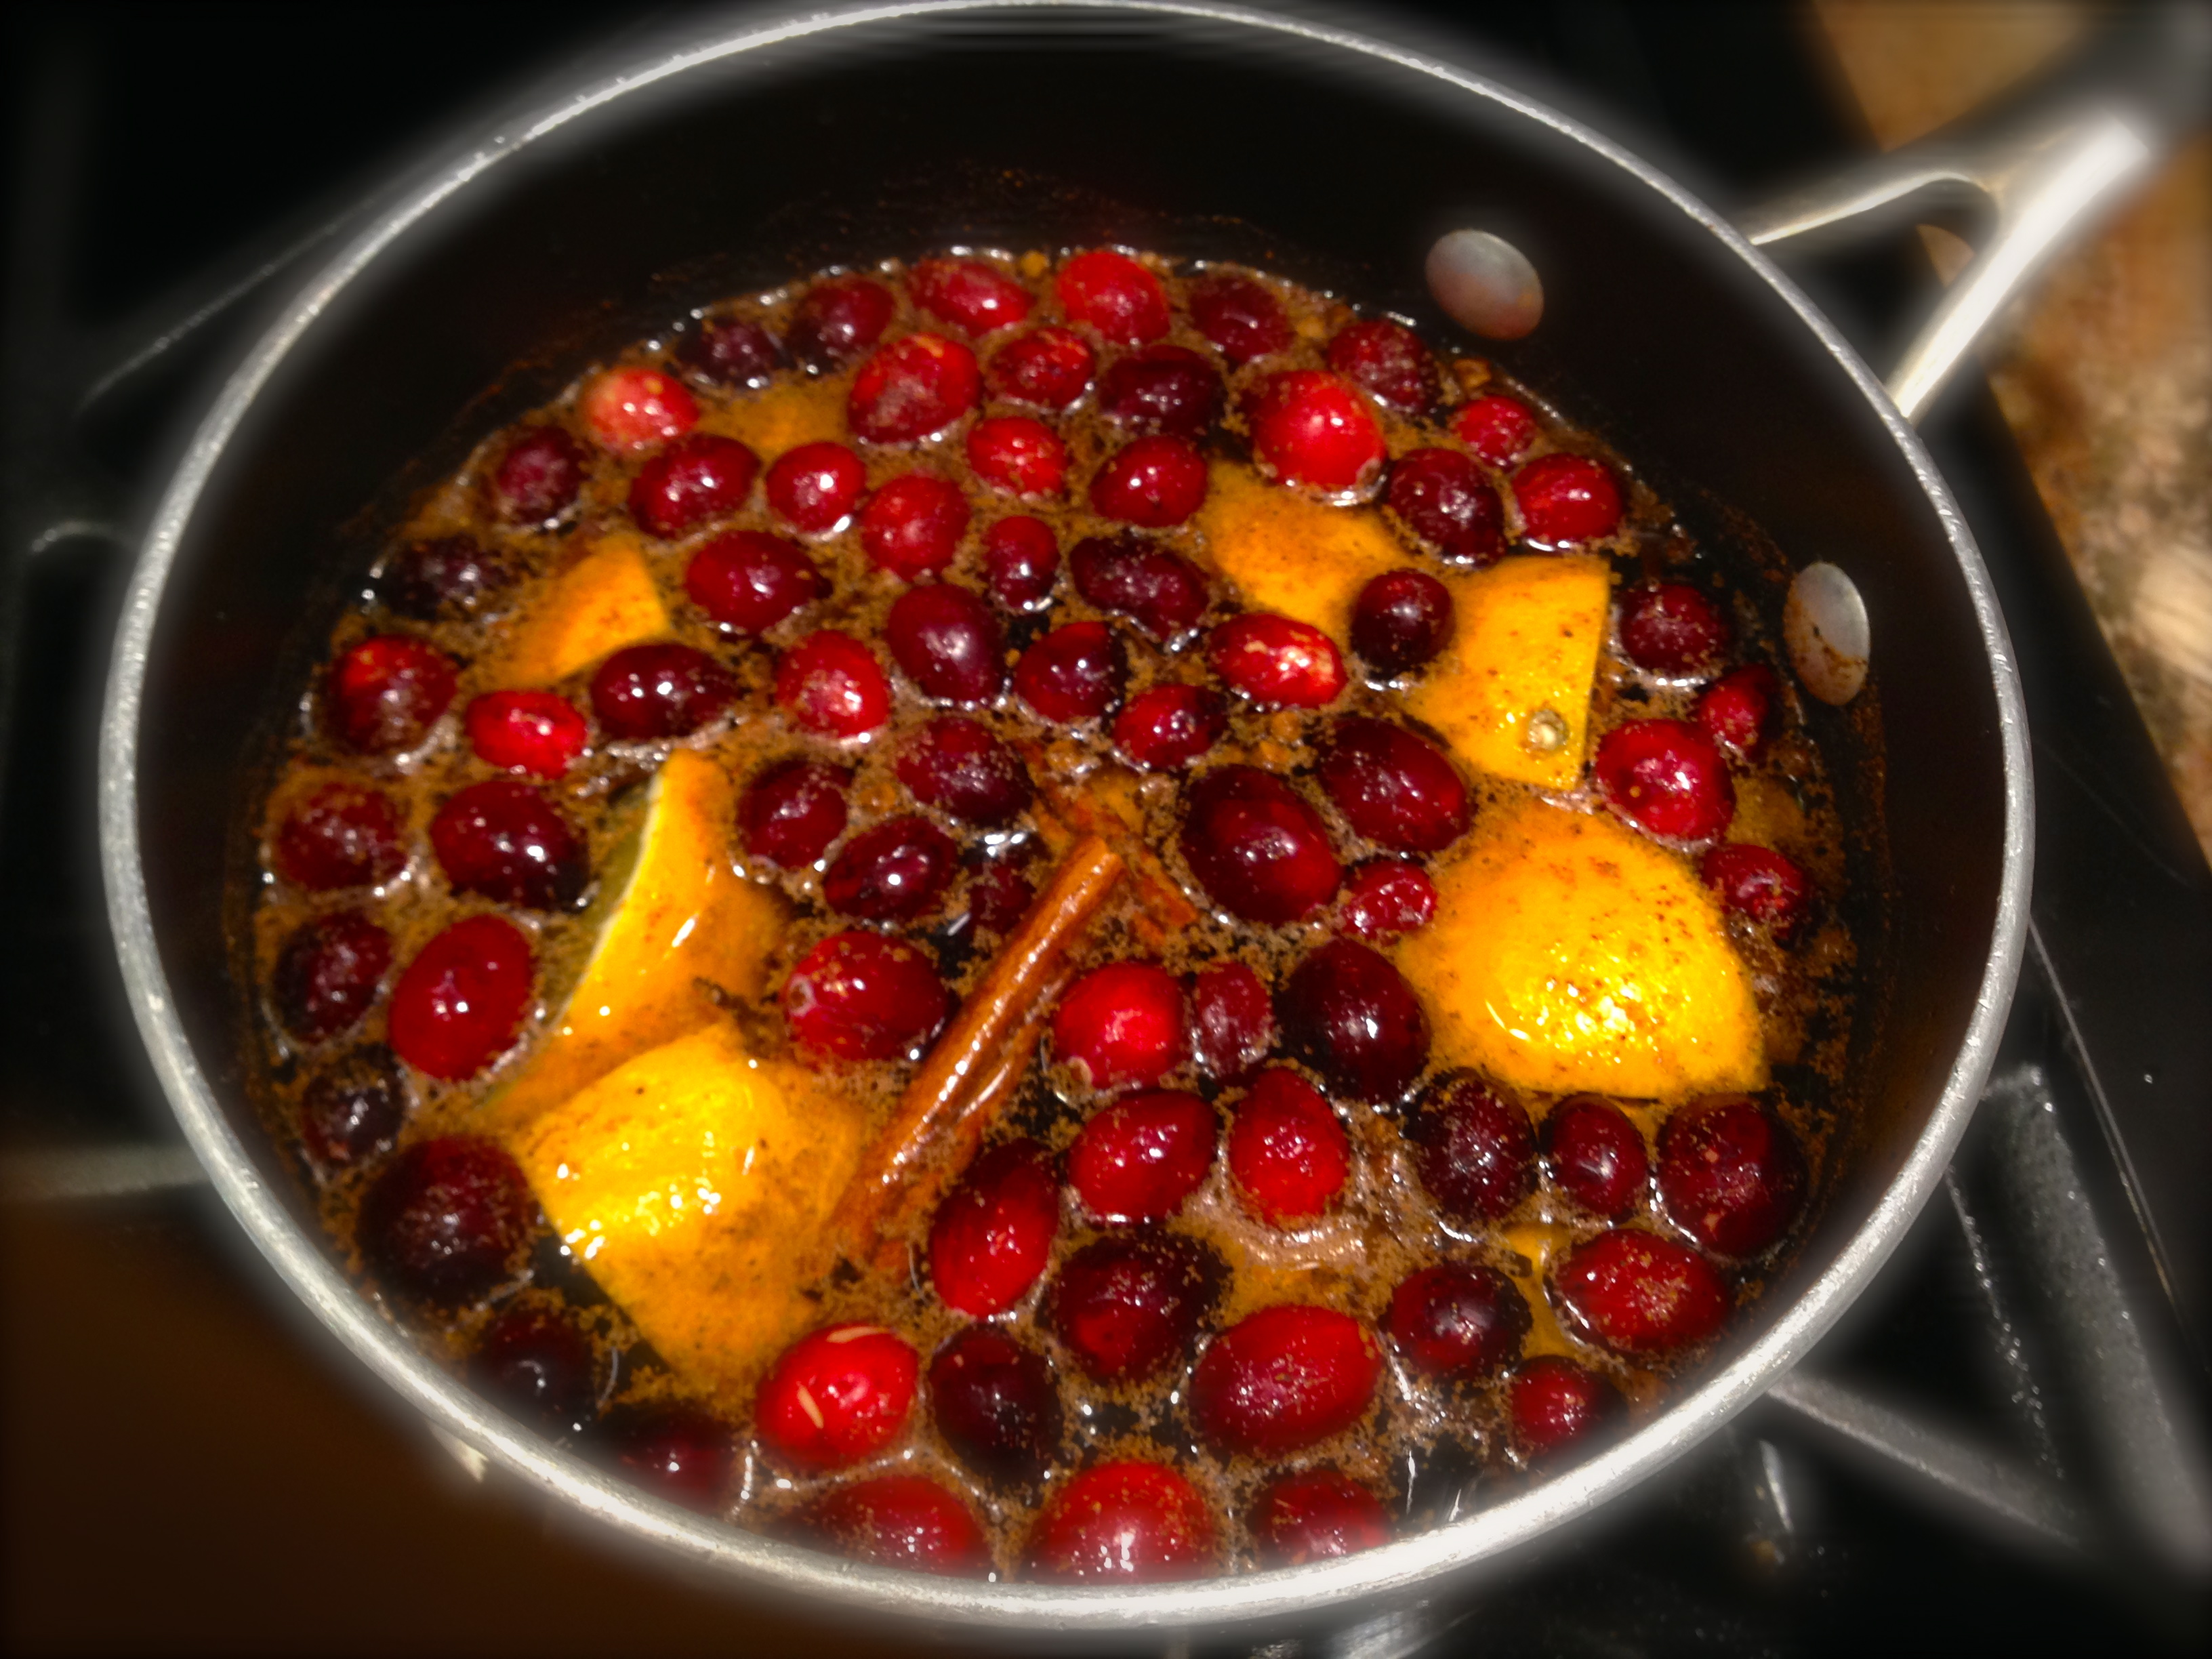
There are only a few ingredients, cranberries, brown sugar and water. No need to add any pectin to this recipe as cranberries are a natural source of it. Pectin is a starch that occurs naturally in the cell walls of fruits and vegetables. When these fruits and vegetables are cooked to a high temperature in combination with acid and sugar, a gel is formed. This is what gives jams and jellies their set when they cool. Pectin by itself can be used in other dishes that require food to gel or thicken. It’s also used as a fat substitute in some baked goods. But the cranberries naturally release pectin when they are boiled. That pop, pop you hear is the cranberry splitting open and releasing the pectin.

Now I realize you probably have already either used your remaining cranberries or thrown them out (like I used to do) but this is a good recipe to have in your back pocket for next holiday season. I promise I’ll remind you of it then so don’t worry.

So let’s talk cranberry jam

Lesson Learned 1 – You can control the sweetness of the jam: The recipe uses brown sugar. I suggest using the least amount and tasting the mixture before you reduce the heat and begin the stirring process. You can always add more sugar. I liked this recipe on the tangy side so I only added the least amount of brown sugar.

Lesson Learned 2 – For the last 10-15 minutes you need to stir the mixture constantly: You need to make the cranberries release the maximum amount of pectin. You also need to break down the berries for the jam. Cooking them the last 10-15 minutes accomplishes that. As I was stirring I was also taking some of the larger berries and pressing them against the side of the pan with a wooden spoon. That helped to break the berries down as well. After a while you will see a noticeable difference in the texture of the mixture – more jam-like. That is when you can stop.

Lesson Learned 3 – You can adjust this recipe: Depending on how much cranberries you have left you can adjust this recipe to that amount. So if you have a little or a lot, you can still make this wonderful jam.

I’m so pleased to know that I no longer need to waste any fresh cranberries after Christmas. This recipe makes a delightful unique jam that you will enjoy or toast, pancakes, or in any other way you use jam.

Homemade Cranberry Jam...

  • Servings: 16-18 Portions
  • Difficulty: Easy
  • Print

INGREDIENTS

4 cups of whole fresh cranberries

1 – 2 cups brown sugar, packed (start with 1 cup)

1 cup water

DIRECTIONS:

Bring the cranberries, sugar and water to a boil. Reduce the heat and let cook for 10 minutes stirring occasionally. At this point taste the mixture to see if it needs more sugar. Add more if necessary.

Reduce heat to a very low setting. Cook for an additional 10-15 minutes, stirring constantly. Break apart larger cranberries against the side of the pan with a spoon if necessary.

Cool in the pan for about 30 minutes. Transfer the mixture to a mason jar, cover and chill.

SaveSave

SaveSave

SaveSave

SaveSave

SaveSave

SaveSave

SaveSave

SaveSave

SaveSave

SaveSave

SaveSave

Cranberry Orange Coffee Cake Pt 2…

This time of year with all of the Fall/Winter holidays approaching just screams to me cranberry and orange. As a matter of fact I love that flavor combination so much this is the second variety of cranberry orange coffee cake that I’ve posted on this site. To see the original post just click on “recipe”.

There are slight variations to the two of them and both are equally delicious. One you make in a spring form pan with the traditional leavening agents of baking powder and soda and that produces a taller, airier cake. This particular recipe does not use any type of leavening. Rather the eggs and sugars are beaten for an extensive period of time to create a mixture that doubles in size and provides the needed lift for the cake. This particular cake is denser and moister.

Both cakes are equally good, although my husband liked this particular recipe better. Whenever he monitors how much of a finished product I bring to work and how much I leave at home, I know the recipe is a hit. This time he made me bring much less of the cake to work than usual.

So let’s talk Cranberry Orange Coffee Cake Pt. 2…

Lesson Learned 1 – Be organized when you bake: I found the experience of baking much more pleasurable if I do it in an organized fashion. By that I first get out any ingredients that need to be room temperature in plenty of time for them to reach that desired state. Then I read the entire recipe to see what I’m up against. I preheat the oven and prep any pans that require prep. After that I figure out how to organize the assembly process (as in this recipe I recommend making the crumb topping first as you will read below). Then I get all my ingredients out and ready. That usually means getting the dry ingredients together and combined and then moving on to the wet ingredients. After that, everything seems to fall into place.

What you are trying to avoid is stopping to find things and taking time to mix things while other mixtures sit and wait for a long period of time. Think about how making the recipe can flow and organize yourself to make the process go that way.

Lesson Learned 2 – The importance of beating the eggs and sugar for a long time: As mentioned above this recipe does not use traditional leavening agents like baking powder or soda so you need something to provide the lift to the batter. That lift is produced by beating eggs and sugar into submission. By submission I mean you need to beat them for at least 5-7 minutes. That’s why I recommend using a stand mixer for this recipe so you’re not left with holding a hand mixer for that length of time.

I would also time the process and not leave it up to your memory. You will actually see the mixture double in size and become more thick when you beat it for that length of time. That’s what you’re looking for. Be careful. Don’t try to shortcut this part of the process. If you do you will be left with a somewhat flat coffee cake.

Lesson Learned 3 – This cake may need to bake for much longer than the recipe suggests: I was originally thinking this would take between 45-50 minutes. It actually took me 65 minutes, but then again I live in high altitude where everything takes longer to make. The key with this cake, as with all cakes, is having a toothpick inserted in the middle come out clean. If you have some redness from the cranberries on your toothpick that’s ok. But it should be clean of everything else.

Lesson Learned 4 – Make the crumb topping first: I found the entire process of making this cake went much more smoothly if you made the crumb topping first. Other than beating the eggs, this is the most labor intensive part of the recipe. If you make the topping first than everything else seems to go like clockwork.

As with making any type of crumb topping, use very cold butter and a pastry cutter to cut the butter into flour and sugar. The desired result is coarse crumbs as seen in the picture below.

The Desired Consistency Of The Crumb Topping

Lesson Learned 5 – The importance of room temperature eggs: In my baking recipes you will see that I always call for room temperature eggs. Why? The answer is simple. Room temperature eggs blend much more thoroughly into the batter. And that is the ideal. Quite often I hear the reason one doesn’t use room temperature eggs is they don’t have the time to get them to room temperature. Never fear, I have a quick and easy trick for you so you will always have room temperature eggs when you need them. Just click on “tips”.

Otherwise every other step of the process is what you normally expect when you make a cake. This cake, although delicious anytime, is a great recipe for the Holidays. And I guarantee you it won’t be around your kitchen for very long. Enjoy!

Cranberry Orange Cake Pt. 2...

  • Servings: 20-24
  • Difficulty: Easy
  • Print

INGREDIENTS:

CRUMB TOPPING:

3/4 cup flour

6 Tbs. brown sugar, packed

6 Tbs. butter, unsalted and chilled

CAKE

3 eggs, room temperature

1 1/2 cups sugar

1/2 cup firmly packed brown sugar

3/4 cup butter, room temperature

1 tsp. vanilla

2 cups flour

1- 12oz. pkg. of fresh cranberries

Zest of 1 large orange, divided into 3/4 and 1/4 portions

GLAZE:

1 cup powdered sugar

Juice from 1 orange (approx. 4 Tbs)

1/4 of the orange zest already grated for the cake

DIRECTIONS:

Preheat oven to 350 degrees.

In a small bowl combine all the topping ingredients. Use a pastry cutter to cut the butter into the flour and sugar until the mixture forms into coarse crumbs. Set aside.

In a stand mixer, beat the eggs and sugars for about 5-7 minutes until thick and doubled in size. Add the butter and vanilla and mix for an additional 2 minutes. Stir in the flour until just combined. Fold in the cranberries and the 3/4 portion of the orange zest.

Put the batter into a greased 13 x 9 pan. Spread the crumb topping on top of the batter.

Bake 45 – 50 minutes or until the top is golden brown and a toothpick inserted into the center of the cake comes out clean.

Let cool completely.

Combine glaze ingredients and drizzle over the cake.


The Best Holiday Stuffing…

I know both Christmas and New Years are over and it’s time to move on to non-holiday recipes. But I just have to blog this one, mainly because I want to make sure I chronicle the recipe for my future use. Most people are pretty fussy about stuffing. My mom made a stuffing that I just loved but did I ever write down the recipe – well of course not. And try as I may I could never replicate it. So for years I have tried various recipes without much success. I just wasn’t satisfied with what I made. This year it was different. I actually put together a stuffing recipe that I loved and although it is not my mom’s it will be the recipe that I use.

The stuffing is a delightful combination of “the trinity”, which is onions, celery and carrots along with sage breakfast sausage, egg bread and herbs. It was a hit at the dinner table and made great leftovers. The guests at my holiday dinner asked if they could have some to take home. Now that is the mark of a good stuffing recipe. I was so happy to finally create a stuffing that I actually enjoyed and will make again. And I learned a few lessons while making it…

Lesson Learned 1 – Make it the day before: I will share a secret with you. When I first made it and tasted it I thought, ugh… this one’s not going to thrill me. But I made it a day ahead of time and let it sit the refrigerator until the following day. When I tasted it the next day it was unbelievably good. I would not recommend making this stuffing the day of your holiday feast. The flavors in this recipe need time to get fully acquainted. It makes all the difference. And, if you are planning a holiday feast, how good is it to be able to make something in advance so that you are not scrambling around on the big day. With this recipe you put it all together, let it sit over night, and then take it out and let it get to room temperature before baking it in the oven.

I also like this recipe because it bakes at 350. I do not have a double oven and so I planned my holiday dinner with dishes that could all be made at the same temperature, including the turkey. This stuffing recipe made my meal preparation easier. I was able to make it a day ahead and bake it in the oven with the turkey. You can’t beat that!

IMG_2542Lesson Learned 2 – Use a good quality egg bread: Like anything else, the quality of what you put into a recipe will determine the quality of what comes out of it. Most recipes call for just plain white bread. I used a egg bread, called a shepherds bread, and it was divine. But if all you have is white bread, use it. I had some extra white bread that I also cubed and I didn’t think it toasted as well as the egg bread. As a matter of fact, the crust burned on many of the pieces. I wound up picking them out and discarding them.

But please, don’t use the prepackage stuffing cubes you find in bags at the grocery store. I’ve never had any luck with those, and who knows what they put in them to get them to last as long as they do. It takes no time to cut the bread into cubes and toast them in the oven.  And the result is so much better.

Lesson Learned 3 – Dice the trinity into equal size pieces: Make sure to finely dice your onions, celery and carrots. If you do, it should take about 8 minutes for them to start to soften and begin to brown. Otherwise it will take a lot longer and chances are by the time your carrots are done your celery and onions will be overcooked.

Lesson Learned 4 – Use fresh herbs in the recipe: I use dried herbs all the time but I think fresh herbs do more to enhance the flavor of this recipe. If you can’t get them, you can use dried. Just remember that with dried herbs you always use less as their flavor is much more concentrated. If you use dried herbs, press the herbs into the palm of your hand with your fingers or slightly crush them with a mortar and pestle to release some of the oil in the herbs before you add them to the recipe. That being said, I still would opt for fresh herbs if at all possible.

Lesson Learned 5 – Cover the stuffing with foil for the first half of the baking process: This is more a matter of taste. I’ve always preferred a softer stuffing while some people prefer a crispy stuffing. I found that by covering the stuffing for the first half hour of baking you get a moist stuffing with just the right amount of crispiness on top. But if you like crispy stuffing, bake it uncovered for the entire hour. Just be sure that if you make this the day before you let the stuffing get to room temperature before baking it off in the oven. I took the stuffing out of the refrigerator and let it sit on the counter for 2 hours before I put it in the oven. The end result was perfect.

This recipe is not difficult to make and only tastes better the more time the ingredients meld. I’m so glad to have finally concocted a stuffing recipe that I like. Keep this one in your file for next year. You won’t be disappointed.

The trinity mixed with breakfast sausage...

The trinity mixed with breakfast sausage…

The Best Holiday Stuffing

  • Servings: 16
  • Difficulty: Easy
  • Print

INGREDIENTS:

1 stick of butter, plus a little extra to coat the baking dish

16 cups of good quality egg bread, cut into 1 inch cubes

4 celery stalks finely diced

2 large carrots, peeled and finely diced

1 medium size sweet onion, finely diced

1 pound sage breakfast sausage

2 Tbs. chopped fresh sage

2 Tbs. chopped fresh thyme

2 – 3 cups unsalted stock (if you can find turkey stock use that. If not substitute chicken stock)

Salt and pepper to taste

DIRECTIONS:

Preheat the oven to 350. Cut the bread into 1 inch cubes and spread out on a baking sheet. Toast for 20-25 minutes stirring occasionally until lightly browned and crisp. Set aside to cool.

Finely dice the celery, carrots and onion. In a large deep skillet melt the butter. Once the butter is melted, pour half of it into a dish and set aside. Add the celery, carrots and onions to the pan and cook over medium high heat until they soften and begin to turn brown. Scrap the vegetables into a bowl and set aside. Add the sausage into the skillet, breaking it up into pieces. Cook until lightly browned and cooked through.

While the sausage is cooking, chop the sage and thyme and set aside. Grease a large 9 x 13 baking dish with butter and set aside. When the sausage is done cooking, add back the vegetables, sage and thyme. Cook for about 1 minute to incorporate the herbs. Add 1 cup of the broth and deglaze the bottom of the pan. Cook until the broth is nearly evaporated, approximately 5 minutes.

Scrape the sausage mixture into a large bowl. Add the toasted bread cubes and remaining stock. Stir until the bread is moistened. Season with salt and pepper. Spread into the prepared baking dish and brush the top with the reserved melted butter.

(Here is where you stop if you are making this ahead. Cover the pan with foil and refrigerate. Take the pan out of the refrigerator at least two hours before baking it in the oven. Remove the foil and cover with plastic wrap while it is coming to room temperature).

Cover the stuffing with foil and bake for 30 minutes. Remove the foil and continue to bake for an additional 30 minutes or until the stuffing is heated through and browned. Let the stuffing stand for 10 minutes before serving.

Add fresh sage and thyme...

Add fresh sage and thyme…

IMG_2573

IMG_2576

Peppermint Twist Kisses…

For many, many years the holidays have meant cookie baking time for me. And over the years I’ve made a wide range of cookies. About five years ago I established a goal of making at least one new cookie recipe each holiday season. The result has been a definite shift in the tried and true cookies I make each year. And it’s nice to see an evolution in my cookie baking.

This blog is dedicated to one of the two new cookie recipes I made this year. Being that I work part time at Crate and Barrel I’ve been really challenged in making my goal of one new post a week during the holiday season. The other recipe (a recipe for oatmeal butterscotch cream cheese bars – also an excellent one) I will try to get posted within the next few days, especially for my readers who may not have started their baking yet.

This blog will also serve as a one stop shop for some of my other favorite cooke recipes. I’ll provide a picture, name and the link to each below since I’ve blogged about them already. Look through them and see what might work for you. I guarantee you, they are all delicious.

I made the peppermint twist cookies this year because I decided not to make spritz cookies and I wanted something on my cookie plates that had the colors of the holiday season. This is a delightful cookie and the combination of peppermint and chocolate truly is indicative of the holidays. It’s easy to make, colorful and delicious. Need I say more.

Recipe Rating – A: This is a flavorful, colorful cookie that will brighten up your holiday cookie platter. Just make sure your family doesn’t raid the bag of kisses before you bake the cookies like my husband did. They are a necessary part of making this cookie special.

Lesson Learned 1 – Rolling out the cookies: This is definitely the most intricate part of making the cookies. Keep in mind that you will be combining to logs of dough into one so make sure the logs are thin enough. Once you have divided the dough and colored half of it with red food coloring, you need to chill the dough for at least an hour. Then divide each half of the dough into 4 equal parts and roll one of each color into a log 9 inch log. I have a silicone baking mat that was great to use in this process as it had measurements in inches on the top of the mat that helped guide me through rolling out the logs into the appropriate length.

Roll each color of dough into 9 inch logs...

Roll each color of dough into 9 inch logs…

Once you do that, you need to loosely braid them together and roll them into a single log. This will elongate the log about an inch or two. Remember you want the circumference of the combined log to be as thick as each individual log.

IMG_2228

Once you’ve rolled both pieces into a single log cut them into pieces approximately 1 1/8 inches thick. (Once I cut the first piece I used it as a guide for cutting the others)

IMG_2237


Take each individual piece and roll it into a ball and place on a cookie sheet.

IMG_2224


You will need to flatten each ball slightly with the bottom of a glass before putting them into the oven. That is definitely the hardest part of making these cookies.

Lesson Learned 2- Make sure you unwrap the chocolate kisses ahead of time. You only have a short window of opportunity to place the kisses on the cookies once they come out of the oven. Make sure you have them unwrapped so that you can get them on quickly. Then DON’T TOUCH THEM. The warm cookie will cause the kisses to get very soft and they need to reset to retain their shape.  Once the cookies have cooled slightly I put them on a baking sheet and stick them in the freezer for a few minutes to get the chocolate to set a little quicker.

These cookies are fun to make, colorful, flavorful and will brighten up any holiday cookie tray. Enjoy!

IMG_2245


Peppermint Twist Kisses…

  • Servings: 3 Dozen Cookies
  • Difficulty: Easy
  • Print

INGREDIENTS:

1 cup unsalted butter at room temperature

2/3 cup sugar

2 egg yolks

1 tsp. peppermint extract

1 tsp vanilla extract

2 1/2 cups flour

1/2 tsp. salt

Red food coloring

36 chocolate kisses (1 bag will give you more than enough)

DIRECTIONS:

In a large mixing bowl cream butter and sugar. Add the egg yolks one at a time and blend. Add the extracts and mix well. Combine the flour and salt. Gradually add the dry ingredients to the wet ingredients. Mix well but do not over mix. Divide the dough in half. Tint one half of the dough with the red food coloring. Wrap both halves individually in plastic wrap and refrigerate for at least one hour.

Preheat the oven to 350 degrees. Divide each half of each dough into four equal portions. Shape each portion into a 9 inch log. Place one red log next to one white log and gently twist them together to create on swirled log. (see picture above). Gently roll both together to create one log. Cut each log into pieces approx. 1 1/8 inches thick. Roll each segment into a ball and place on an ungreased cookie sheet. Flatten each ball slightly with the bottom of a glass.

Bake at 350 for 10-12 minutes or until the edges are lightly browned. Press chocolate kisses into the center of each warm cookie. Remove to a wire rack and let cool. (once slightly cooled you can put the cookie on a flat sheet into the freezer for a few minutes to help the kisses set faster).

IMG_2250


QUICK GUIDE TO OTHER HOLIDAY COOKIES: (just click on the title underneath the picture)


Holiday Stove Top Potpourri…


Whenever the holidays roll around I look to fill my house with the scents of the season. There is nothing like a candle filling a room with the aromatic scent of balsam or pine. I love scented candles but with a young cat in the house I worry about what might happen while he prowls the upper reaches of the cabinets and countertops. So until I can break him of his curiosity, no scented candles this holiday season. Bummer…

I began to research something I could do to create those holiday smells in a way that I was able to provide more controlled monitoring. Low and behold on Facebook, of all places, I found a “recipe” for holiday smells I could simmer on my stove while doing my many hours of holiday baking.

I tried this yesterday and with a few tweaks it worked like a charm. I used water in the mixture yesterday, but next time I will substitute apple cider for water. The “recipe” couldn’t be easier and provides hour upon hour of warm, inviting holiday smells. Enjoy this little trick for the upcoming season!

Holiday Stove Top Potpourri…

1 small pot

1 orange, cut up in chunks

1 cup fresh cranberries

1/8 cup cloves

3 large or six small sticks of cinnamon, broken in half

2 tsp. nutmeg

Cover ingredients with water or apple cider – liquid should cover the dry ingredients and be about 1 inch from the top of the pot

Simmer on stove for hours of wonderful holiday smells

IMG_1439

IMG_1447

Dip-etty Do Dah…

Macy’s Thanksgiving Day Parade – check. Football games – check. Thanksgiving dinner reservation – check. Santa Claus is coming to town – check. And so it begins (although one would argue that it began some time ago), the Christmas season is upon us. Time for the insanity of gift buying, decorating, baking, holiday parties and the annual fear of whether you will survive yet another holiday season. The pressure is on to have your house look like a picture posted on Pinterest, your home filled with home-baked goodies and your gifts wrapped with a professional flair. No wonder so many people say bah humbug at this time of year.

But it doesn’t have to be all that bad, especially if you get a little help from your friends. So let me introduce myself, I am your holiday friend. Now I can’t decorate your home or purchase and wrap your gifts, but I can give you some great great recipes that I have either tested or used over the years to help you with some food decisions for your parties and family gatherings.

Creamy Spinach and Red Pepper Dip Ingredients

Creamy Spinach and Red Pepper Dip Ingredients

I already started with a great holiday recipe for a crab dip in a previous post, but just in case you missed it just click here and it will take you to that blog with a link to the recipe. Today I was challenged to make something for a pot luck we are having at work (I work at Crate and Barrel and we will be at the store in full force this holiday weekend) and I wanted to make something that could be enjoyed by all, especially since we have quite a few vegetarians on staff. I have a great recipe for holiday meatballs, which I will share some time within the upcoming days, but I knew that would not fit the bill. So once again I journeyed to Pinterest and did a search for cold dips. There I found a great recipe for Creamy Spinach and Red Pepper Dip from the tastykitchen.com website. The ingredients fit the bill and the rest was history.

As always, with recipes I try from other sites, I do my self-claimed rating and lessons learned in the hopes that if I made any mistakes or learned any valuable lessons while making the recipe it will help you make it perfectly on your first try. This one was relatively simple so definitely something to keep in your hip pocket if you need to bring something to a party or want an appetizer for a holiday meal.

Recipe Rating: A – the ingredients are simple, fresh and the recipe is easy to make. The most work you have to do is chopping the green onions and the roasted red peppers.

Lesson Learned 1: This is something I already knew but if you don’t it could definitely save you time and aggravation. The recipe calls for a 10 oz. package of frozen spinach. I was surprised how long it took for the spinach to thaw. I put it in the refrigerator the day before and then put it out on the counter this morning and left it there until 1:00 p.m. After thoroughly draining it (which really requires you to put the spinach in a towel and squeeze until no water comes out at all) I noticed there was still some ice particles in the spinach. So I separated the leaves, put them between two paper towels and pressed down on them. A lot of water still came out. The lesson here is to make sure it is thoroughly defrosted and as totally dry as possible (it will take longer than you think). Otherwise you will have a runny dip.

Lesson Learned 2: The recipe does not call for it but I added a pinch of salt at the end. After tasting it, it seemed like it was lacking a little something and the salt brightened up the flavor. Once it sits for a while, the flavors will be even more dynamic.

Lesson Learned 3: I am a big fan of roasting my own red peppers, but the roasted red peppers in a jar are just as good and a great time saver. So no need to do the process on the stove, just buy a jar and chop them up.

Lesson Learned 4: The recipe says that the prep time is only 3 minutes. I’m not sure what speedy chef decided that but by the time you assemble all the ingredients, do the chopping and mix the dip, I would say it takes about 10-15 minutes of your time. The nice thing about this recipe is that it serves 30 so for a large crowd like I have at work this is a great and inexpensive recipe to make.

Lesson Learned 5: This is a easy, flavorful recipe and the green of the spinach and the red of the roasted red pepper also provides the traditional holiday colors for which we have become accustomed – a nice decorative touch to your table.

So, get ready to deck the halls with this recipe. It is easy, colorful, impressive and will actually give you time to focus your energies on other things during the upcoming holiday season. Enjoy!

Creamy Spinach and Red Pepper Dip

Creamy Spinach and Red Pepper Dip

Get Your Holiday Crab On…

SINCE ORIGINALLY POSTING THIS RECIPE I’VE BEEN ASKED TO INCLUDE THE RECIPE IN THE BLOG AND I’VE TWEAKED IT SLIGHTLY FROM THE ORIGINAL. SO I WILL REPOST THE BLOG, WITH THE LINK TO THE ORIGINAL RECIPE AS WELL AS A PRINTABLE RECIPE ON THIS BLOG:

I stumbled on this one quite by accident. I was looking for a make-ahead appetizer recipe to bring to a friend’s house. All I could seem to find on Pinterest were appetizers best served hot and I wanted something I could make on Friday to bring to an event on Sunday. Somehow I stumbled on this recipe from justapinch.com called crab dip to make ahead. It sounded like it would fit the bill, so I decided to try it.

The challenge for me was finding some good crab meat. The last time I bought lump crab meat was from Costco and it was full of shells and very salty, even after I rinsed it thoroughly. This time I went to a local grocery store called Sprouts and found an 16 oz.can of crabmeat. When I opened it up, much to my surprise, it was a can of crab claw meat. The meat was tender, there were no shells and a slight rinse was all the meat needed. The dip took about 20 minutes to prepare and the recipe says it serves ten but I think it will serve more than that.

My rating of the recipe: A++++. This recipe is fabulous, easy to make and definitely one that tastes better once the flavors have had a chance to meld, so definitely make it ahead of time. This recipe would be a great addition to any holiday gathering.

Lessons Learned:

1. The recipe calls for 1/2 pound or 6 ounces of crab meat. I put in approximately 16 ounces. The more crab the better. There’s nothing worse than a crab dip where you can barely see or taste the crab.

Make Ahead Crab Dip

Make Ahead Crab Dip

2. The recipe includes adding unflavored gelatin to the mixture, the purpose being to keep the dip from getting too runny once it sits out for a while. I added it and would recommend it. The dip stayed nice and firm and you never taste the gelatin.

3. The original recipe also calls for either cream of shrimp or cream of mushroom soup. If anyone can tell me where to find cream of shrimp soup I would certainly like to know. I went to four different grocery stores and no on carried it. The cream of mushroom soup worked very well, but I would like to try it with cream of shrimp soup.

4. Everyone who tasted it loved it. You will be asked to share this recipe, I guarantee it.

Quite a few times I talked about the joy of trying a recipe and having it turn out perfectly the first time. This is one of those recipes. I was so excited to bring it with me to my friend’s house. Unfortunately the evening got canceled. My co-workers wound up being the recipients of my culinary success. Already four of them have asked for the recipe.

Holiday Crab Dip

  • Servings: 25-30
  • Difficulty: Easy
  • Print
INGREDIENTS:

1/2 – 1pound crab meat (I used a 16 ounce can)

1 8 oz package cream cheese

1 can cream of mushroom soup (I used the brand with roasted garlic)

1 packet unflavored gelatin

1/2 cup mayonnaise

1/2 cup (4 stalks) green onion, chopped fine

1/2 cup (1 1/2 large stalks) celery, chopped fine

1/8 tsp. salt

1 package cocktail pumpernickel bread and/or party crackers

Old Bay for garnish.

DIRECTIONS:

Open the can of crab meat and drain. By hand, clean the crab meat and remove any remaining shells or cartilage. Set aside.

Cut the cream cheese into smaller chunks. In a medium saucepan combine soup and cream cheese. Stir occasionally until cream cheese has melted. Add gelatin and stir to combine. Stir in the mayonnaise until combined. At no time let the mixture come to a boil.

Once combined, take the mixture off the heat and stir in the onions and celery. Add the crab meat and fold in gently until combined.

But crab mixture into a bowl and refrigerate for at least 6 hours (overnight is best). Put in a serving bowl and garnish with a sprinkle of Old Bay and a lemon slice. Serve with cocktail pumpernickel slices or cracker.

Holiday Crab Dip