Be careful when you send your husband to pick up something at the grocery store. You might be surprised at what he brings home. The other day I asked my husband to pick up a bag of tater tots for dinner. I thought he would go to the local grocery store but his brilliant idea was to go to Sam’s Club. He brought home tater tots all right – an 8 pound bag of them! What the heck was I going to do with all those tater tots? We’ve been systematically using them over time, but we were starting to get tired of them as simply a side. So I thought I’d try making a tater tot casserole.
This particular recipe is very easy and guaranteed to be a family favorite. If you have kids, I’m sure they will enjoy this. I mean ground beef, cheese and tater tots – what’s not to like? So let’s talk beefy tater tot casserole…
Lesson Learned 1 – This recipe serves 4 people: But don’t despair. You can easily change the ingredients for larger crowds – just double or triple the amounts depending upon what you need.
Lesson Learned 2 – Make sure you put the dish under the broiler for the last few minutes to get the tater tots crispy: The taters tots are cooking on top of bubbly beef and melted cheese so they will be slightly soggy at the end. Simply put the broiler on and keep the dish under the broiler for a few minutes and you’ll get your desired crispiness for the tater tots.
Lesson Learned 3 – Feel free to experiment with this recipe: Add ingredients to the ground beef that you and your family like. If you don’t like mushrooms, don’t use them. If you like sweet peppers, dice them up and use them. If you’re not a big fan of spicy don’t use the hot sauce. But if you want some real tang add some crushed red pepper to the beef. If you prefer pearl onions, add them. You can use cheddar cheese instead of muenster cheese (I find cheddar cheese to be somewhat greasy) or any melting cheese you prefer. The beauty is this recipe can be very versatile to include anything you enjoy.
The process for this recipe is pretty straightforward and I know it will be a family favorite. Try it and let me know what you think…
Muenster cheese slices – 4-6 depending on the dish you use
1 small bag of tater tots – you may have some leftover
2 dashes hot sauce
salt and pepper to taste
cooking spray
DIRECTIONS:
Preheat the oven to 375.
Over medium heat, add one tablespoon of olive oil to a large skillet. Add the onions and cook until translucent. Remove the onions and add the mushrooms. If you need more oil add it. Brown the mushrooms and remove them from the skillet.
Add the ground beef and cook until browned, breaking up the beef into crumbles while cooking it. Add the garlic and cook until fragrant, approximately 1 minute.
Add the Worcestershire sauce, brown sugar, tomato paste, hot sauce, beef broth and salt and pepper. Cook until combined. Fold in the onions and mushrooms. Taste for seasoning and add more salt and/or pepper as needed.
Place the meat mixture into a 1 1/2 – 2 quart casserole dish sprayed with cooking spray. Cover the meat with the cheese slices. Take the tater tots out of the freezer and cover the top of the casserole with tater tots.
Bake in the oven for 30-40 minutes. Once nice and bubbly, turn on the broiler and place the dish under the broiler for approximately 3-5 minutes to crisp up the tater tots.
The saga of the kitchen, dining room, living room and den flooring projects continues and prevents me from posting some new recipes. I’ve lived through this many times before and even recognize the many ebbs and flows of this type of process. We are definitely in the “frustrated” stage of the project. The whole house is in disarray and will be for a few more weeks (the hardwood floor goes down next week) and it’s at this stage that you long for a clean, organized home.
I liken these types of projects to giving birth. Once the baby arrives you forget about all the pain and rejoice in the outcome. I am so waiting for that time. Before I go into some of my favorite slow cooker recipes I thought I’d share a few pictures of my kitchen to give you some perspective of what I am currently going through.
The picture below gives you somewhat of an idea of what the kitchen looked like when we moved in. Not bad you might say, but there were definitely some challenges. The gas cook top was not what was originally there. When buying a condo I told my husband I would not even consider one that did not have a gas stove. I’ve been a gas girl all my life and know that most if not all professional chefs cook with gas so there was no room for negotiation there.
We took out the cooktop you see in the picture below to install the gas cooktop in the picture above (the gas cooktop was the one the builder took out and replaced with the electric cooktop when doing the remodel). Our condo had been previously owned but purchased back by the builder and converted to the model for the development. (the development was done in two phases and our condo was in one of the first phase buildings). “Upgraded” appliances were installed as part of the conversion. I say upgraded in parenthesis because the new appliances were actually not very good and my husband and I wound up replacing all of them except the refrigerator. I also found it interesting that the electric cooktop they originally installed looked like Mickey Mouse, my bizarre sense of humor.
The original electric cooktop that was in our kitchen
The original kitchen design called for the cooktop and oven to be separate. You can see a small portion of the original oven on the far right of the very first picture above (note the stainless outline at the bottom far right of the picture). The problem with having the oven located there was the thermostat for our heating and cooling system was on the wall directly opposite the oven. Using the oven had a direct effect on the thermostat and we certainly didn’t want that. So we decided to eliminate the cooktop and separate oven combination and get a stove with an oven (see the picture below), install it in the space where the cooktop was (requiring removing the cabinets underneath) and adding cabinet space where the oven had been. It worked out great.
After that, the final problem we wanted to resolve was the engineered wood flooring (you can see it on the bottom of the first picture above). It really doesn’t look that bad in the picture but it was cheap stuff, scratched easily and was hard to clean. Both my husband and I have had wood floors in our previous kitchens and always wound up replacing them with tile. Tile is more durable and easily stands up to the wear and tear of work done in a kitchen. Just be careful not to drop your wine glasses, though. Tile is not forgiving in that regard.
So at this point the tile is laid and setting for a day before doing the grout. My husband does excellent work and is a perfectionist so the work sometimes is painstakingly slow. In the end I know I will be so pleased but in the interim living in a war zone has its ups and downs.
Where my stove/oven used to be
waiting for grout
The one thing we’ve already noticed is the tile is brightening up the kitchen. With the dark cabinets and the dark floor the kitchen was a pretty dark place. The tile is changing all that and brightening it up considerably.
And so, because of all this, once again I do not have a new recipe to share this week. But the good news is I have so many recipes amassed from the many years of doing this blog that I can share some of my recipes that have not seen the light of day for quite some time.
This week I decided to focus on some of my personal favorite slow cooker recipes. Over the years I’ve learned that slow cookers are actually very versatile. Years ago when I would make something in a slow cooker (or crock pots as we used to call it then) my food would come out bland and overcooked. Now I’ve mastered some techniques that have helped me create some wonderful slow cooker dishes. Those are the ones I want to share with you today.
So let’s talk slow cooker favorites…
I’ve chosen these particular recipes because they are easy, impressive and your guests (or family for that matter) will never think they were made in a slow cooker.
SLOW COOKER GROUND BEEF STEW: I really like this recipe because the end result is a thick and luscious stew. The secret is using a large amount of tomato paste. For a 15 ounce can of tomato sauce I recommend using an entire 6 ounce can of tomato paste. For this recipe you want the sauce to be really thick before the stew starts to cook. If the sauce still looks a little thin after mixing the sauce and paste I recommend adding more tomato paste. Don’t be afraid if you think it’s too thick. The residual fat from the browned ground beef will loosen up the sauce in the cooking process but not to the point of making it runny. The consistency of this stew is similar to a nice thick chili. And the flavor of this stew is fabulous. I assure you, this recipe can easily become a family staple.
2. CREAMY MEATBALL AND TORTELLINI SOUP: Years ago I never would have thought of making soup in a slow cooker. But actually it is a perfect tool for making soup. This was the recipe where I learned I can vary my temperatures during the cooking process versus just cooking a recipe on low or high all the time. I made sausage meatballs for this recipe but if you don’t want to take the time to remove the casings and shape the meatballs you can just cut the sausage up in links and throw it in that way. This is a great dish for a chilly night. Serve with a salad and some crusty bread and you have one heck of a meal that takes virtually no effort at all to make.
SaveSave
SaveSave
SaveSave
SaveSave
SaveSave
SaveSave
SaveSave
SaveSave
SaveSave
SaveSave
SaveSave
SaveSave
SaveSave
SaveSave
SaveSave
SaveSave
SaveSave
SaveSave
SaveSave
SaveSave
SaveSave
SaveSave
3. SLOW COOKER TURKEY AND DUMPLINGS: Remember when you only used to have turkey around the holidays? I happen to love turkey and so I try to find as many ways of serving it all year round. I used turkey tenderloins in this recipe, cooking them whole and then shredding them. The surprise ingredient is refrigerated biscuits that I cut up and used as the dumplings. This is a flavorful and hearty dish and a great way to incorporate turkey more routinely into your meal plans.
4. JAMBALAYA: This was my breakthrough recipe using a slow cooker. From past experience, this was the first time that I made something in the slow cooker that didn’t look or taste like mush. If you are inclined to try any of these recipes, I would start with this one. This is a traditional chop and drop slow cooker recipe. The difference is you don’t add all of the ingredients at once so everything is cooked properly but not overcooked. My husband and I absolutely love this recipe and I am sure you will too.
5. SLOW COOKER COUNTRY STYLE PORK RIBS: I have been making this recipe for years. It is definitely a recipe for someone who is just learning to cook as it is, if you follow the instructions, absolutely foolproof. The sauce is rich and thick and the pork is fall-off-the-bone delicious. You can serve this with rice or potatoes and a vegetable of your choice and have a superb meal. If you want a great recipe that is a complete no brainer, this is the one for you.
And there you have it – the saga of my kitchen remodel coupled with my favorite slow cooker recipes. I’m not sure if I will be able to post a new recipe next week, but I certainly hope to. If not, I will share some of my former recipes that have not surfaced for a long time and probably something sweet versus savory. We’ll just have to see how it goes. Thanks for hanging in there with me. Next stop, doing the grout and the hardwood floor installation in the rest of the condo!
It seems that lately I’ve been obsessed with my slow cooker. You have to admit it is a major convenience, especially when you have a busy day planned. Which was the case with me last week. But even when my calendar is full I still want to have something good and home made for dinner (unless I’m so exhausted I suggest we just go out to eat). The beauty of the slow cooker is that you get it ready early in the day when you have energy so that later in the day you go home to amazing smells and a dinner that is ready to serve without a lot of time and effort on your part. I just love my slow cooker!
I’m always experimenting with basic ingredients and I’ve really never used ground beef as the main protein in one of my slow cooker meals before. So I thought, what the heck, why not give it a try. And I have to say I really, really liked this meal. It’s hearty, flavorful and all you need do is serve it with some crusty bread, or corn bread or a salad and you’re done.
So let’s talk slow cooker ground beef stew…
Lesson Learned 1 – Use a lower fat ground beef in this recipe: I used 93% lean ground sirloin for this recipe. There are some recipes that I prefer a larger fat content but for this one you don’t. You don’t want the crock to be swimming in grease when it’s done. Believe me, it’s worth it to go higher end on the ground beef for something that is cooking for 7 hours.
Lesson Learned 2 – Partially cook the ground beef before putting it in the slow cooker: Many times I’ve talked about the importance of browning meat before you put it in the slow cooker. Slow cookers do not brown meats and so your meat can wind up looking grayish if you don’t brown it first. If that doesn’t bother you then just dump the meat in. But I say you eat with your eyes first and so you want the dish to look pleasing as well. Just cook the meat so there’s only a little pink left. The slow cooker can then handle the rest.
Lesson Learned 3 – Cut your veggies and potatoes into large chunks: I know I’ve said this over and over but it’s worth repeating. If you don’t you cut your veggies into large chunks they will turn into mush. Think about it. The veggies are cooking for 7 hours. Unless they are of substantial size they will break down. Below is the picture of my potatoes and veggies before I added the meat. You can see they are nice and chunky and that’s what you need in order for them to stand up to the cooking process.
Lesson Learned 4 – You can use any kind of potato you like: When I made this I used yukon gold potatoes. Yukon golds have a very thin skin so you don’t have to peel them. I always peel them because my husband has a hard time with the skins. Whether you do or not is totally your preference. You can use red potatoes or russets. I would suggest peeling either one of those if you decide to use them.
Lesson Learned 5 – Seasoning is very important when using a slow cooker: If you don’t season the ingredients well your food can turn out bland. You’ll want to salt and pepper the ground beef when you’re browning it. You’ll want to salt and pepper the onions, carrots and potatoes after you put them in the slow cooker. After you mince the garlic sprinkle it over the veggies and potato. Add the oregano to the tomato sauce. Making sure you season this way will give you a flavorful result.
I will admit I wasn’t too sure about this recipe and I was very pleasantly surprised at how it turned out. Plus it provided some delightful smells in the kitchen will it was cooking. For a simple, no fuss, easy meal the recipe more than fits the bill. Try it and let me know what you think.
2 large potatoes, peeled and sliced in large chunks
3 large carrots, cut in chunks
I medium yellow onion, sliced in chunks
2 garlic cloves, minced
1- 6 oz. can of tomato paste
1 15 ounce can tomato sauce
2 Tbs. Worcestershire sauce
1 tsp. dried oregano
Kosher salt to taste
Freshly cracked black pepper
Olive oil cooking spray
DIRECTIONS:
In a medium skillet, brown the ground beef until there is only a slight bit of pink left in the meat. Set aside. In a large bowl combine the tomato paste and sauce. Stir until completely combined and smooth. (This should give you a nice thick sauce). Add the Worcestershire sauce and oregano and stir to combine.
Spray the inside of the crock with cooking spray. Add the potatoes, carrots and onions. Season with salt and pepper. Sprinkle the minced garlic over the vegetables and potatoes. Add the meat on top. Pour the tomato sauce over the meat. Stir to combine.
Cover and cook on high for 7 hours. Do not lift the lid during the cooking process. Serve with a salad and some crusty bread.
There are certain meals that just become necessary to make once the weather gets cooler – pot roast, beef stew, roast chicken… And one of my all time favorite cooler weather meals has to be chili. It is so easy to make and I serve it with shredded cheddar cheese and diced sweet onion and boy or boy, does it ever stick to your ribs! Chili is the ultimate in comfort food on a crisp Fall evening.
What I like about chili is it’s so easy to make. There are a couple of hints to making a chili that suits our needs that I will share. But bottom line, the chili pot is your canvas and you can make chili basically any way you want. I will share with you my go-to recipe.
So let’s talk chili…
Chili Ingredients
Lesson Learned 1 – The onions: I use a large sweet onion when I make my chili. I dice the onion and use about three quarters of it in the chili itself. The rest I set aside and use as a raw topping when I serve the chili. I’ve found the best way to use these onions to enhance the flavor of the chili is to caramelize them. That takes a little time. The pictures below show how I dice the onions and the onions when they first become translucent. The photo below them shows when they are caramelized. Technically you can use them either way but I’ve found if you take the extra time and let them caramelize they add more flavor to the chili.
The challenge when you caramelize onions is the extra time. Normally I can get them the way I want them (as pictured below in the bottom photo) in about 15 minutes. If you want to cook your chili faster that may not be an option. But if you can take your time with this first step you will definitely taste the benefits of doing so.
Lesson Learned 2 – The importance of seasoning during the initial stages: I find if I season the onions and the meat with salt and pepper each time during the first two steps the flavor of the chili is greatly enhanced. Besides is their anything better than the smell of onions seasoned with salt and pepper cooking on the stove? So after I season the onions and let them caramelize I add the meat and season the meat with salt and pepper as well. It may seem like a lot of seasoning but it actually is not.
After that I don’t add any more salt and pepper until the very end after all the ingredients have been added and combined. At that time I taste the chili to see if it needs anymore salt and pepper. Very seldom do I have to add any at the end. Seasoning the first two layers and then adding the other seasonings makes a big difference in the end result. Don’t forget to do this.
Lesson Learned 3 – When to add the garlic: I’ve tried adding the garlic a couple of different ways and have landed on a preferred choice when I make chili. You can always add the garlic once you caramelized the onions but I prefer adding them to the ground beef just before I start adding the other ingredients. I allow them to cook in the meat for a minute or so until fragrant and then I continue adding the rest of the ingredients. I find this totally prevents the garlic from burning and better infuses the garlic into the chili.
Lesson Learned 4 – Chopping the green pepper: I guess I don’t actually chop the green pepper – it’s more like dicing. I like the pieces small so that they add flavor to the chili but aren’t necessarily highly visible. The green pepper flavor, in my estimation, balances some of the heat of the chili and adds a nice freshness to it. The pictures below show how I prepare the green pepper:
Lesson Learned 5 – Chili seasoning: I’ve experimented with a lot of different ways to season my chili and finally chose my preferred method. I use McCormick Mild Chili Seasoning Mix because we prefer our chili on the mild side but you can make it has hot as you like. McCormick has a few varieties of seasonings and if you can’t find a seasoning mix that gets you the heat you crave you can always add red pepper flakes. This seasoning mix contains a blend of chili pepper, paprika, cumin, onion salt and garlic. I also add about a teaspoon of chili powder and this combination of seasonings gives us the kind of chili we prefer.
Lesson Learned 6 – The mushrooms: I am a big fan of fresh mushrooms especially now when you can buy them in bulk. This time I had a jar of canned mushrooms in the pantry that I wanted to use so I went that route. Either way, add the mushrooms at the very end so that they don’t overcook. Generally I add fresh sliced mushrooms to my chili.
Lesson Learned 7 – A little bit of tomato paste helps thicken the sauce: Here’s a handy dandy little trick. Add about a tablespoon of tomato paste to the ground beef before you add the seasonings. This will help thicken the sauce. Look for tomato paste that’s sold in a tube. That way you’ll have no waste and can use it whenever you need versus wasting a whole small can.
Lesson Learned 8 – Simmering the chili: I’ve found the best way to meld all the flavors in the chili is to let it simmer for about an hour. Put your heat on very low and stir the chili occasionally making sure none burns on the bottom of the pan. Then the chili is ready to serve. And, of course, if you have the luxury, you can always let it sit overnight to let the flavors meld.
So that’s basically it. Once you’ve browned the ground beef and added the seasonings it’s just drop in and stir from there…
Stir in the diced tomatoes
Drop in the beans
Add the mushrooms and green pepper
Stir and simmer for about an hour and you’re done. I serve this chili over rice, my husband’s preference, or over elbow macaroni, my preference. Or you can serve it plain. I add shredded cheddar and raw diced onion to mine, but you can top it with sour cream, guacamole, diced jalapeños, or whatever you like. I’ve been making this recipe for years and have it down to a science. It is unbelievably easy to make and so good. Try it. I know you’ll love it!
Toppings can include: Shredded cheese, raw onion, sour cream, guacamole, sliced jalapeño peppers, or whatever your preference
DIRECTIONS:
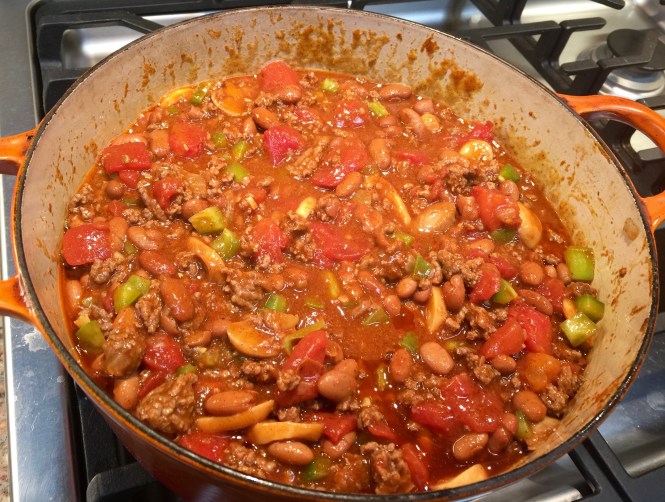
In a 5.5 quart dutch oven melt the butter. On a medium heat add the onions and cook until caramelized, approximately 15 minutes. Season the onions with salt and pepper while cooking. Push the onions to the side and add the ground beef. Layer the cooked onions on top of the beef. Break up the ground beef with a spoon and cook through, seasoning the ground beef at the beginning with salt and pepper. Once cooked, stir in the garlic and cook until fragrant, approximately 1 minute.
Stir in the tomato paste and thoroughly combine. Stir in the chili seasoning and chili powder. Add the diced tomatoes. Stir to combine. Add the chili beans. Stir to combine. Cook for about a minute. Add the mushrooms and the green pepper. Gently stir to combine. Taste to see if any additional salt and pepper is needed.
Cover and simmer for one hour. Serve with desired accompaniments.
I am always amazed at the versatility of a cast iron skillet. I used to think they were just cheap and heavy cookware but now I think they are the best thing out there when it comes to cooking in the kitchen. And I am always looking for ways to make a one pot meal so when I decide to make one I go first to my trusty cast iron skillet before anything else. There is nothing that compares to using a cast iron skillet when you have a recipe that goes from stovetop to oven. And that is the kind of recipe I am sharing today.
This particular meal is so easy and so tasty you’ll want to keep it in your arsenal of go-to meals. When you don’t have the time or energy to make tacos the traditional way, you can still get that “taco feel” without a lot of major prep. It’s basically everything in one pan. Serve it with a salad and some tortilla chips, or slather it into a soft tortilla shell with some lettuce and jalapeños and it will be a hit!
So let’s talk skillet taco casserole…
Lesson Learned 1 – Get creative with the rice you use: Of course you can always use the old standby white rice. But don’t be afraid to get creative. I used a rice blend of texmati white, brown, wild and red rice for this recipe and found it added great depth of flavor. But you could use basmati rice, paella rice or any short or medium grain rice to this dish. And if all else fails you can even use quick cooking rice. The point is, don’t be afraid to experiment. As long the rice is precooked you’ll be just fine.
Lesson Learned 2 – Don’t forget to add the flour: As I’ve become a little more proficient as a cook I’ve come to learn that flour and corn starch are my best friends. If you want to thicken a sauce or a gravy, you need to use one or the other. And along the way, as I have experimented with both, I’ve wondered what the difference is between the two of them.
Flour Versus Cornstarch – What’s The Difference?
The First Difference – Appearance: Flour makes a gravy opaque and can dull or lighten the color, while cornstarch (when used properly) yields a clear, shiny sauce.
Sauce Thickened With Flour
The Second Difference – Flavor: flour needs to be cooked enough to lose its raw flavor; cornstarch doesn’t have much flavor on its own so you don’t need to cook it through. And if you use a cooked flour (such as a long-cooked Cajun-style roux, or roasted flour), you can add a roasty-toasty flavor you can’t get with cornstarch.
The Third Difference – Cooking Time: Flour needs to be cooked to lose its raw flavor and to unleash its thickening powers. Cornstarch needs only a short cooking time to thicken. In fact, if you cook cornstarch too long, it lets go and the sauce thins out again. So if you are anticipating a longer cooking time, stick with flour.
What thickening agent do I prefer? Well the answer it easy – for me, it’s flour. Although you do need to cook it for about a minute, I find it is easier to work with, doesn’t lose it effectiveness over longer cooking times and it always does a great job of thickening. The only time I prefer cornstarch is when I want clear, shiny sauce.
Ready To Go Into The Oven
Lesson Learned 3 – Judge how much tomato sauce you need: I bought a small can of tomato sauce and after I poured in some I thought using the whole can might make the dish too runny even with using flour. So I only added about 3/4 of the can. But judge for yourself. If you add the whole can and find it reduces the affect of the flour, just mix a little flour with water (thoroughly) and add it in. The sauce will thicken up again in no time.
And that’s it. The recipe is very easy and you’ll have a great dinner on the table in no time. Enjoy!
1 Tbs. Garlic Infused Olive Oil (you can substitute EVOO)
1 medium onion, chopped
1 pound 85% lean ground beef
2 Tbs. flour
1 pkg. taco seasoning
1 cup chicken stock
1 small can tomato sauce
3 cups cooked rice
1 cup sharp cheddar cheese, shredded and divided
1 cup Jack cheese, shredded and divided
1/4 cup sour cream
Green onions or flat leaf parsley for garnish (optional)
Salt and pepper to taste
DIRECTIONS:
Preheat oven to 375 degrees. In a large cast iron skillet (or any other type of oven proof skillet) on the stove saute the onions, stirring occassionally, until they just begin to caramelize (about 7 minutes). Salt and pepper the onions while sautéing. Move the onions to the side of the pan and add the ground beef, breaking it up with a spoon and spooning the onions on top. Cook until the beef is cooked through. Salt and pepper to taste. Once cooked drain any excess grease out of the pan.
Stir in the taco seasoning and flour and cook for at least 1 minute. Add the chicken stock and tomato sauce. Bring the mixture to a boil, reduce the heat and simmer for about 10 minutes.
Stir in the cooked rice, half the cheeses and sour cream. Cooked until combined. Add the remaining cheese to the top of the mixture, put in the oven and bake until cheese is golden brown and bubbly, approximately 15 minutes.
Garnish with sliced green onions or chopped flat leaf parsley and serve.
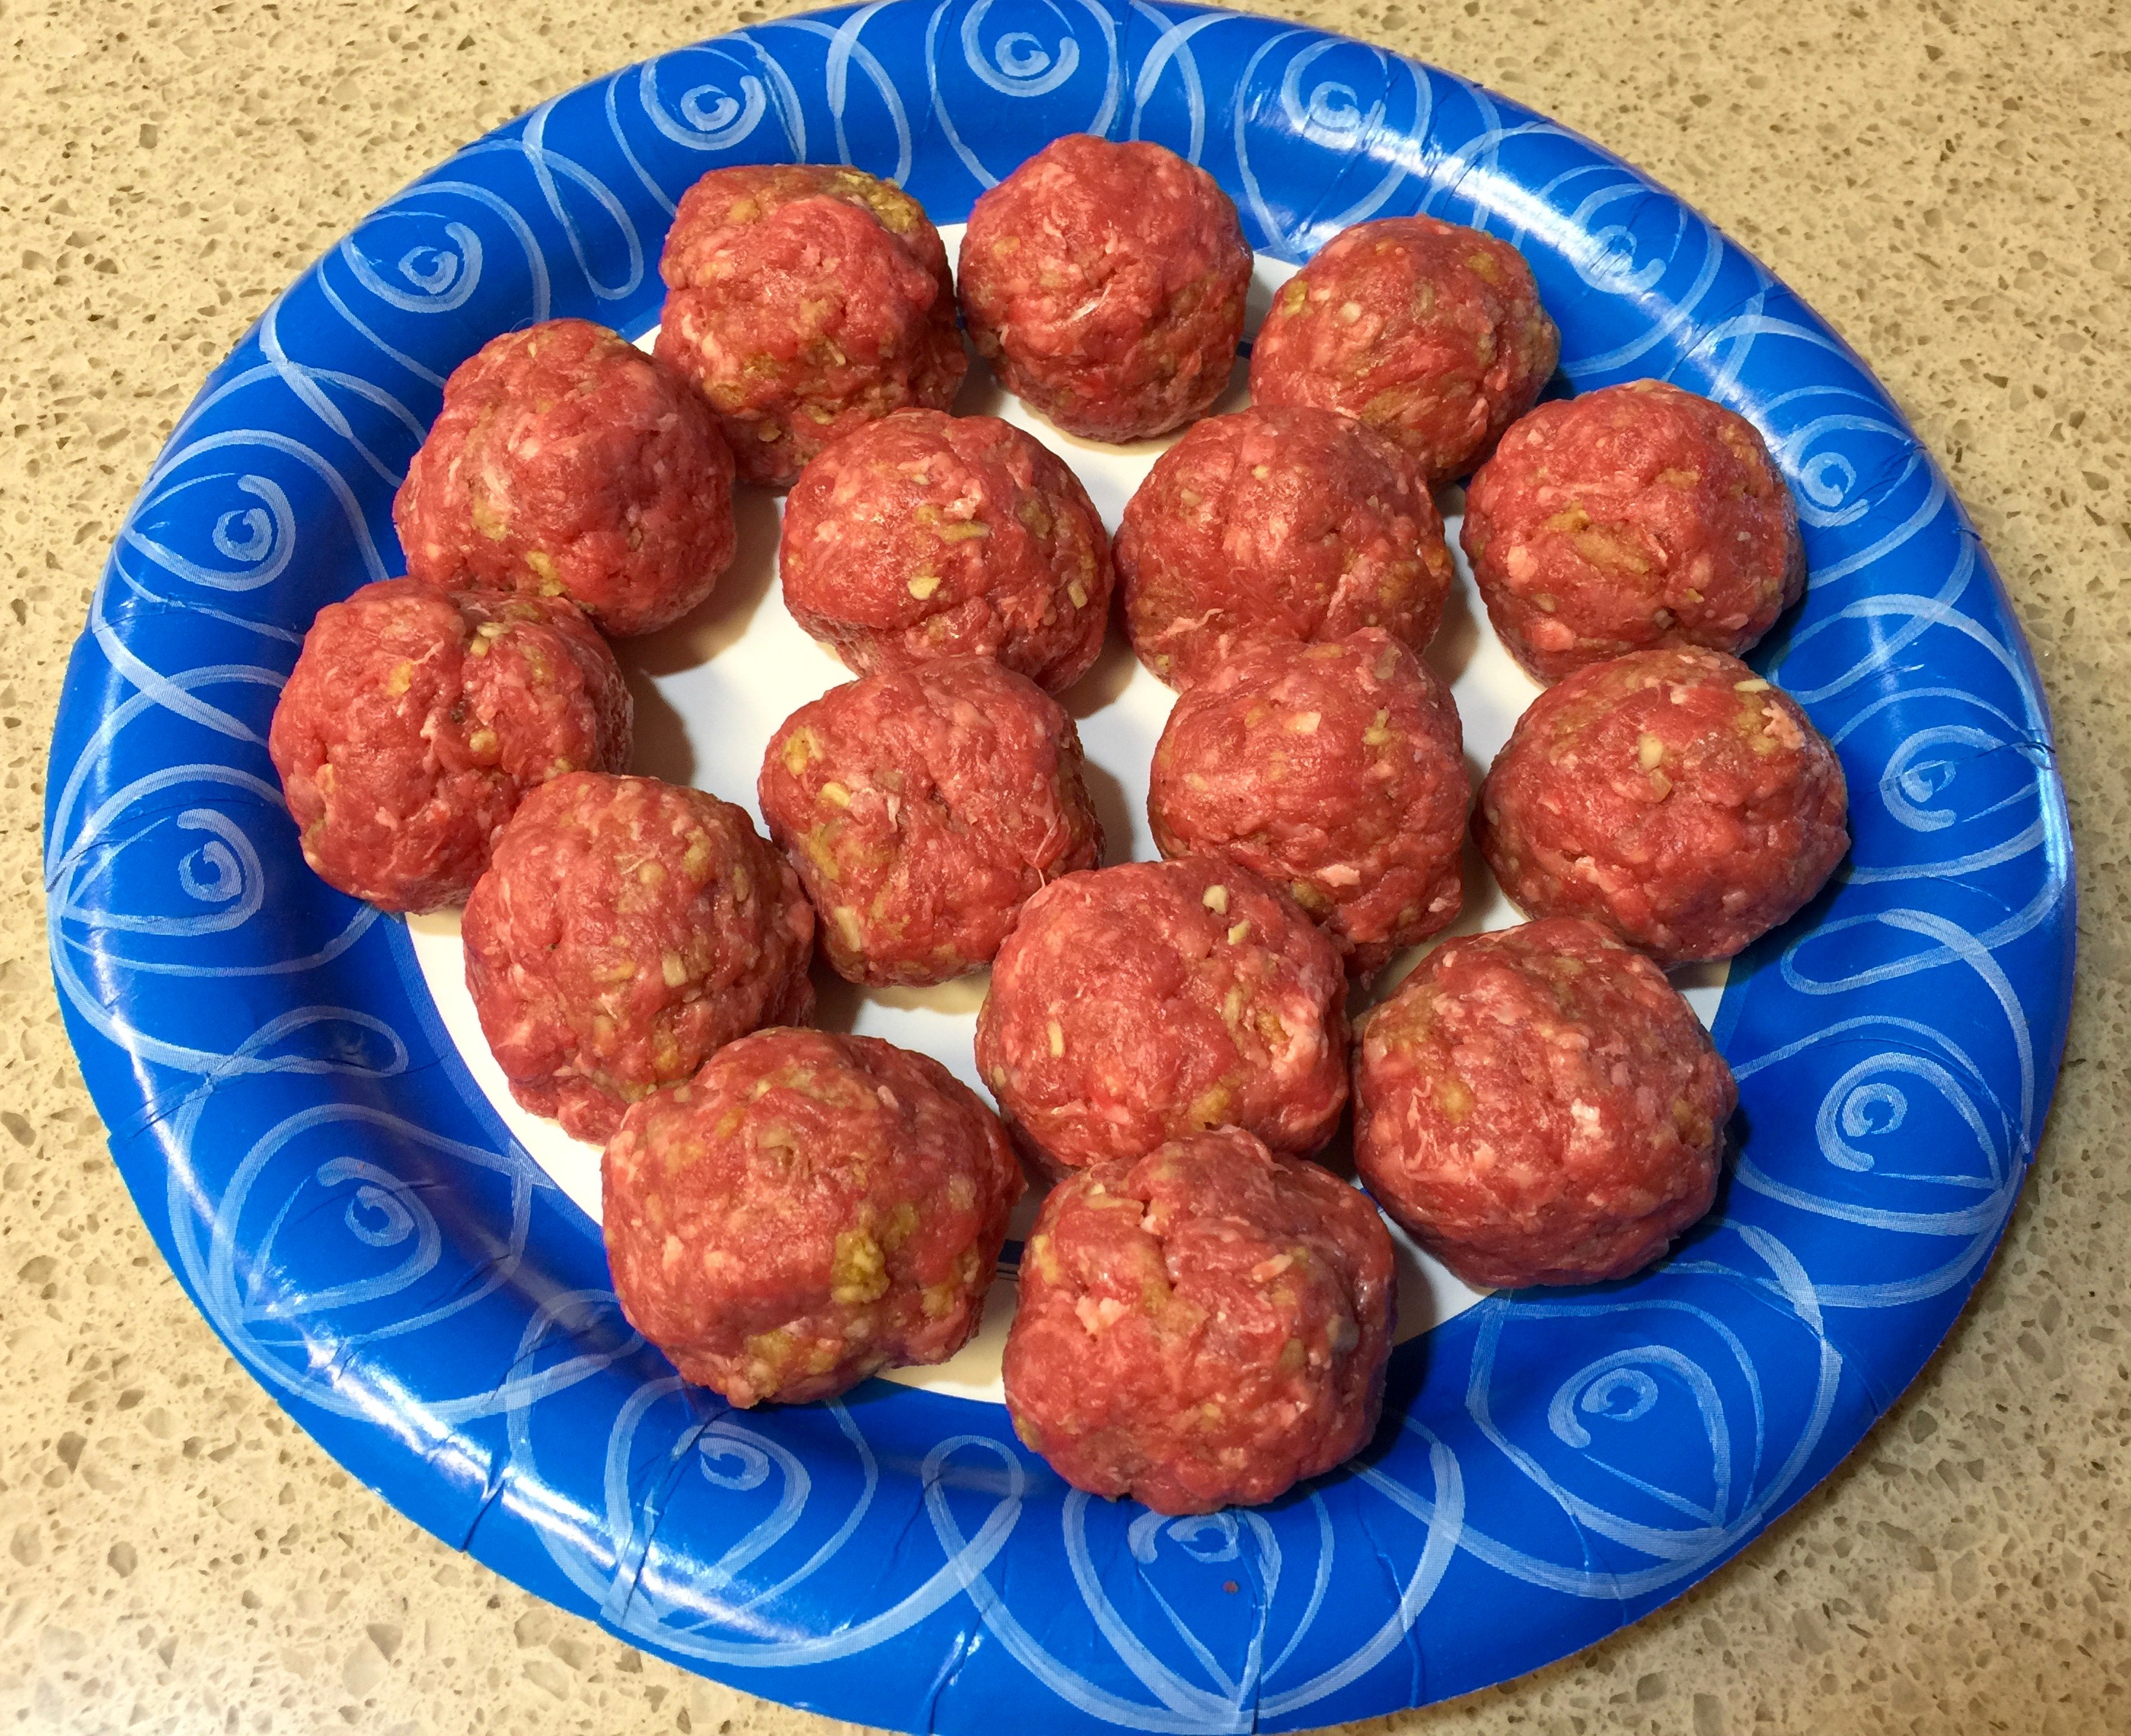
My “Best Ever Meatballs” is my go-to recipe for an hors d’oeuvre but I wanted to experiment with a meatball recipe that could serve as a entree and not an appetizer. I definitely wanted them to taste differently from the appetizer version and I also wanted to have some fun with them. So I decided to make these meatballs and I think they’ll be my go-to entree recipe.
This is a great recipe for a variety of reasons. I love it because the meatballs are easy to make, they’re delicious, they cook quickly, the cheese inside is a delightful surprise and it makes great leftovers! I have to say I cheated when I made these, I used pre-made mashed potatoes instead of making them from scratch. But by doing that I could have dinner on the table in 30 minutes. So it was worth the short cut.
So let’s talk meatballs with a surprise…
Lesson Learned 1 – It doesn’t take many ingredients to make the meatballs flavorful: basically you’re mixing the meat with an egg yolk, some panko, minced onion, worcestershire sauce and dijon mustard – that’s it. Combined with the cheese inside and the beef gravy you get flavorful meatballs without a lot of work! The key is to make sure you combine all of the ingredients but not over work the meat. If you do you’ll have tough meatballs and you don’t want that.
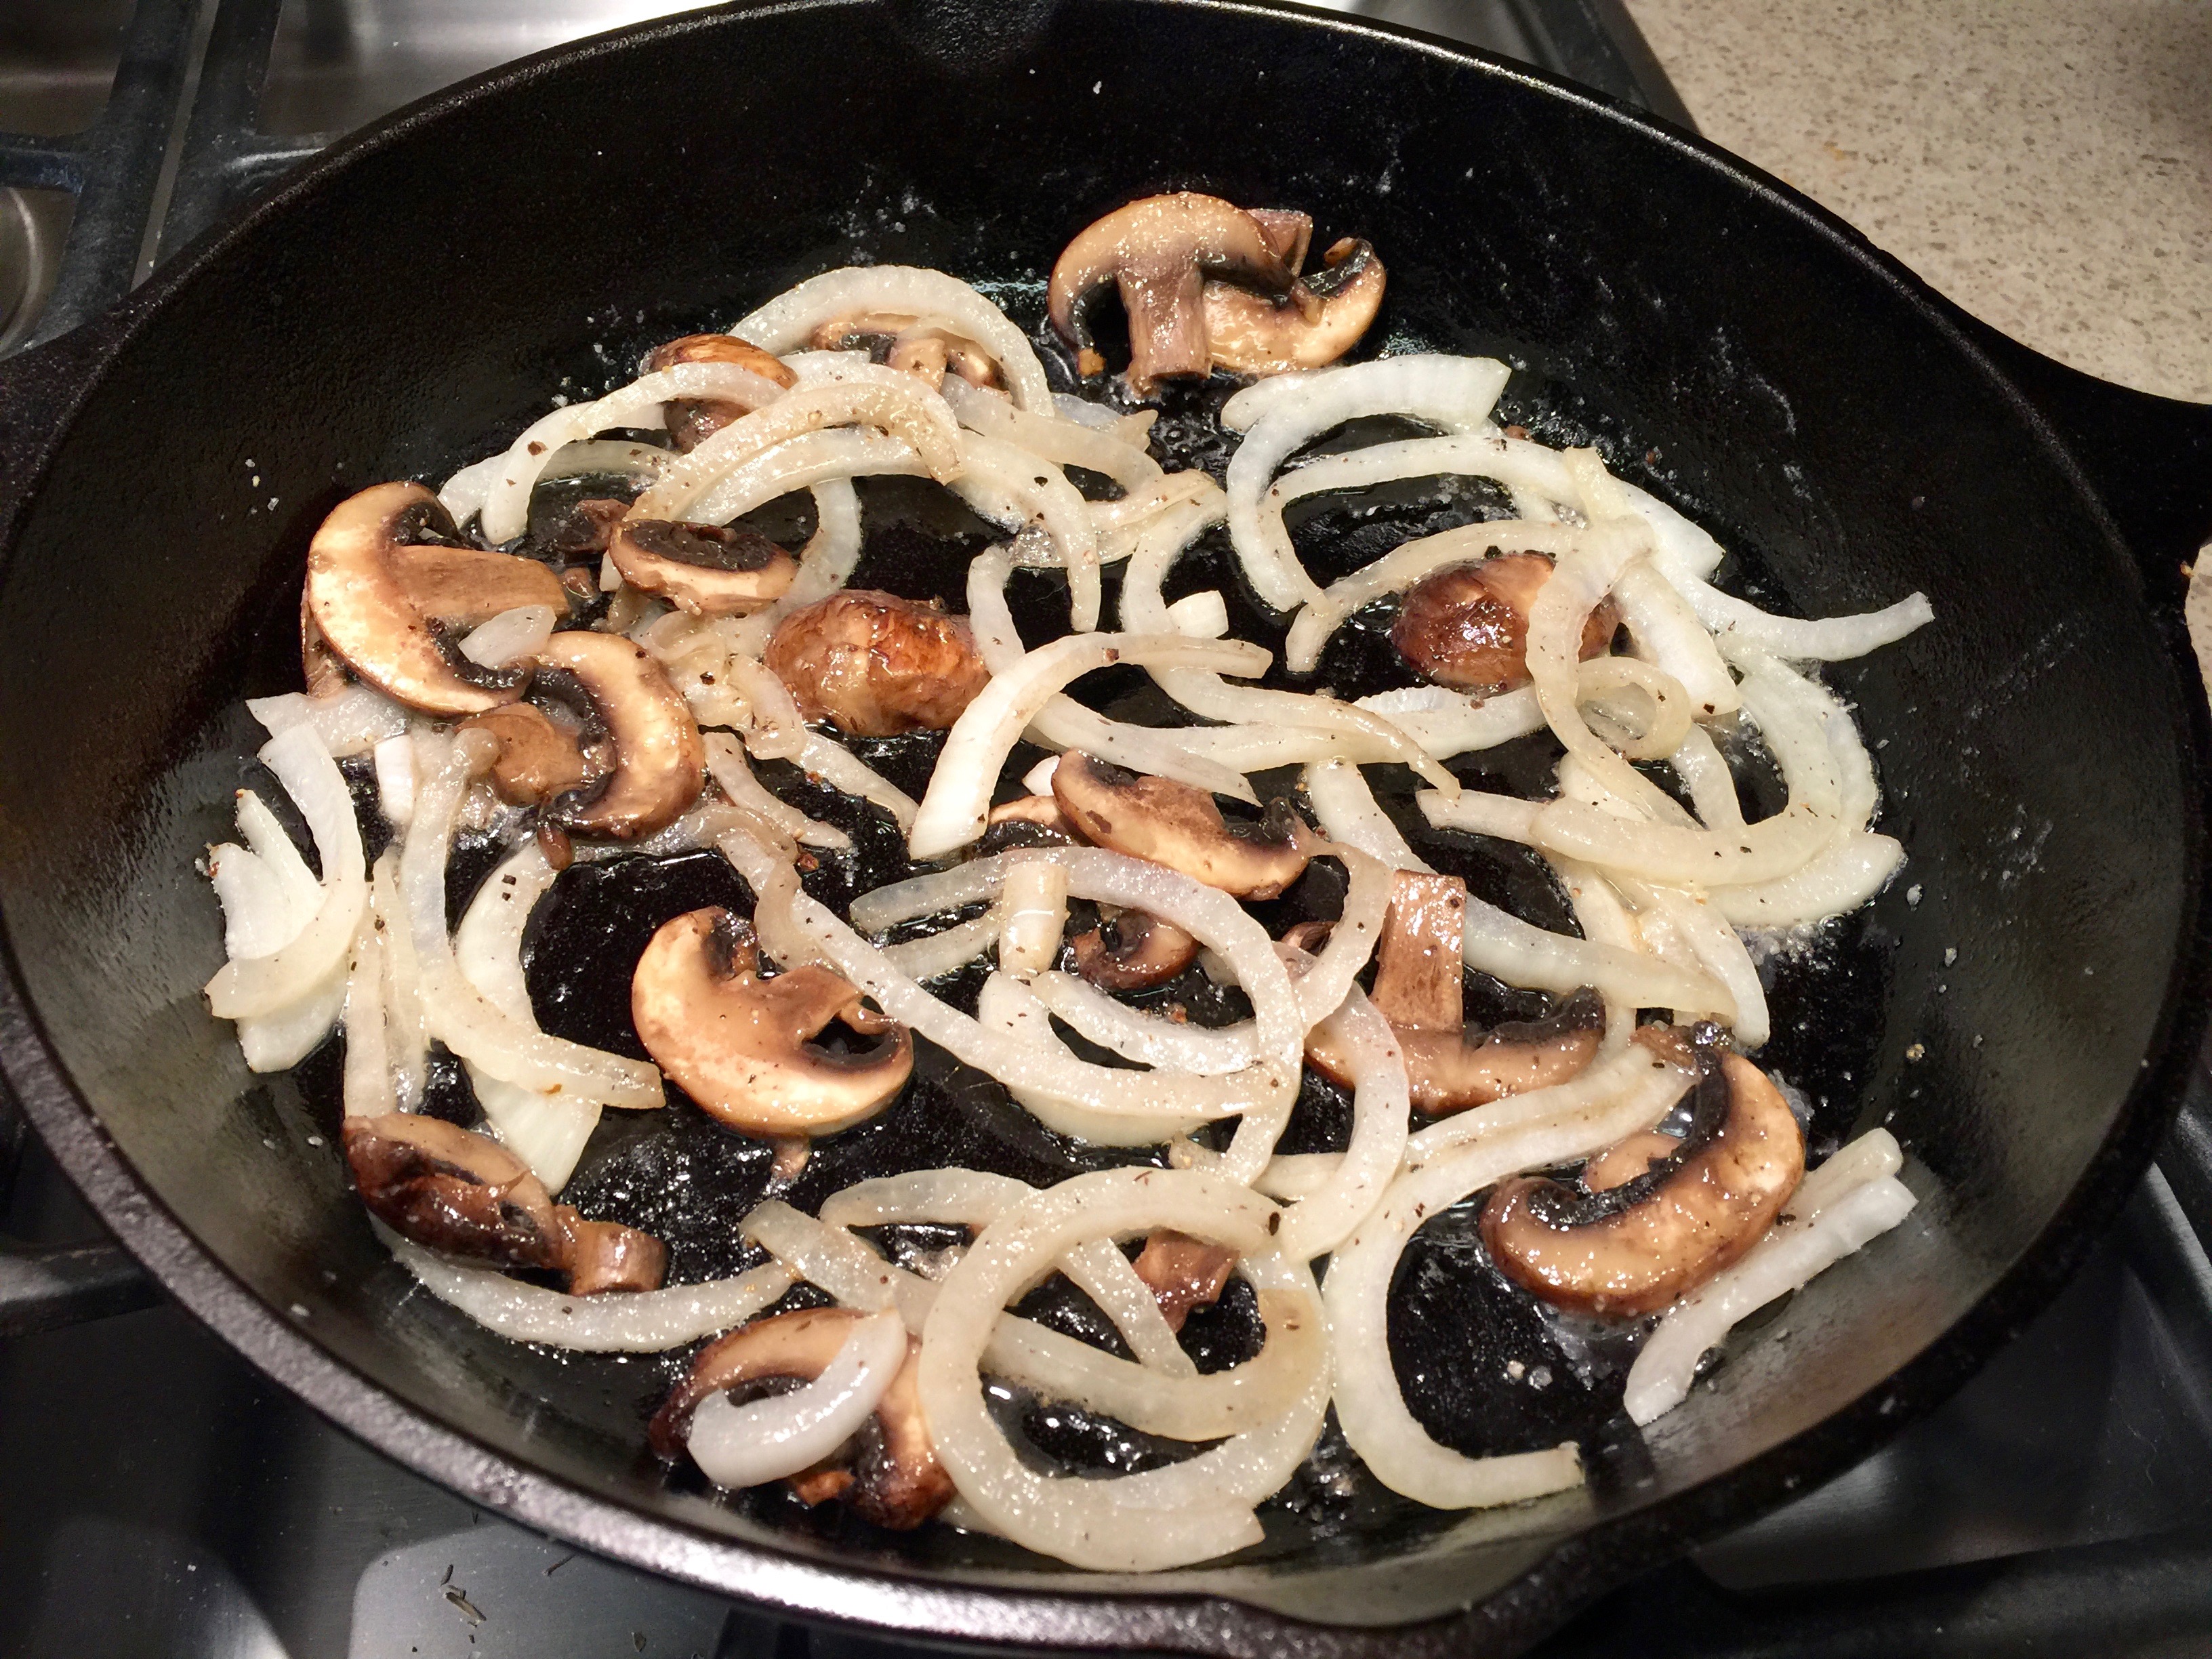
Lesson Learned 2 – A little bit of cheese goes a long way: You can use any kind of good melting cheese in the center of your meatballs. I chose one called Buttrekase, a cheese that originated in Switzerland and now produced in Wisconsin. It’s American name is “butter cheese” although it has no butter in it. It melts luxuriously and has a mild buttery flavor. This was a perfect choice for these meatballs.
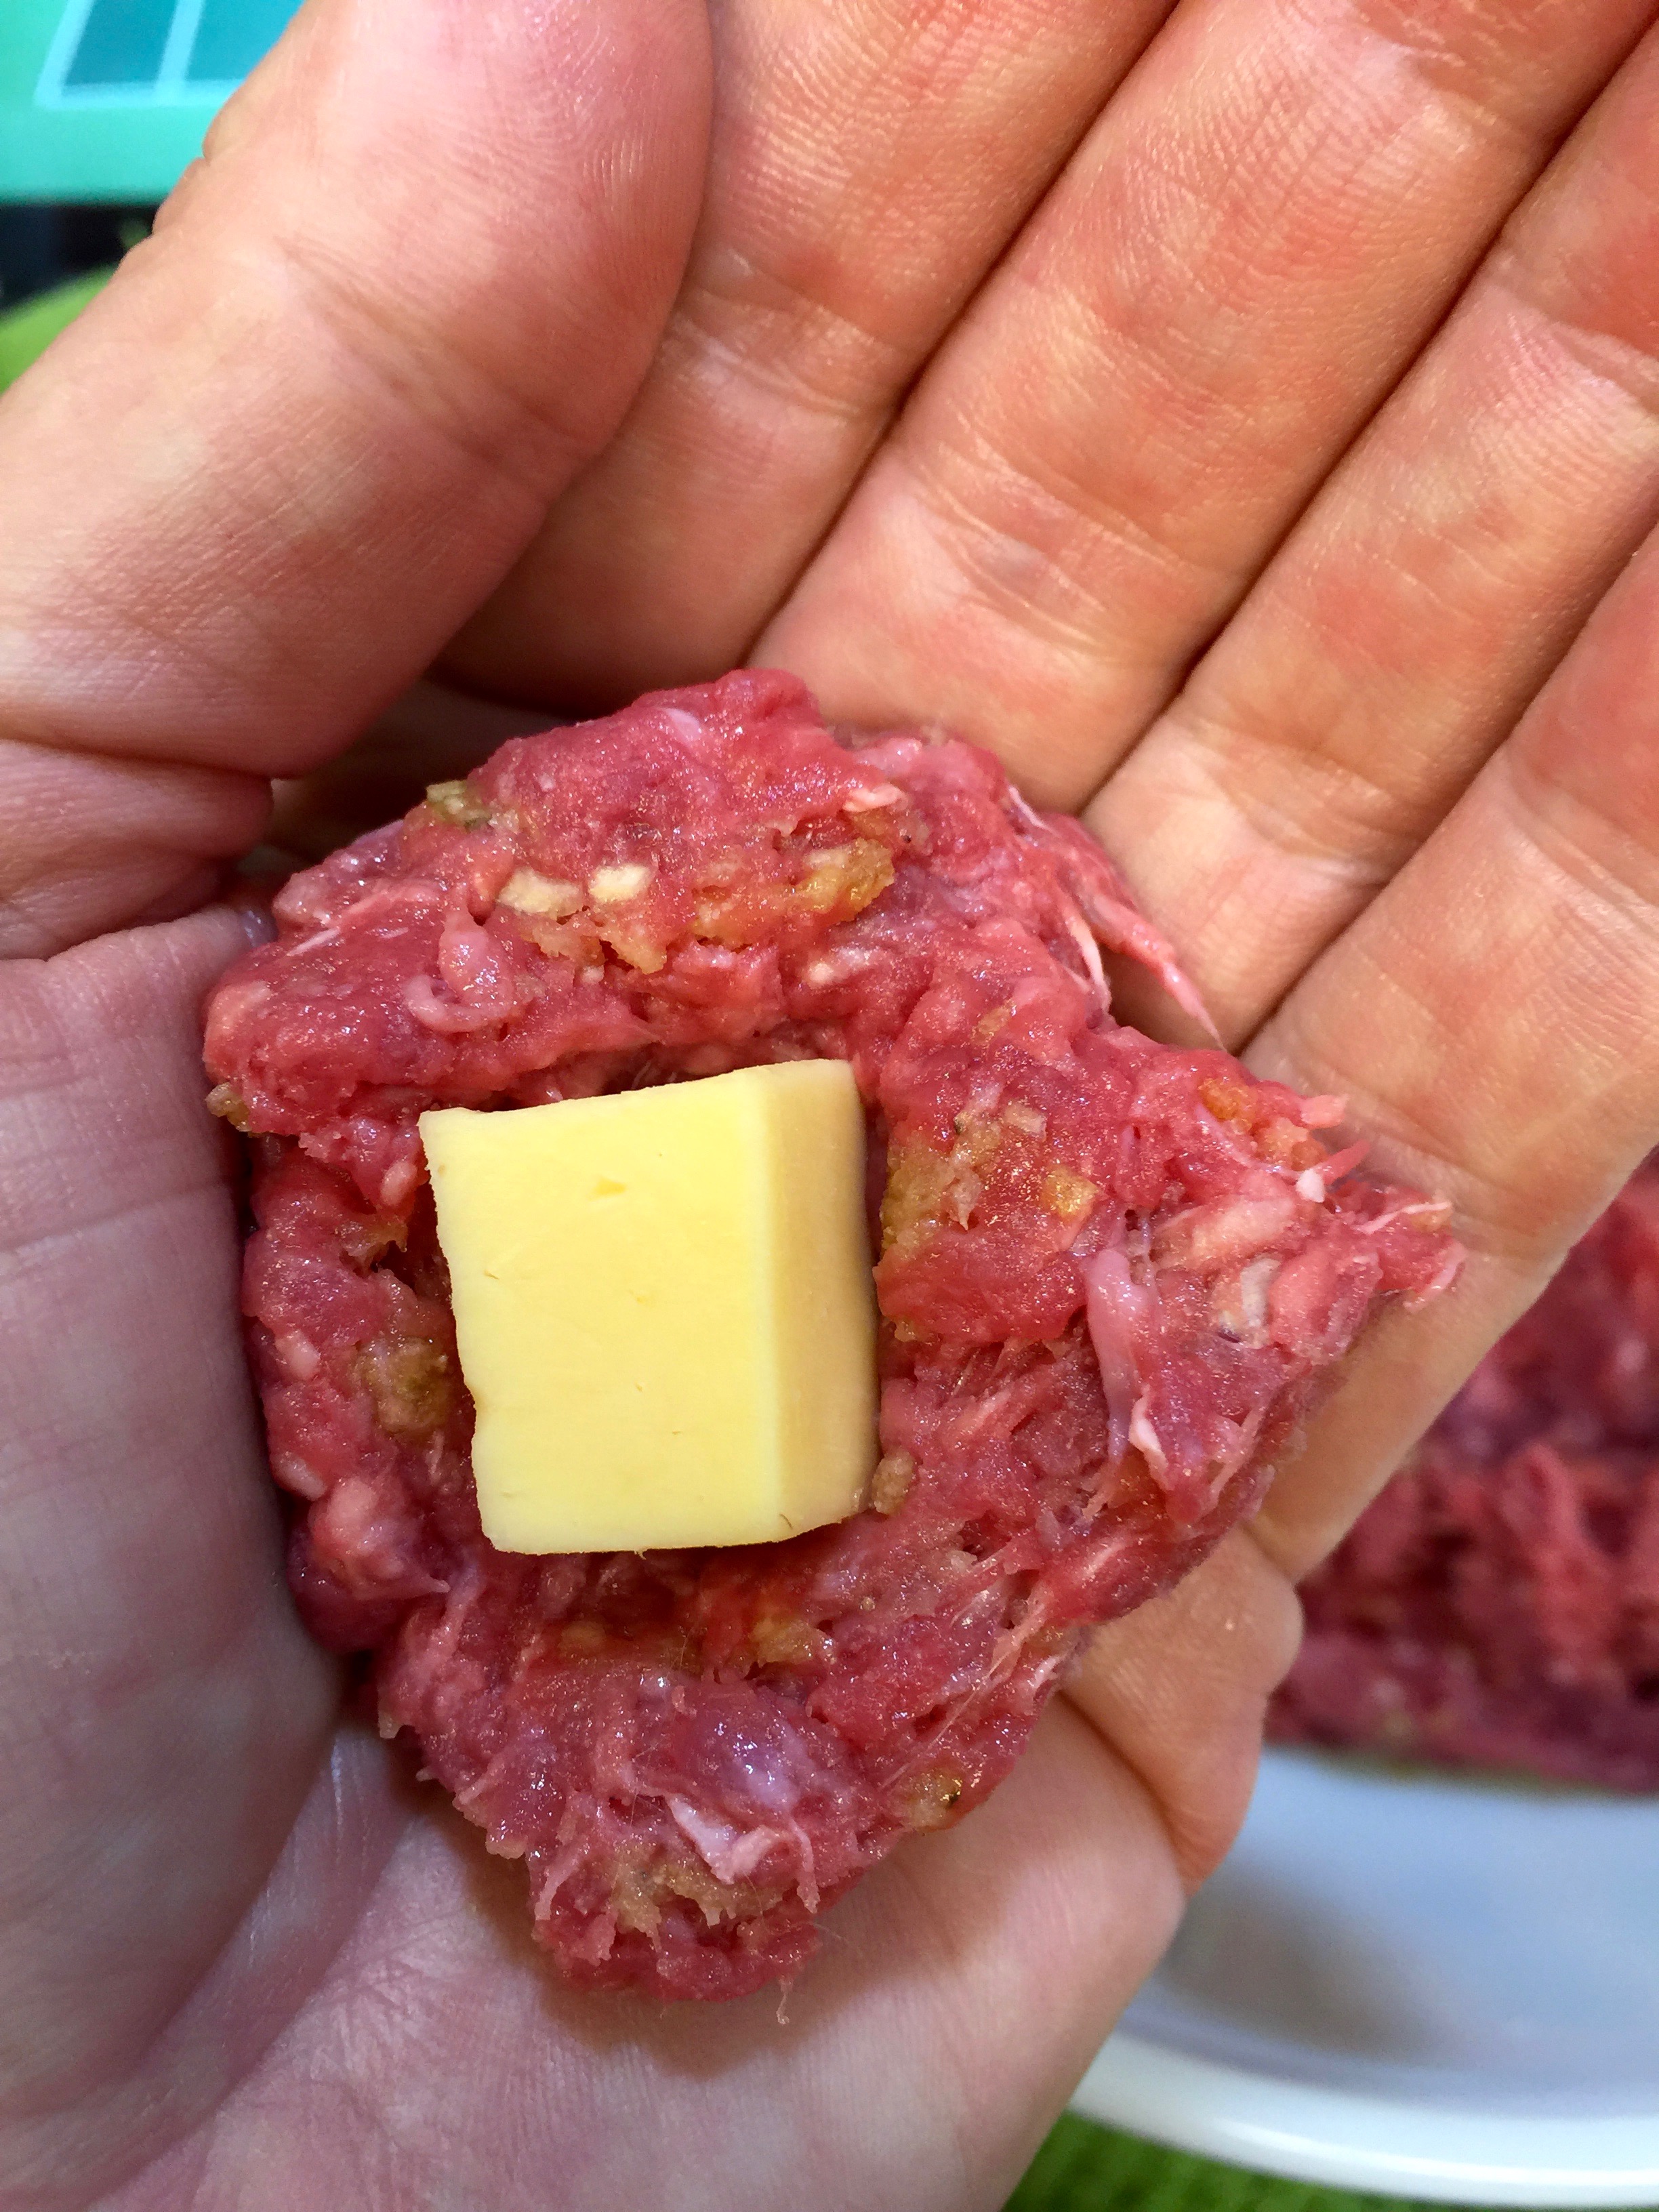
You will get approximately 15 meatballs out of one pound of ground beef. You don’t want your meatballs to be too big, maybe an inch to an inch and a half in diameter. Make sure you cut pieces of cheese that are small enough to support a meatball that size. Then just take the meat mixture and wrap it around that cheese, pressing the meat together to try to minimize any holes. But don’t worry if cheese leaks out when you bake them. There will still be more inside.
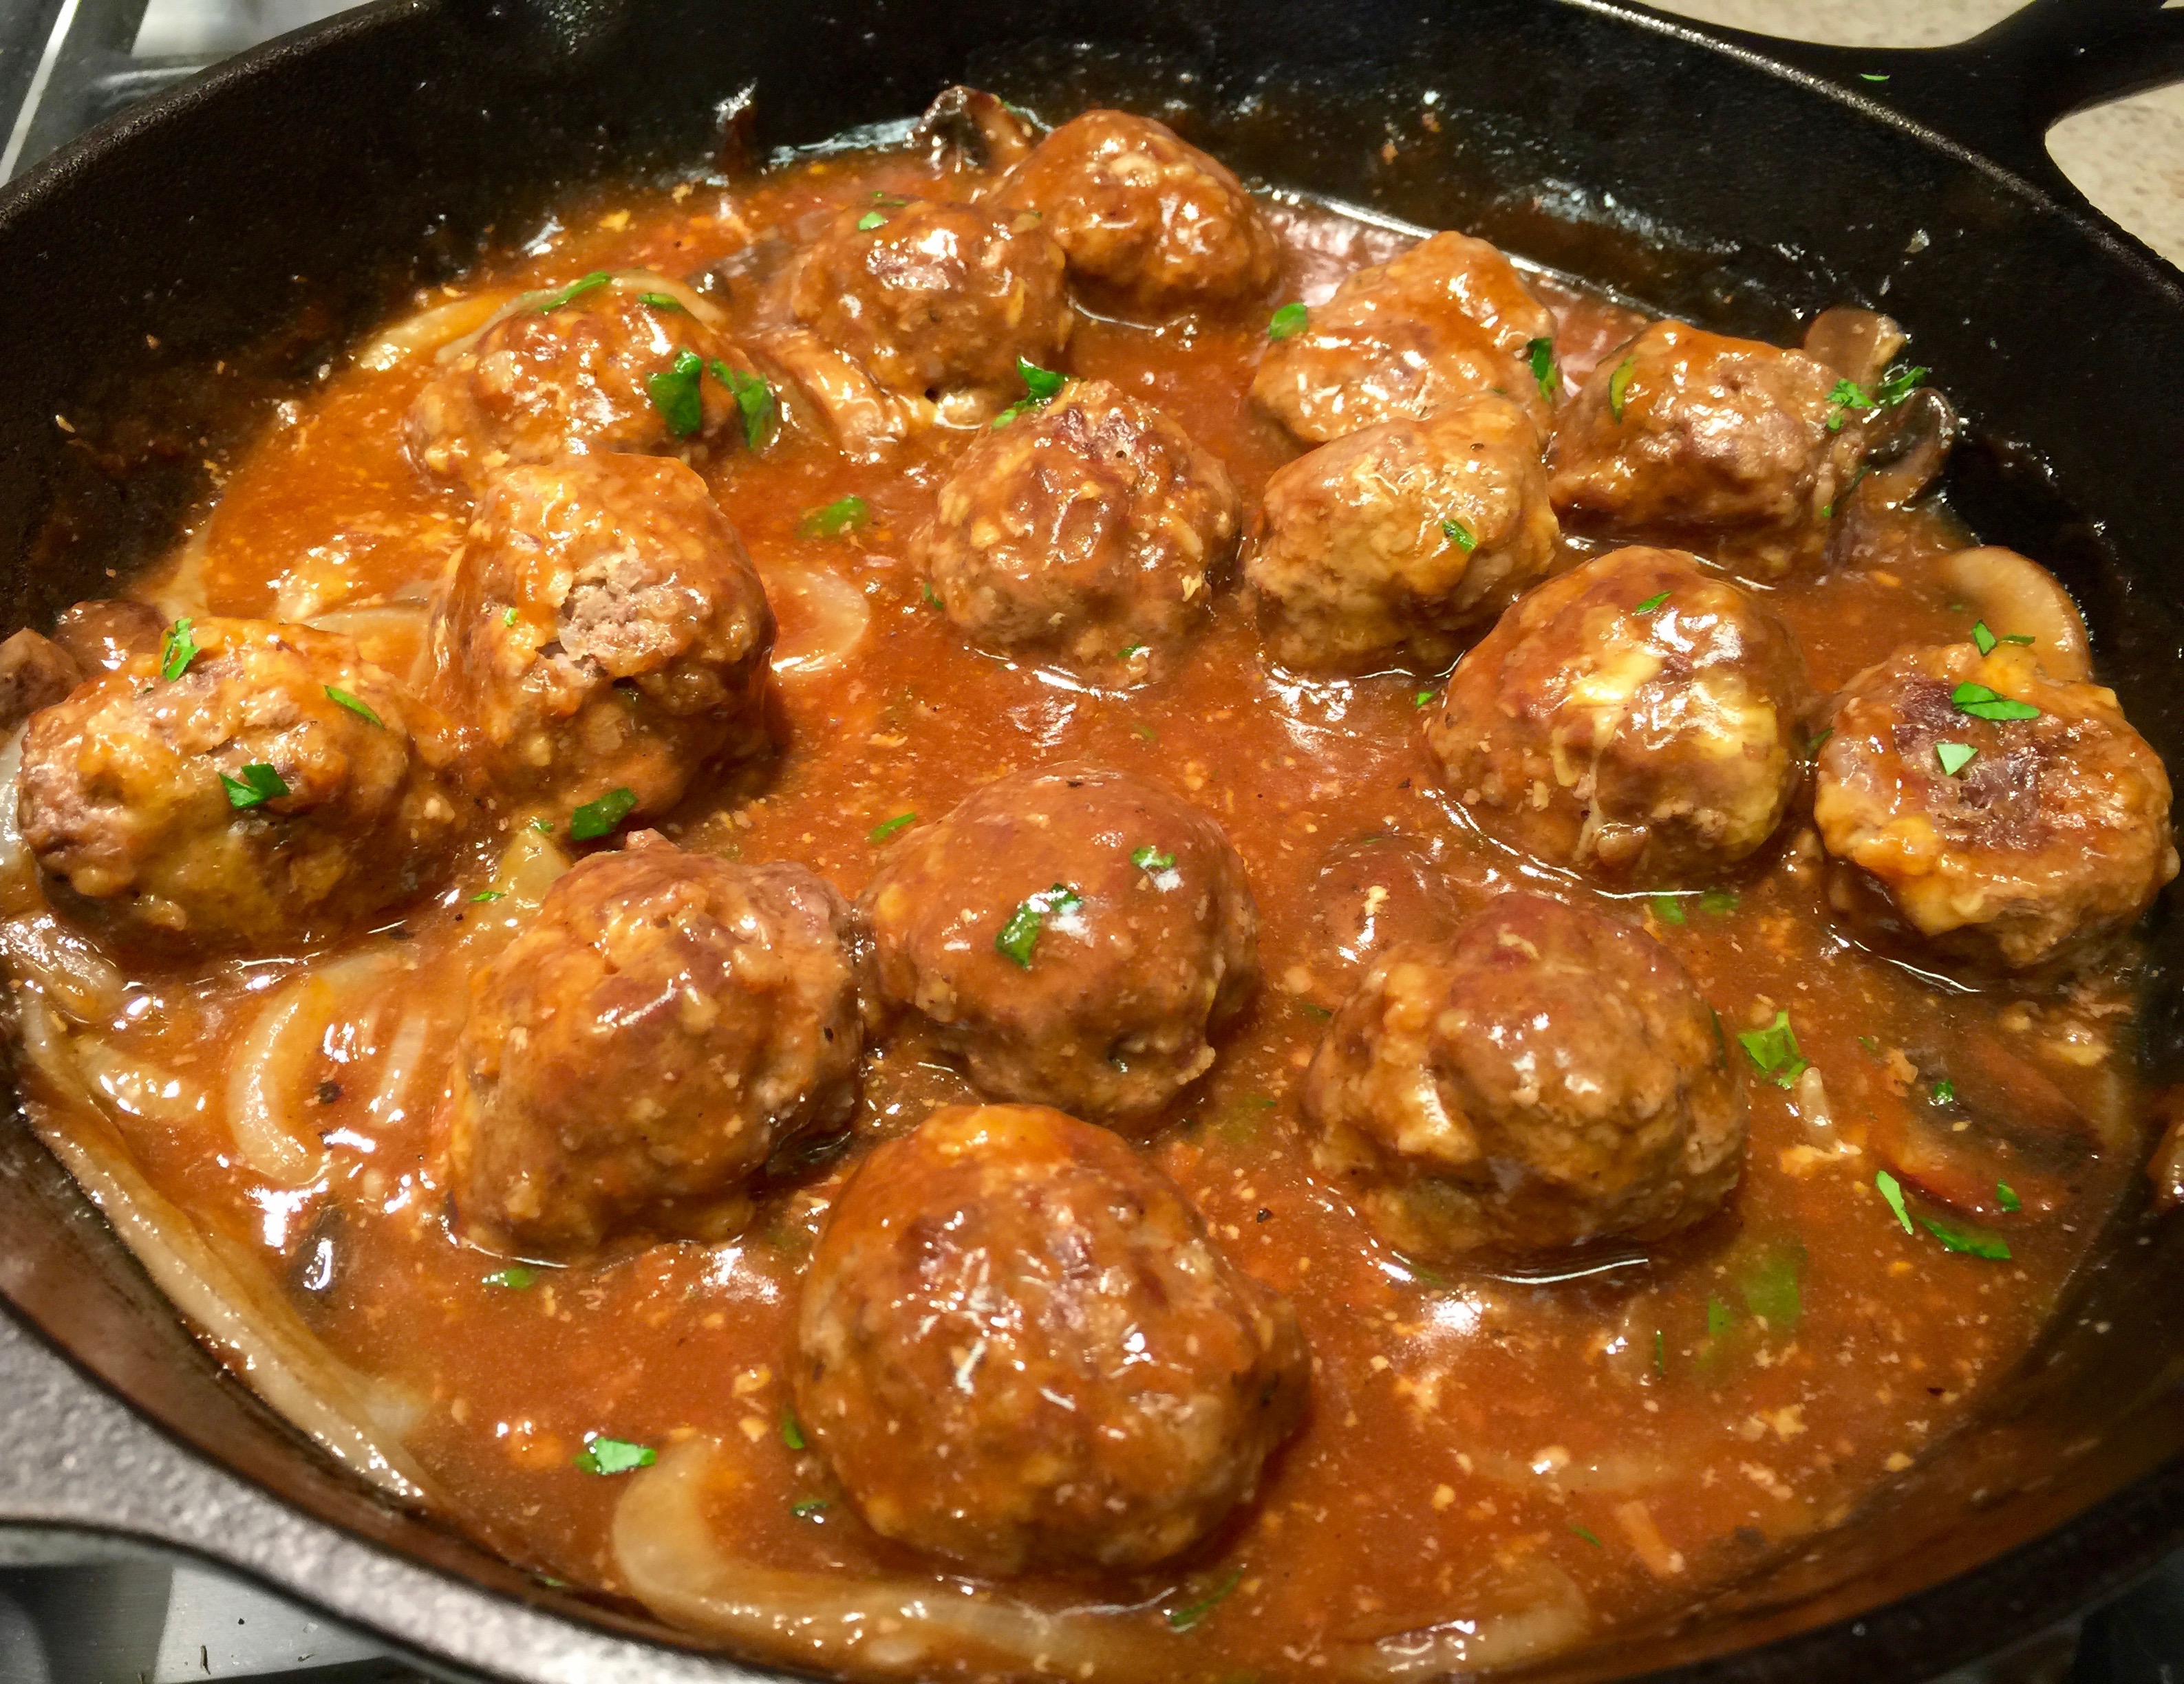
Lesson Learned 3 – Don’t over bake your meatballs: Although the meatballs look large, remember that there is a good amount of cheese inside them. So I would not bake them any longer than 15-18 minutes. Keep in mind you will also be simmering them for a few minutes in the gravy once you take them out of the oven, so they have plenty of time to get cooked through.
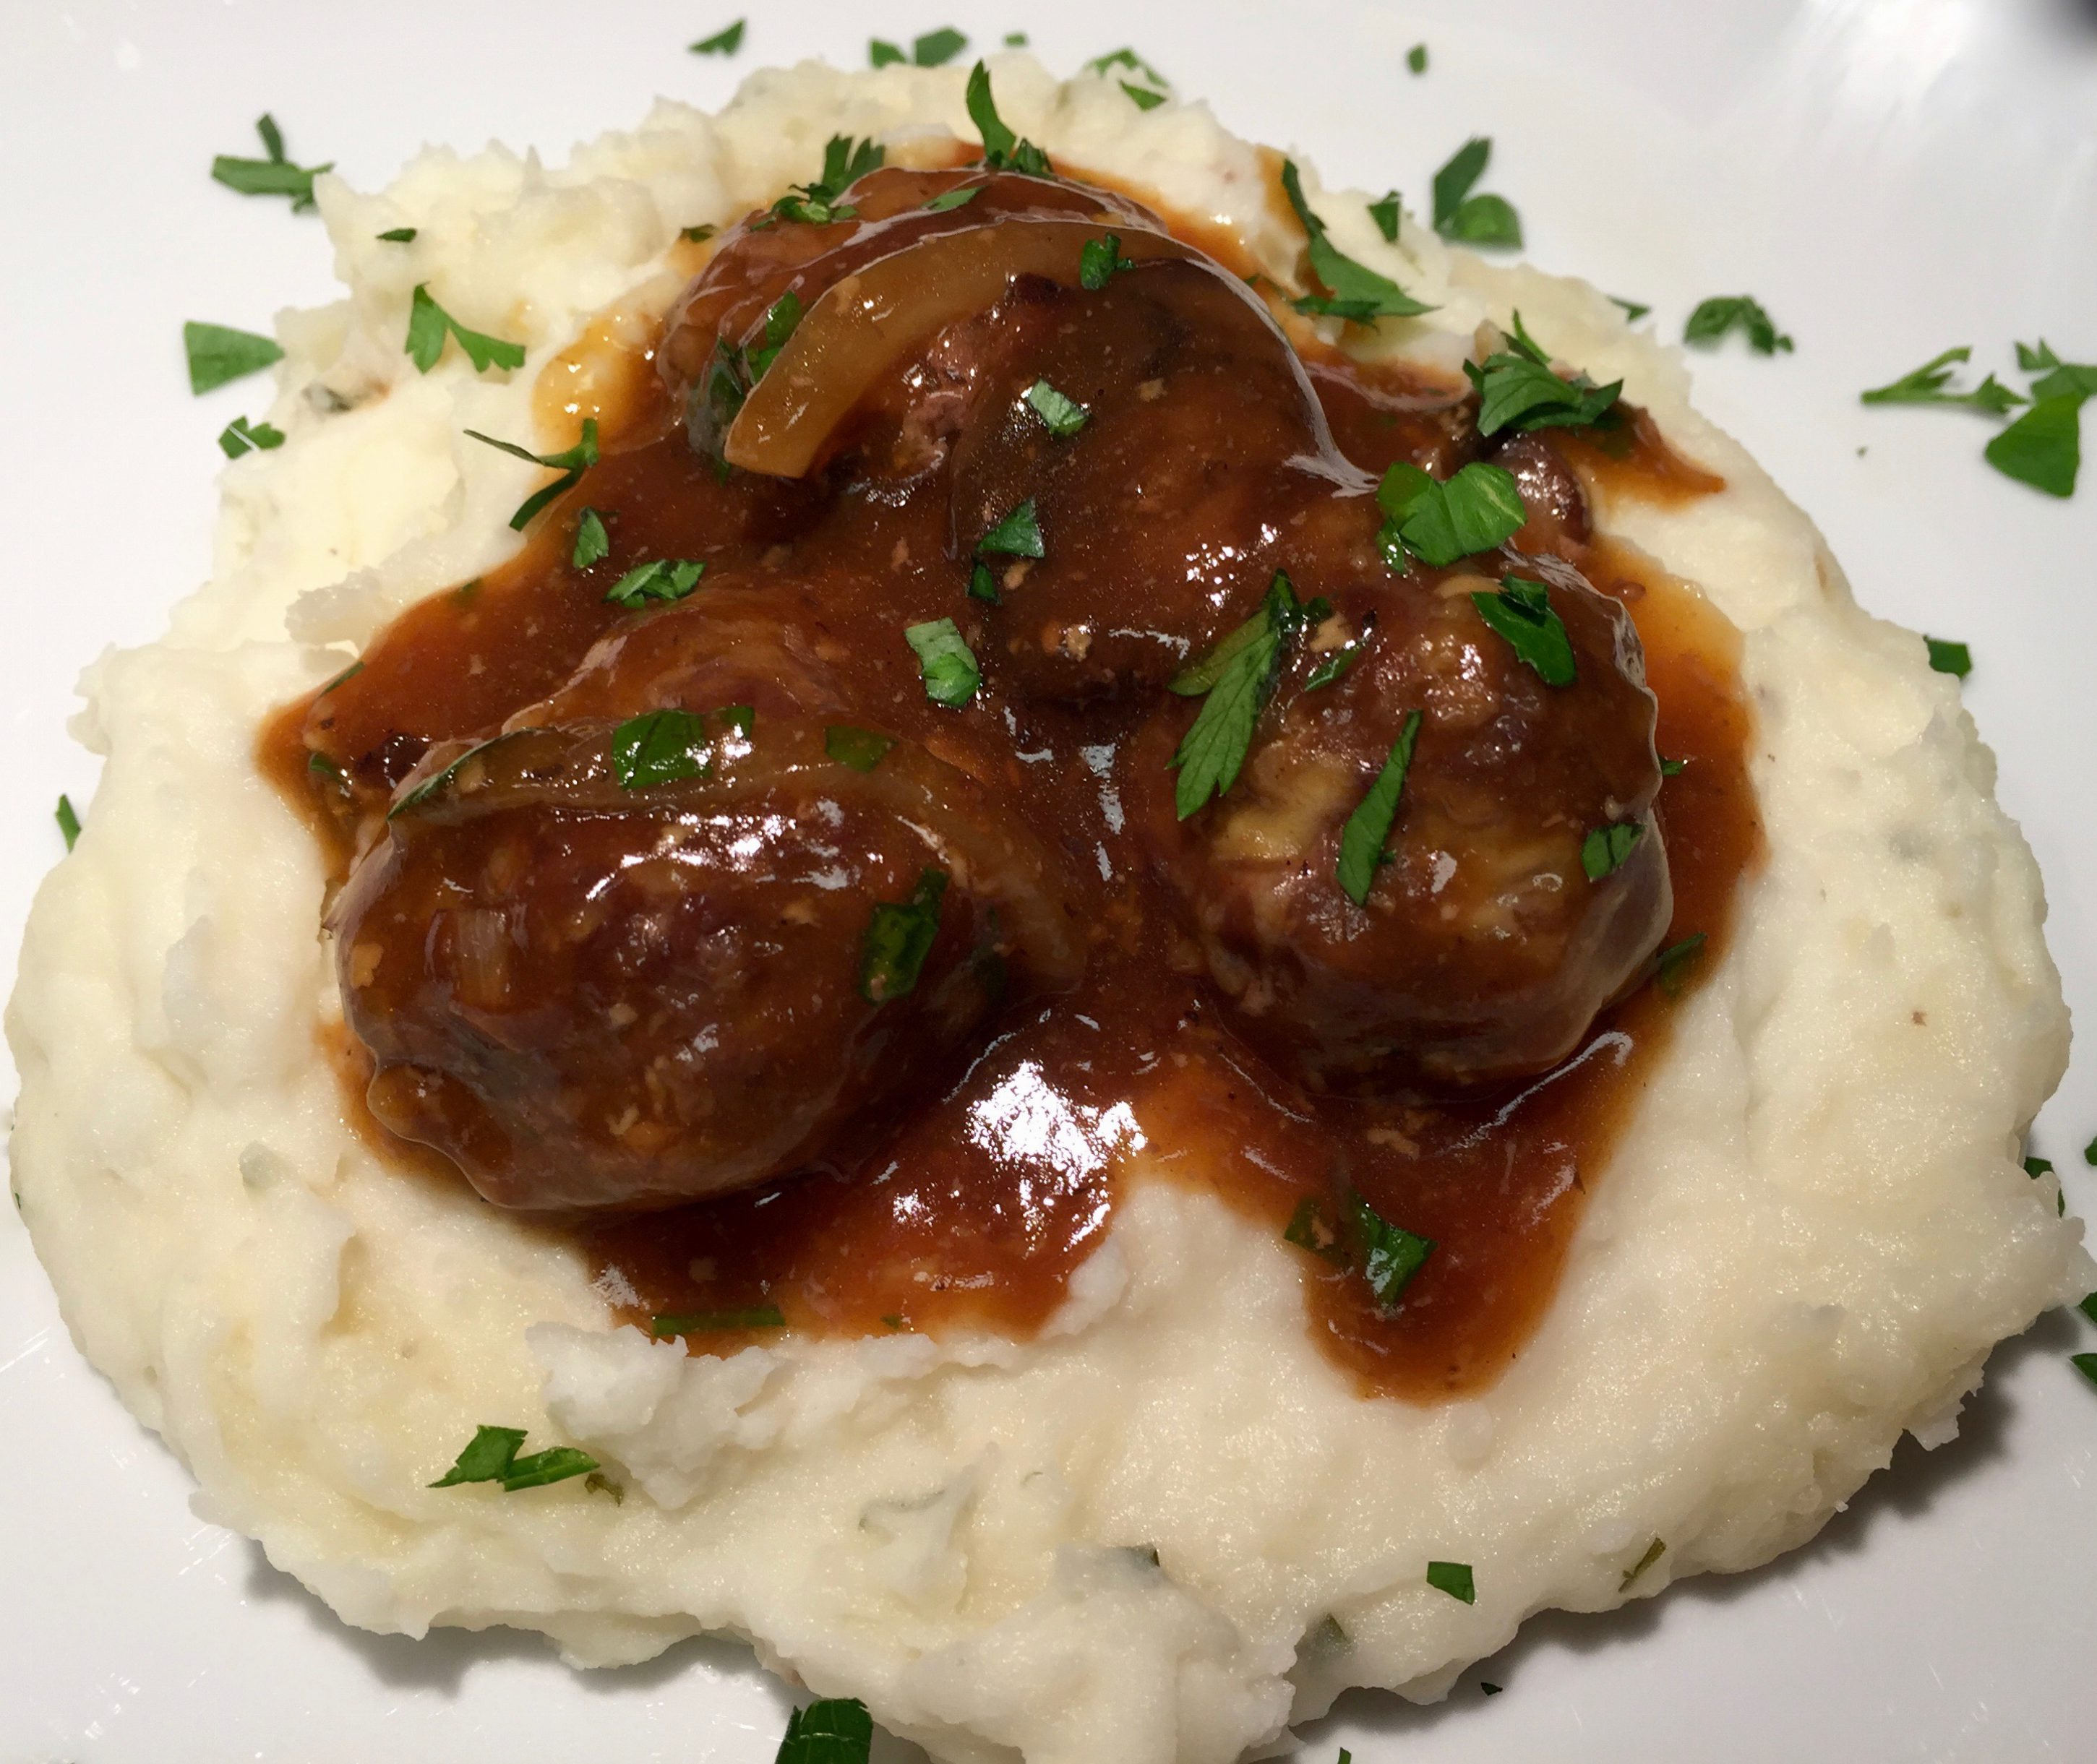
This has got to be one of the easiest recipes ever and produces a great meal in a short amount of time. I love topping a mound of mashed potatoes with these meatballs and then drizzling the beef gravy on top. Add a sprinkling of fresh cut flat leaf parsley and you’ve got a meal that looks as good as it tastes. Enjoy!
4 oz. good melting cheese (I used Butterkase cheese)
Chopped flat leaf parsley for garnish
(For The Sauce)
4 – 6 cremini mushrooms, sliced
1 small onion sliced
2 cloves garlic, minced
3 Tbs. unsalted butter
2 1/2 cups beef stock, divided and unsalted
2 Tbs. corn starch
2 Tbs. ketchup
2 Tbs. worcestershire sauce
Salt and pepper to taste
DIRECTIONS:
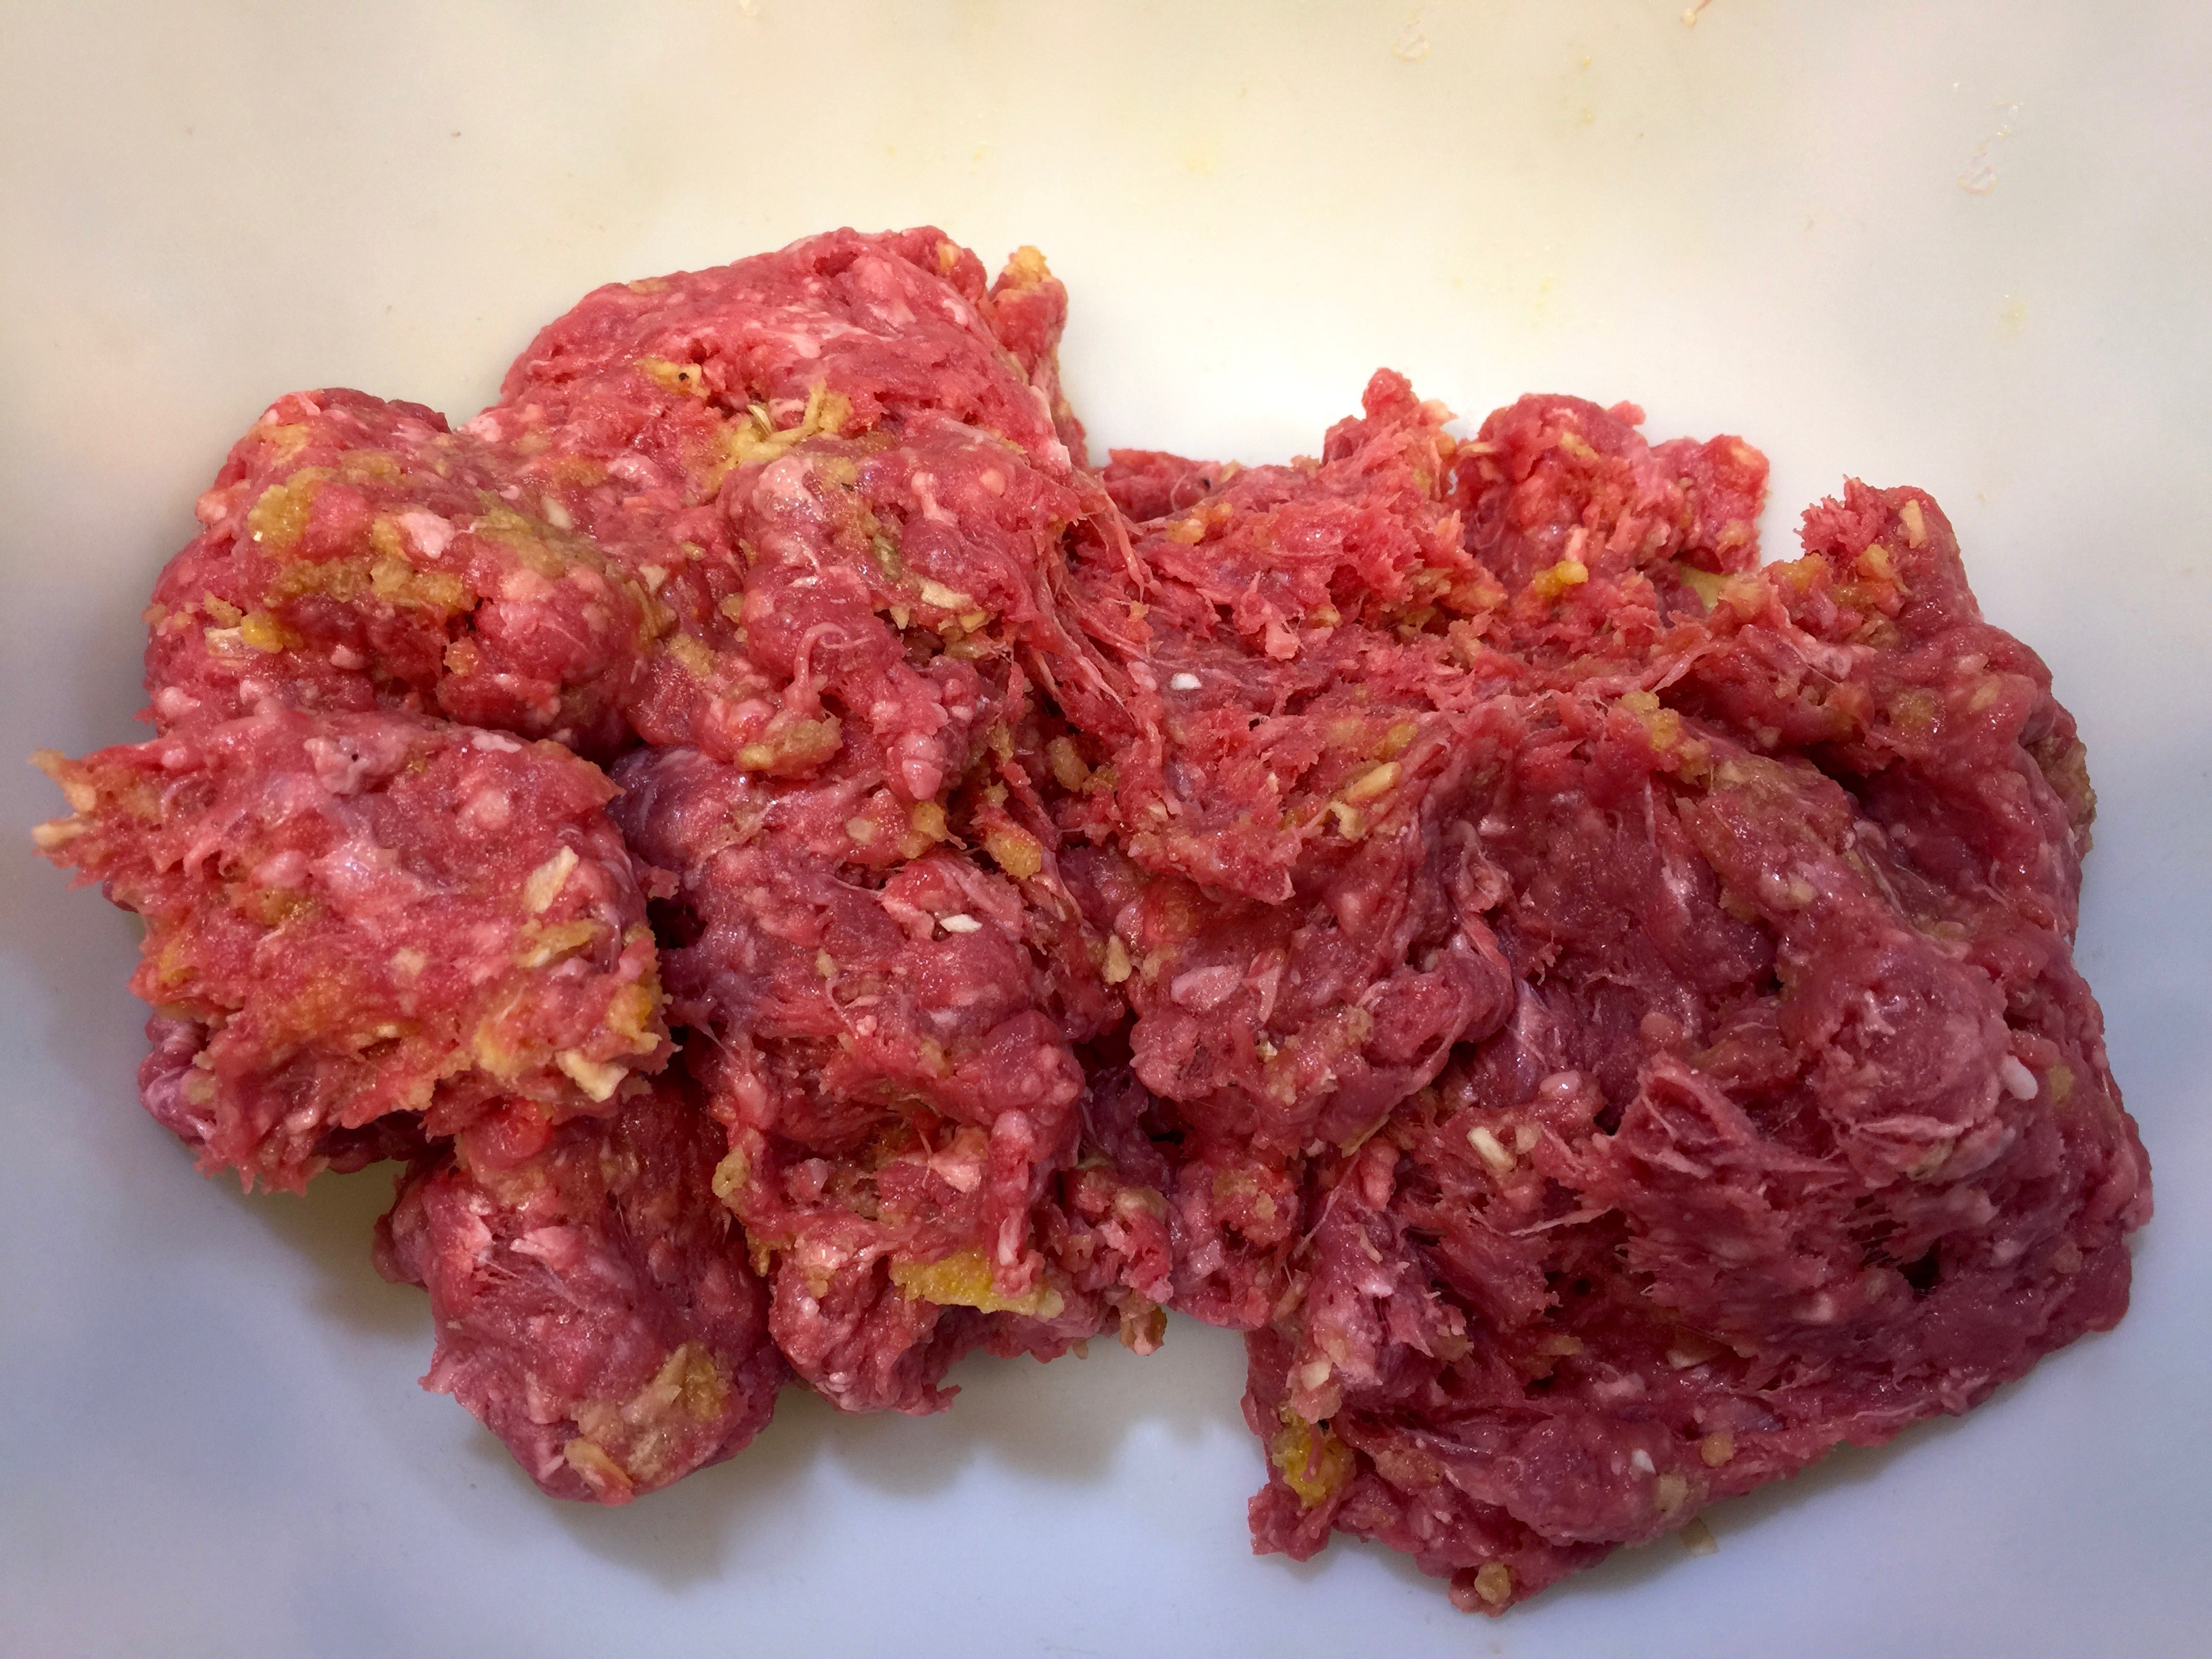
Heat the oven to 400 degrees. Line a lipped baking sheet with foil and spray with cooking spray. Cut the cheese into about 15 small pieces. Combine onion, egg yolk, minced onion, bread crumbs worcestershire sauce and mustard until well combined. Add the ground beef and mix until just combined.
Divide the ground beef mixture into about 15 equal sized pieces. Flatten each piece, add a piece of cheese into the center and roll the meat around the cheese sealing it to the best of your ability.
Bake 15-18 minutes. While the meatballs are baking, make the sauce.
Melt the butter in a large skillet. Add the onions and mushrooms and cook until tender (5-8 minutes). Add the garlic and cook until fragrant (approx. 1 minute). Pour all but 1/4 cup of the beef stock into the pan. Mix the remaining stock with the cornstarch, making sure that the cornstarch is completely absorbed into the stock. Add that to the pan along with the ketchup and worchestershire sauce. Cook until thick. Salt and pepper to taste.
Take the meatballs out of the oven and add them to the sauce. Simmer them in the sauce for about 3 minutes. Serve warm.
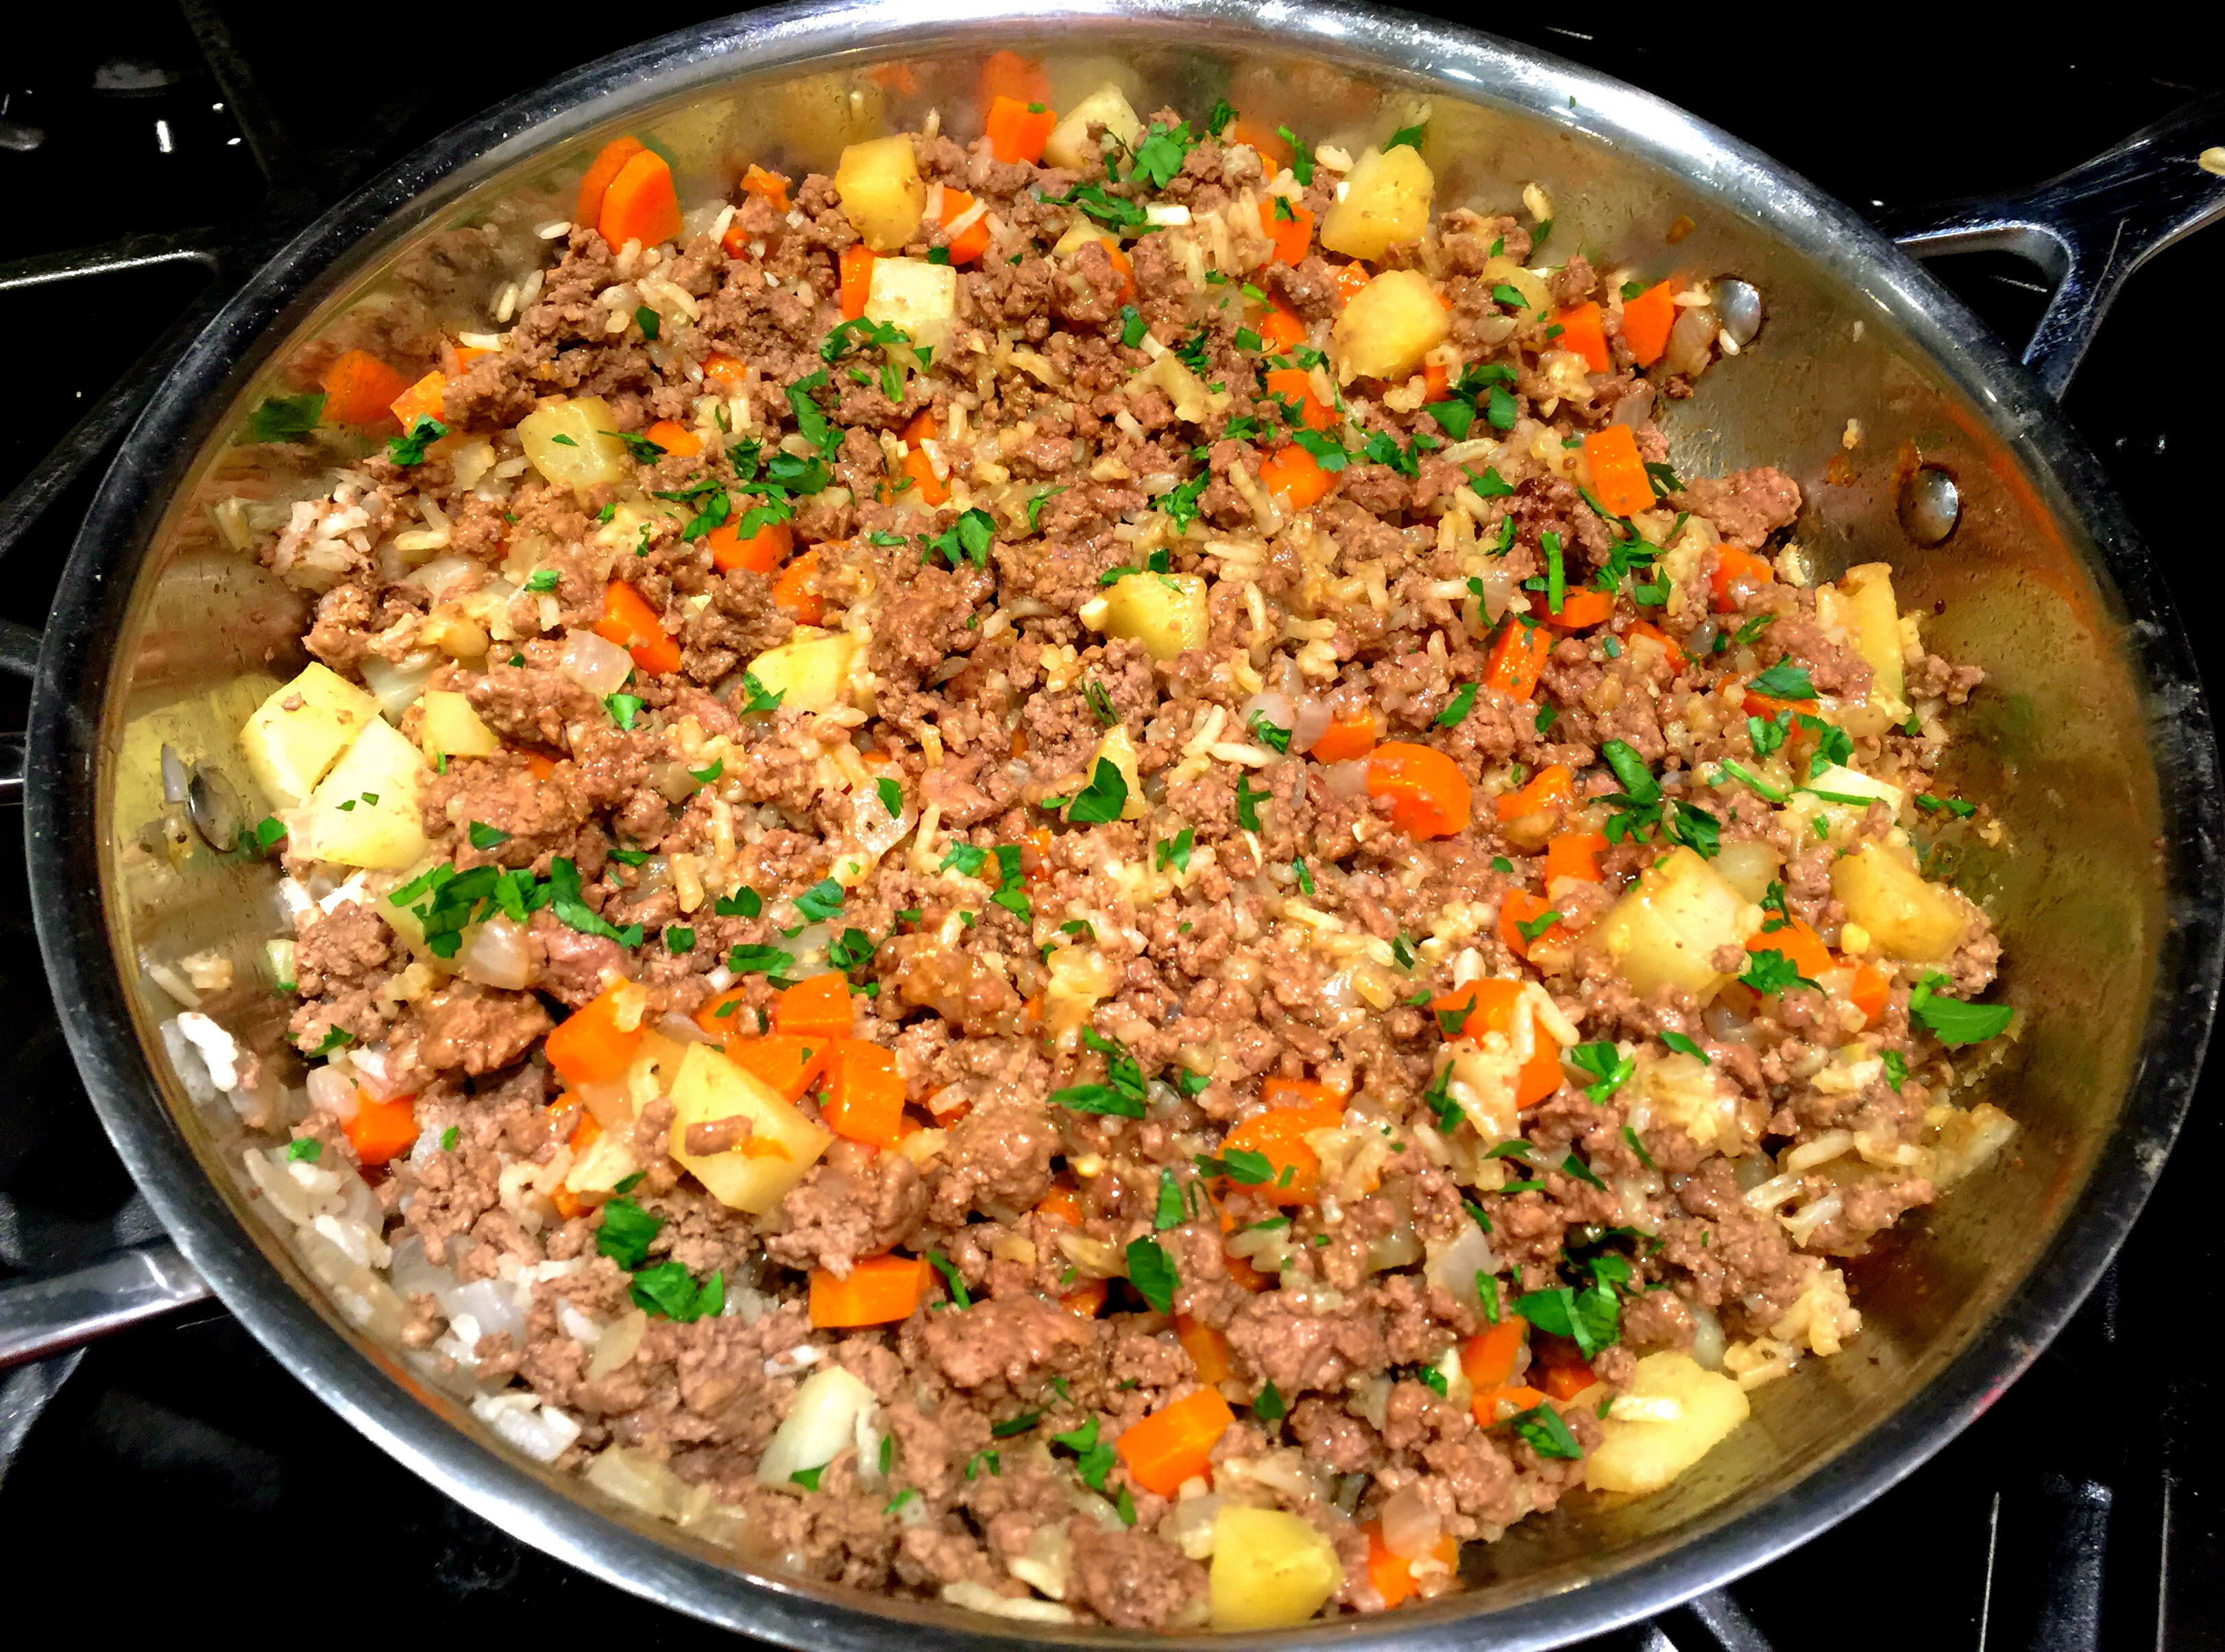
I’m always looking to make something different but sometimes it needs to be different and fast. For those wanting that too, this recipe is for you. I was actually amazed how flavorful this was given the simplicity of the recipe. This recipe accompanied by a small salad and some crusty bread can be just what the doctor ordered.
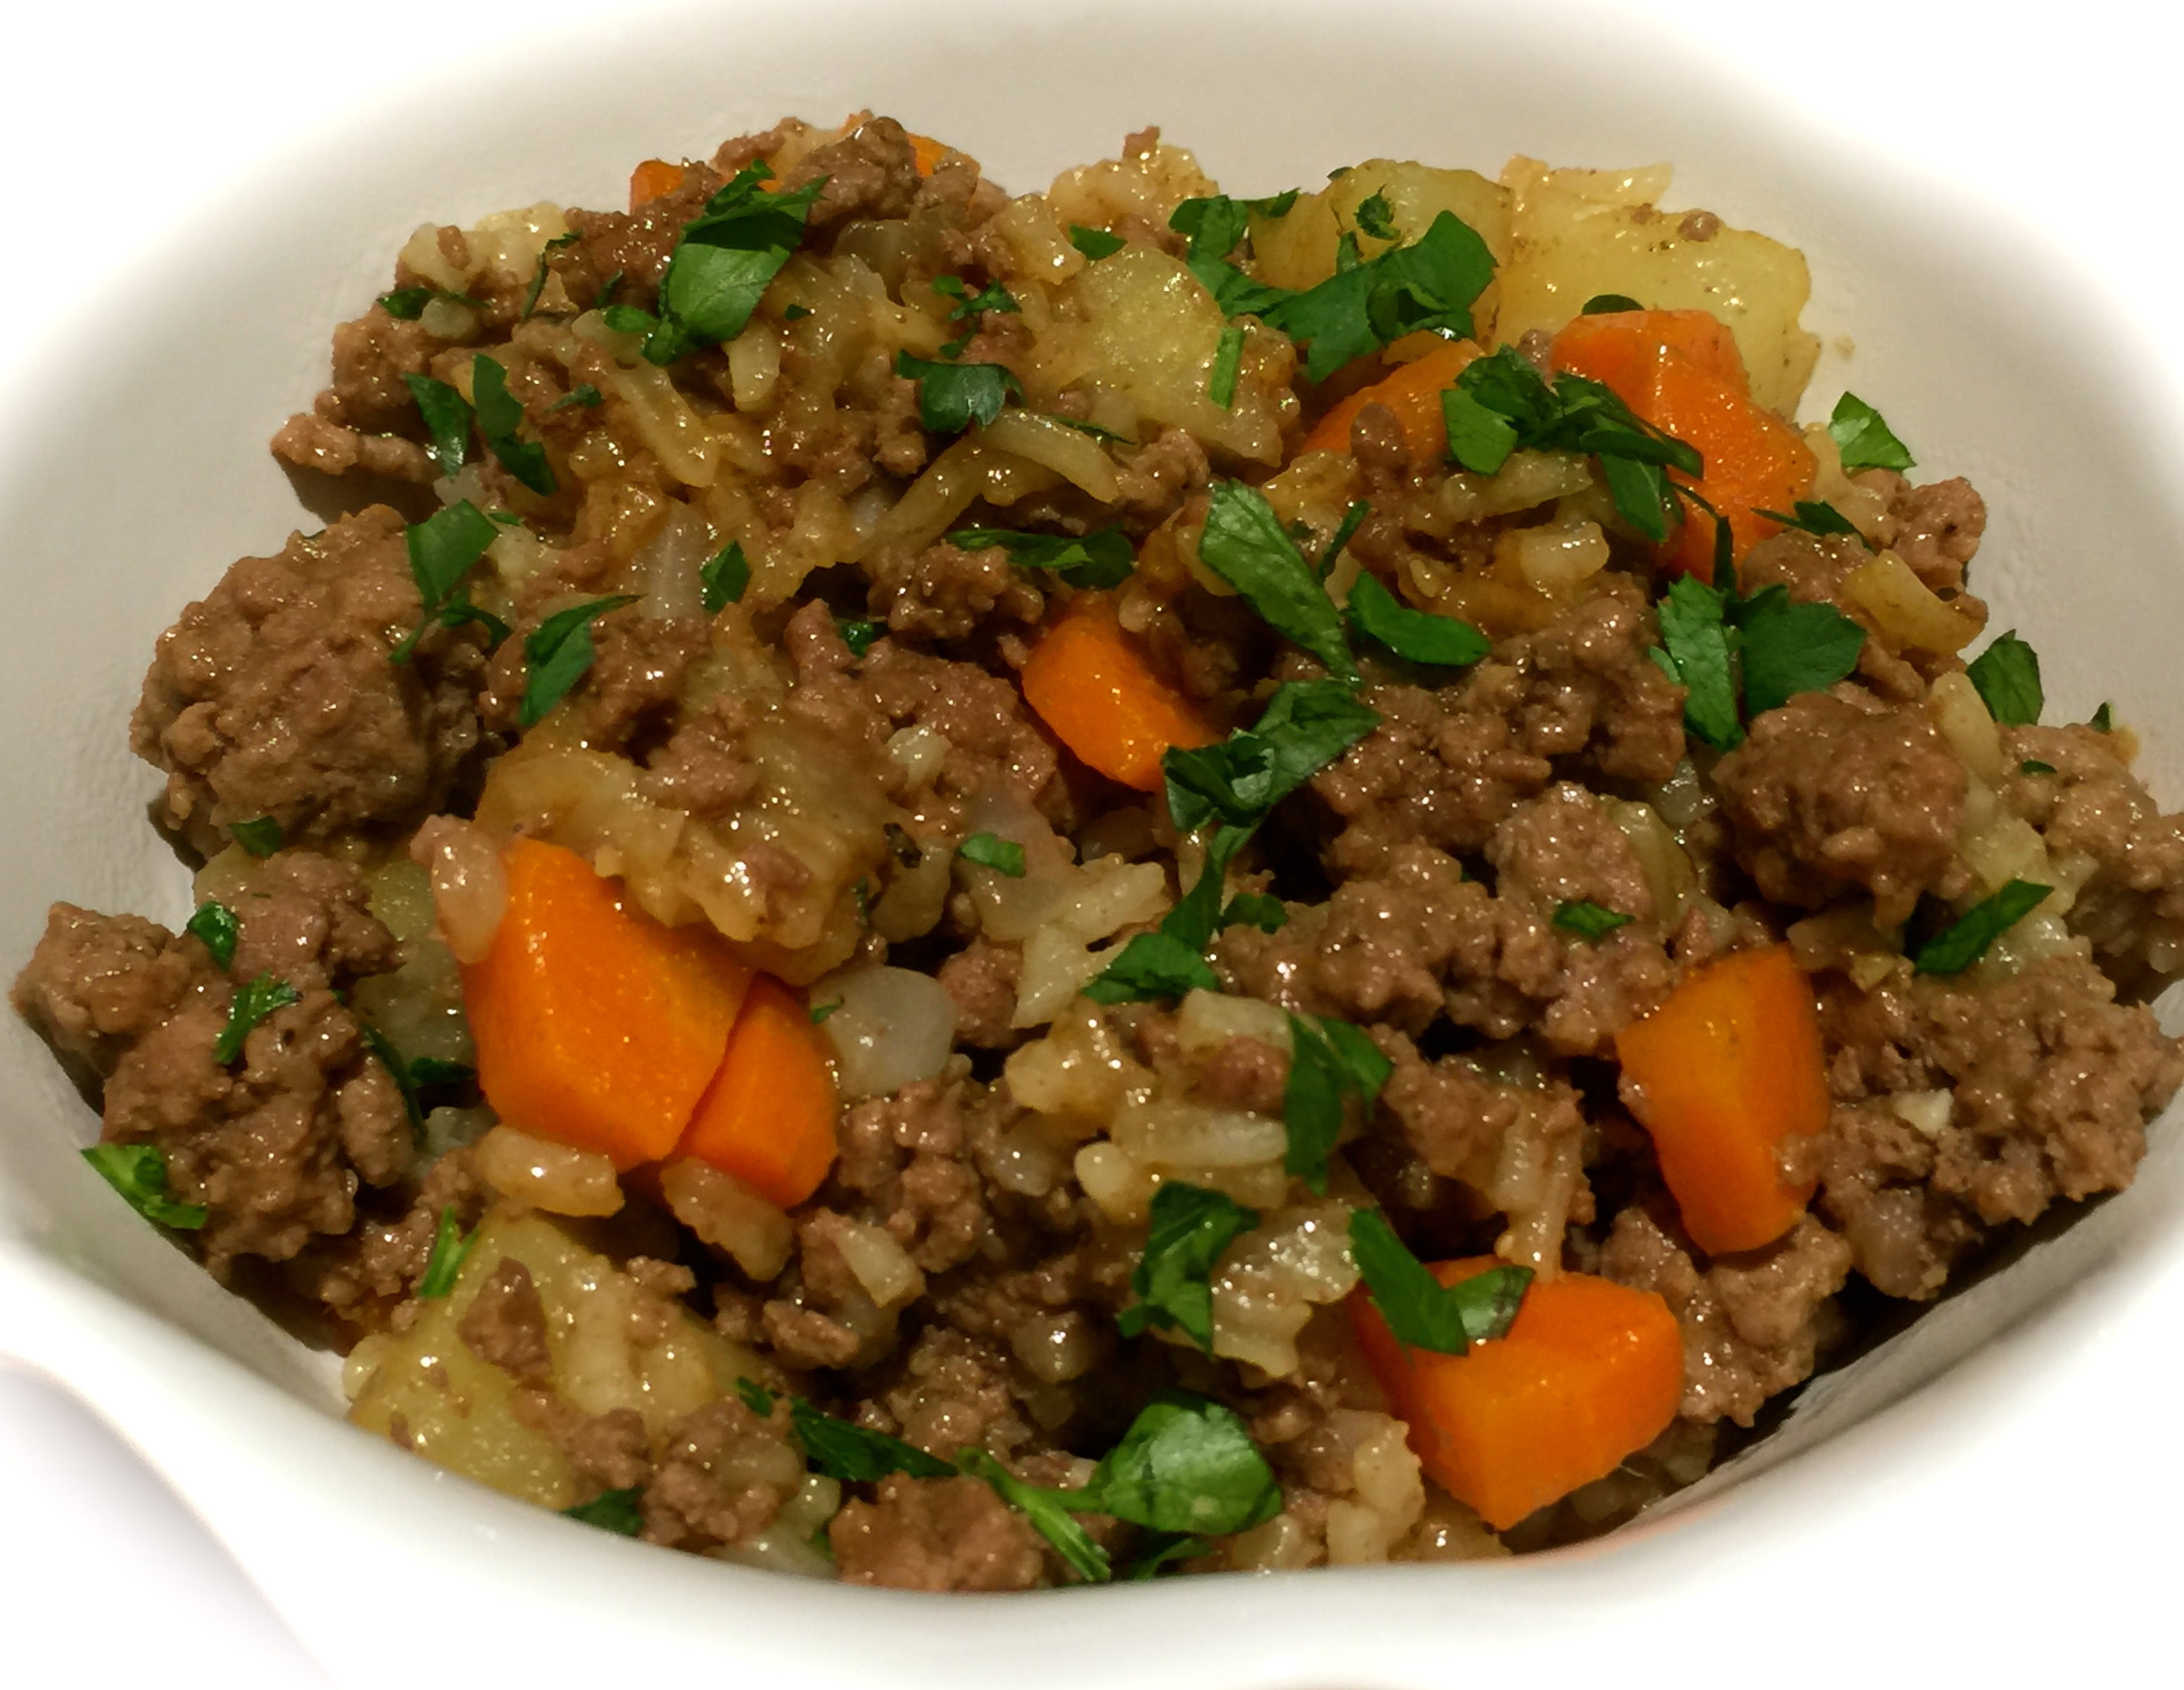
There is nothing particularly fancy about this recipe. Probably the most unique thing about it is it contains both potatoes and rice. Surprisingly enough, the rice gives the dish a creamy texture and the potatoes, carrots and onions give it depth and bulk. There’s not even a lot of prep work involved and once everything is combined you just simmer everything for thirty minutes and voila, dinner is served!
So let’s talk hearty one skillet dinner…
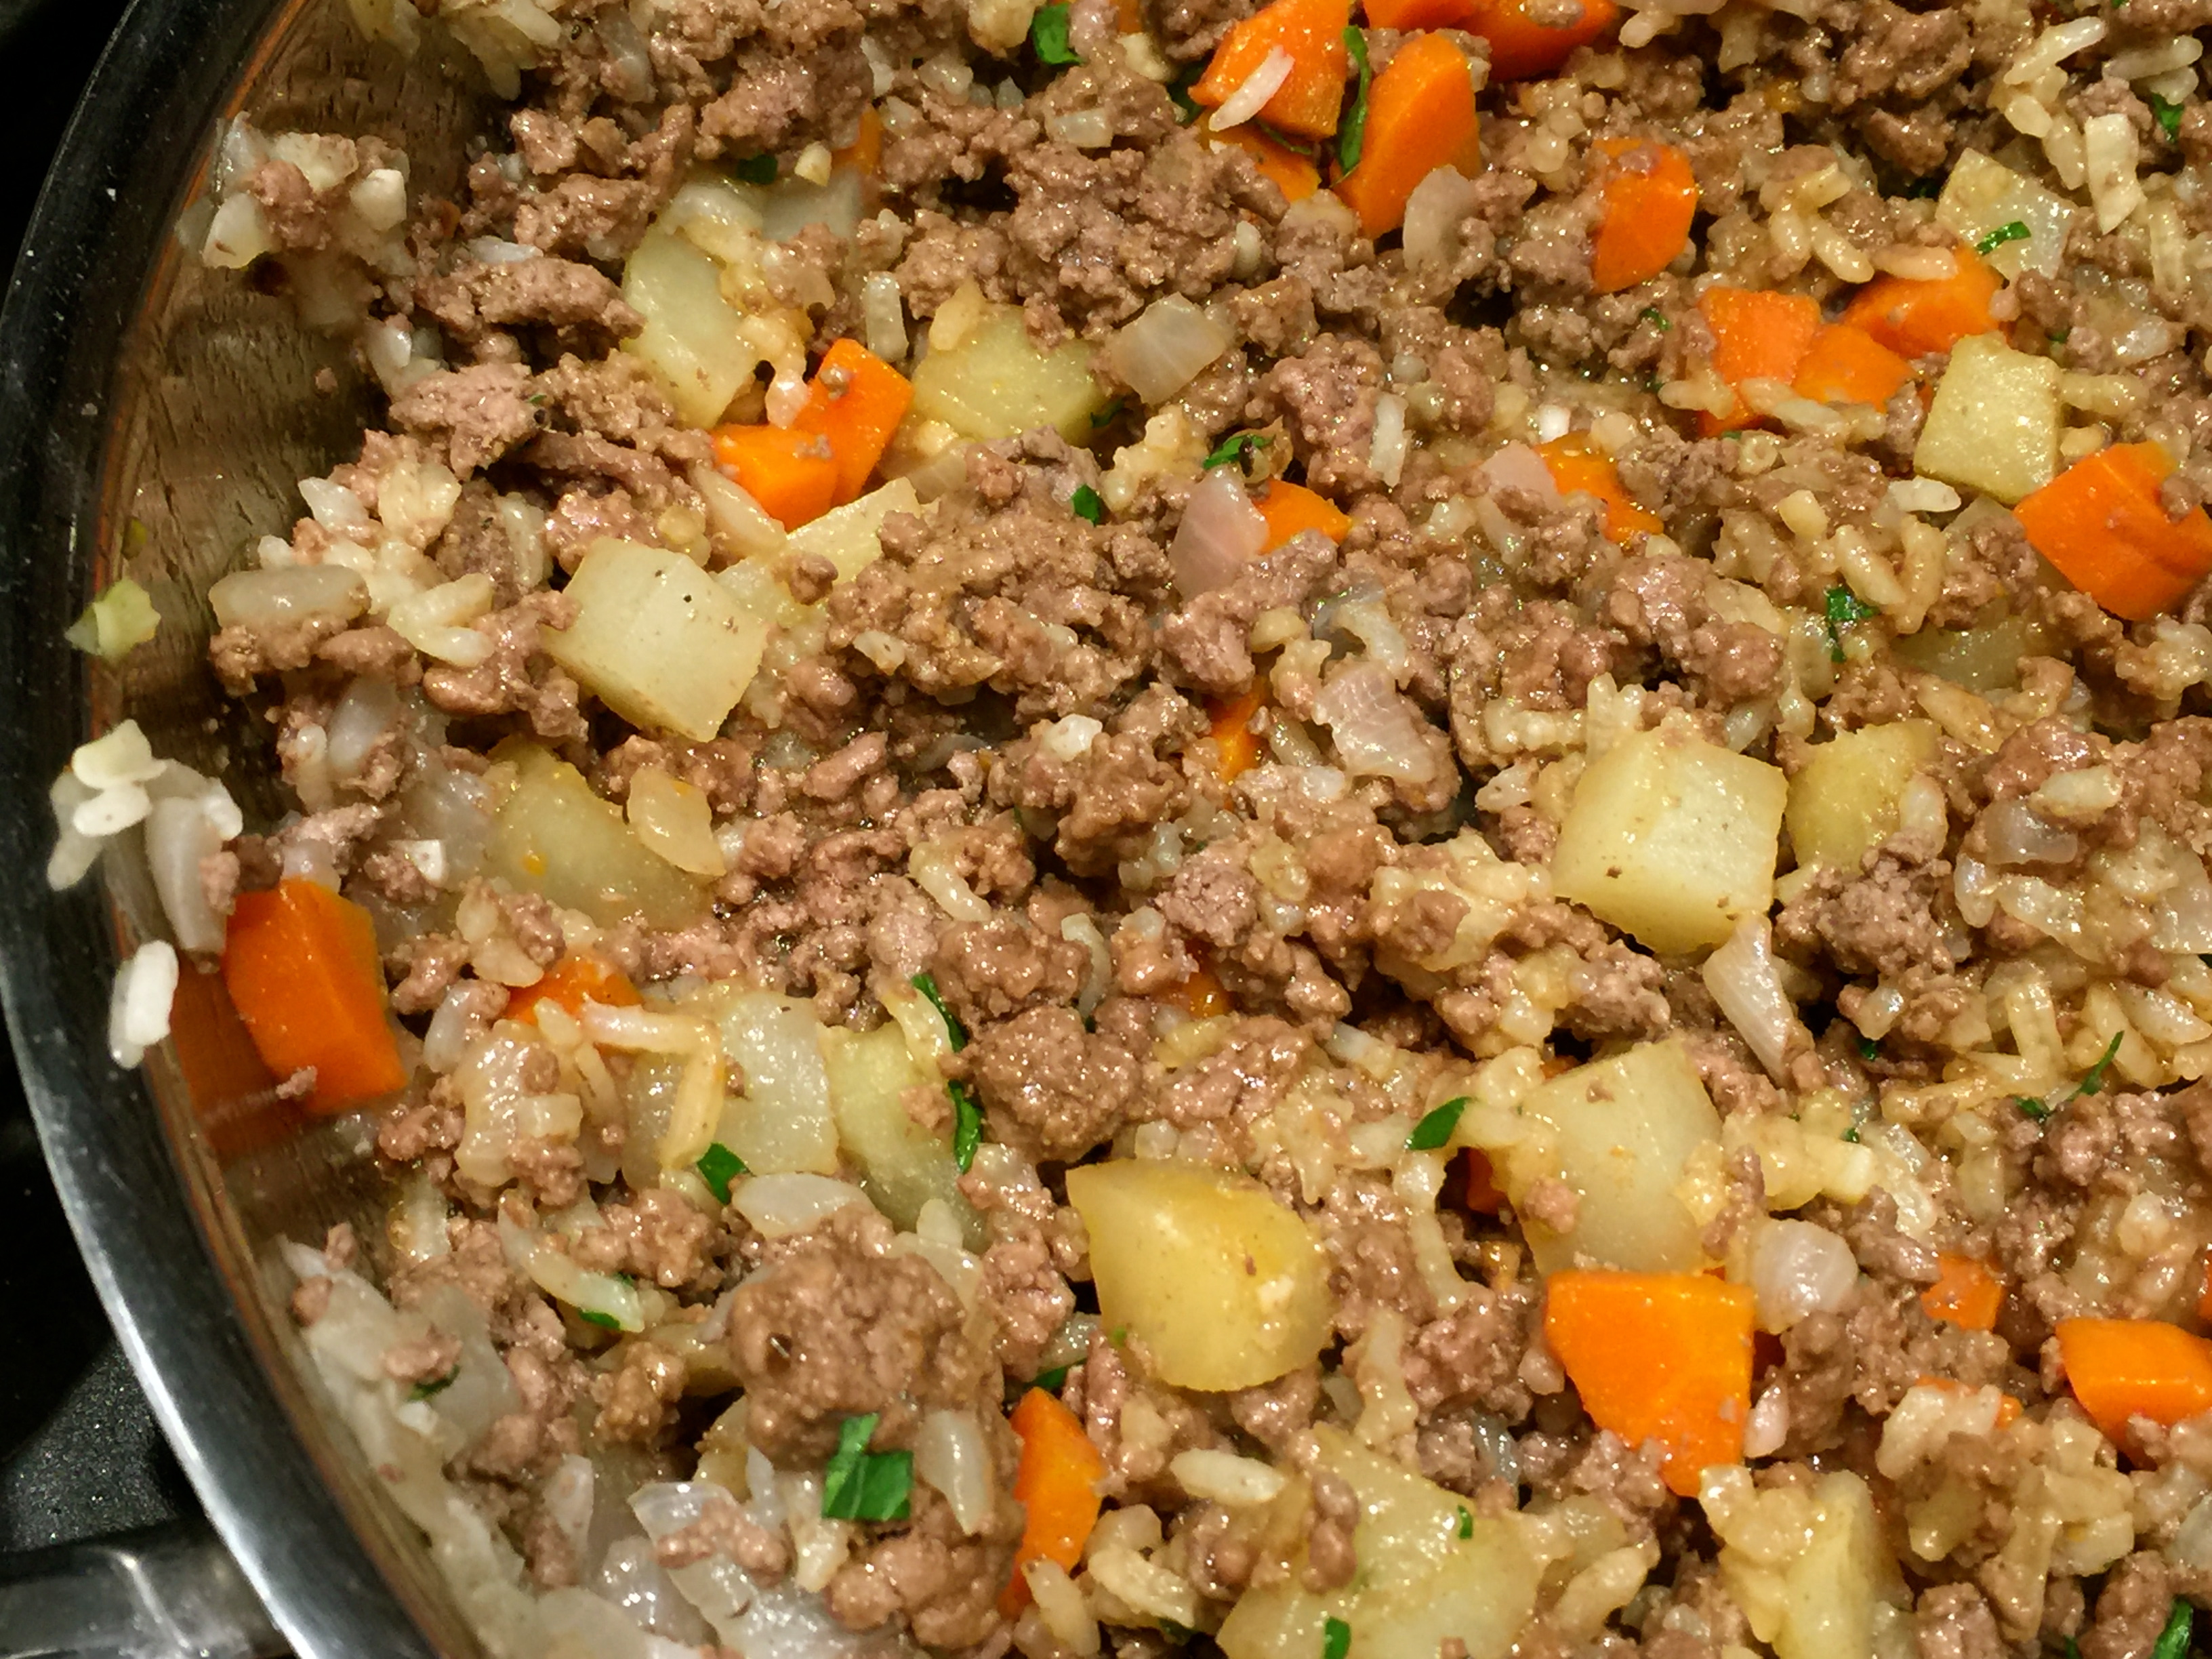
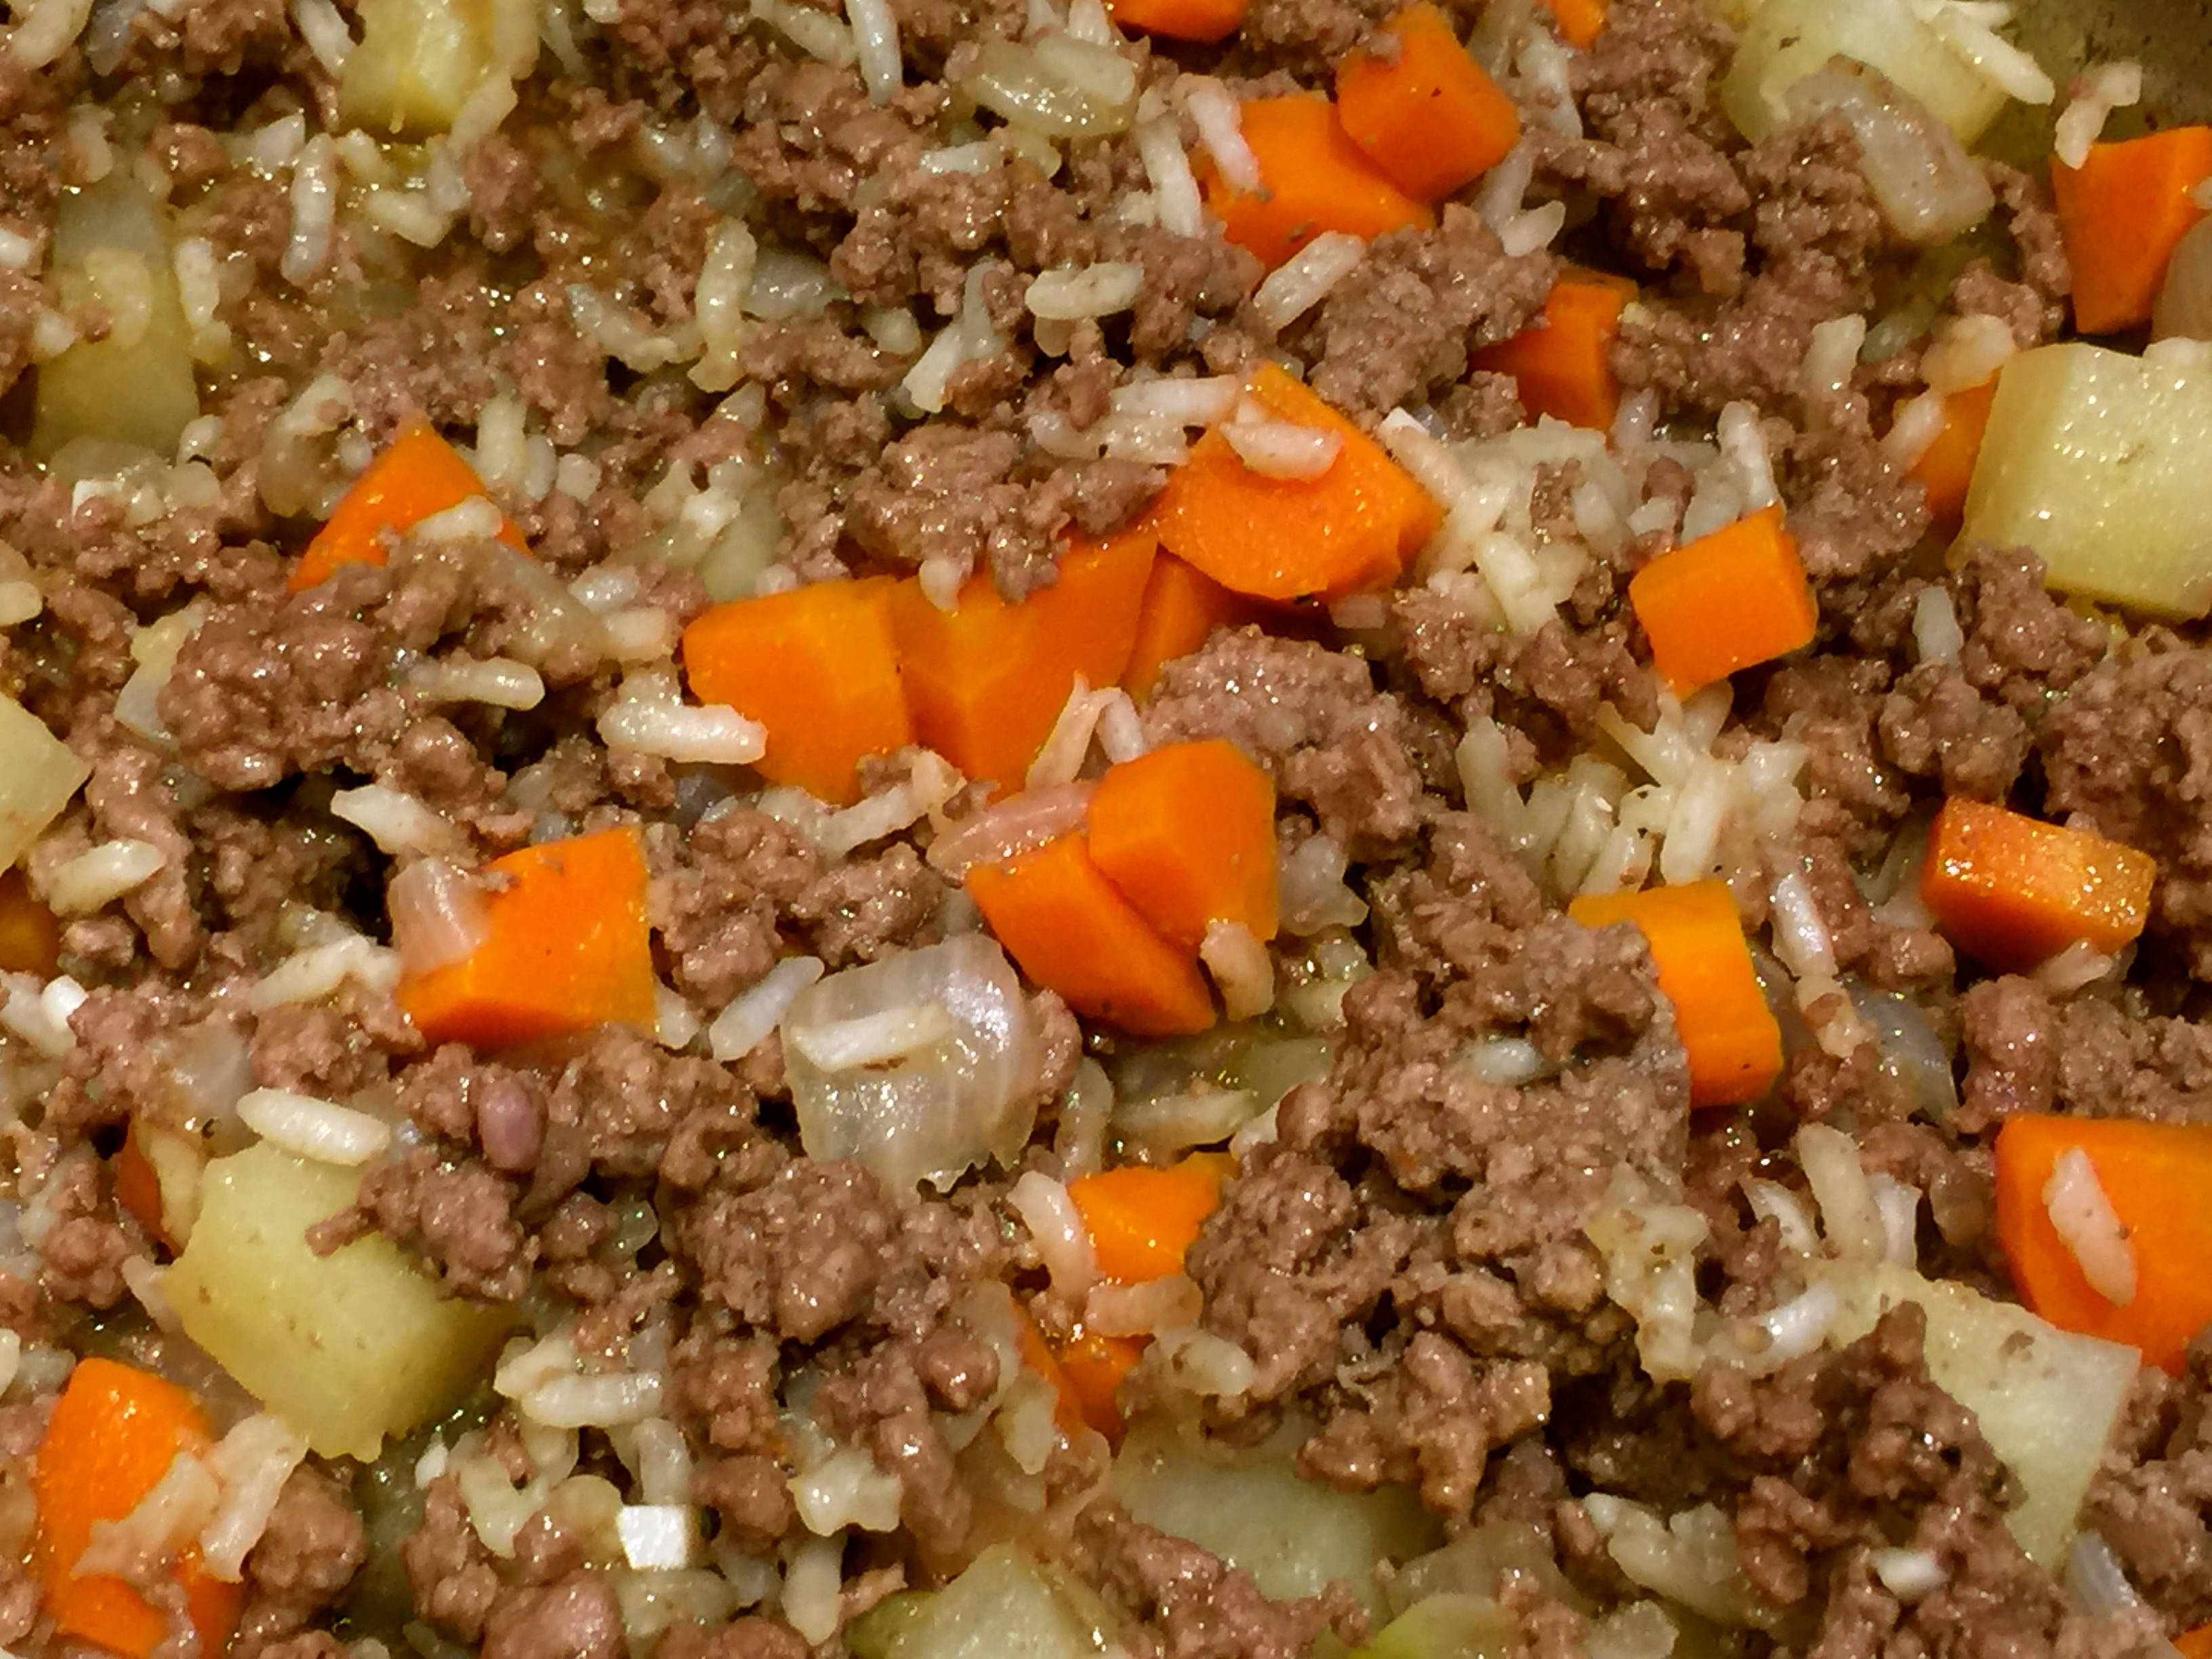
Lesson Learned 1 – It’s important to cut the carrots and potatoes into small pieces: You want to make sure that the carrots and potatoes cook through and so they need to be diced a little smaller than usual. With the carrots I peeled them, cut them in half lengthwise and then each piece in half lengthwise again. Then I diced the carrots into about 1/4 inch size pieces.
With the potatoes I also tried to cut them into 1/4 inch sized chunks. It’s not necessary to drag out the ruler to make sure you have the correct size. Just know that you want the pieces small but not too small that they disintegrate during the cooking process.
Lesson Learned 2 – Check on the dish for moisture during the simmering process: You want to make sure that the beef stock reduces completely when you’re done but not so quickly as it causes the rice not to cook through and the rest of the mixture to stick to the bottom of the pan. Check on the liquid during the simmering process. If the beef stock has completely reduced and you still have more time to cook add some more stock. The amount of additional stock you add will depend on where you are in the 30 minute simmer process. I would start with a couple of tablespoons to a quarter cup and go from there. The main point is you don’t want the dish to dry out during the simmering process nor do you want to be left with soup after 30 minutes.
Lesson Learned 3 – If you want to shorten the overall time for this recipe prep most of the ingredients ahead of time: You can prep the onions, garlic, and carrots ahead of time – even the night before. Keep them in air tight containers or covered tightly in plastic wrap. I would wait until you begin cooking the meal to chop up the potato. The only way to keep the potato from oxidizing once it is cut is to put it in cold water. I’m not sure you’re going to want to have your potato sitting in water overnight or all day. Prepping ahead of time will take a good 15 minutes from the total time to make this dish.
Not only is this dish delightful the first time around but it is also great reheated. Try this one the next time you are short on time but still want something good. I think it just might become one of your go to favorites.
1 Tbs. olive oil (I used garlic infused olive oil)
salt and pepper to taste
flat leaf parsley, chopped for garnish, optional
DIRECTIONS:
Add the olive oil to a large preheated skillet. Saute the onions until they are slightly translucent. Salt and pepper the onions while they are cooking. Once the onions are translucent, use a wooden spoon to push them to the side of the pan and add the ground beef, separating the beef with the spoon. Spoon the onions over the ground beef while it is cooking. Salt and pepper to taste.
Once the ground beef is no longer pink drain any excess fat, if necessary. Stir the garlic into the beef and onions. Cook until the garlic becomes fragrant – approximately one minute. Stir in the carrots, potatoes and rice. Pour the beef stock over the mixture and stir to combine.
Lower the heat, cover and simmer for 30 minutes or until the rice and vegetables are tender. (Make sure to check the level of moisture and add a little extra beef stock if it has completely reduced before the end of the cooking process). Stir in the soy sauce. Taste. Add any additional salt or pepper as needed.
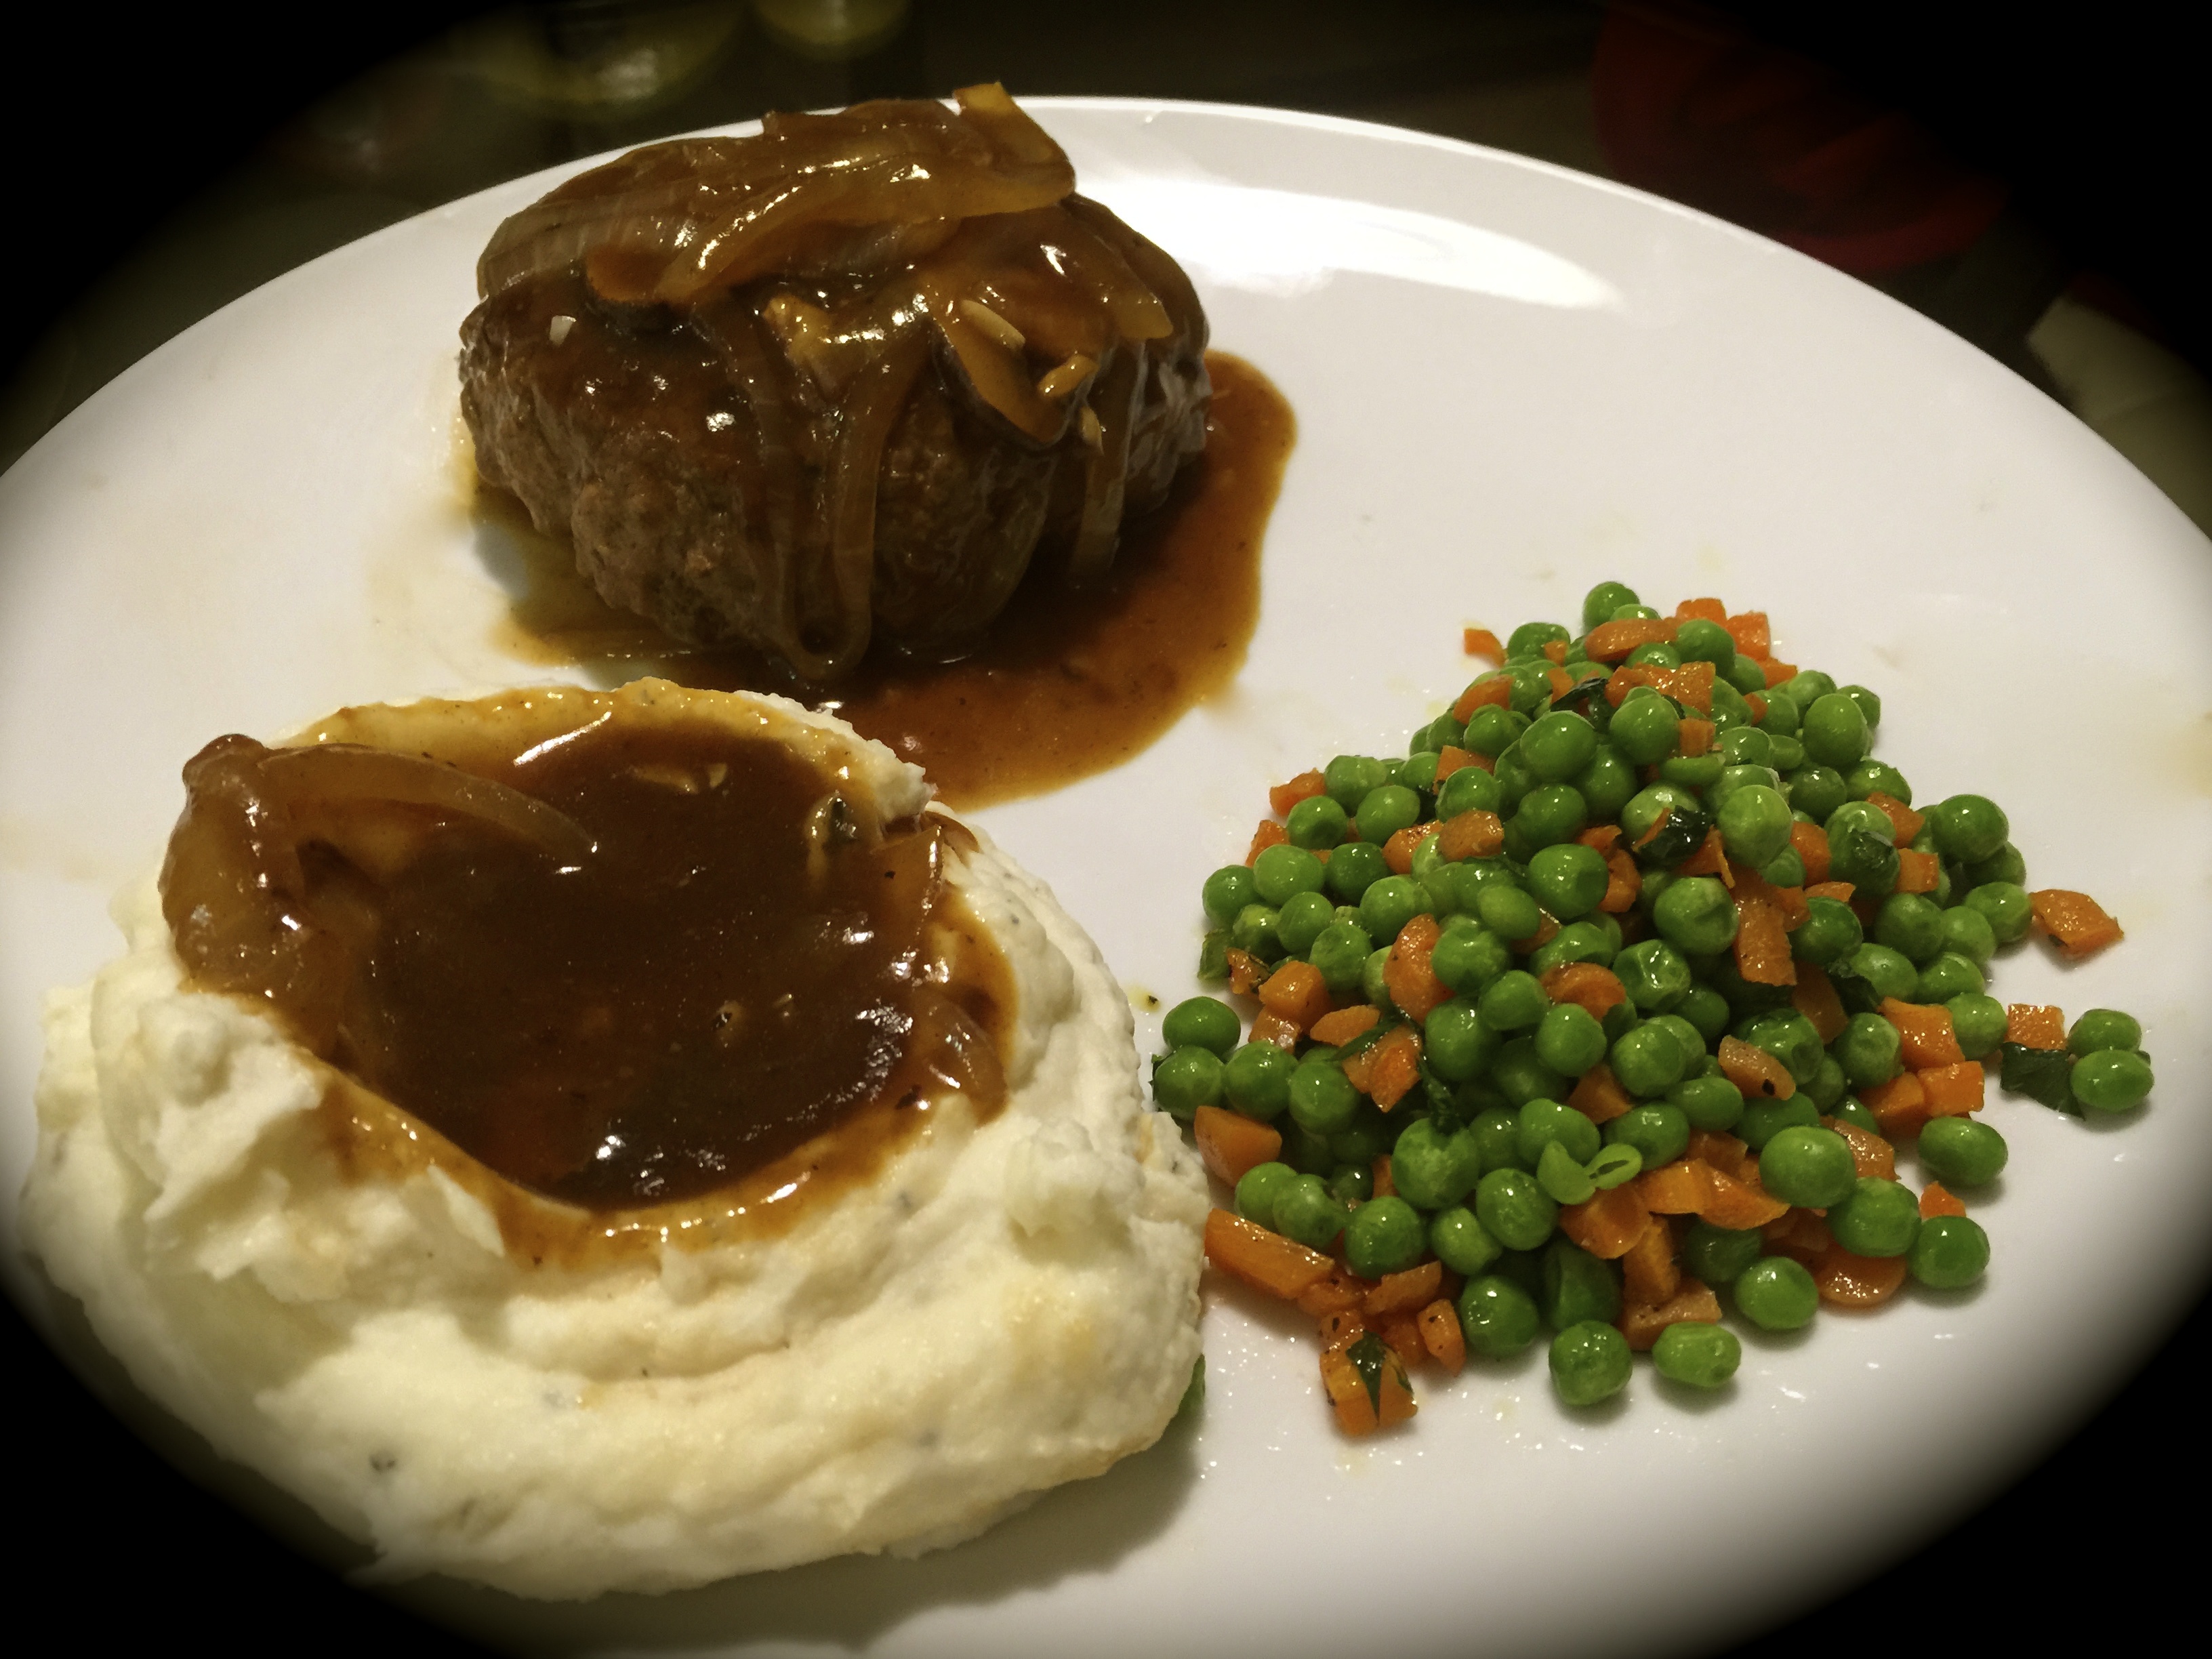
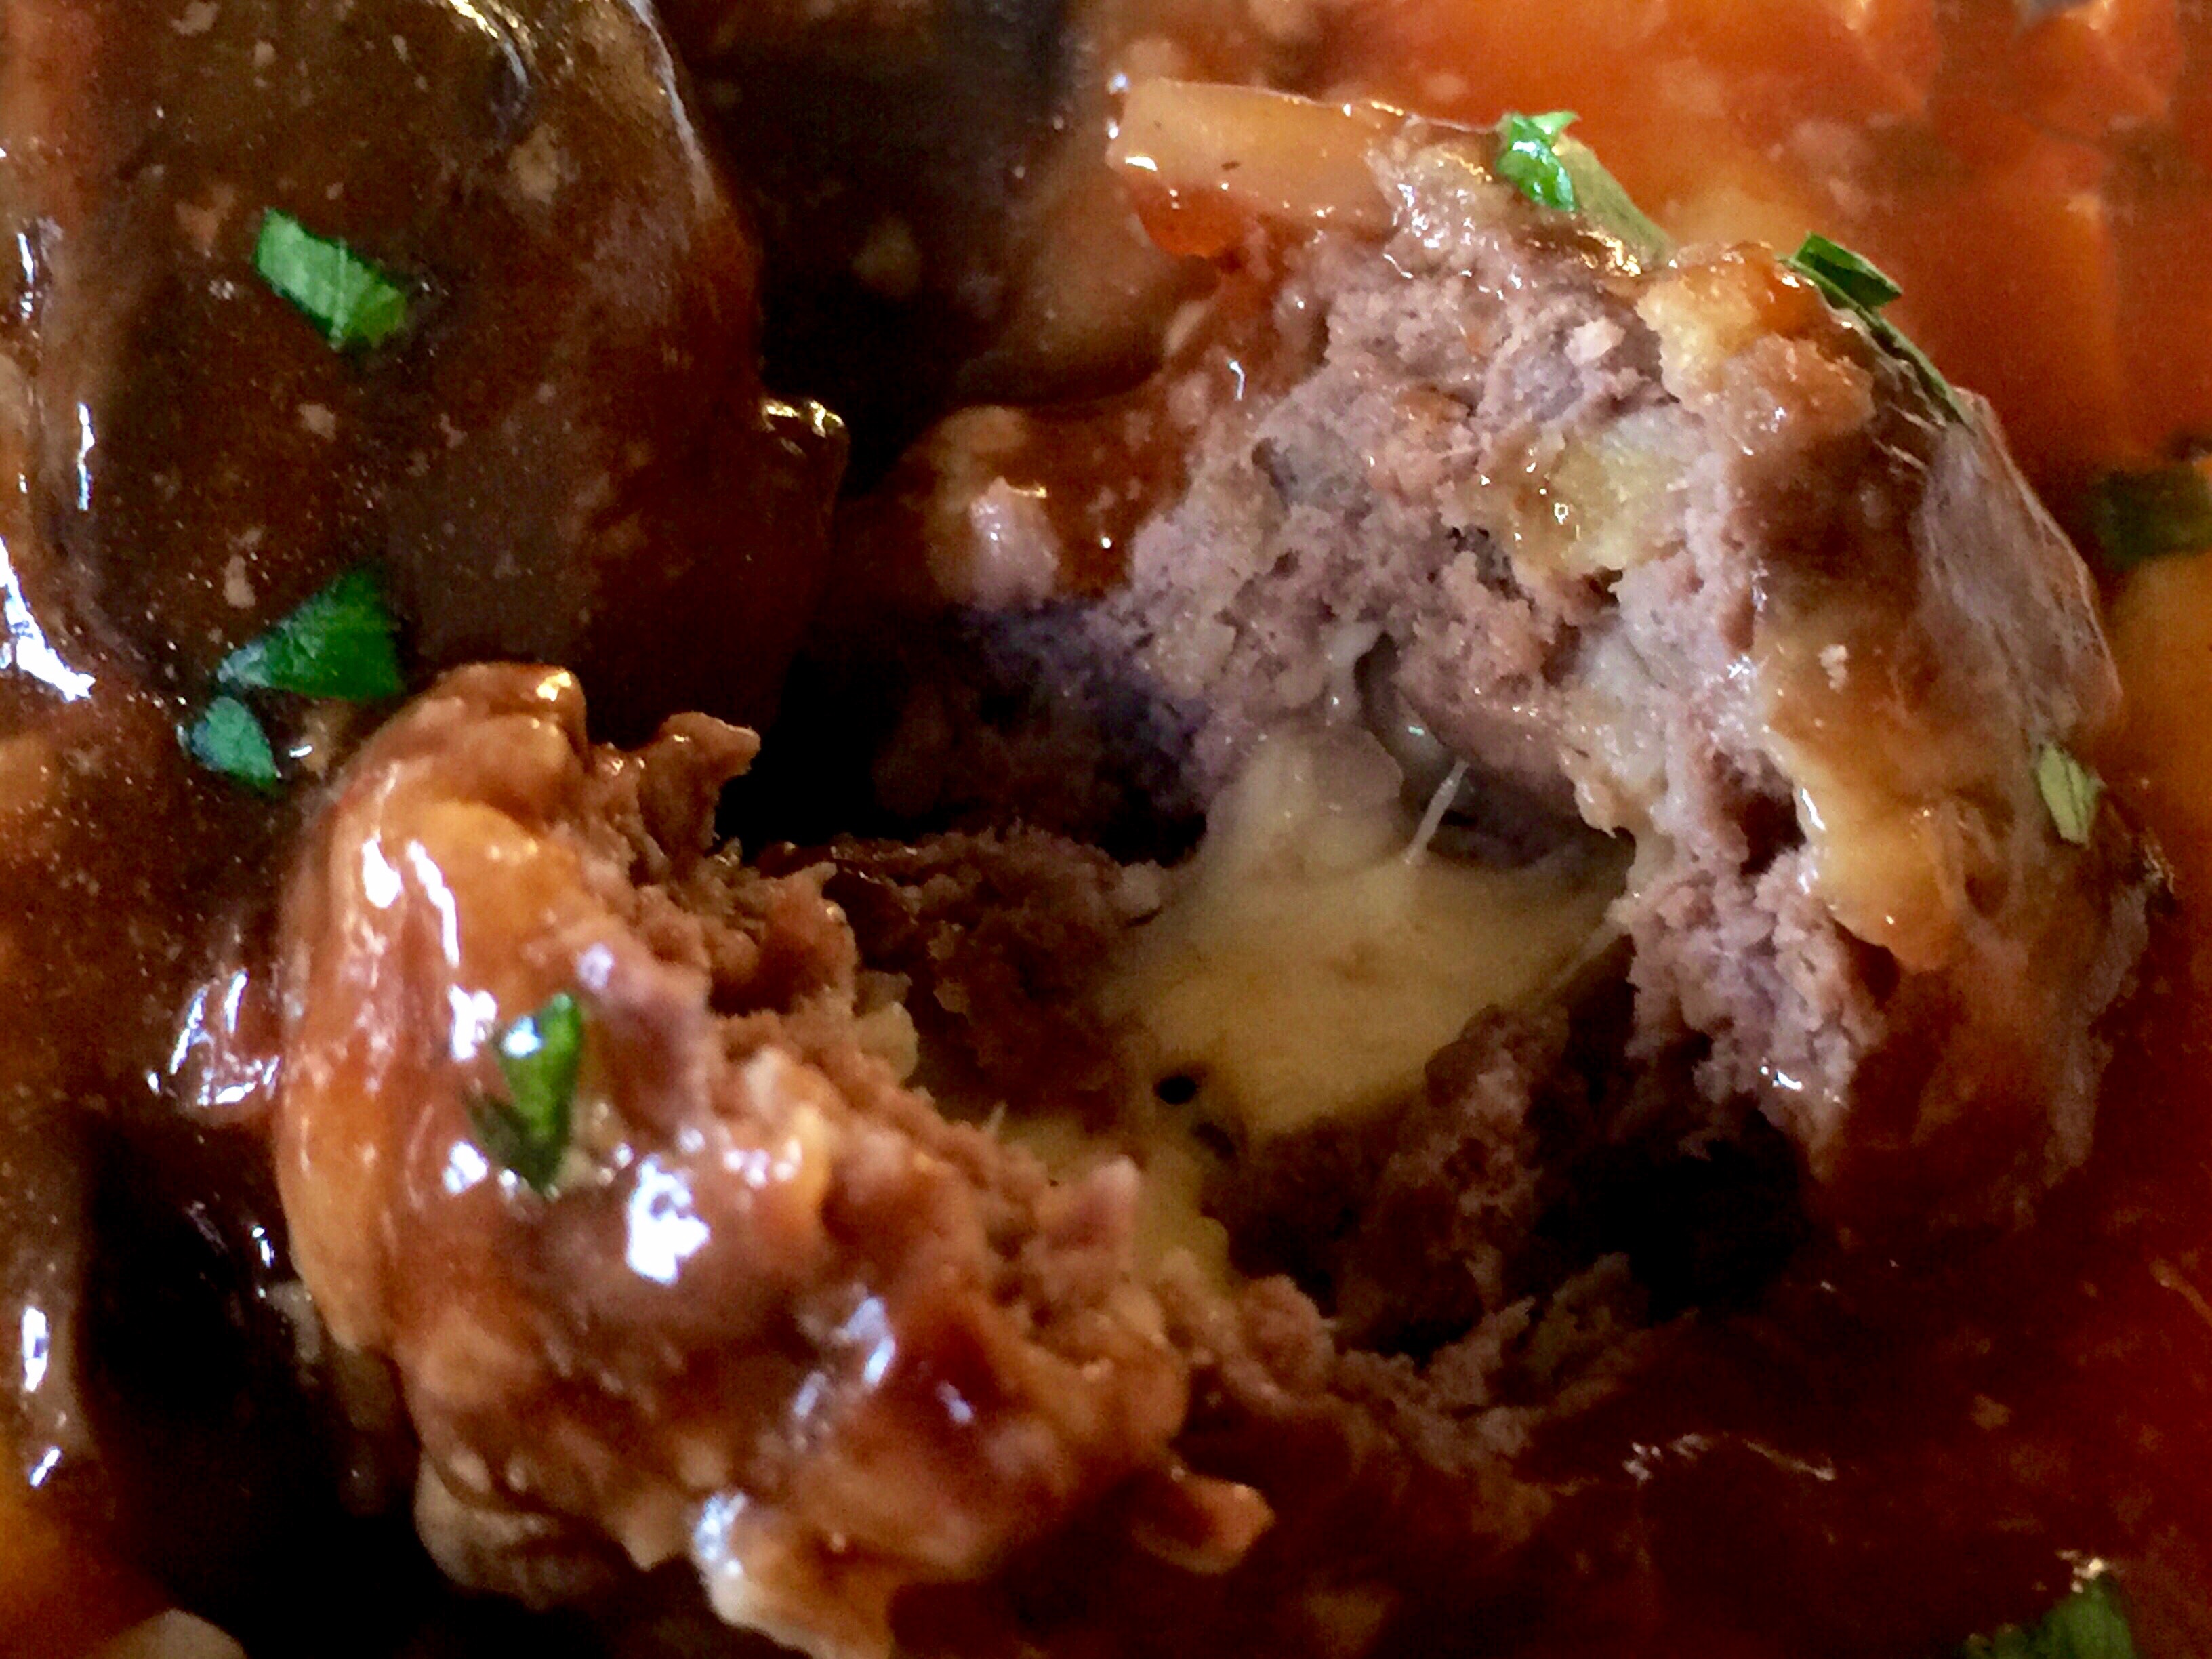
Want a meal that is a step up from just a regular hamburger? Try making salisbury steak. The key to the flavor in this recipe is the ingredients mixed in with the ground beef and the wonderfully decadent sauce. This recipe doesn’t take much longer to make than just a plain old hamburger and it adds a little flair to serving ground beef. So jazz it up next time. I’m sure your family will love it.
I first saw the Pioneer Woman make Salisbury Steak on her television program and she has a recipe for it in one of her books. I looked at her recipe and changed a few things up and both my husband and I said this was the most flavorful ground beef we’ve had in a long time.
So let’s talk making Salisbury Steak.
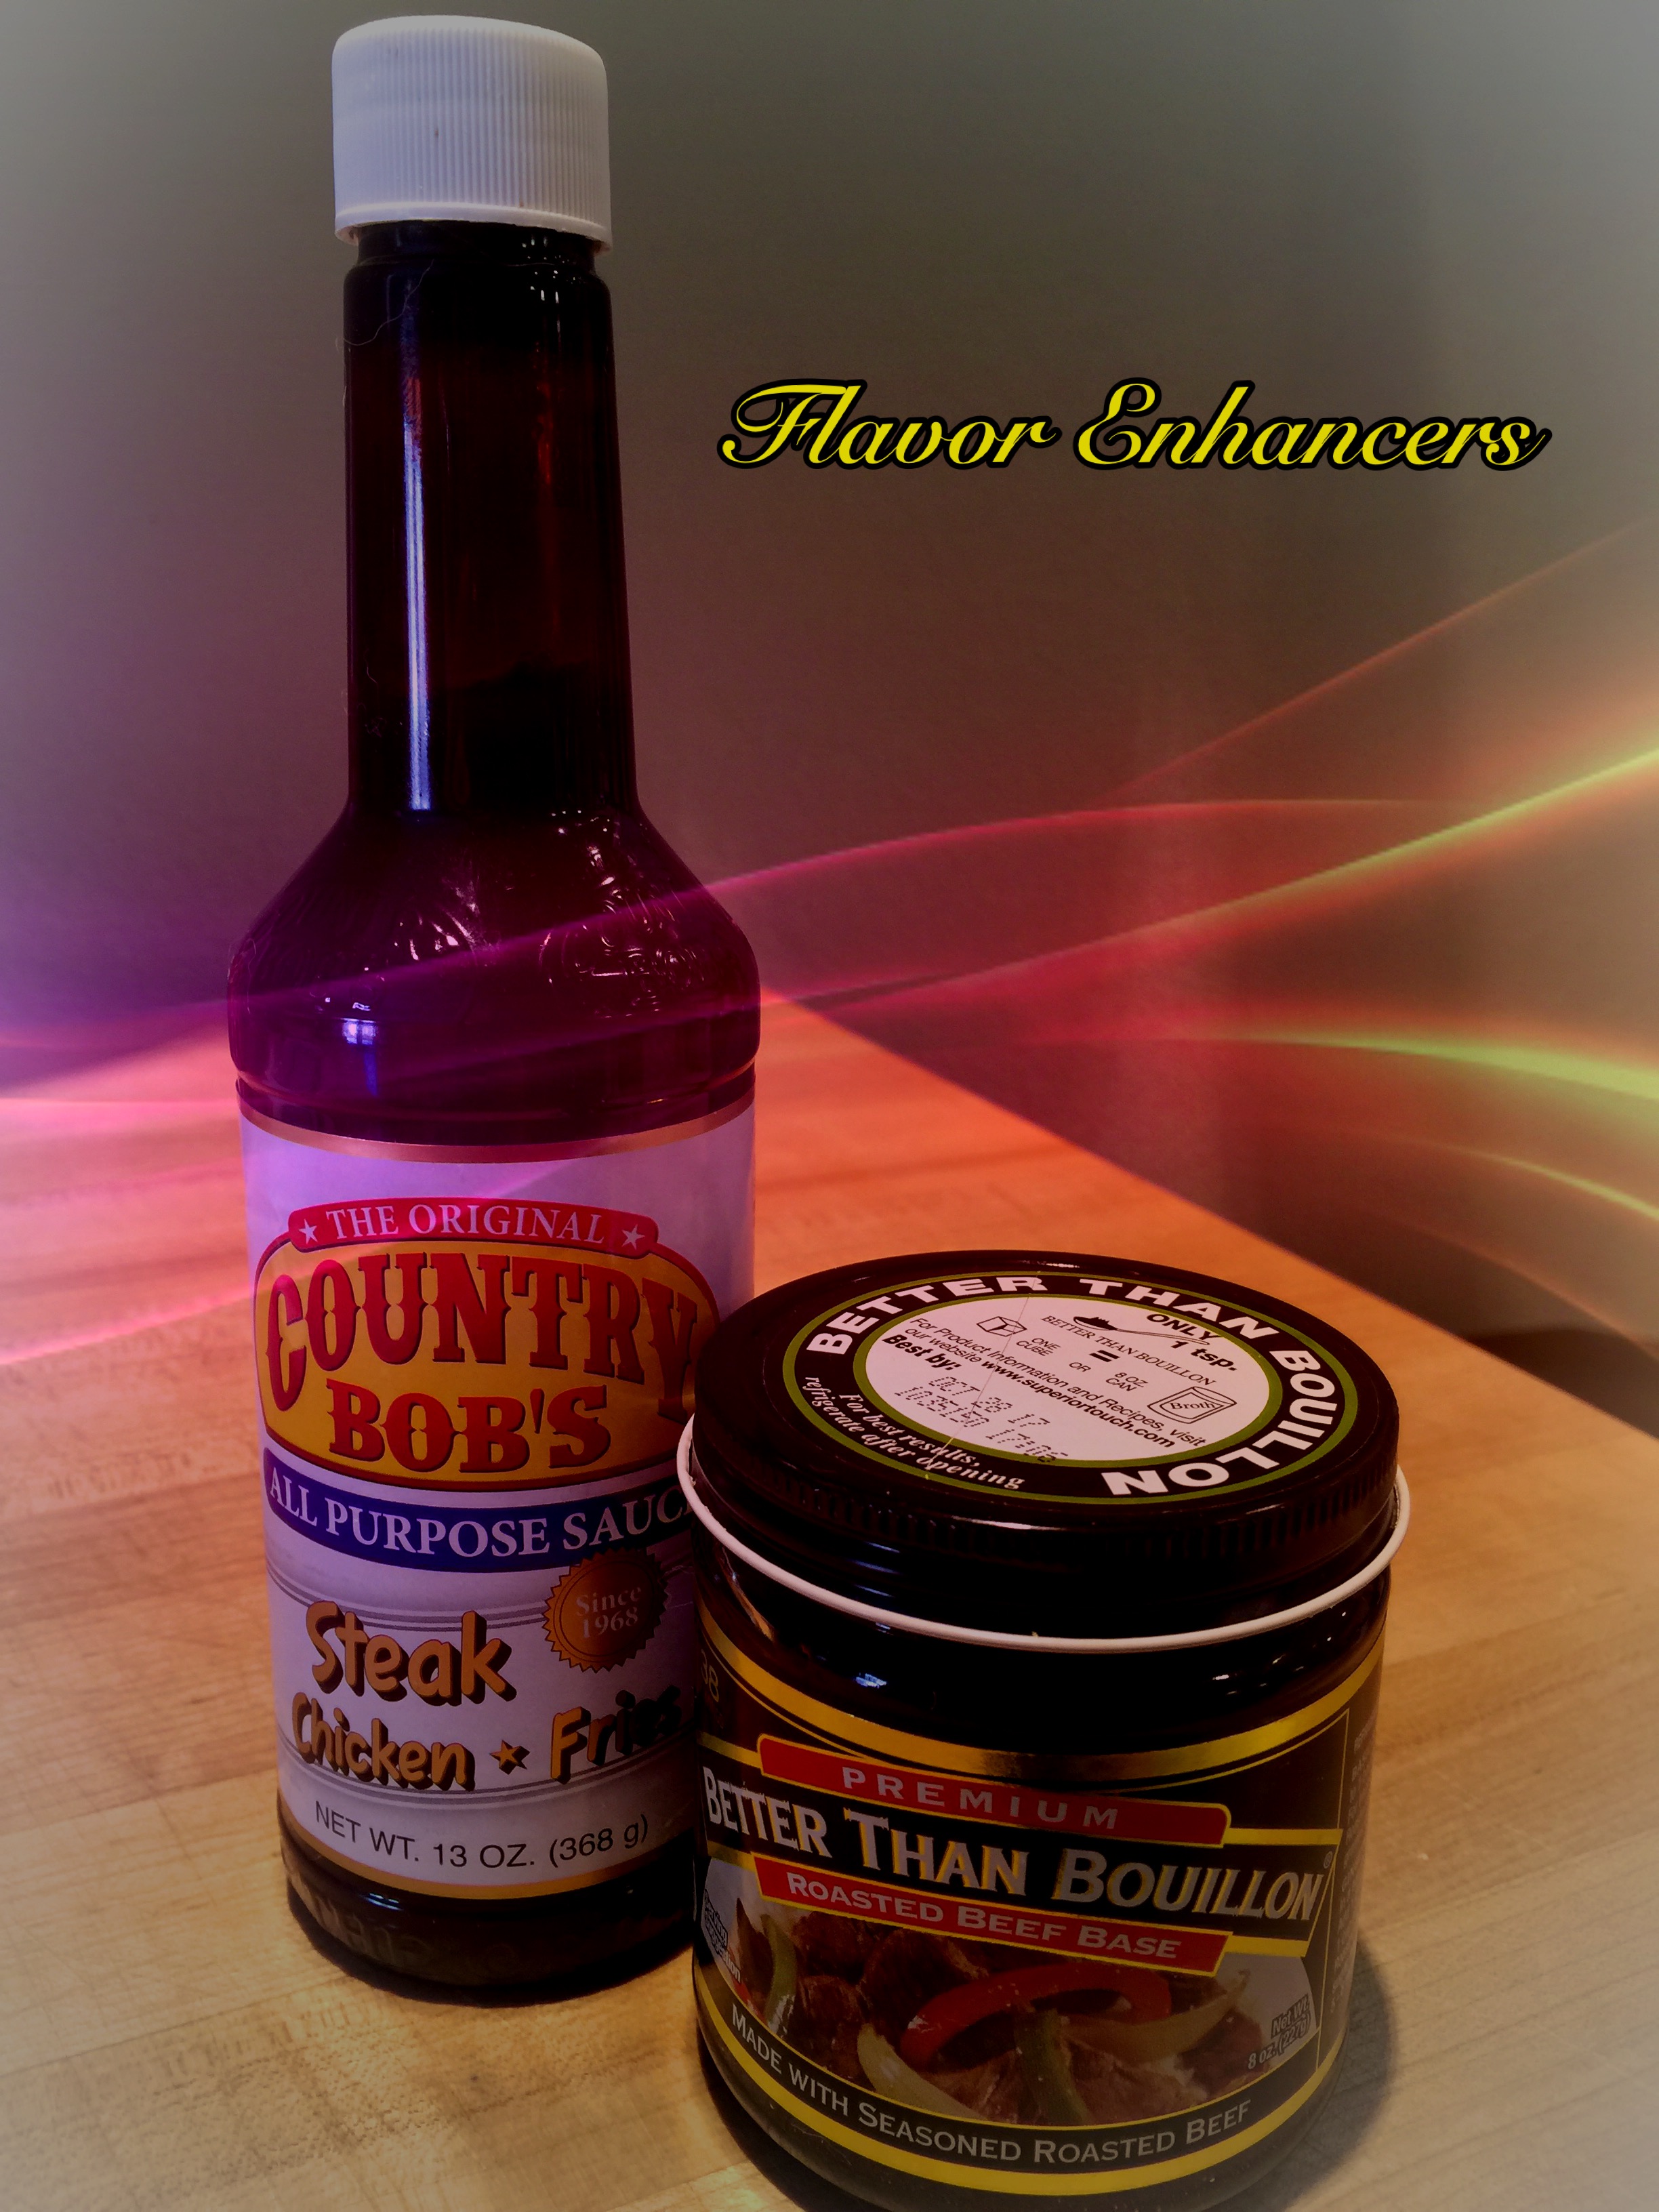
Lesson Learned 1: I found two secret weapon flavor enhancers – in her recipe, the Pioneer woman uses beef bouillon cubes in her ground meat and Kitchen Bouquet in her sauce to add depth of flavor. I found this stuff called “Better Than Bouillon” which is a roasted beef sauce made with seasoned roasted beef. It has a gel-like consistency. I used it instead of bouillon and I really believe it boosted the flavor – tons! I now use it even when I make hamburgers to kick the flavor up a notch. I think it’s great stuff. You should try it.
I used Country Bob’s original all purpose sauce to enhance the flavor of the sauce and the sauce was divine. I guess what I’m trying to say here is try different substitutions in recipes you make. You might find that you like the recipe with the substitutions even better than the original.
Lesson Learned 2: Try using seasoned panko bread crumbs instead of just regular seasoned bread crumbs: I think the panko gives the meat a nice texture as well as flavor and I found I could use a slightly lesser amount than regular bread crumbs.
You want to be careful not to overload your ground beef with bread crumbs. You’ll dry it out. After making hamburgers and meatloaf for years and now salisbury steak, I know how the beef should feel so that it will not be overly dry. It should feel moist but not overly sticky. This is something you’ll get a feel for over time. Don’t worry about it. I always add about half the amount of bread crumbs the recipe calls for to begin with and add more from there. You can always add more and you don’t want to wind up with too much bread crumbs in the mix.
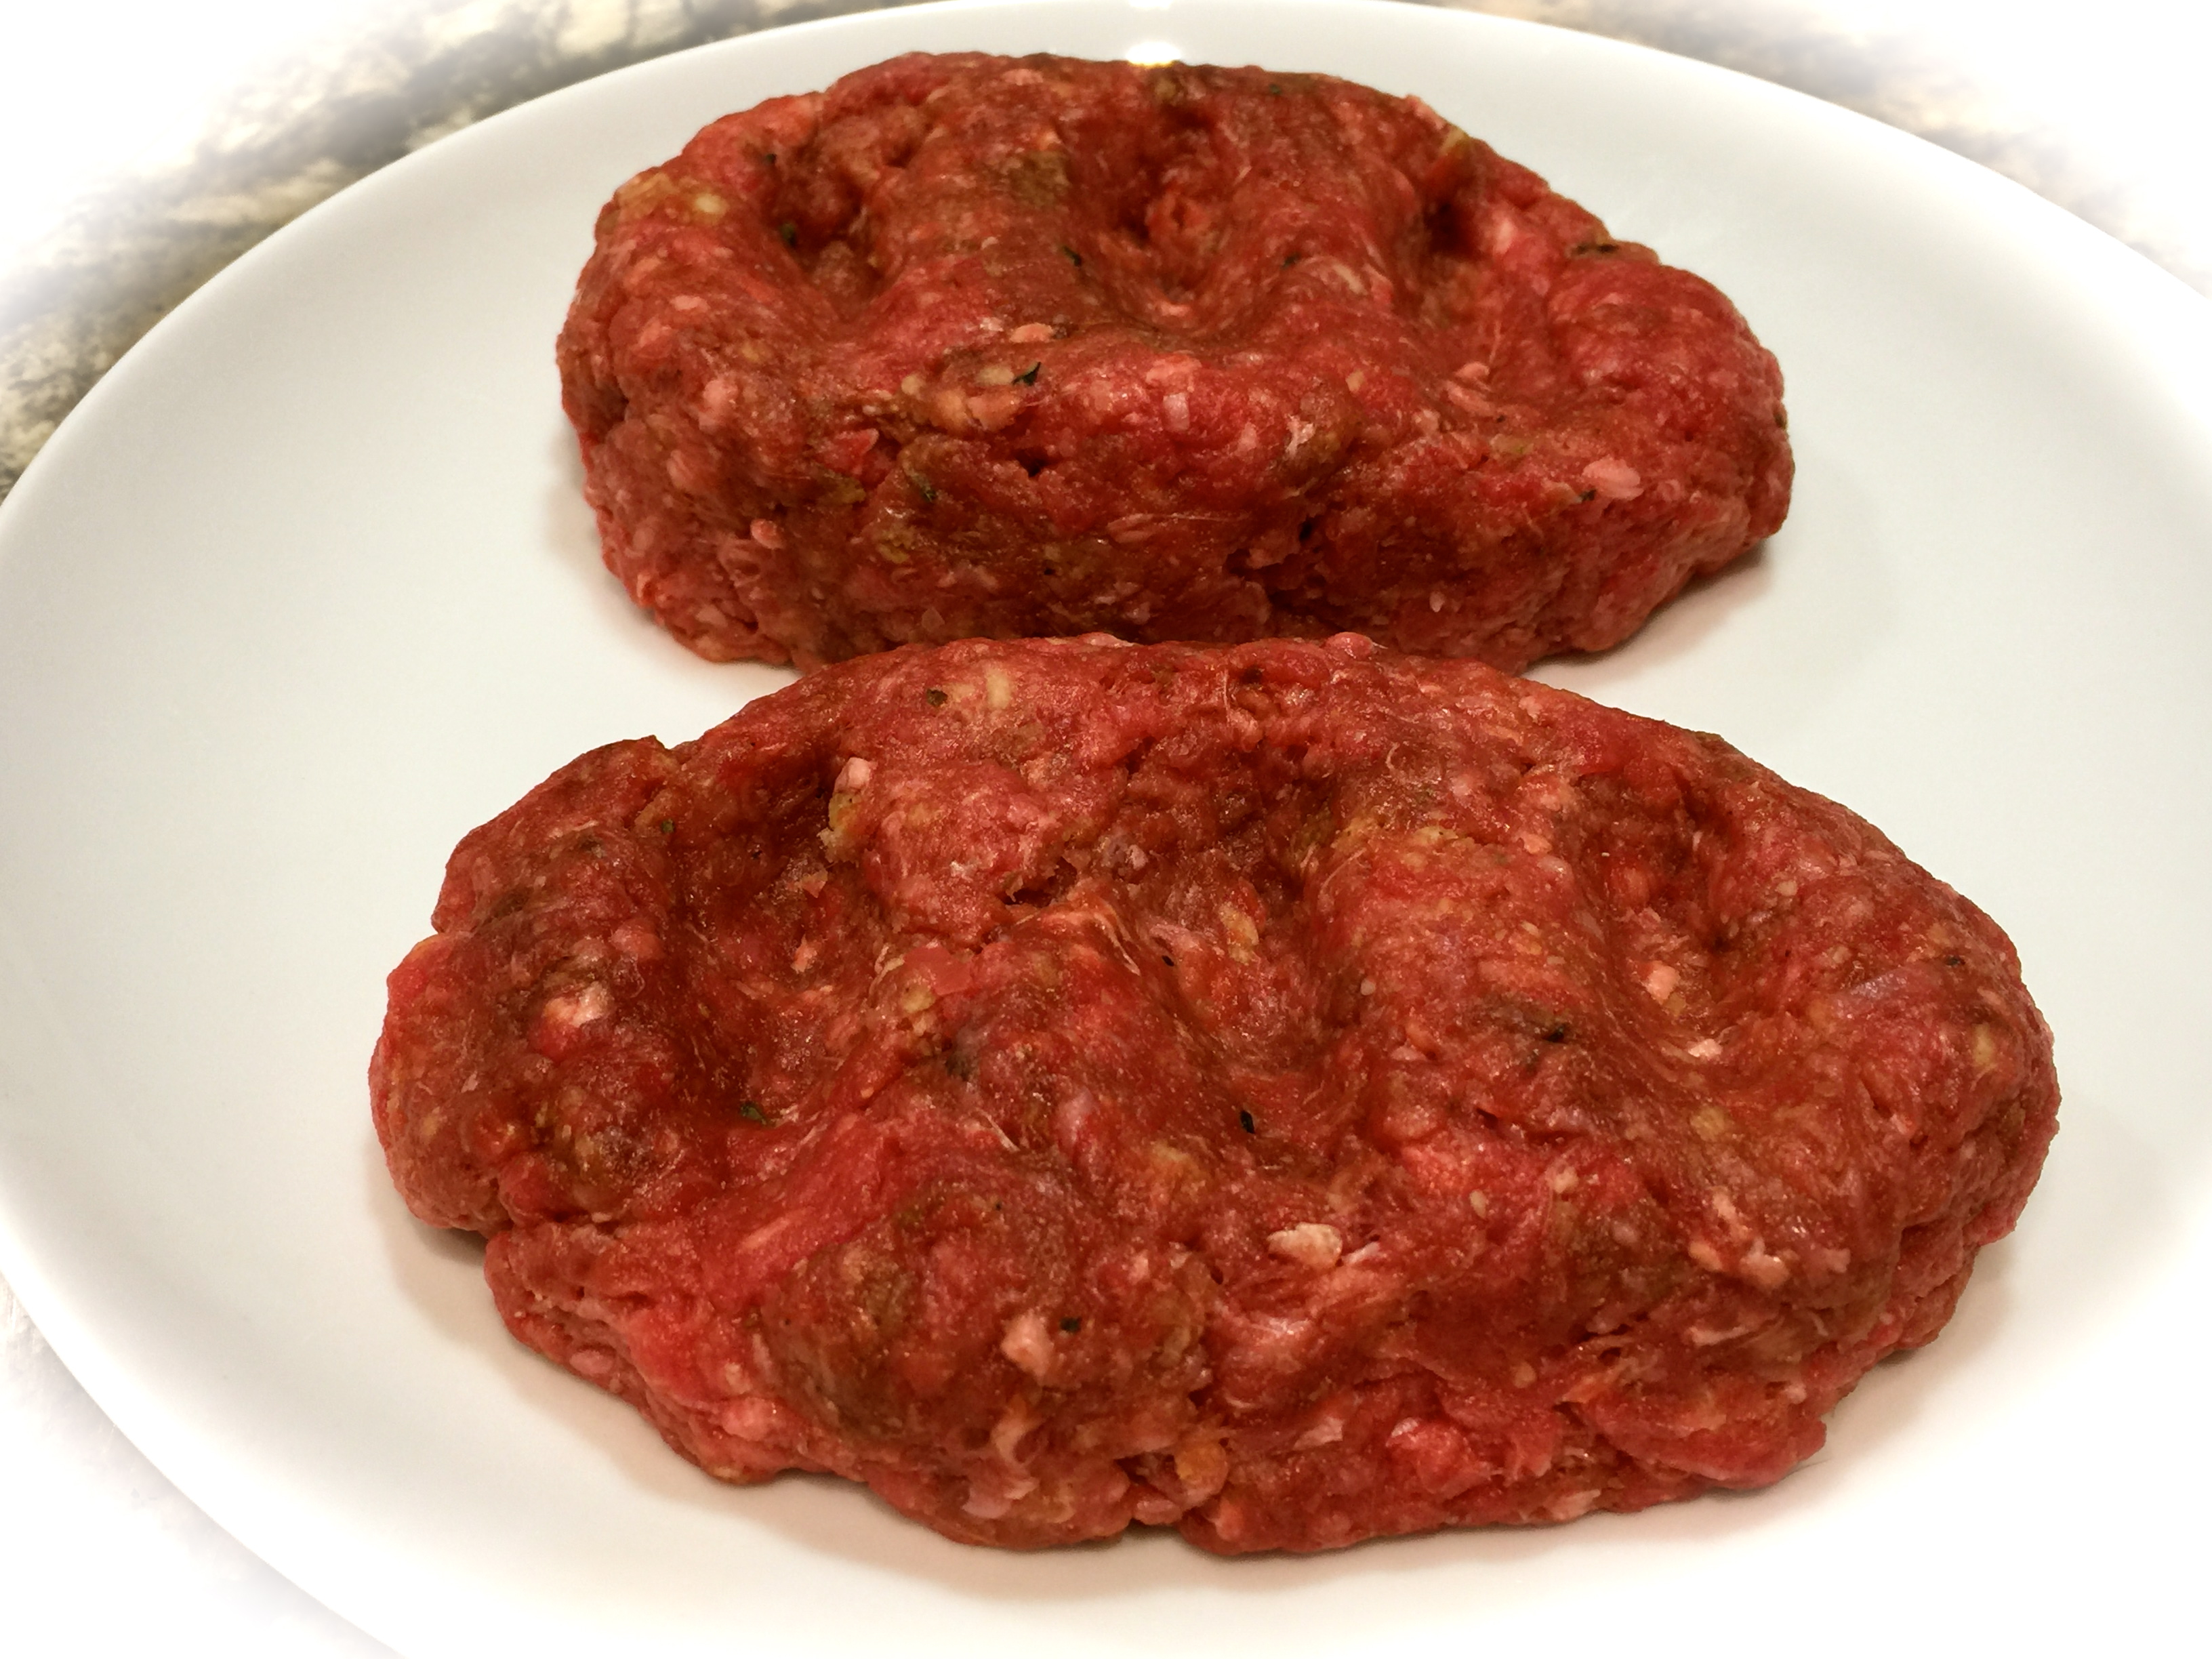
Lesson Learned 3: Make sure you sufficiently elongate the patties: Just like a hamburger, these patties will shrink and rise in the center if you don’t elongate them sufficiently and then put an indentation in the center to prevent them puffing up. You can see by my pictures that I didn’t quite nail that process. It doesn’t matter from a flavor perspective, just from a visual perspective. And visually you want to create a different look than that of just a plain old hamburger.
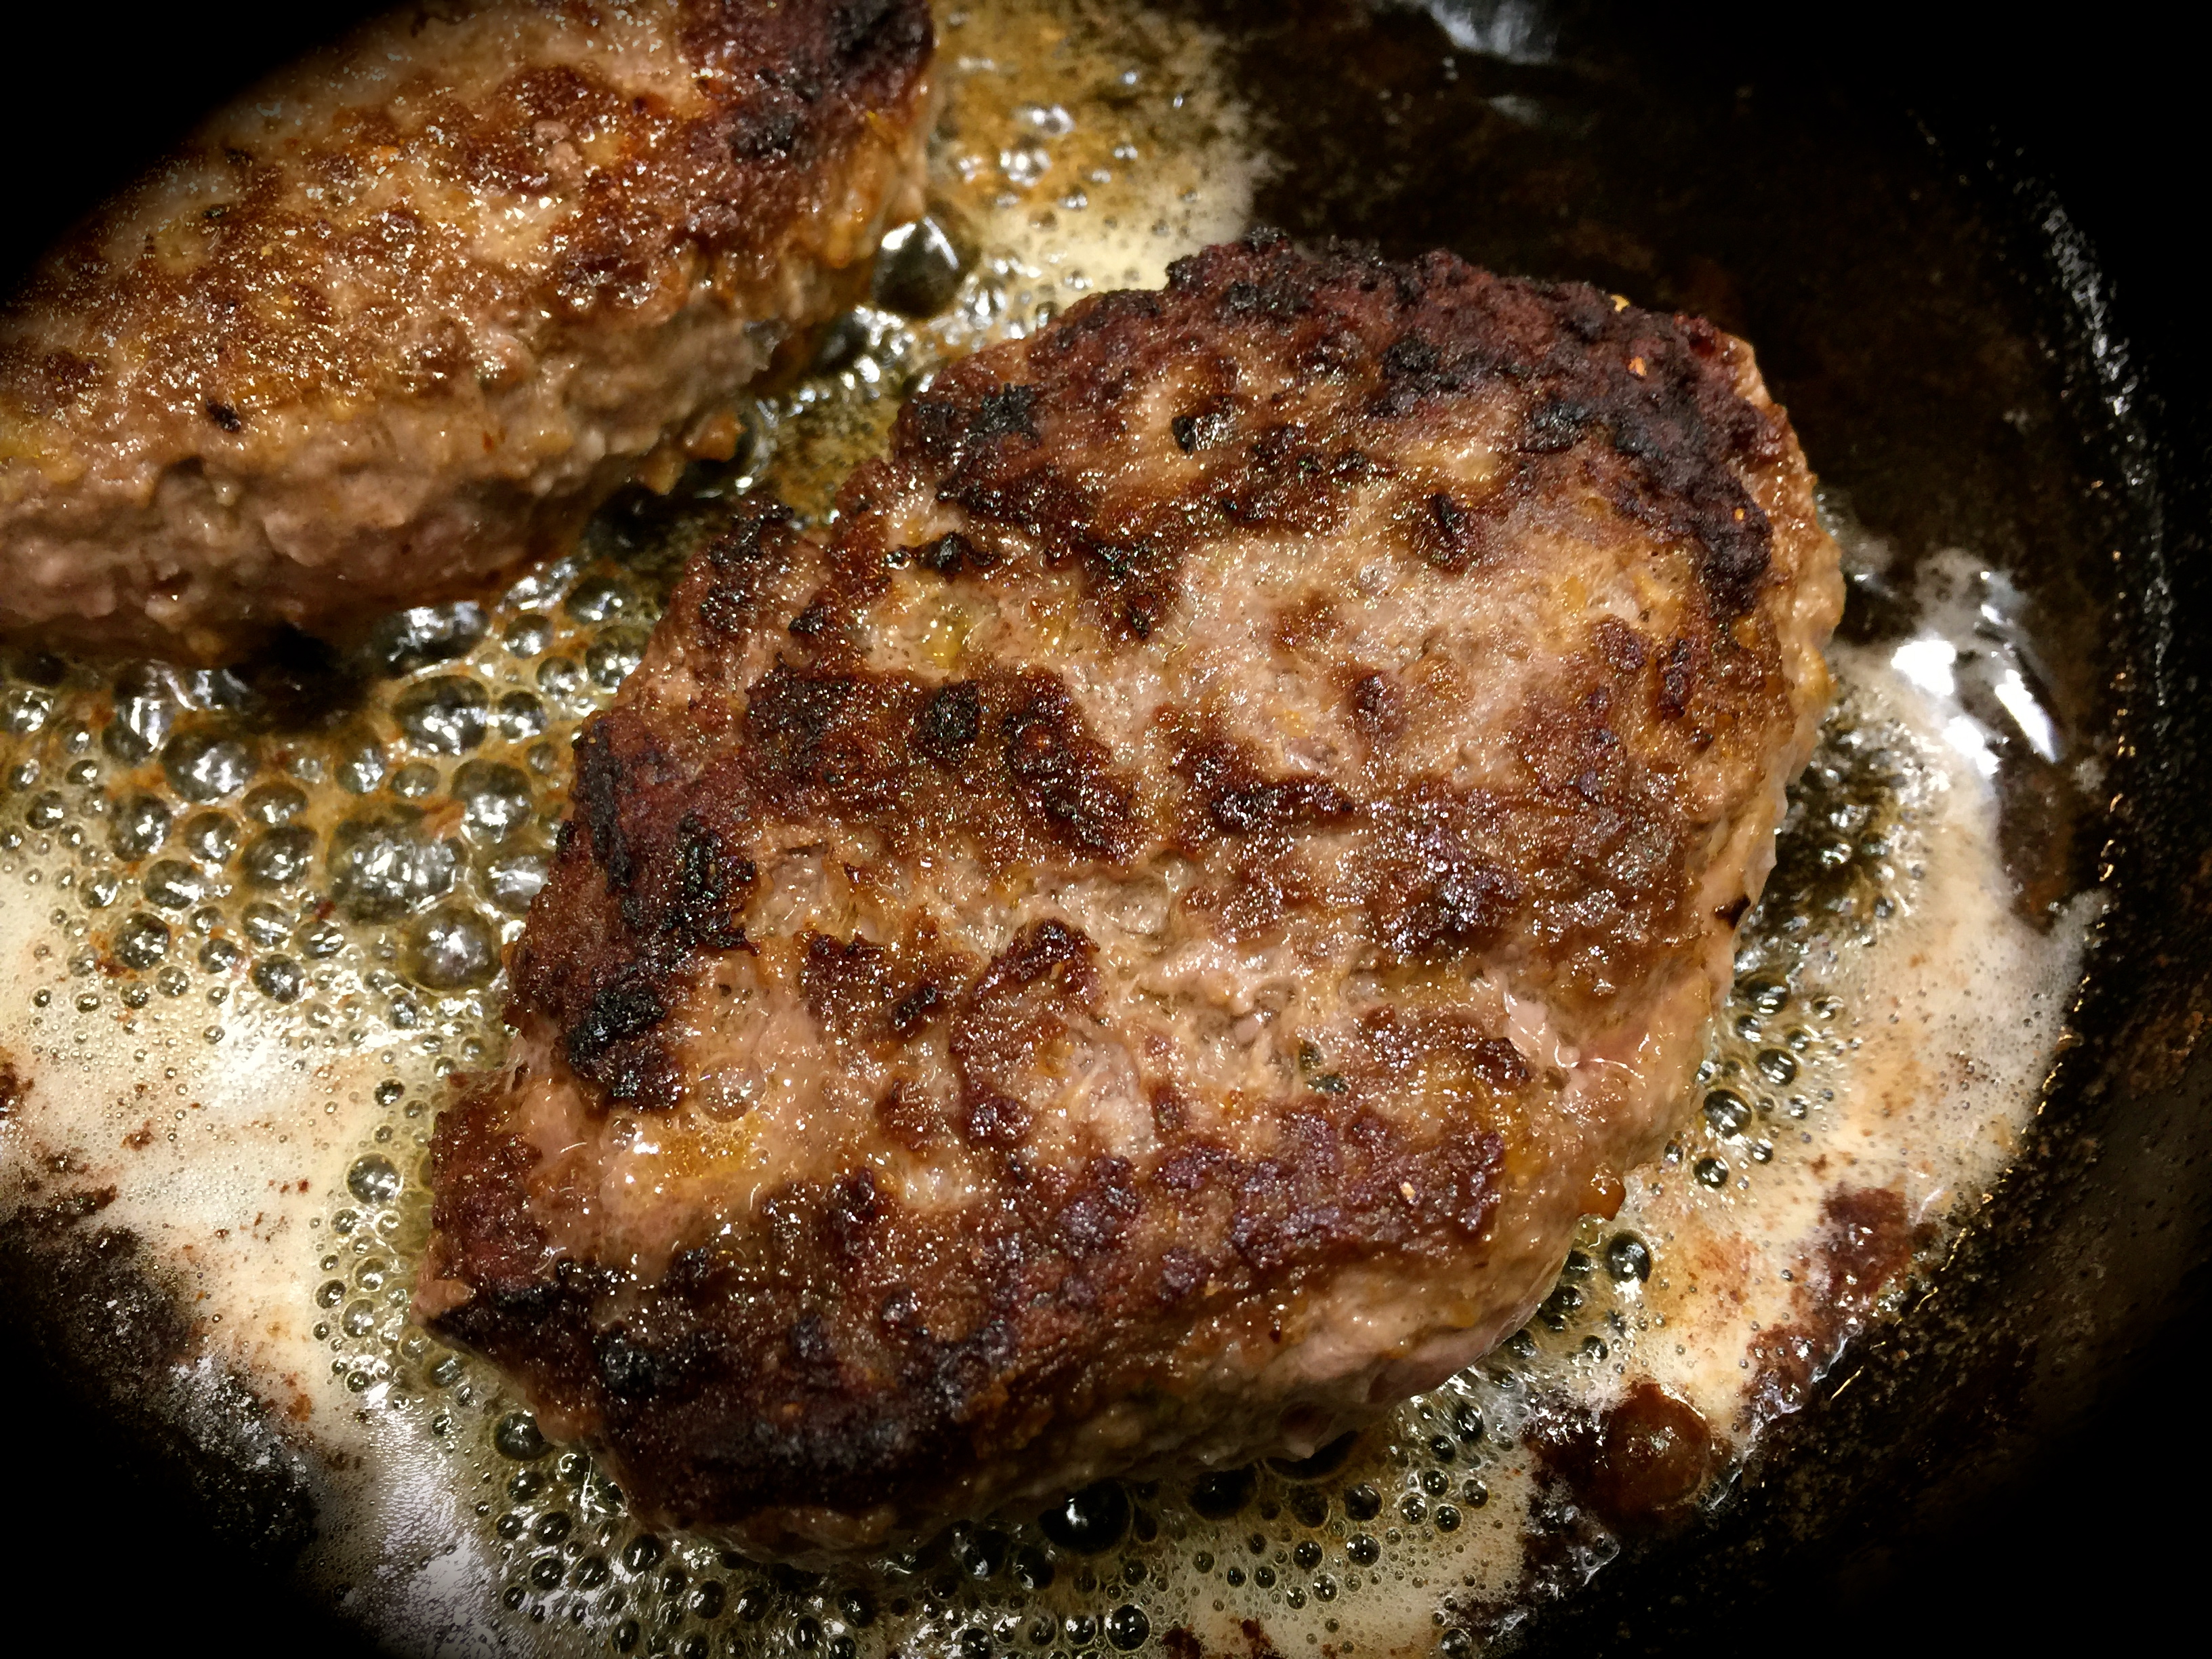
Lesson Learned 4: Used a cast iron skillet for this recipe if you have one: Cast iron provides you with the most even heat which I think is important when you’re cooking everything on the stove but especially ground beef patties. Invest in a basic no frills cast iron skillet. Depending on the size you choose, it could cost you between $15-$25 and will probably be one of the best cooking investments you’ll ever make that you will hand down to your grandchildren.
This recipe is a nice way to dress up ground beef. Try it and let me know what you think.
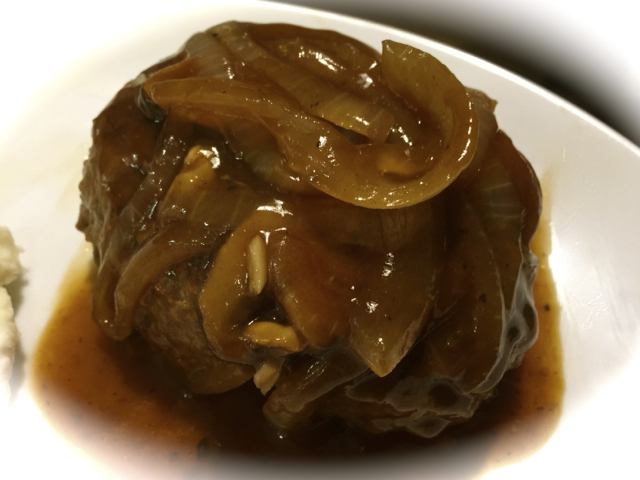
Salisbury Steak Smothered In A Mushroom Onion Sauce
2 1/4 cups beef broth (save 1/4 cup to mix with the corn starch)
1 Tbs. Worcestershire sauce
1 Tbs. ketchup
1 Tbs. Country Bob’s all purpose sauce (or you can substitute a different steak sauce)
2 Tbs. corn starch
Salt and Pepper
DIRECTIONS:
Make the patties by combining all of the ingredients for the patties except the butter and olive oil. Make sure to sufficiently flatten the patties into an oblong shape and make an indentation in the center so they keep their shape. Add the butter and olive oil to a cast iron skillet. Cook the patties on both sides. about 3 minutes per side.
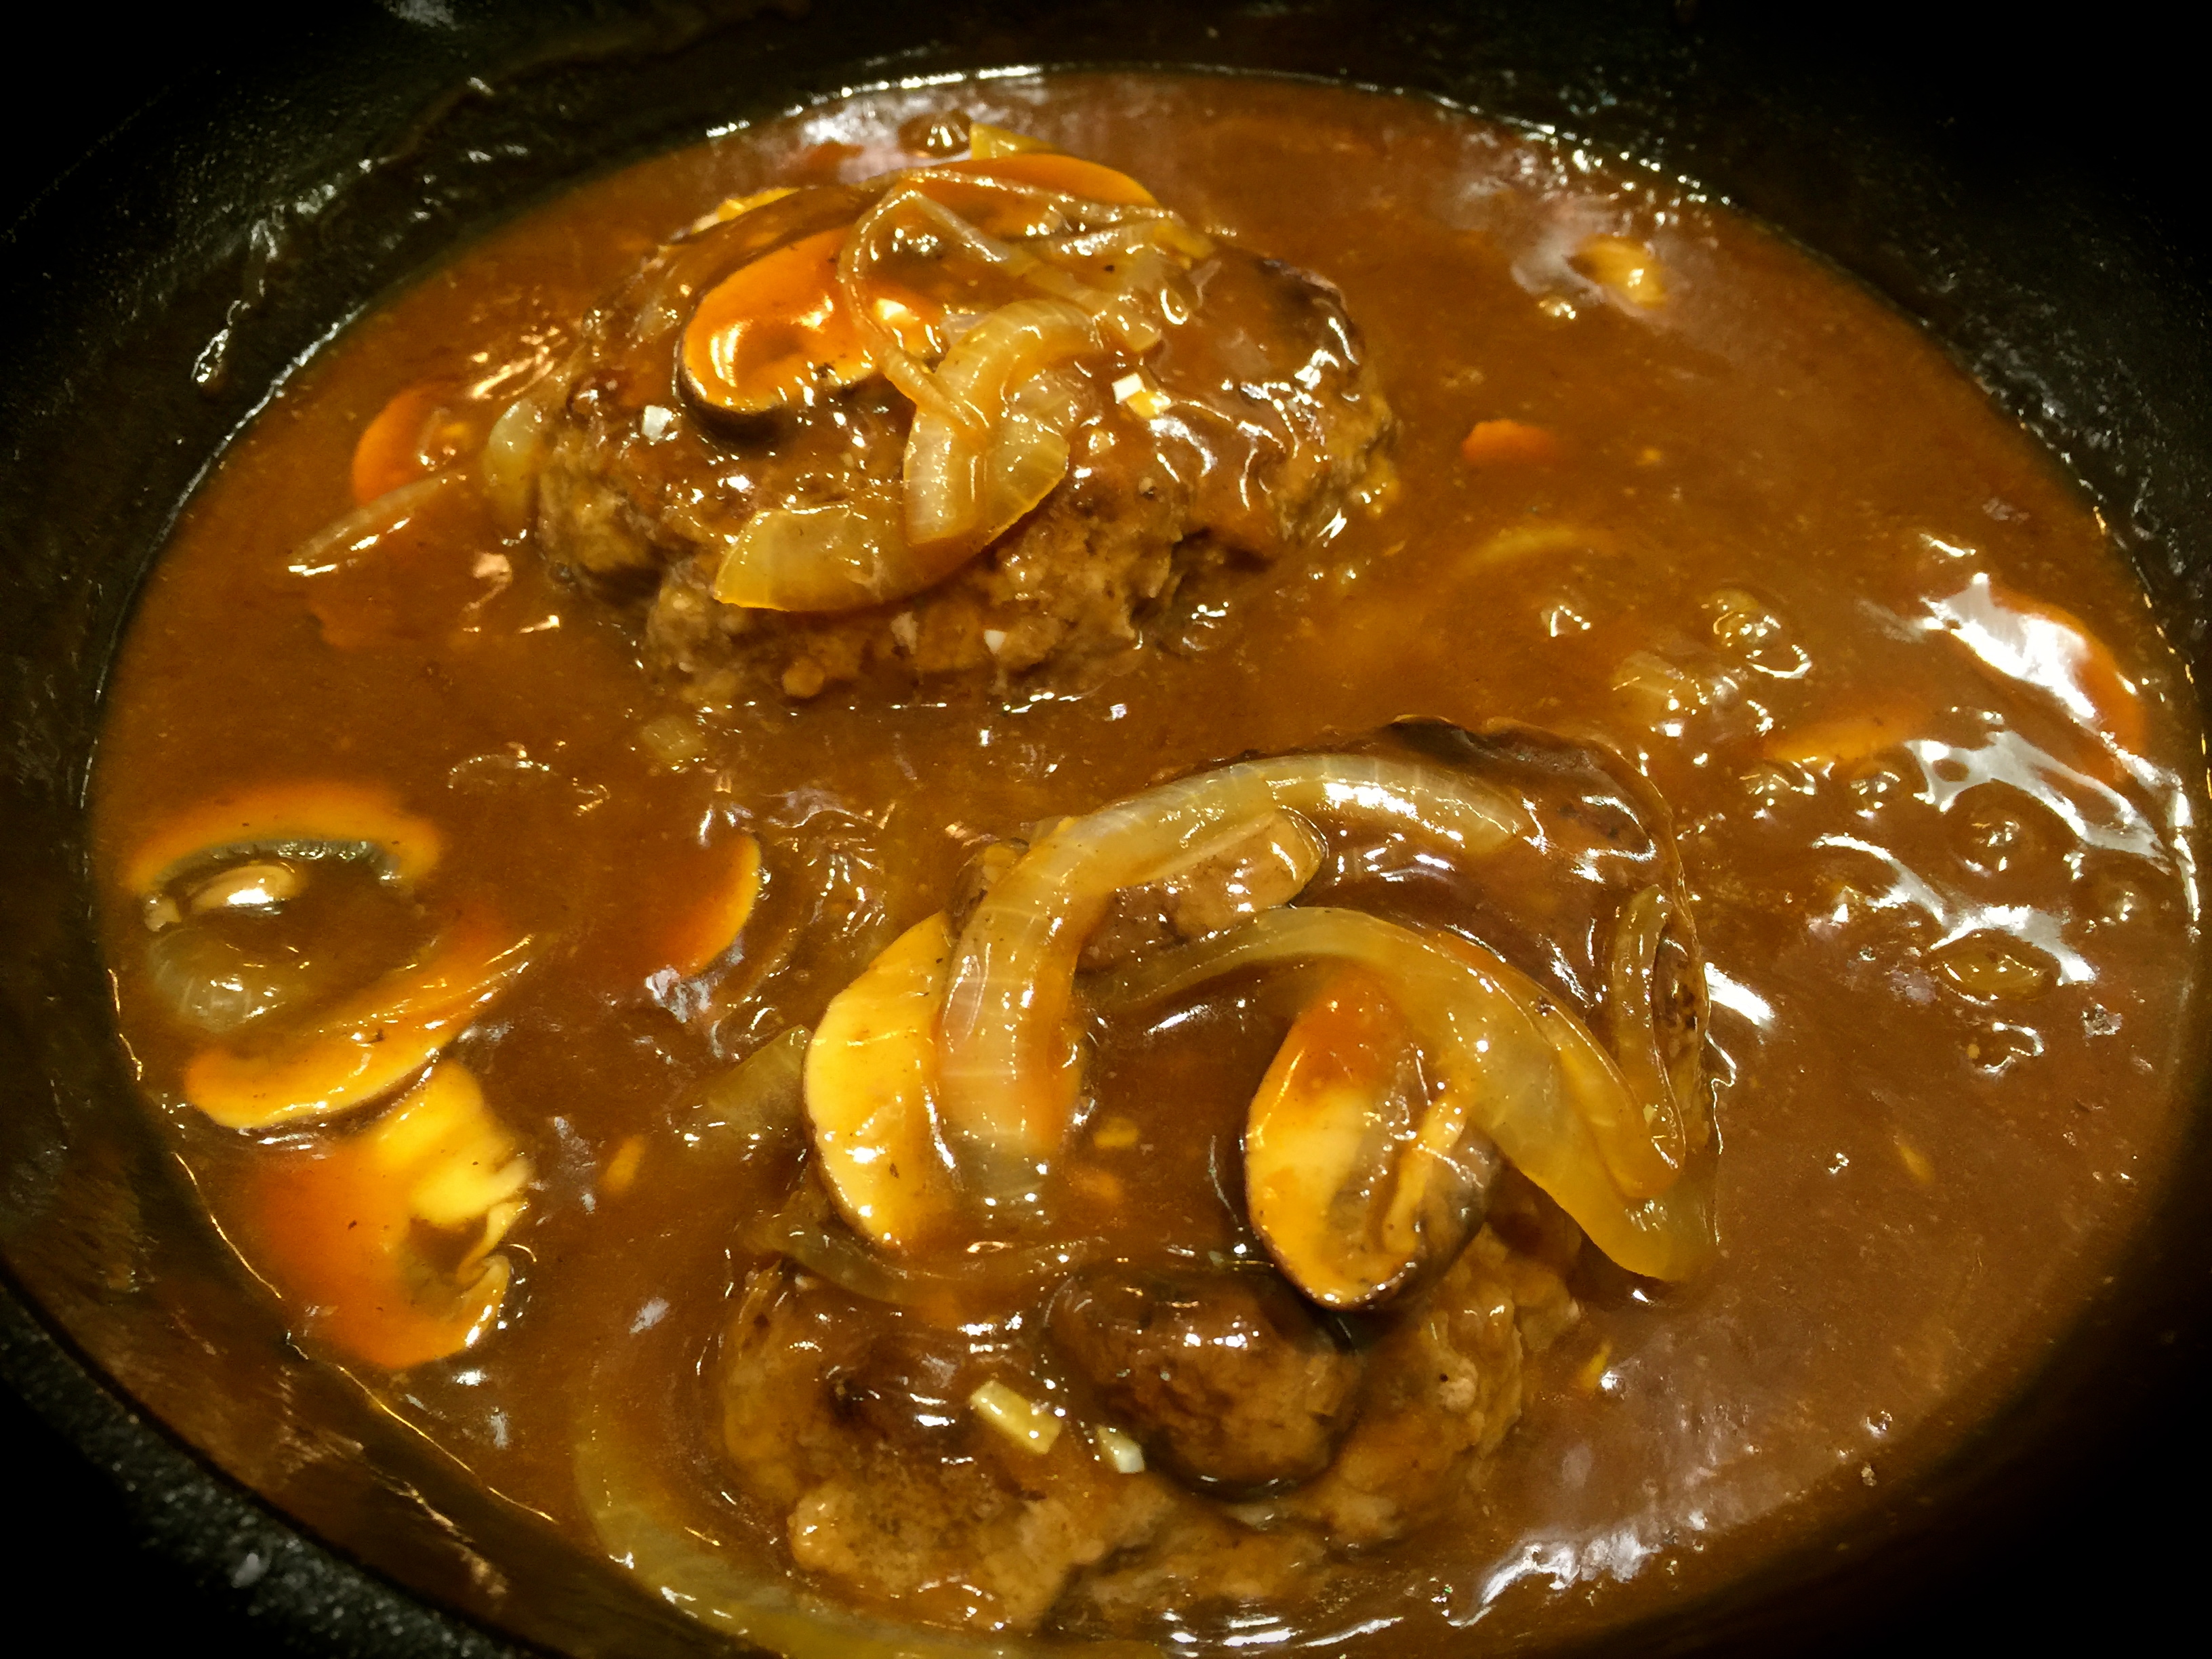
Remove the patties to a plate and cover them with foil to keep them warm. In the same skillet (you can add a little more butter or oil if you feel you need it) sauté the onions and mushrooms until the onions start to brown slightly. Add the garlic and sauté another minute until the garlic becomes fragrant. Whisk together the two cups beef broth, worcestershire sauce, ketchup and all purpose sauce and add it to the onions and garlic. Cook for a couple of minutes.
Whisk together the remaining beef broth and corn starch until there are no lumps. Add to the sauce. Cook on higher heat until the sauce bubbles and starts to thicken.
Put the patties back in the pan and cover them with the sauce. Let them simmer for a couple of minutes. Serve immediately.
Salisbury Steak Patties Smothered In Sauce
Serving Suggestion: With Garlic Mashed Potatoes and Peas and Carrots
Lately I have been posting a lot of baking recipes so I thought this time I’d go for something savory. I had some ground beef in the refrigerator and I started to think about how I could prepare it in ways other than more traditional faire like burgers, meatloaf or tacos. Then I thought about Shepherd’s Pie. I’ve made Shepherd’s Pie with left over pot roast (the traditional recipe) and I’ve also made a Turkey Style Shepherd’s Pie but I didn’t have any left over mashed potatoes and didn’t feel like making some.
What I did have was a bag of frozen diced potatoes and a bag of frozen vegetables and the recipe grew out of that. I also had a hodgepodge of shredded cheeses in my refrigerator and I decided to try to incorporate that – sort of a clean out your fridge and freezer type of recipe. I never could have imagined how tasty this would be. After we had this for dinner my husband was already looking forward to eating the leftovers.
The most time consuming part of this recipe is assembling the ingredients but once that’s done, like any other casserole, all you do is pop it in the oven and wait for it to do its thing. This recipe requires using two pots and a casserole dish but believe me the end result is worth it. Try it out and see what you think!
Lesson Learned 1 – There is some prep to this recipe: But tell me now, what from scratch recipe does not require some prep. You brown the onions, add the meat and seasonings, add the veggies and cook thru till warm while in another pot you make the homemade cheese sauce. But at least this way you know every ingredient that is going into the recipe and that’s the beauty of making it from scratch – you control all of the ingredients. There are ways you can shorten the prep time by perhaps using a prepared cheese sauce but now that I’ve mastered making my own sauces and gravies I very seldom, if ever, revert to buying them packaged or jarred. And really, you have to admit, homemade tastes so much better. So take the time to do the prep – it’s worth it.
Lesson Learned 2 – It’s easy to adapt this to a meatless recipe: Quite often I post on my Facebook page a picture of the next recipe I will blog as a teaser for what’s to come. This time when I posted a picture for this dish I got two very specific comments. The first was that I should write a recipe book and I am seriously thinking about doing an ebook. (Have any of you done that – would love to hear your story). The second was that you could substitute veggie crumbles for the ground beef in this recipe. To be honest, I had never heard of veggie crumbles before and I wondered why you would substitute the meat for veggies when veggies are already included in the recipe. But I was thankful to learn about this. A few of my friends who are not carnivores say they use these crumbles when making chili or tacos and they tell me it’s a great substitute. So I wanted to offer that piece of information here. This is definitely the kind of recipe that could use the crumbles as a substitute for the ground beef. I am not recommending any particular brand. Both MorningStar Farms and Boca make the crumbles. I just wanted to give you an example of what you might consider.
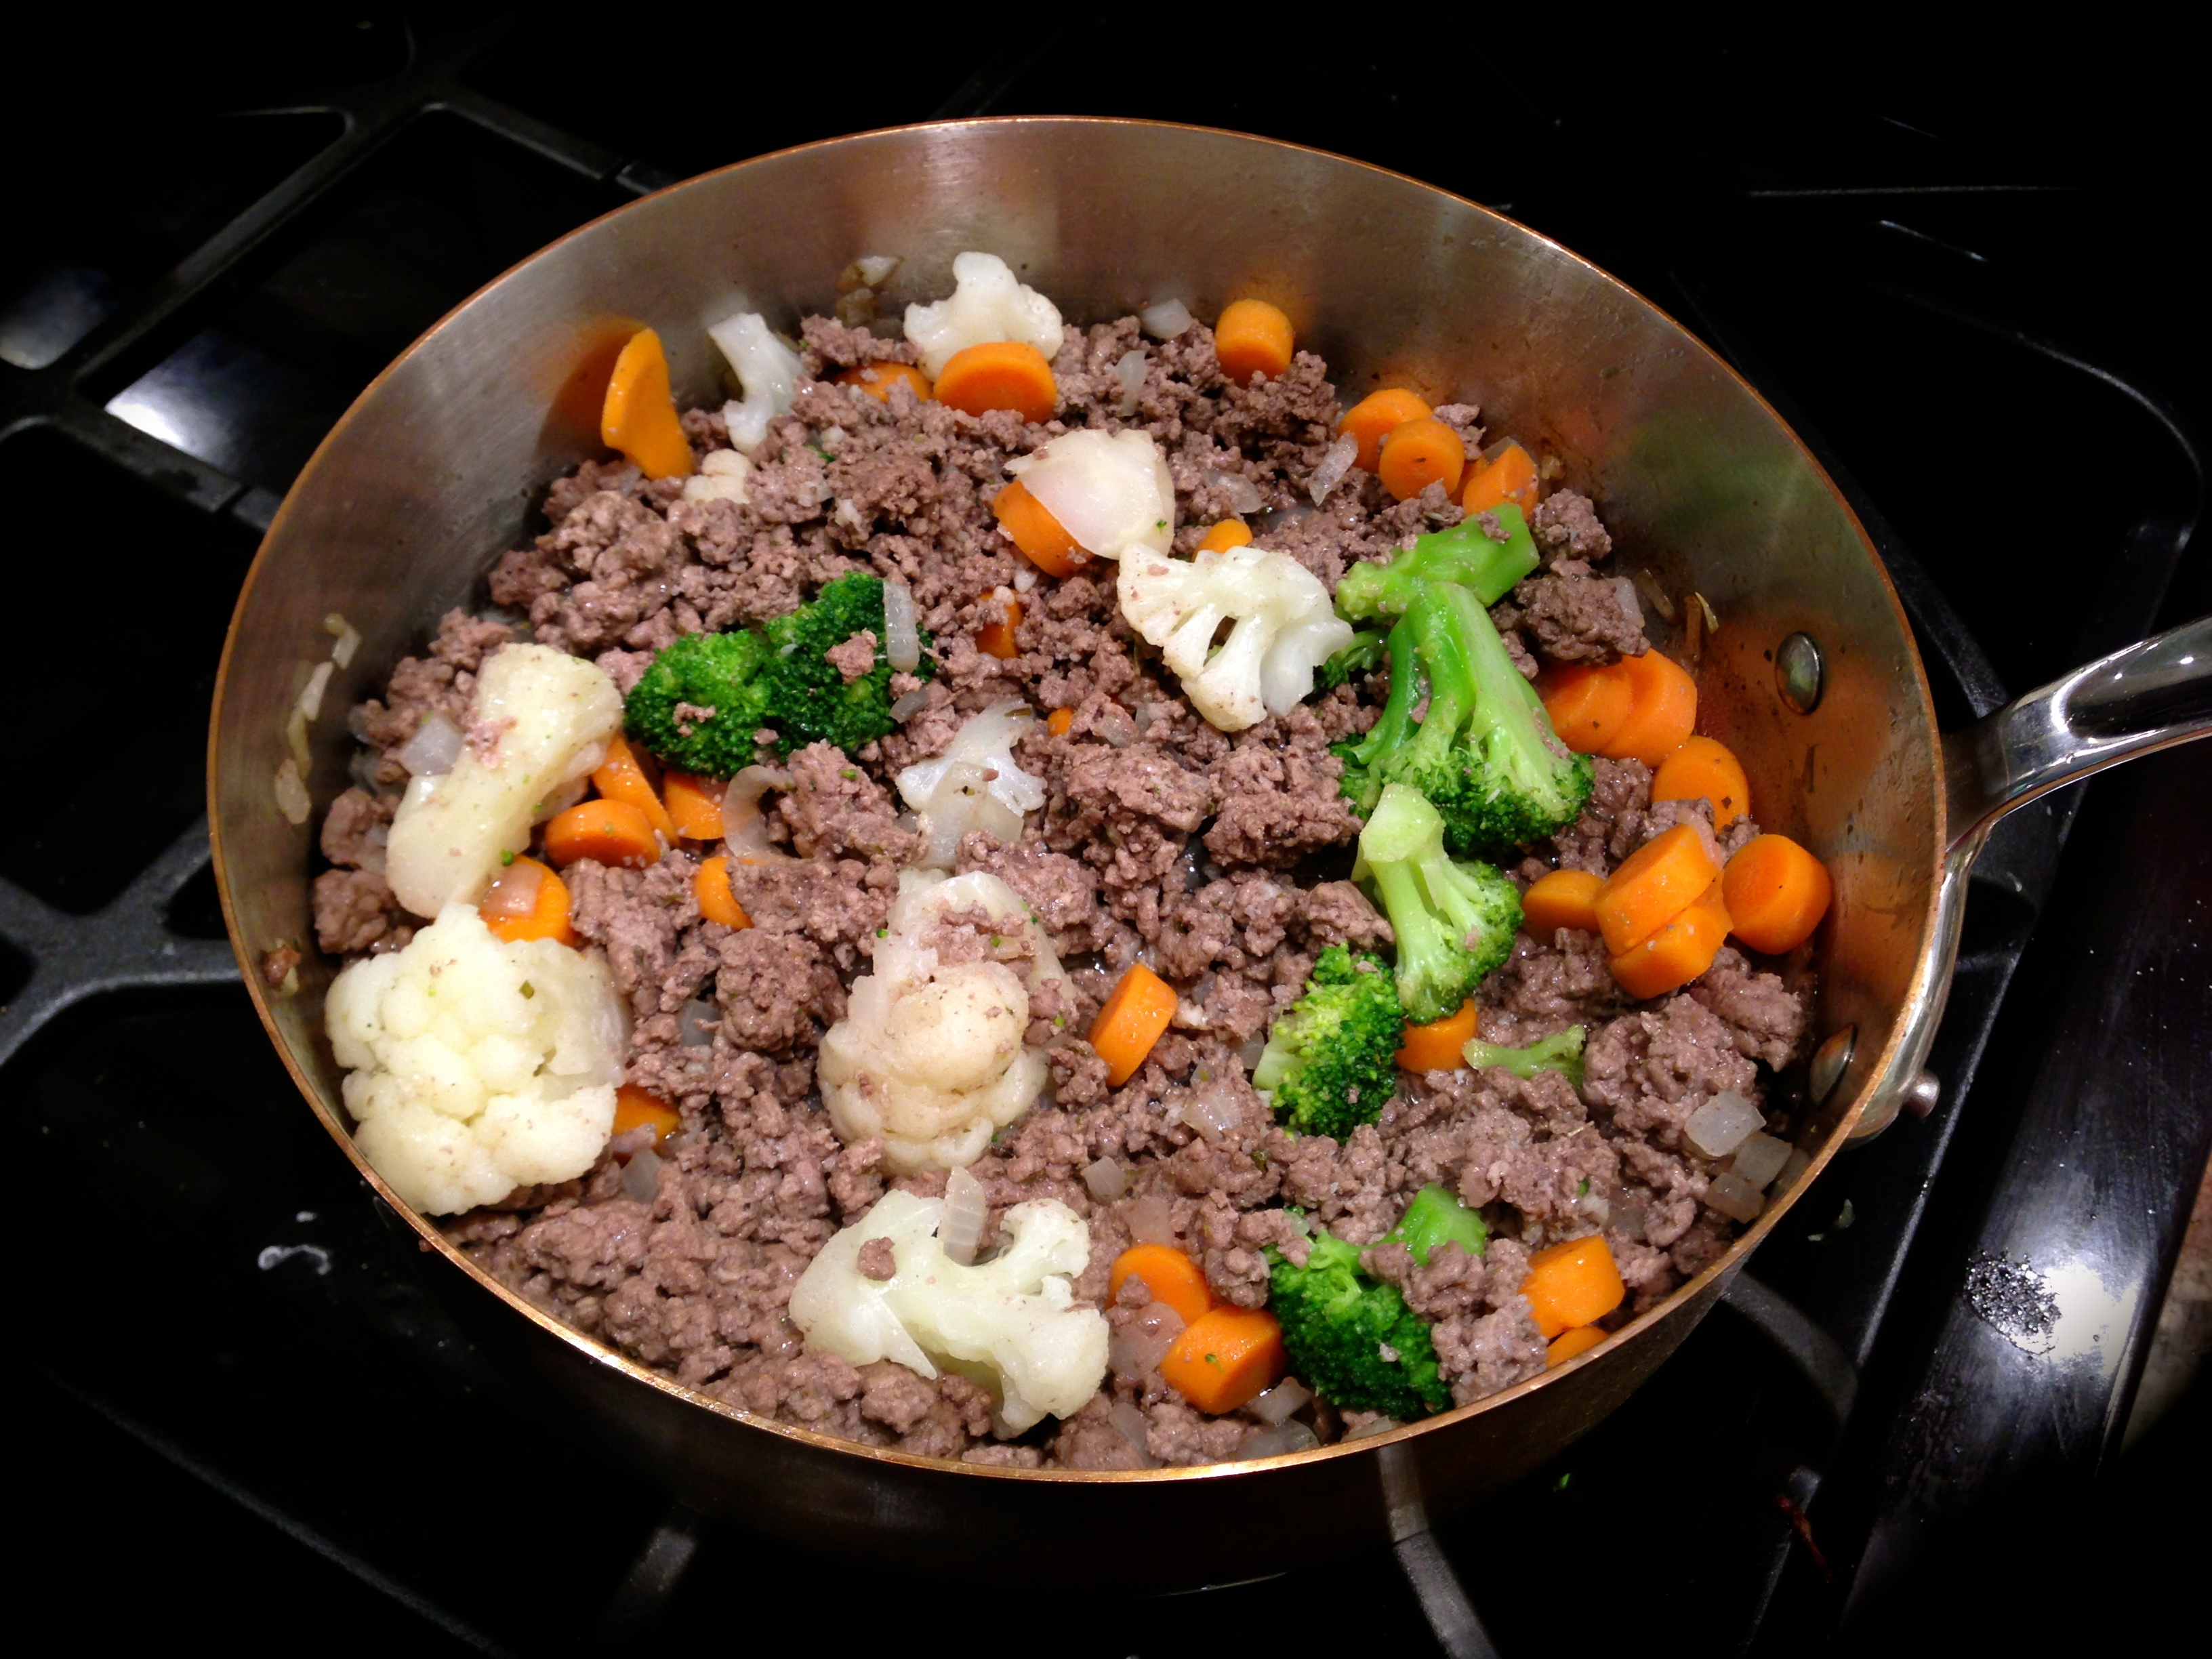
Lesson Learned 3 – Any frozen vegetables will do: I had some frozen broccoli, cauliflower and carrots and I add them to the recipe. You can also use frozen mixed vegetables (peas, carrots, green beans and corn). Just remember to make sure the pieces are not too large. I found I had very large cauliflower pieces so I cut them in half to make sure they would cook. You can also add fresh vegetables. I would cook them until slightly softened and then put them in the casserole. I think I am going to try fresh vegetables the next time I make this. Regardless, my husband told me that this recipe is definitely a keeper!
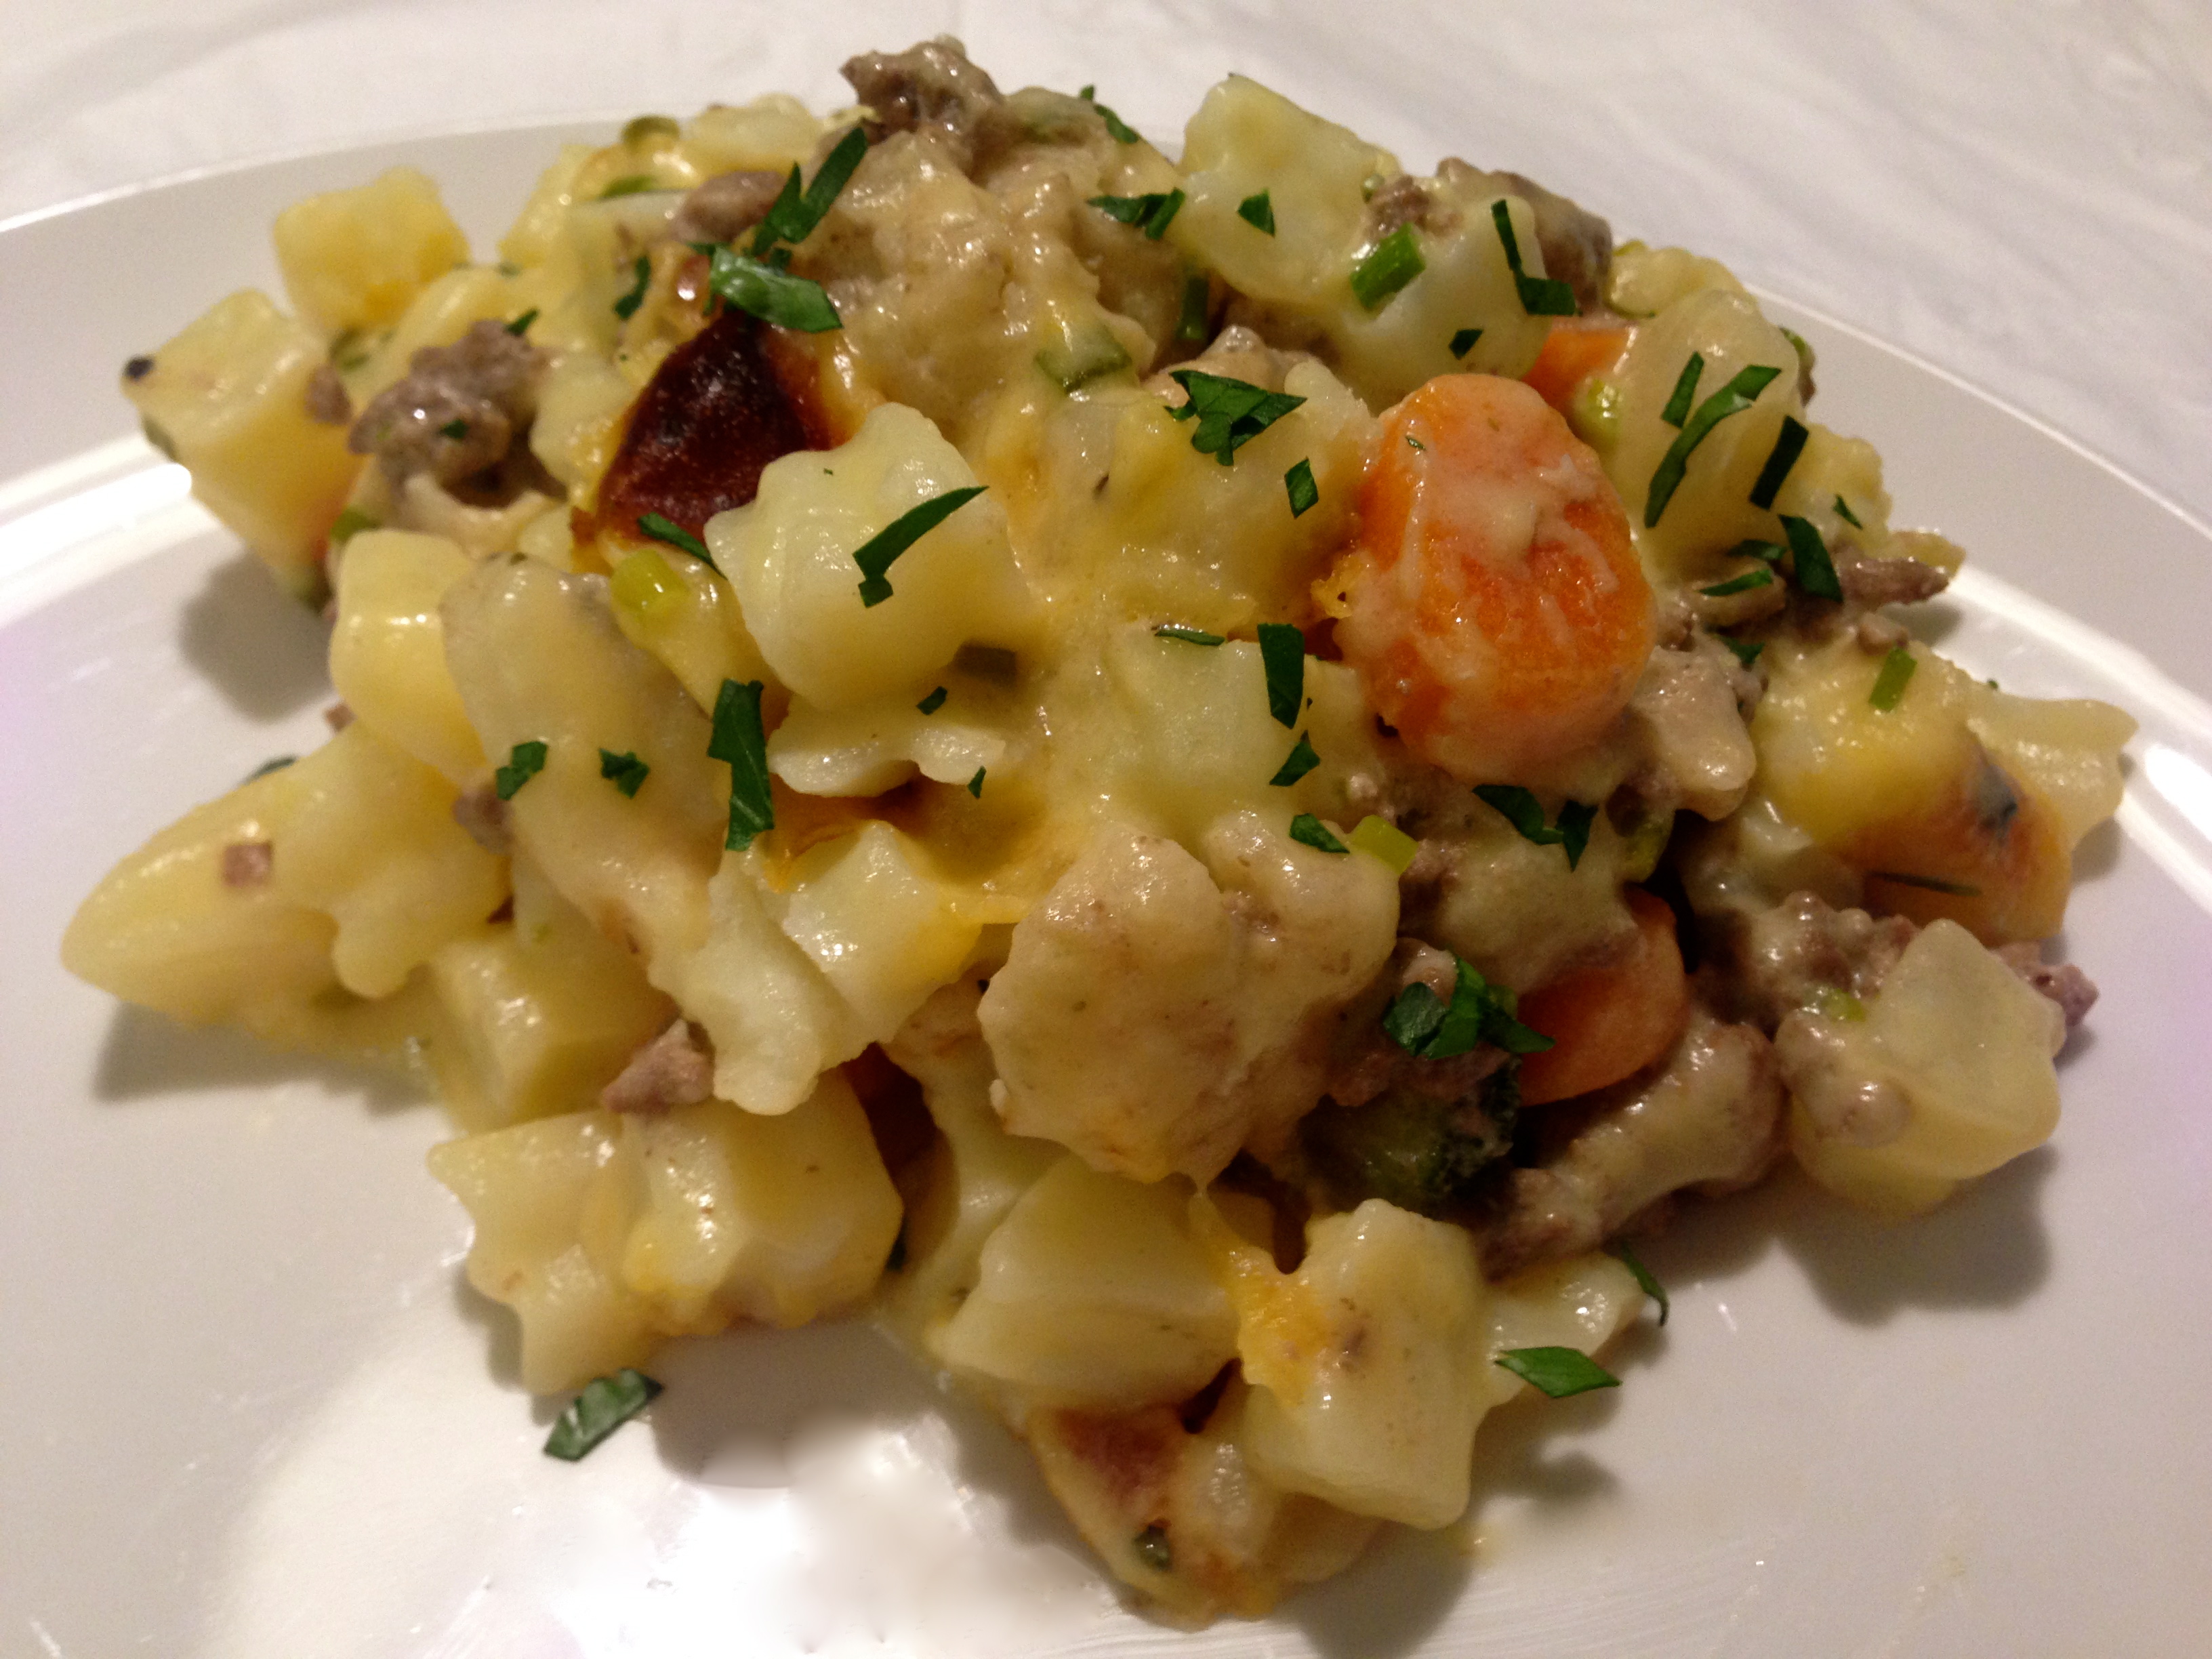
Lesson Learned 4 – This recipe makes great leftovers: The recipe as written serves 6 and my husband and I could not eat the whole thing the first time. We had it two days later as leftovers and it tasted equally as delicious as when it was first made. The best way to reheat this is to first take the casserole out of the refrigerator and let it sit on the kitchen counter for an hour. That takes the chill off. Then reheat at 375 for 45 minutes. (maybe 30 minutes at sea level). Make sure you reheat it covered in foil as the cheese will burn if you don’t. The ends result is piping hot and just as delicious as the first time around. This recipe is a winner out of the gate and as leftovers.
1 cup shredded cheese (I had a white cheddar and gruyere blend)
1/c cup sour cream
1/4 cup fresh chives, chopped
Frozen, diced potatoes (enough to cover the top – not quite a full 32 oz. bag)
Flat leaf parsley, chopped for garnish (optional)
DIRECTIONS:
Preheat the oven to 400 degrees. Spray a 10 x 10 casserole dish with cooking spray. Set aside.
In a large skillet heat 1 Tbs. of butter. Add the onions and cook until they start to become translucent (about 5 minutes). Salt and pepper the onions during this process. Add the ground beef and oregano. Cook until the meat is mostly cooked through. Add the garlic and vegetables and cook until the vegetables are slightly heated. Taste the mixture and add salt and pepper if needed. Once the vegetables are slightly heated, remove the mixture from the heat and set aside.
In another skillet melt the remaining 2 Tbs. of butter. Add the flour and whisk for about a minute. Add the milk and continue to whisk so the mixture stays smooth. Once the milk heats it will start to thicken. When the milk reaches a desired thick consistency (this takes about 5 minutes), turn off the heat and add the cheese. Whisk until the cheese melts. Once the cheese is incorporated into the milk mixture add the chives and stir to combine. Taste the cheese mixture and add salt and pepper, if needed.
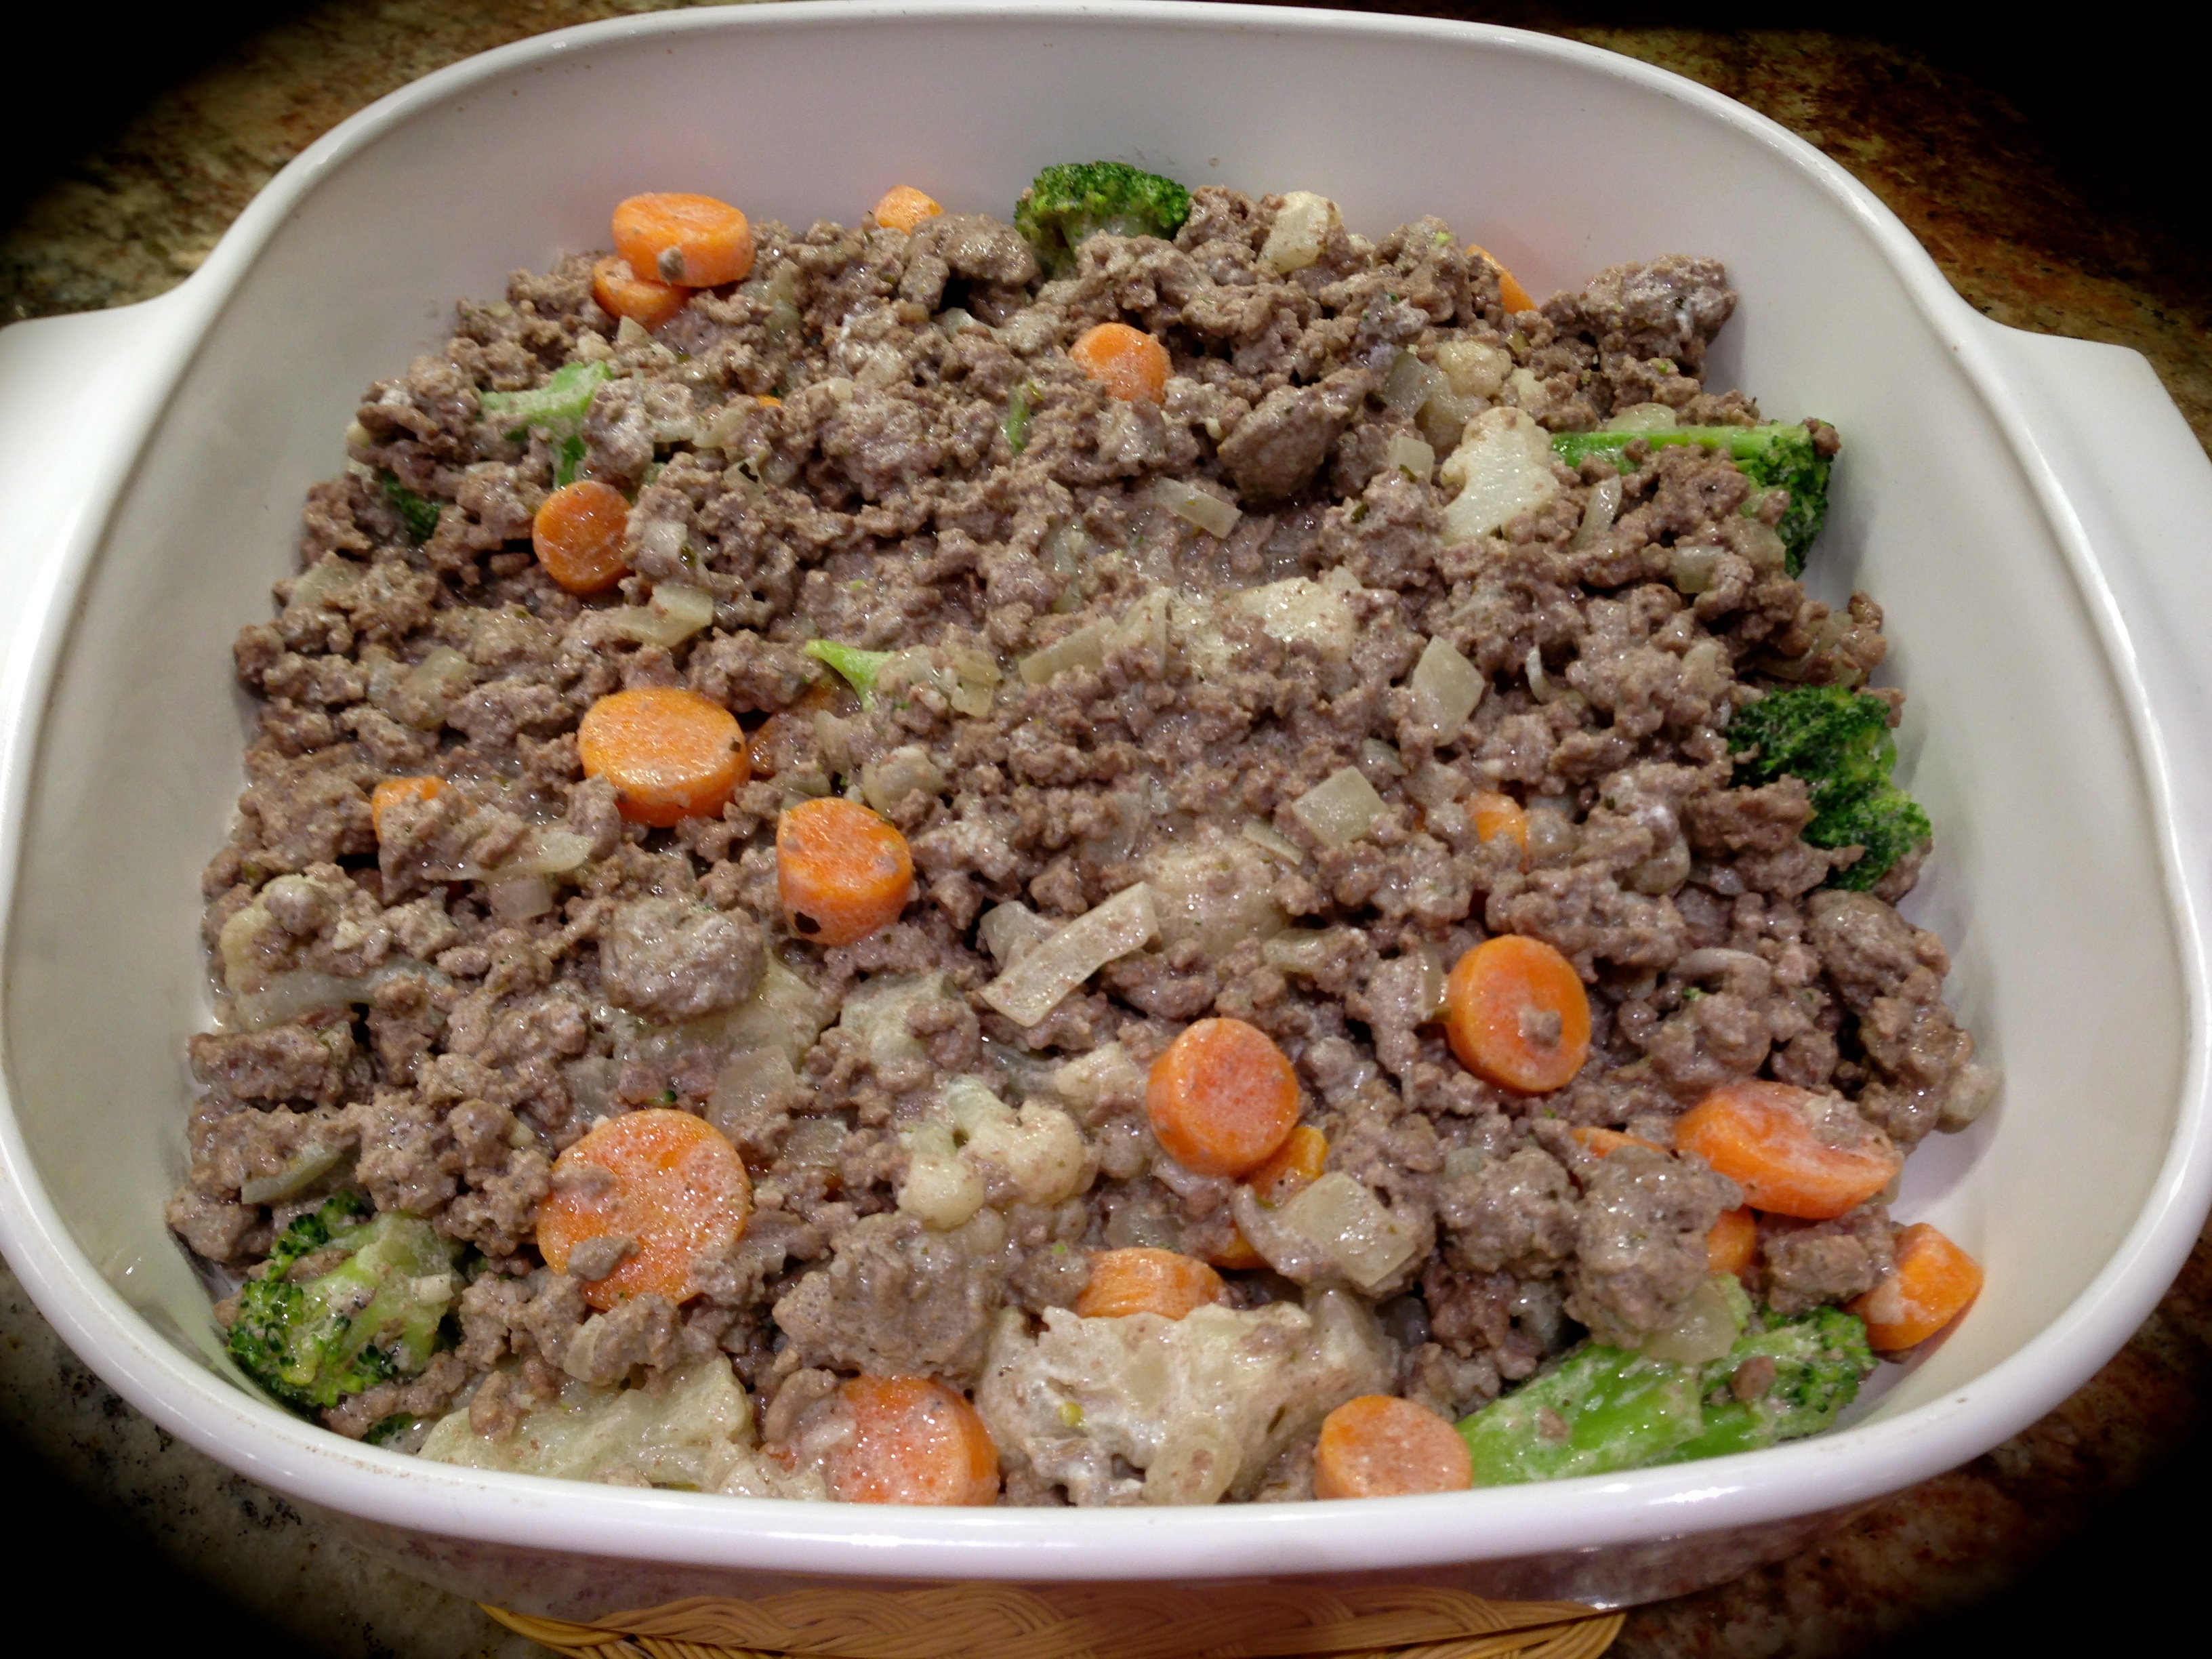
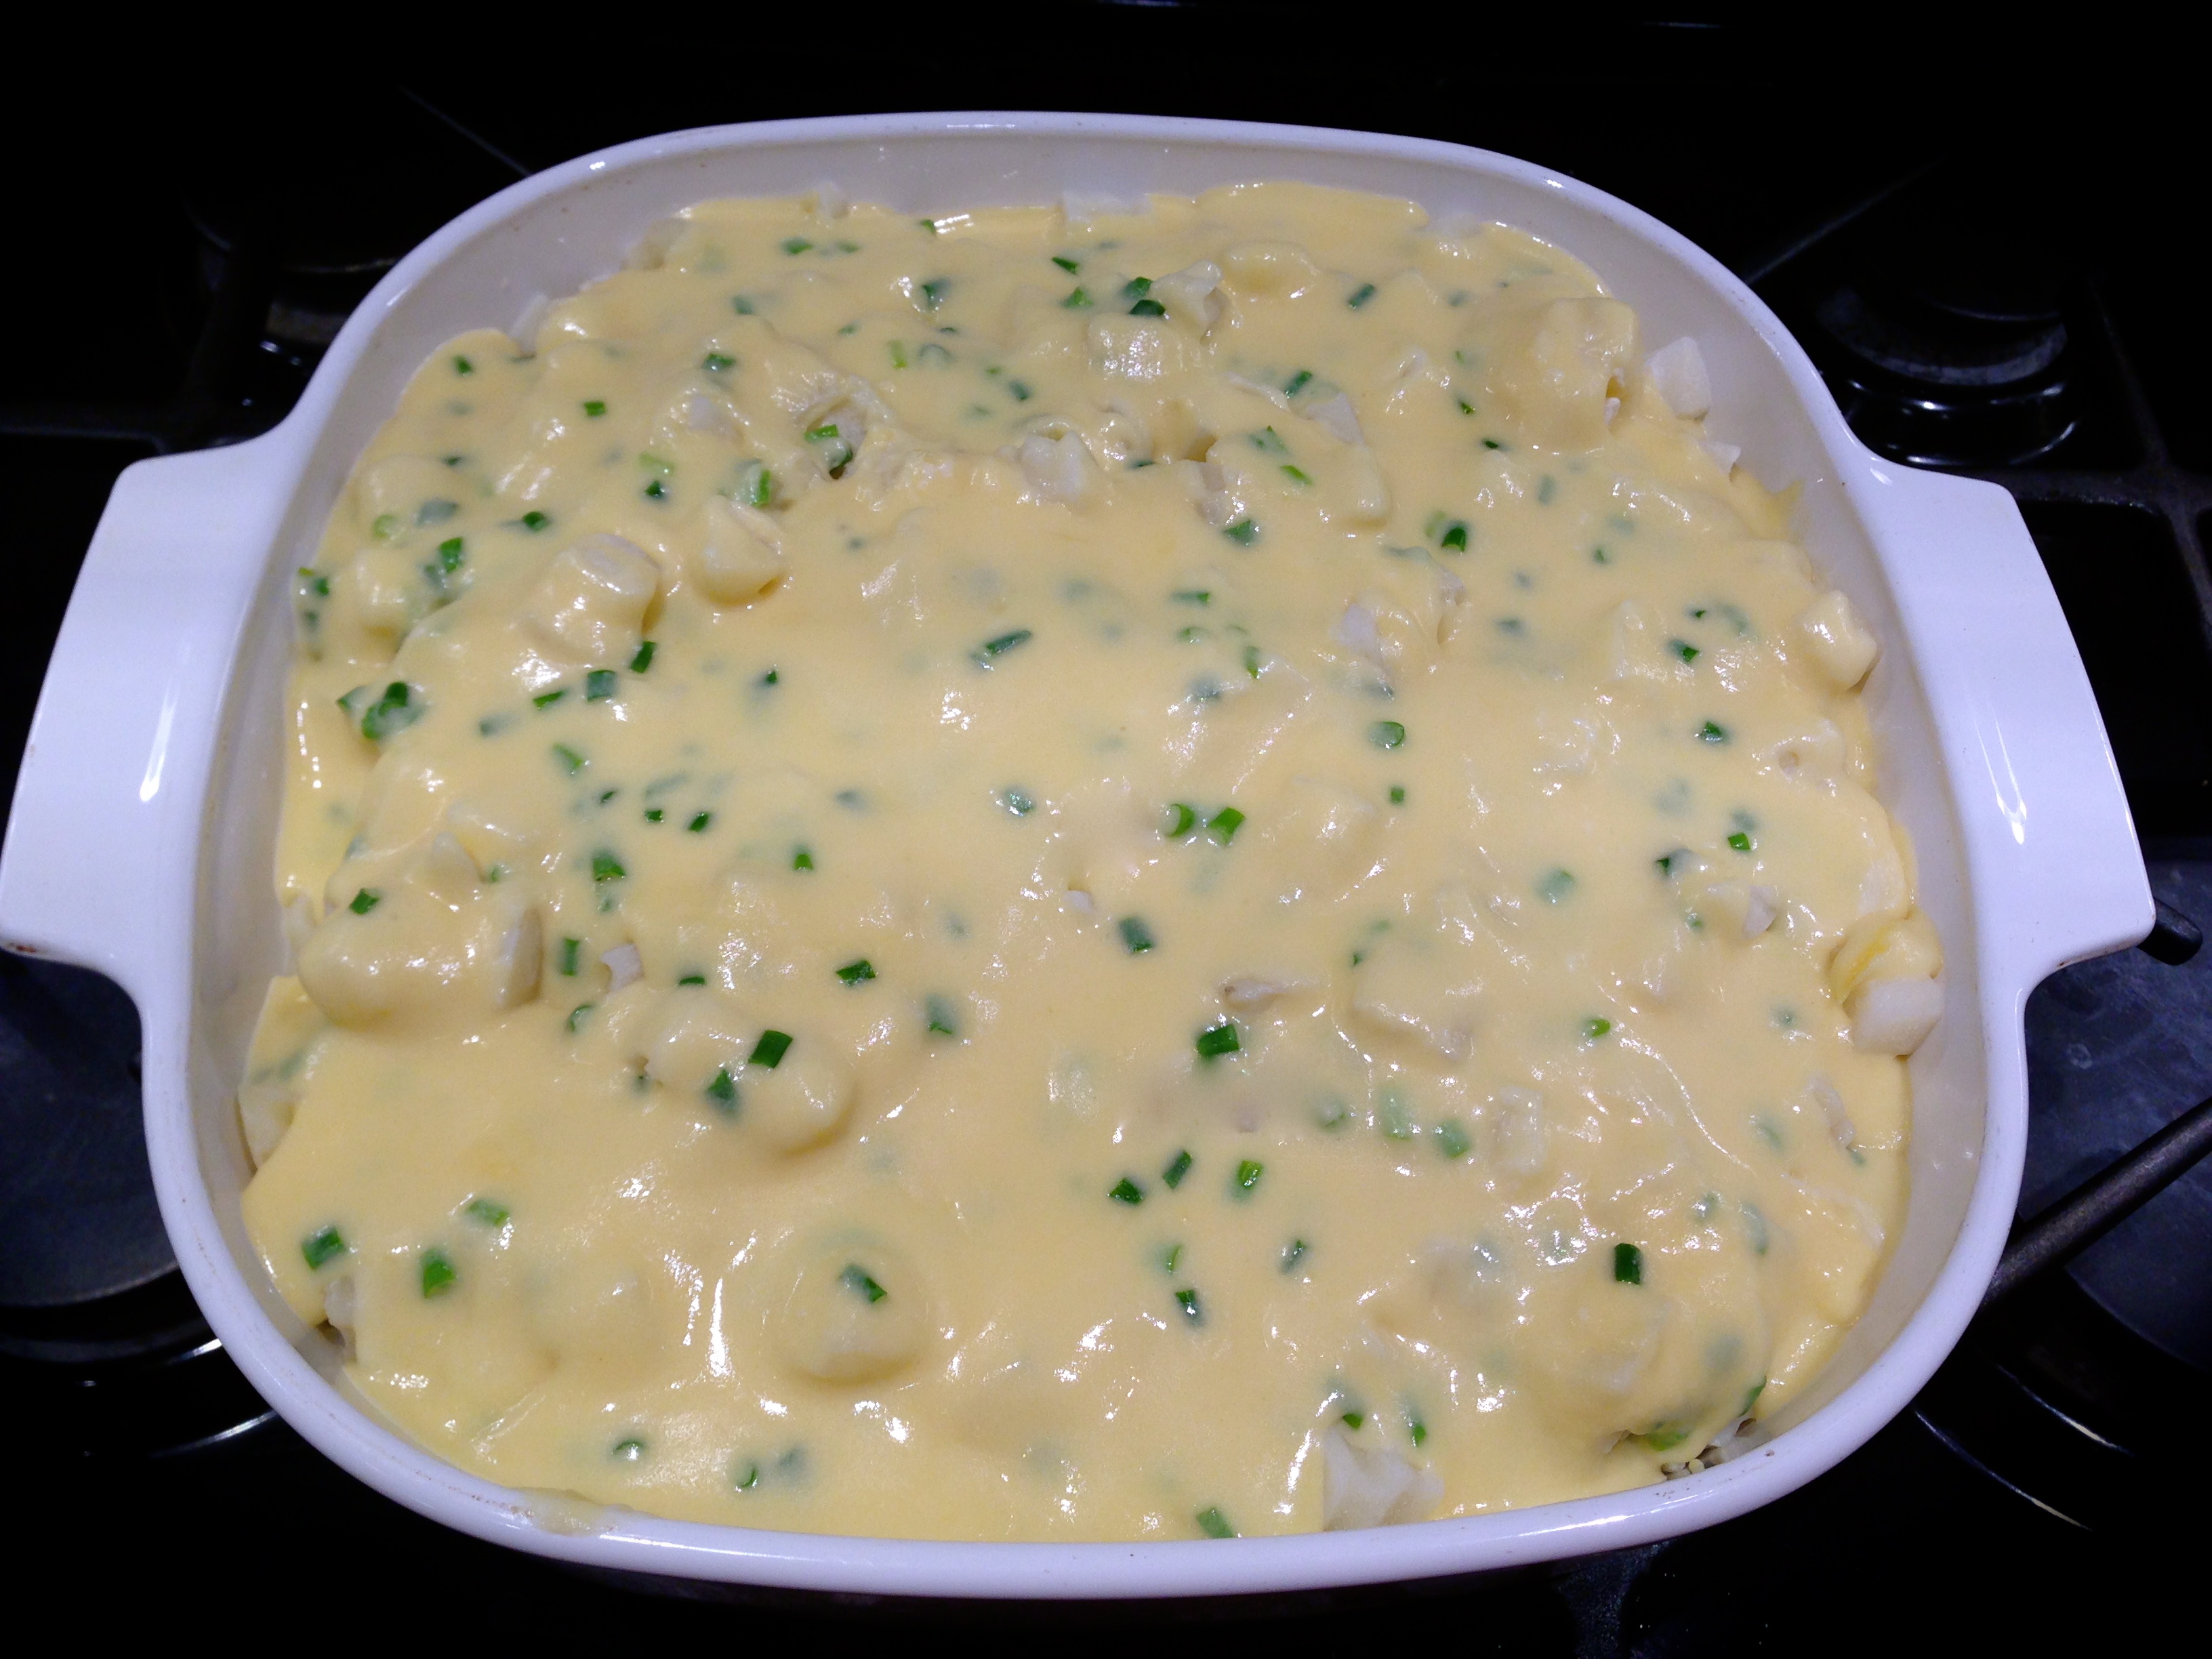
Add the sour cream to the meat mixture and stir to combine (You need to do this when the meat has slightly cooled so the sour cream does not curdle). Spread the meat mixture into the bottom of the prepared baking dish. Cover the meat mixture evenly with the frozen diced potatoes. Pour the cheese mixture over the potatoes.
Bake for 45 – 60 minutes. For the first 20 minutes cover the casserole with foil, then remove the foil and bake for the remaining time. Remove the casserole from the oven and let it rest for 5 minutes before serving.
Add the sour cream to the meat mixture and spread in the bottom of the dish…
Arrange an even layer of frozen potatoes over the meat…

 Lesson Learned 3 – Feel free to experiment with this recipe: Add ingredients to the ground beef that you and your family like. If you don’t like mushrooms, don’t use them. If you like sweet peppers, dice them up and use them. If you’re not a big fan of spicy don’t use the hot sauce. But if you want some real tang add some crushed red pepper to the beef. If you prefer pearl onions, add them. You can use cheddar cheese instead of muenster cheese (I find cheddar cheese to be somewhat greasy) or any melting cheese you prefer. The beauty is this recipe can be very versatile to include anything you enjoy.
 INGREDIENTS:


 but you can make it has hot as you like. McCormick has a few varieties of seasonings and if you can’t find a seasoning mix that gets you the heat you crave you can always add red pepper flakes. This seasoning mix contains a blend of chili pepper, paprika, cumin, onion salt and garlic. I also add about a teaspoon of chili powder and this combination of seasonings gives us the kind of chili we prefer.


 You want to be careful not to overload your ground beef with bread crumbs. You’ll dry it out. After making hamburgers and meatloaf for years and now salisbury steak, I know how the beef should feel so that it will not be overly dry. It should feel moist but not overly sticky. This is something you’ll get a feel for over time. Don’t worry about it. I always add about half the amount of bread crumbs the recipe calls for to begin with and add more from there. You can always add more and you don’t want to wind up with too much bread crumbs in the mix.