White Chocolate Strawberry Cookies

This time I wanted to do something a little different with my leftover strawberries. Normally I make some sort of loaf but I was intrigued by the thought of making strawberry cookies, something I’d never done before. I have to say it was a learning experience, and a very good one I might add.

I’ve always found strawberries to be tricky in the baking process. They add additional moisture when baking and that can play havoc on your end result especially if you live in high altitude like I do. But I’ve had enough disasters along the way that I say with great confidence that I think I’ve finally got baking with strawberries down pat. So lets talk white chocolate strawberry cookies…

cut strawberries
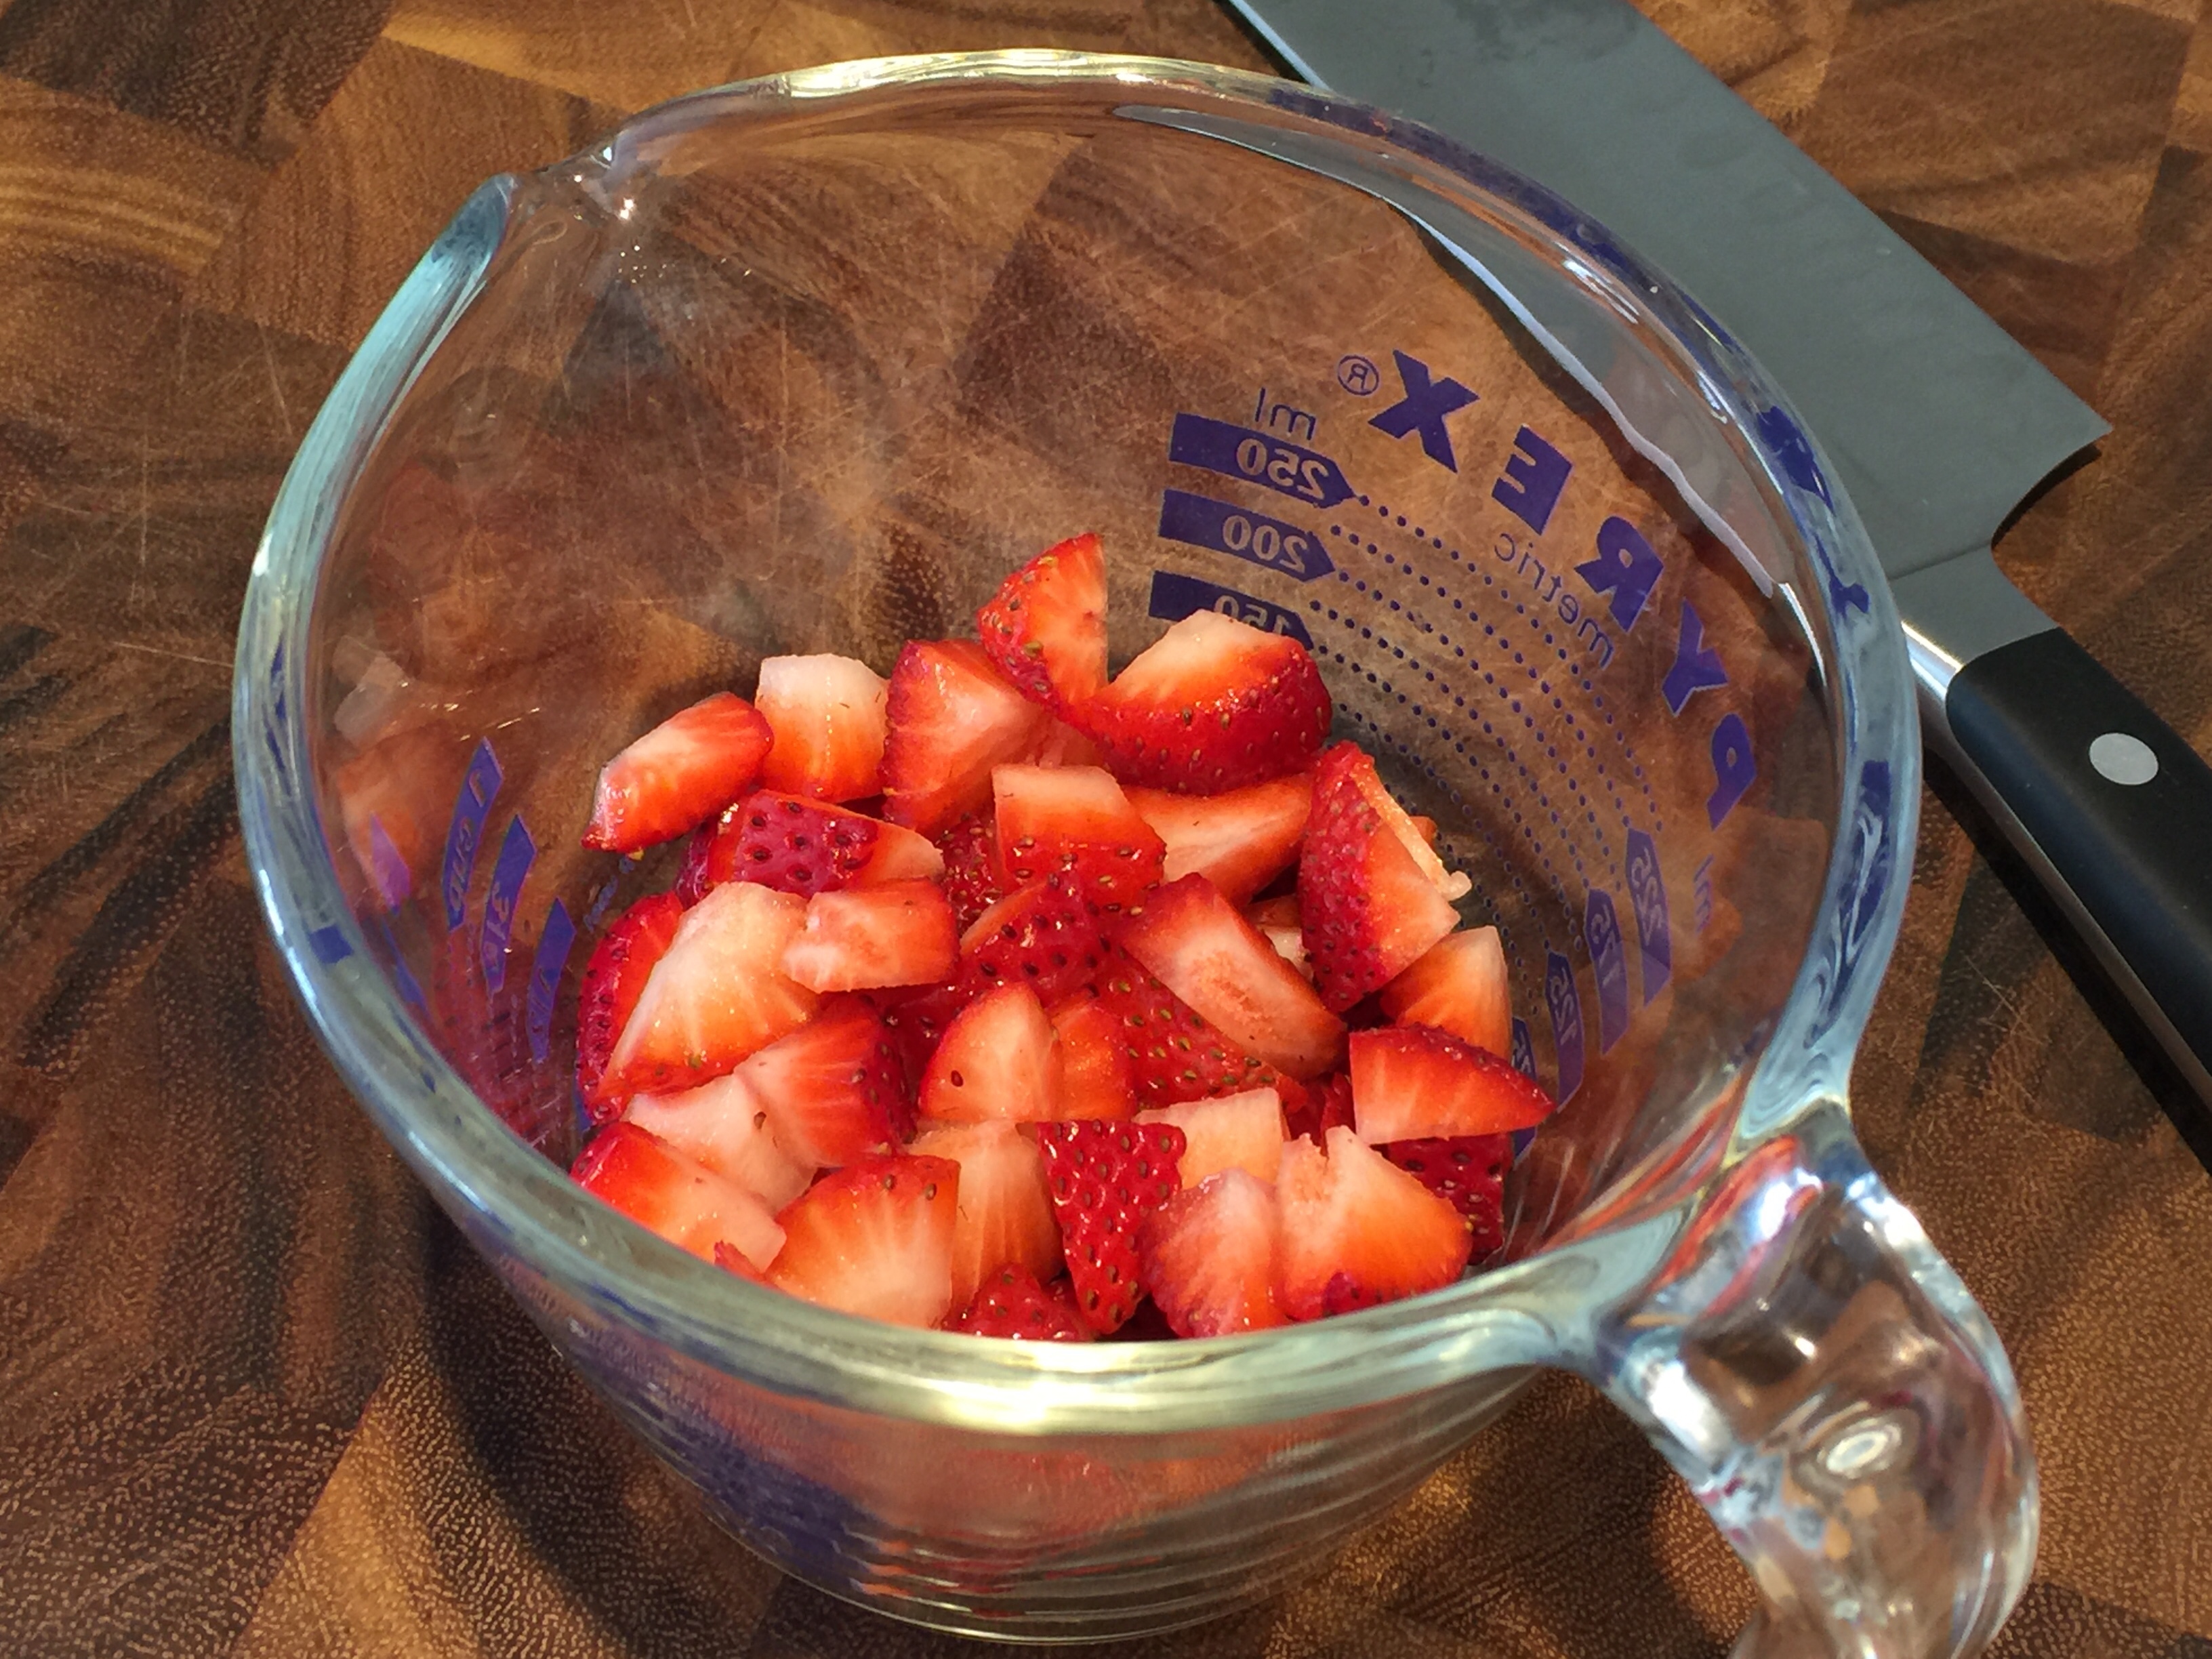
Lesson Learned 1 – Follow these basic tips for baking with strawberries: Strawberries give off moisture when they bake and that can make the consistency of the batter too runny and result in a baking disaster. I’ve learned a few simple tips along the way that will help you be successful when baking with strawberries. First, prep the strawberries the very first thing. Cut them into smaller rather than larger pieces. Sprinkle the strawberries with a tiny, tiny bit of lemon juice, place them in a colander over a bowl and allow them to shed some excess moisture. Normally you add strawberries at the end of a recipe. Prepping them at the beginning gives them plenty of time to shed some of that excess moisture.

Before you add them to a batter sprinkle them with a little flour and make sure all of the berries are lightly coated. That way the flour will continue to absorb moisture and the berries will not all clump together in the baking process. If you are making a strawberry bread, sprinkling them with a little flour before adding them to the batter will prevent all the strawberries from sinking to the bottom of the bread. Try these few tips and you should be successful baking with strawberries.

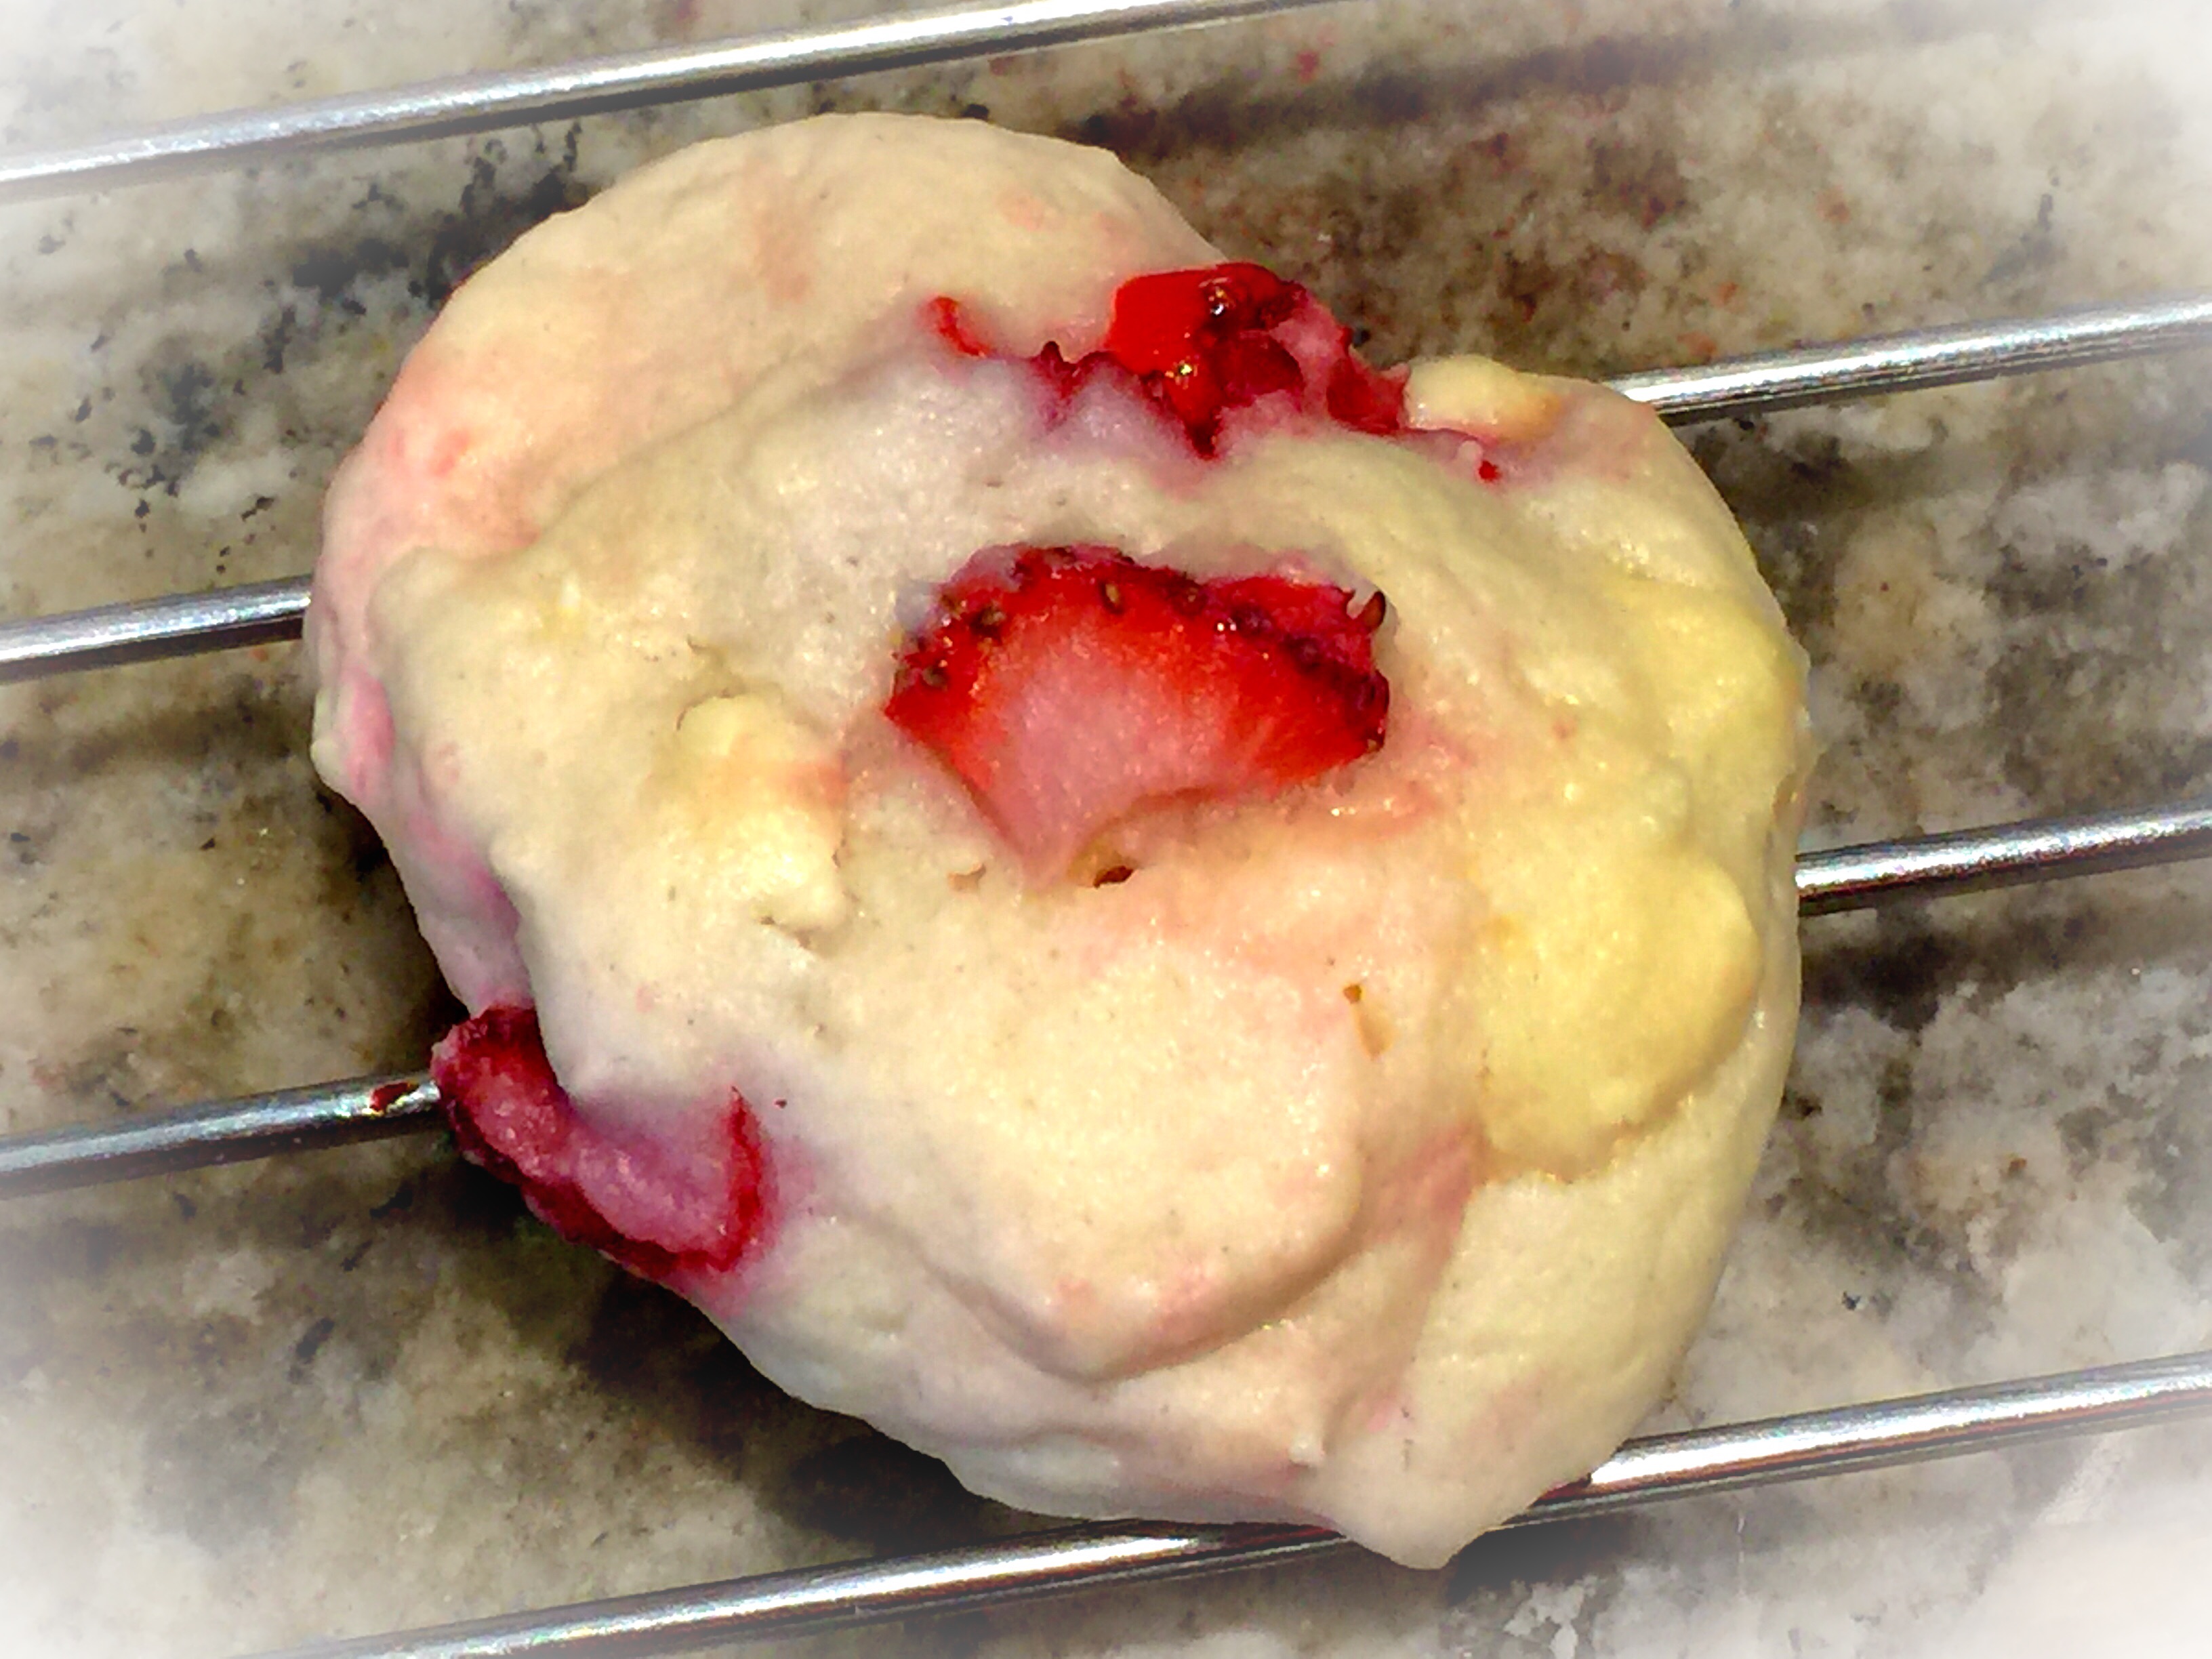
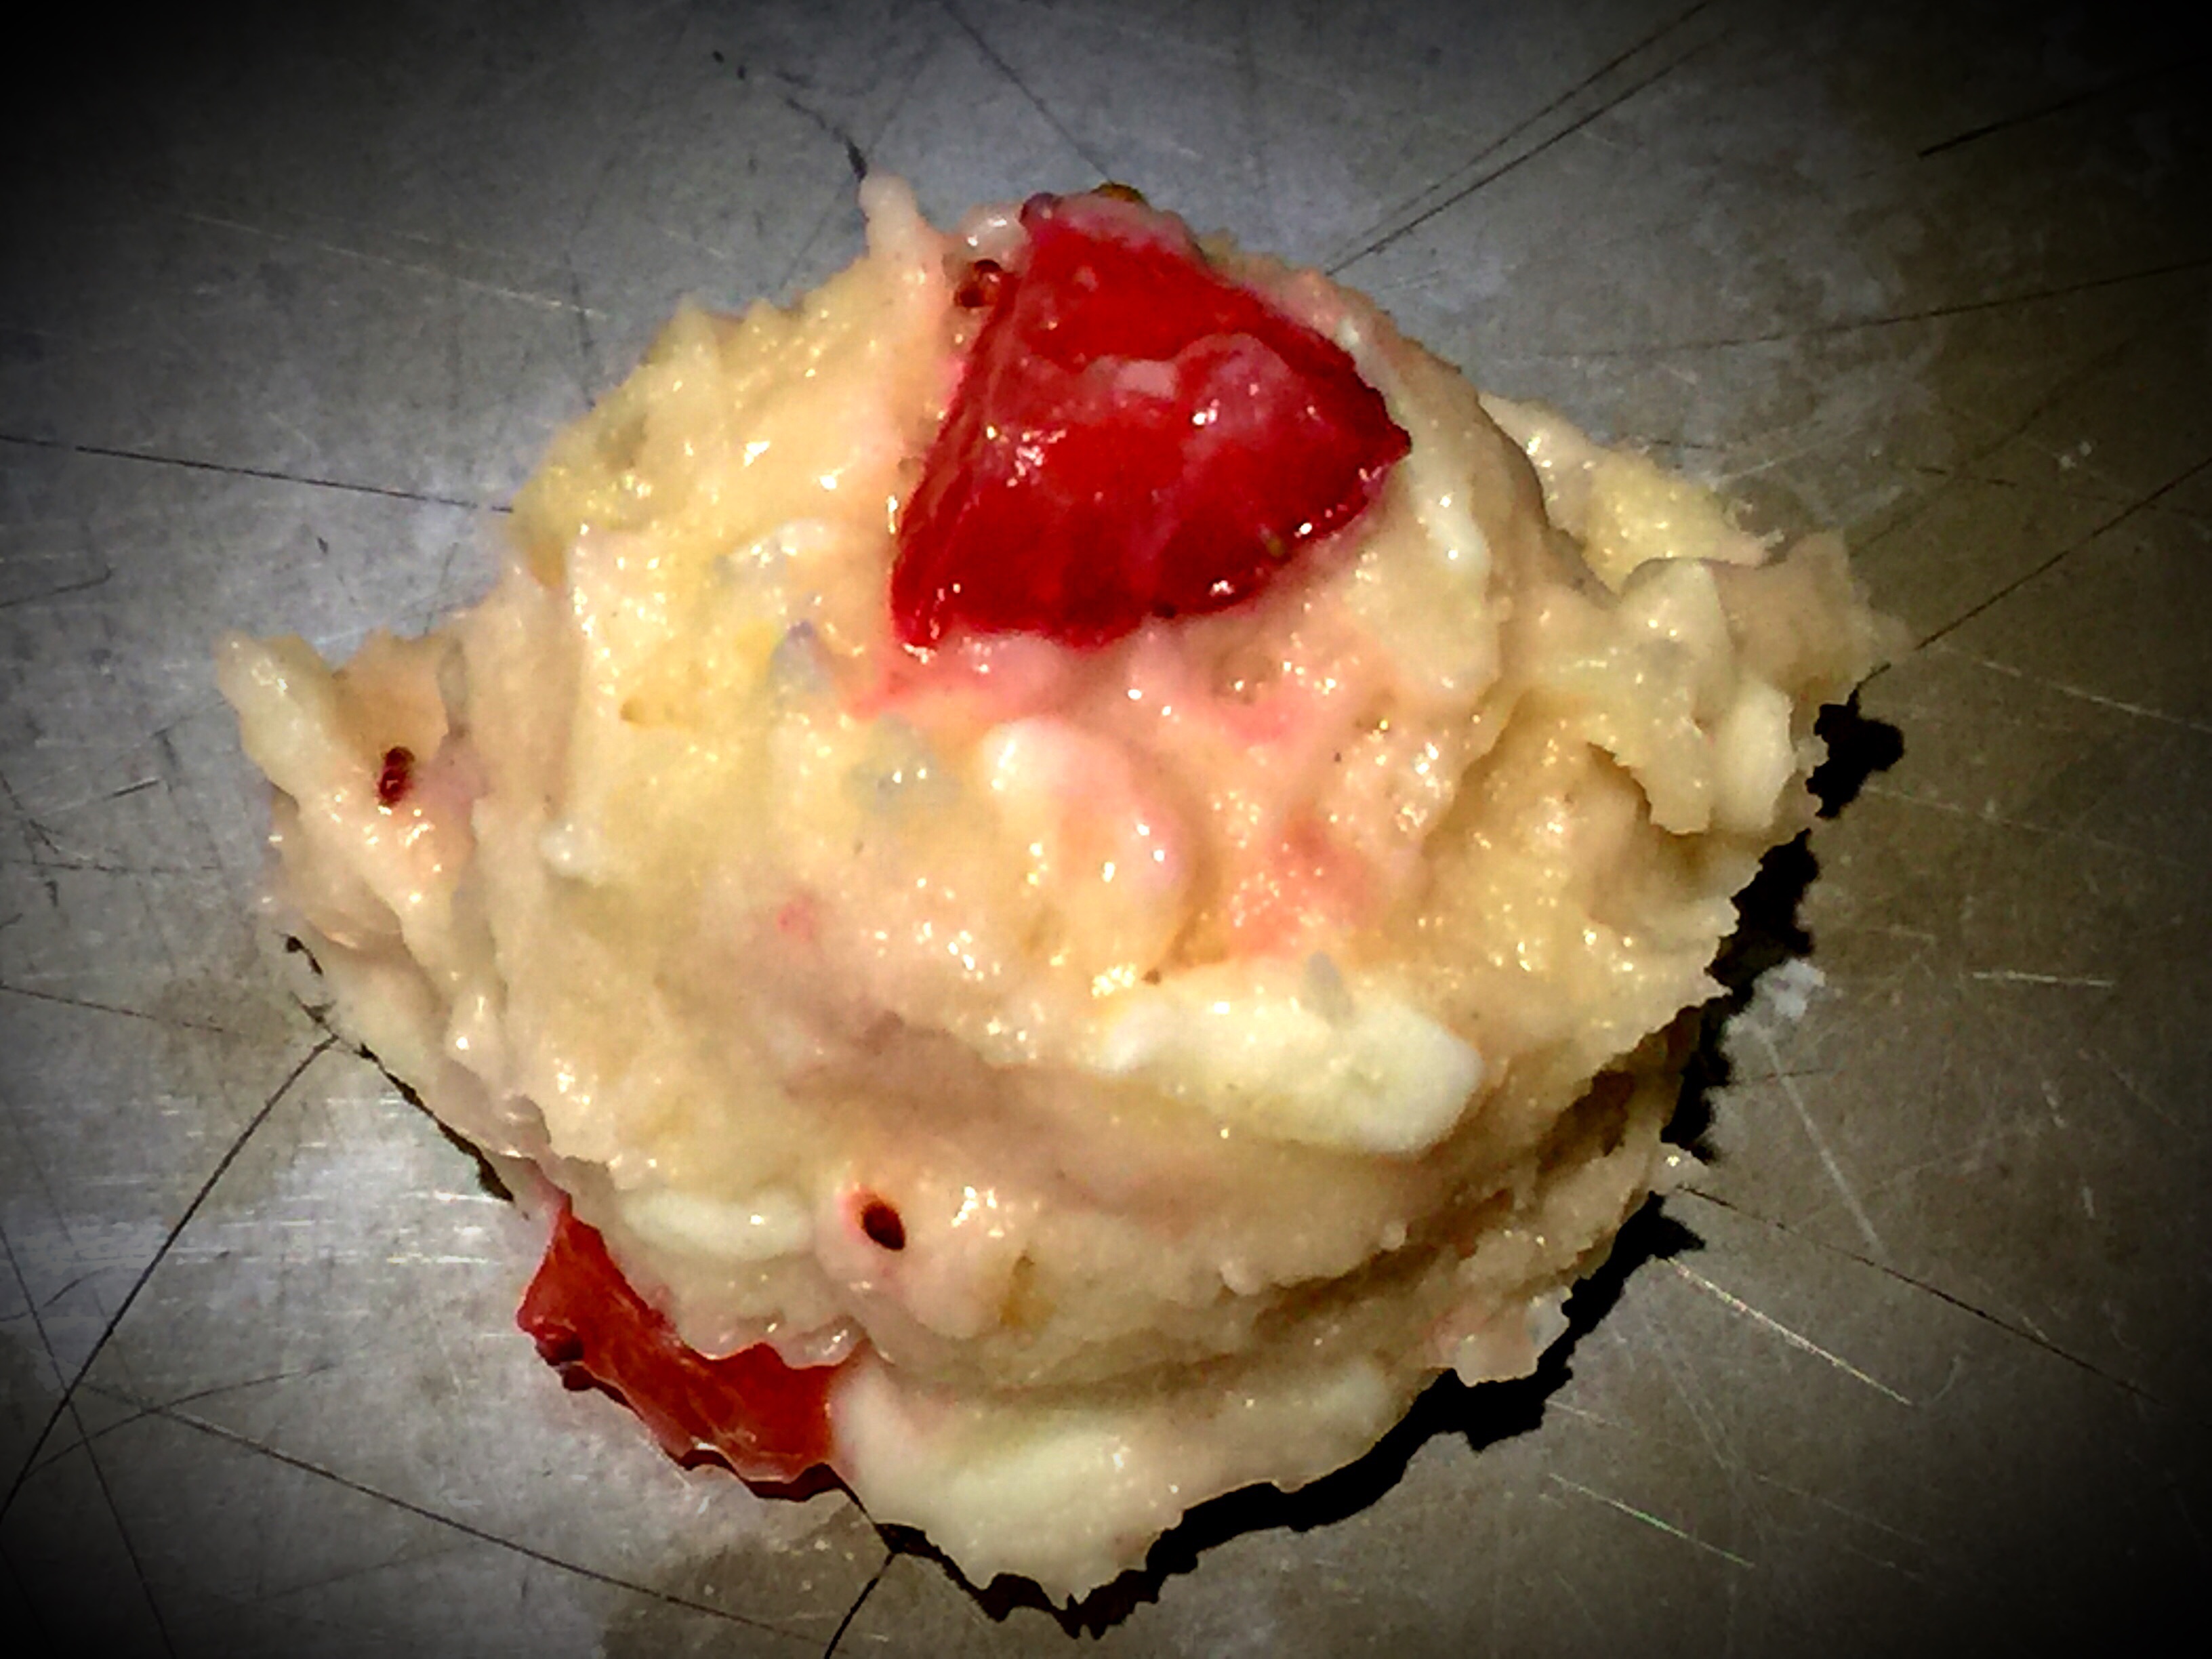
Lesson Learned 2 – This is a very moist batter: The consistency of this batter is very moist. Once you make it I recommend you put it in the refrigerator for 15-30 minutes. That way it will be a little easier to work with. Even after you refrigerate it the batter will still be moist as is evidenced by the picture below. Don’t worry, the cookies will not run. They will hold shape and turn out to be a delightful cookie!

Cookie dough before baking

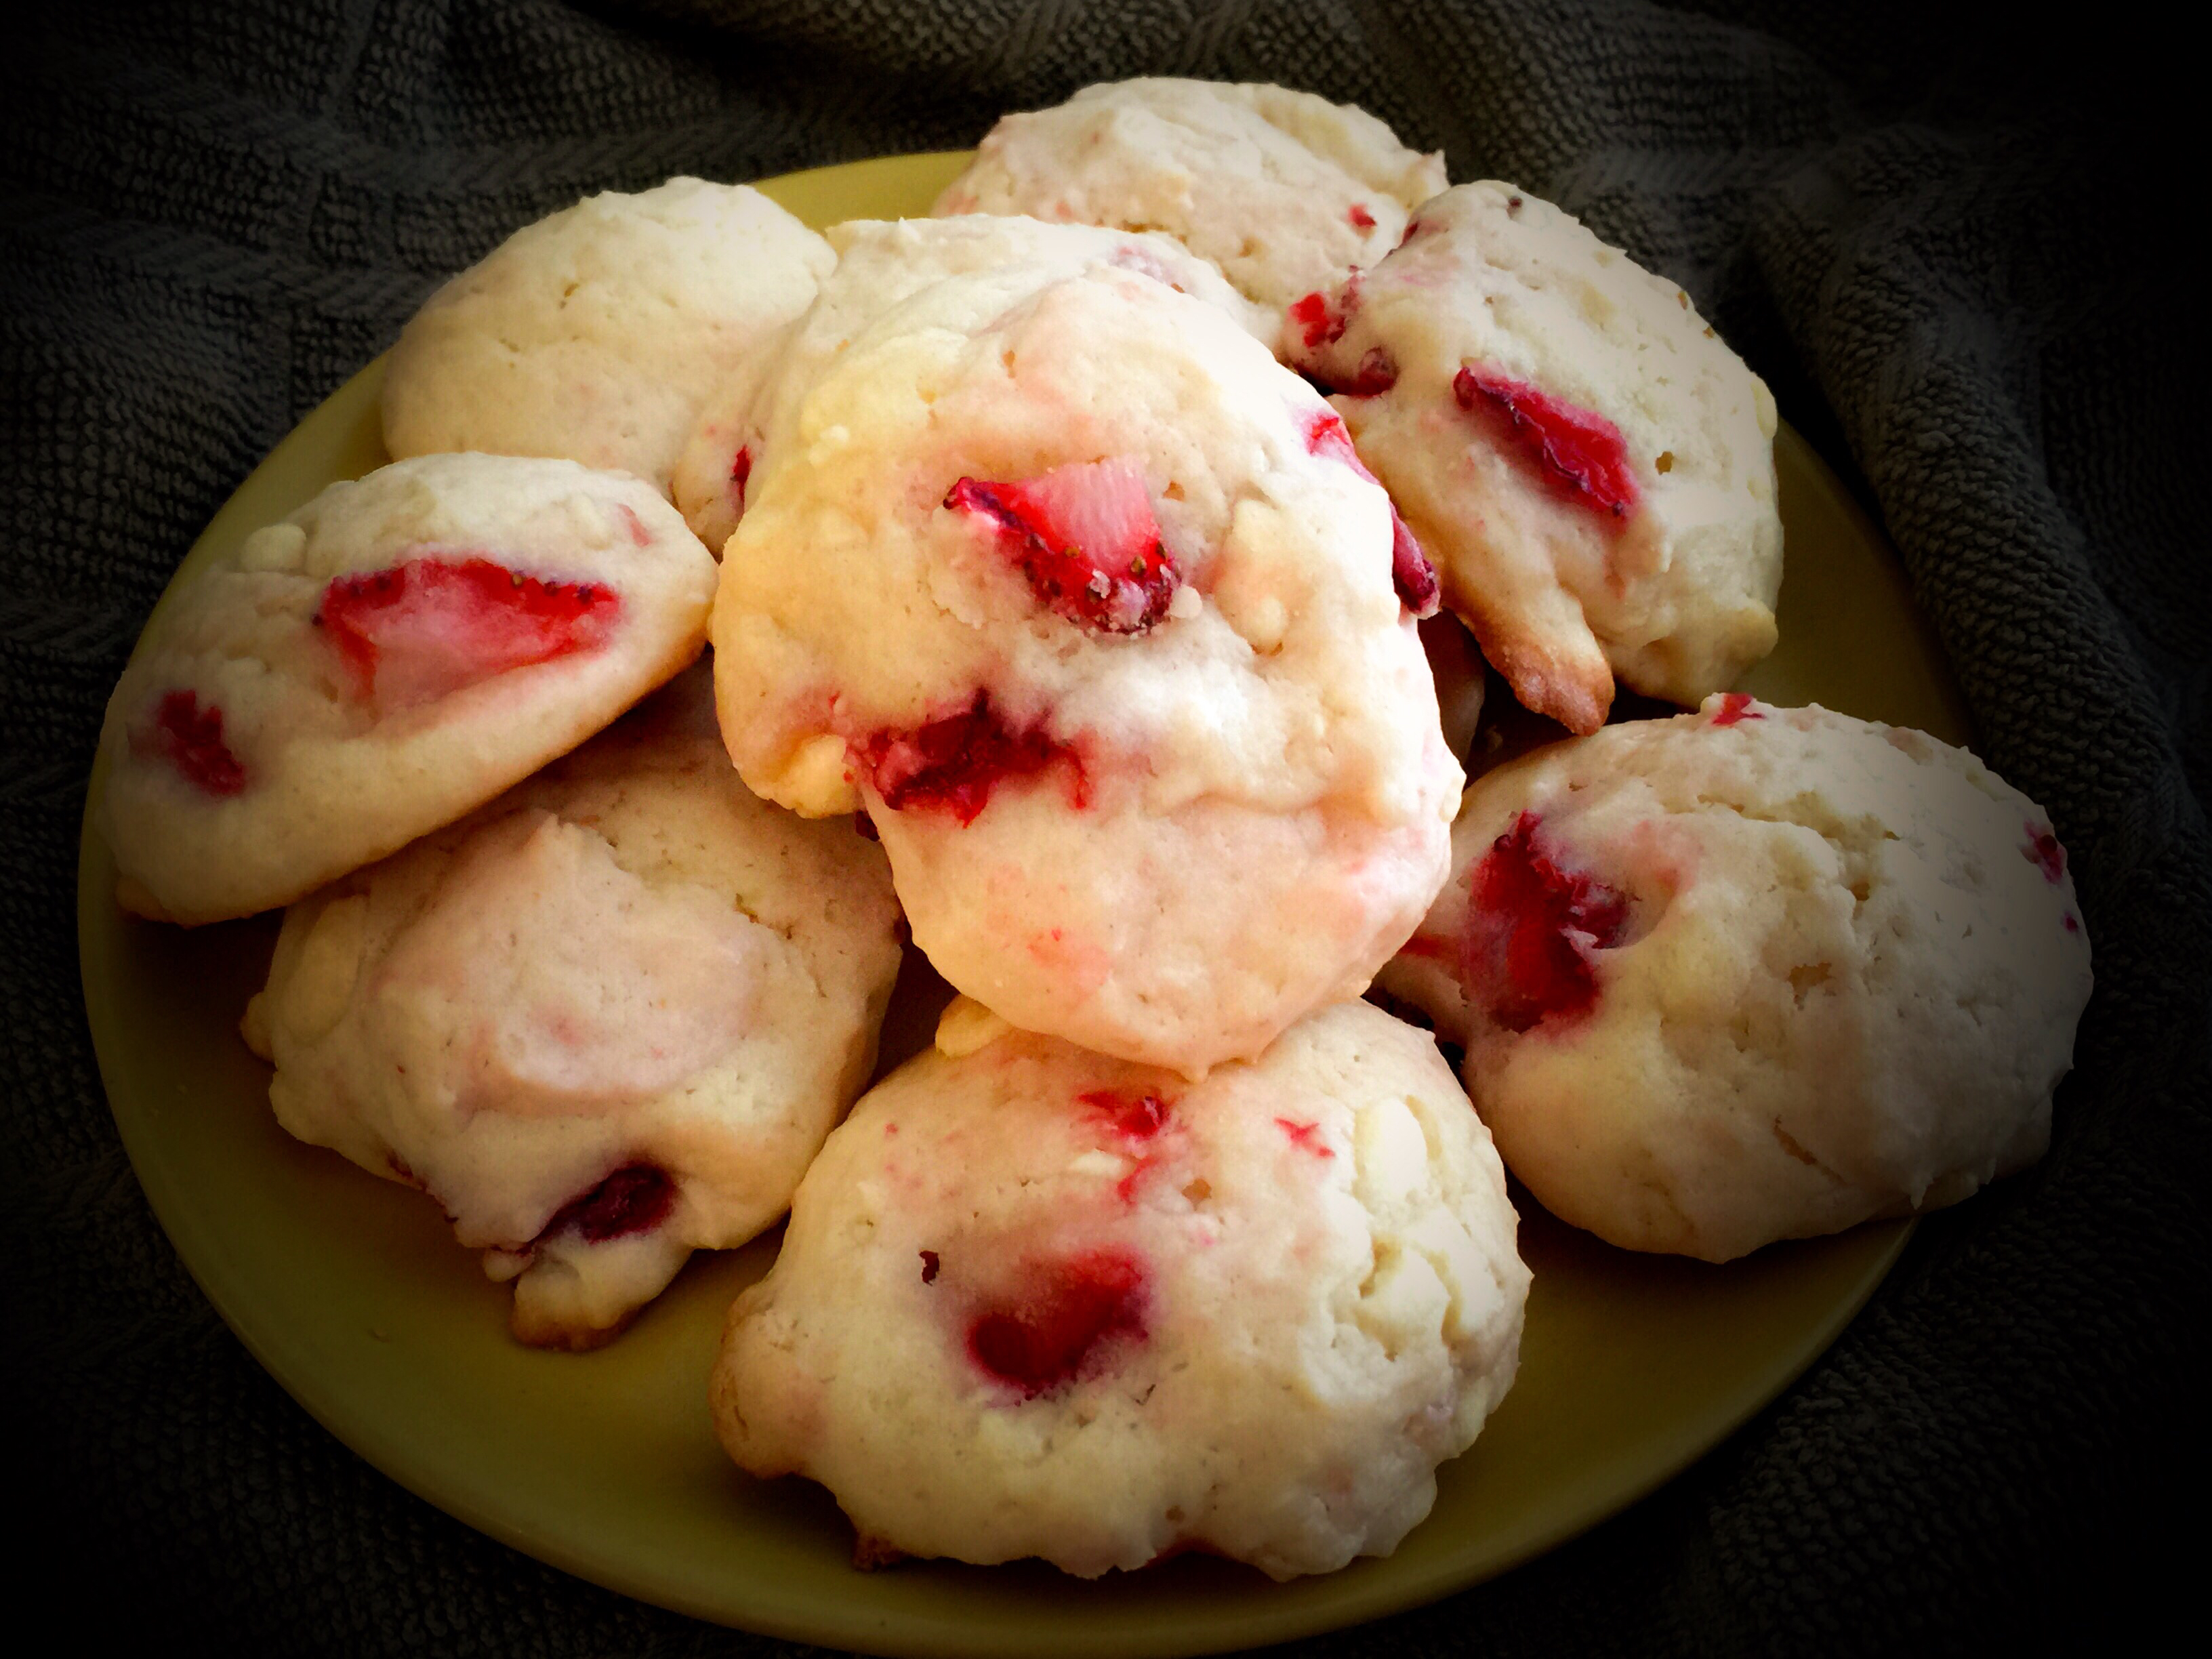
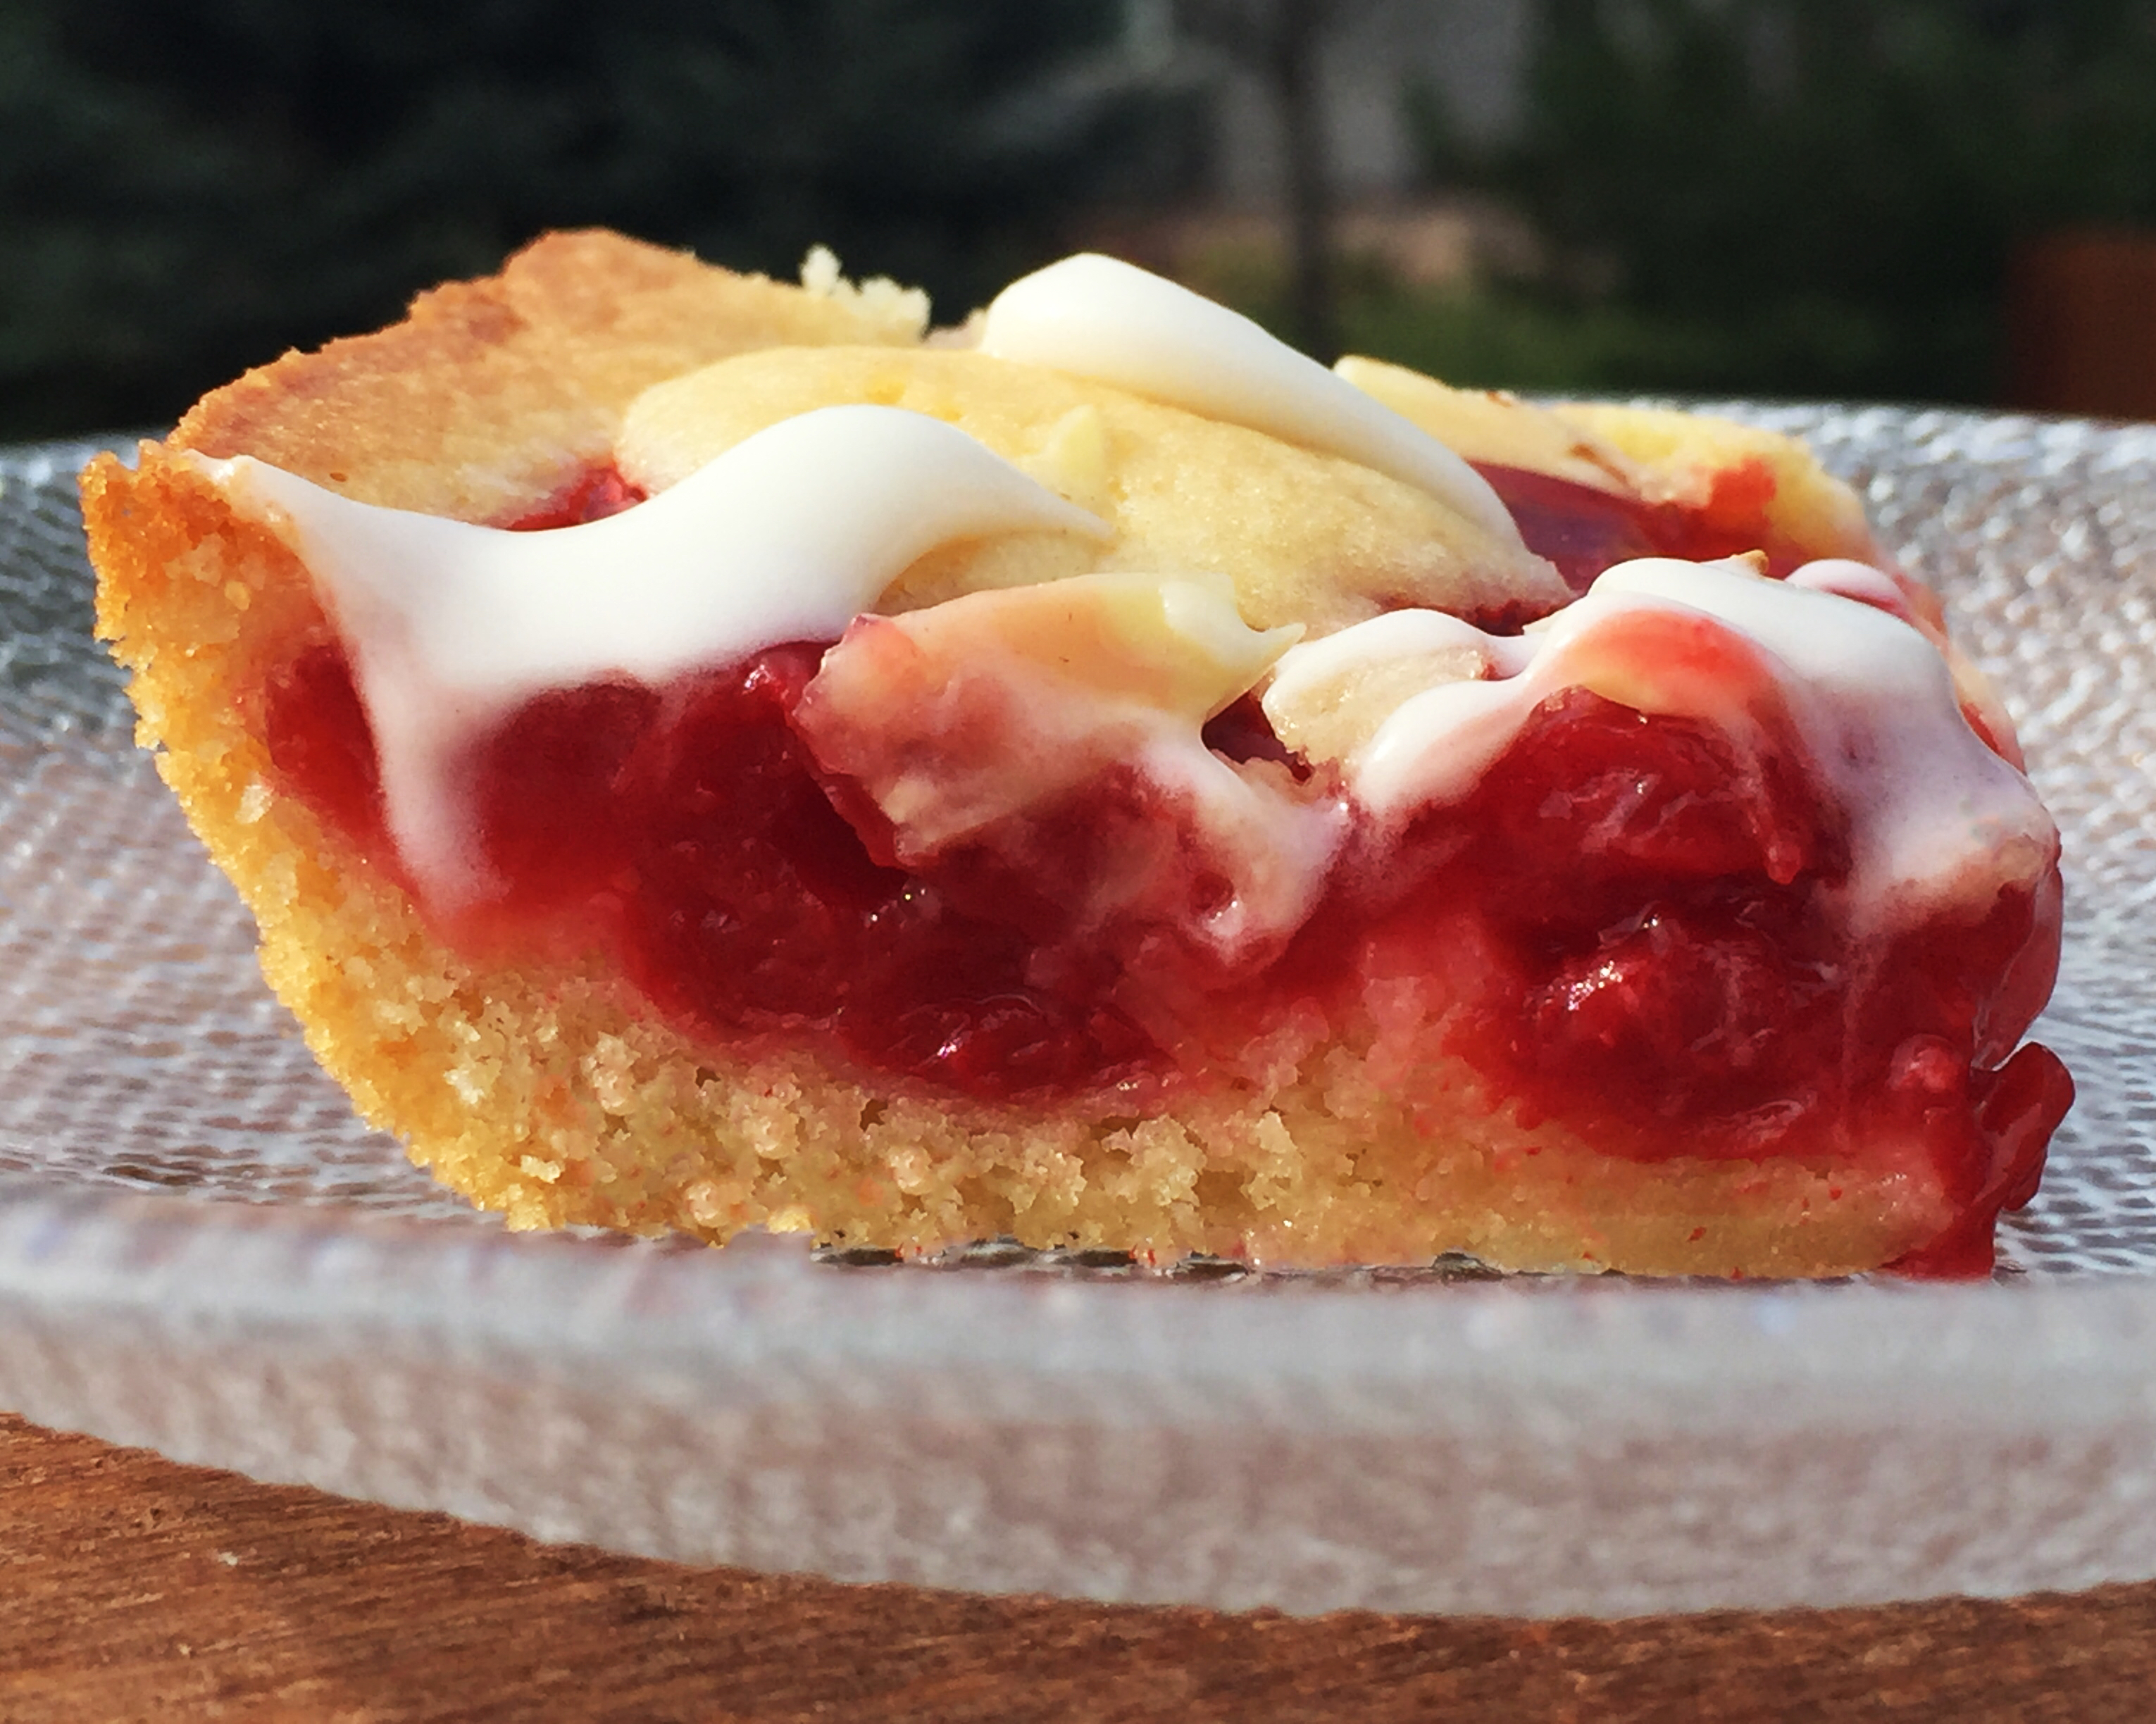
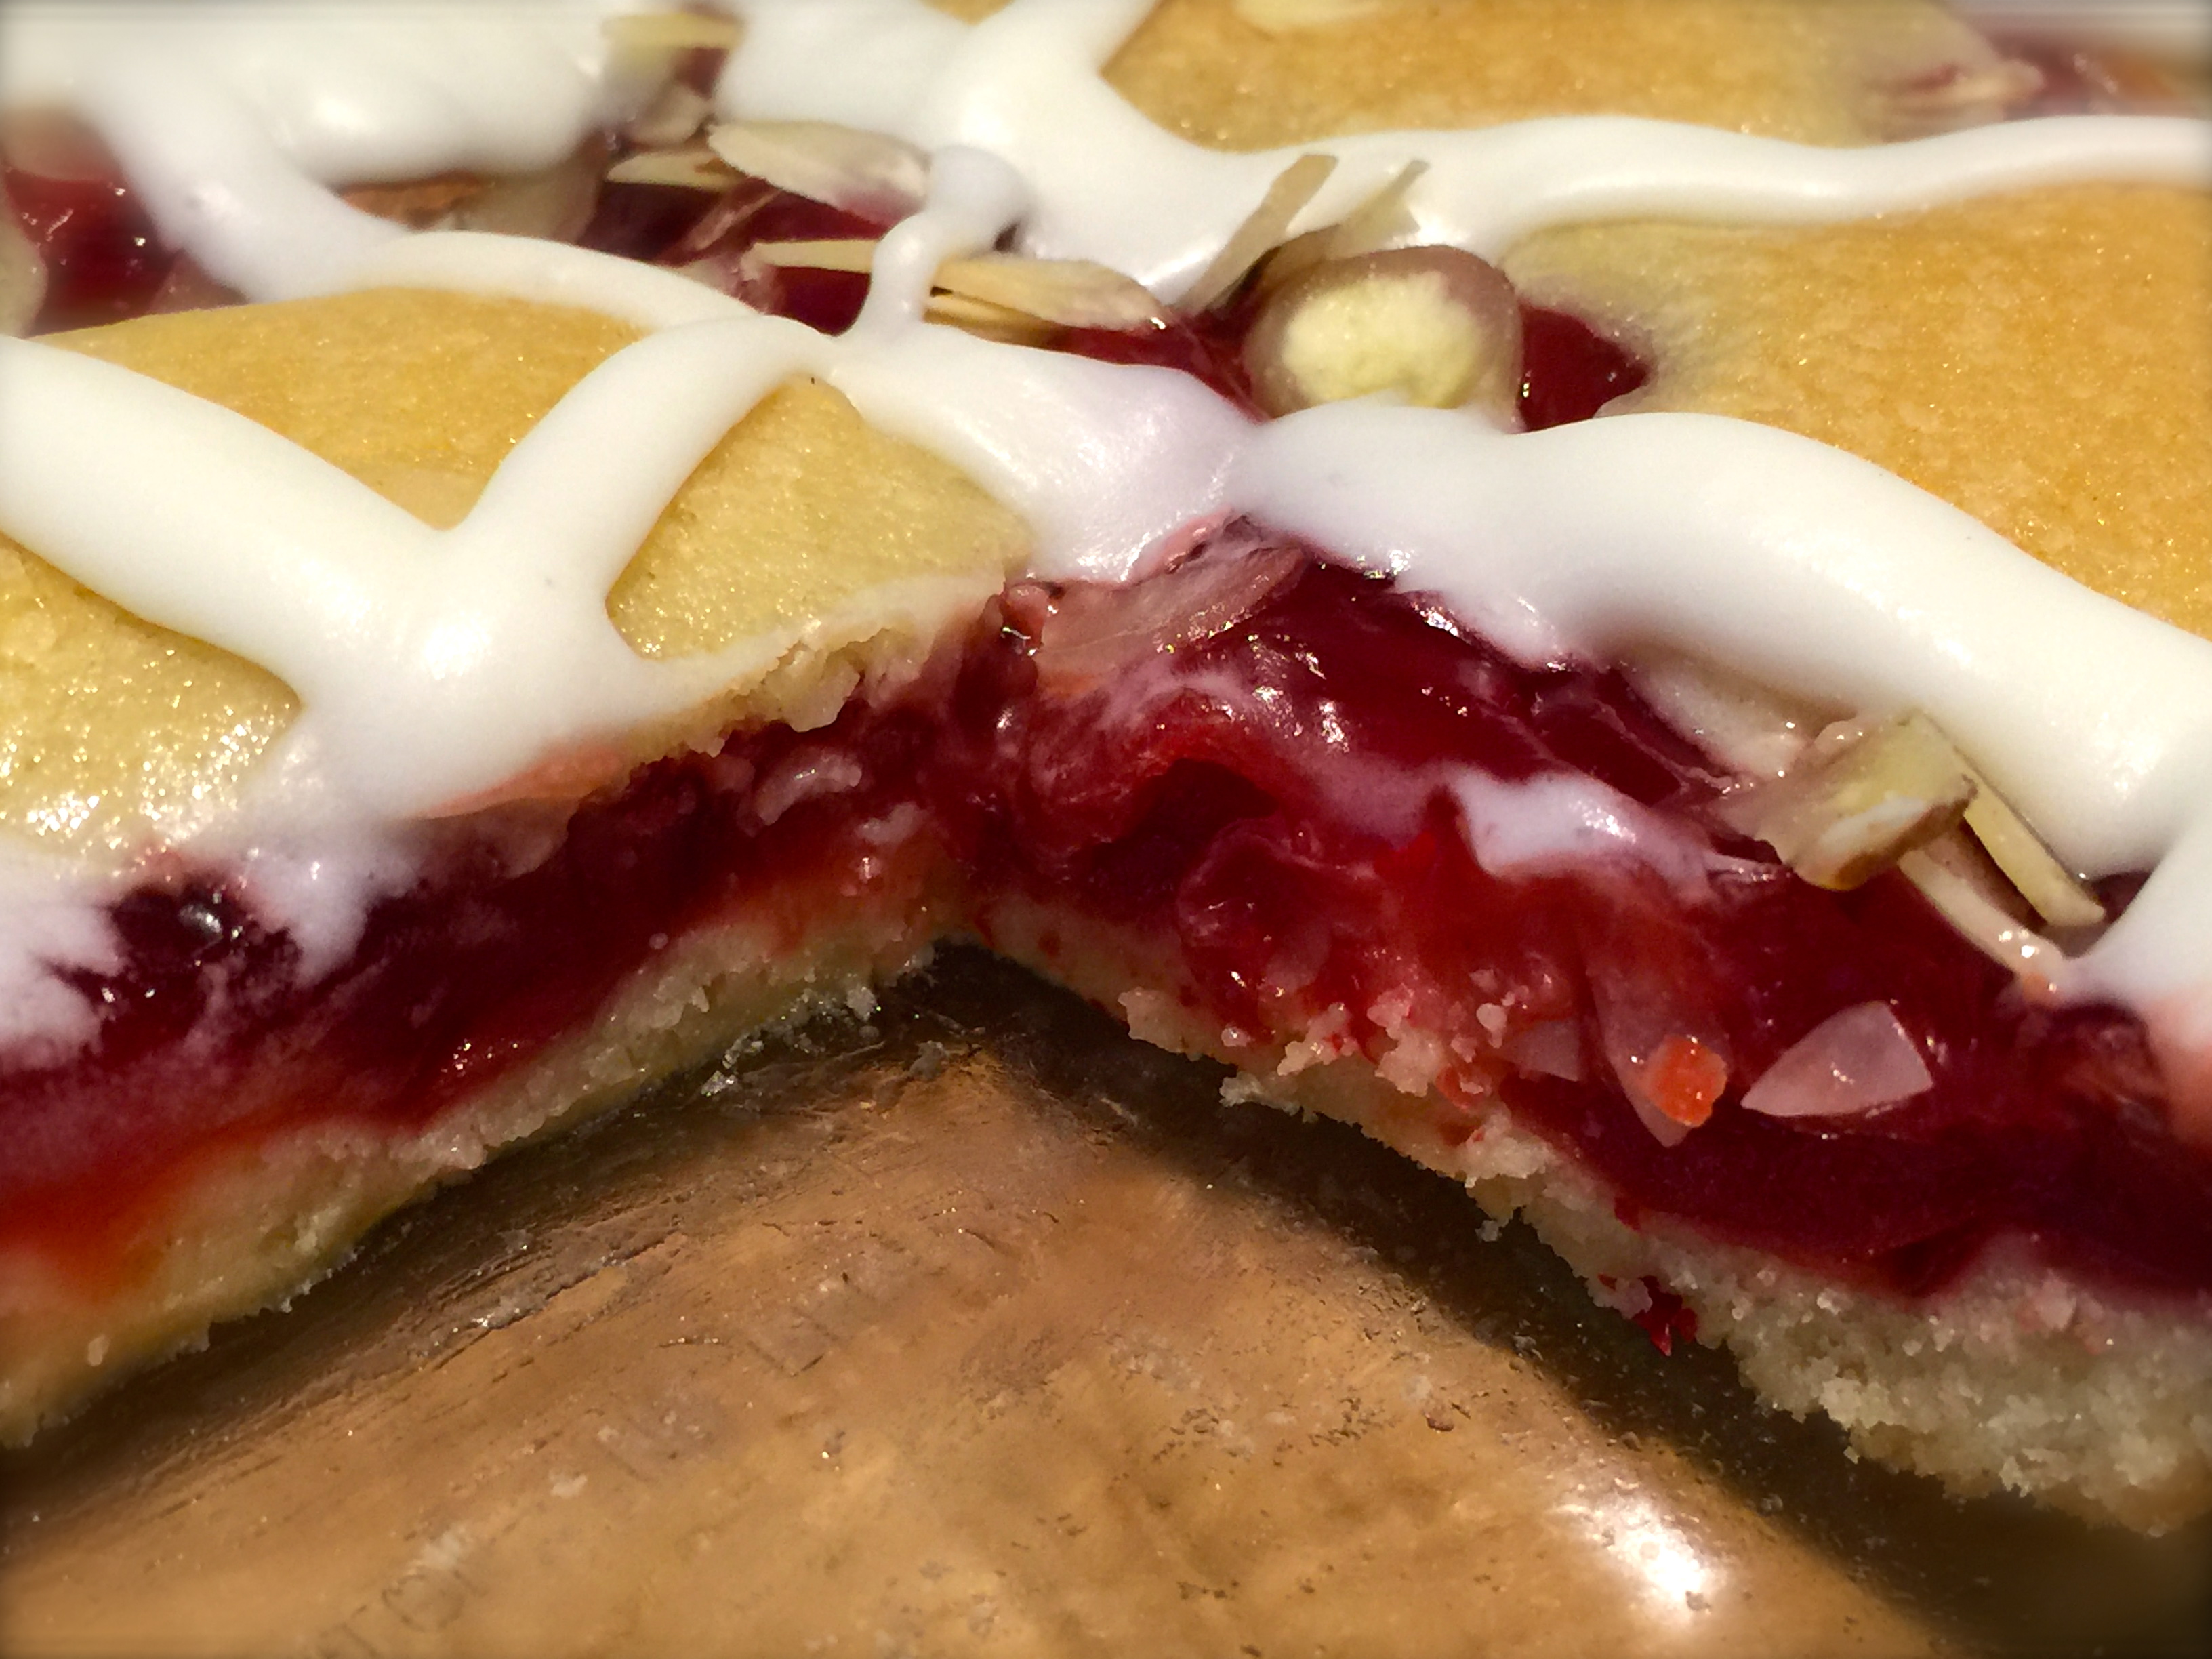
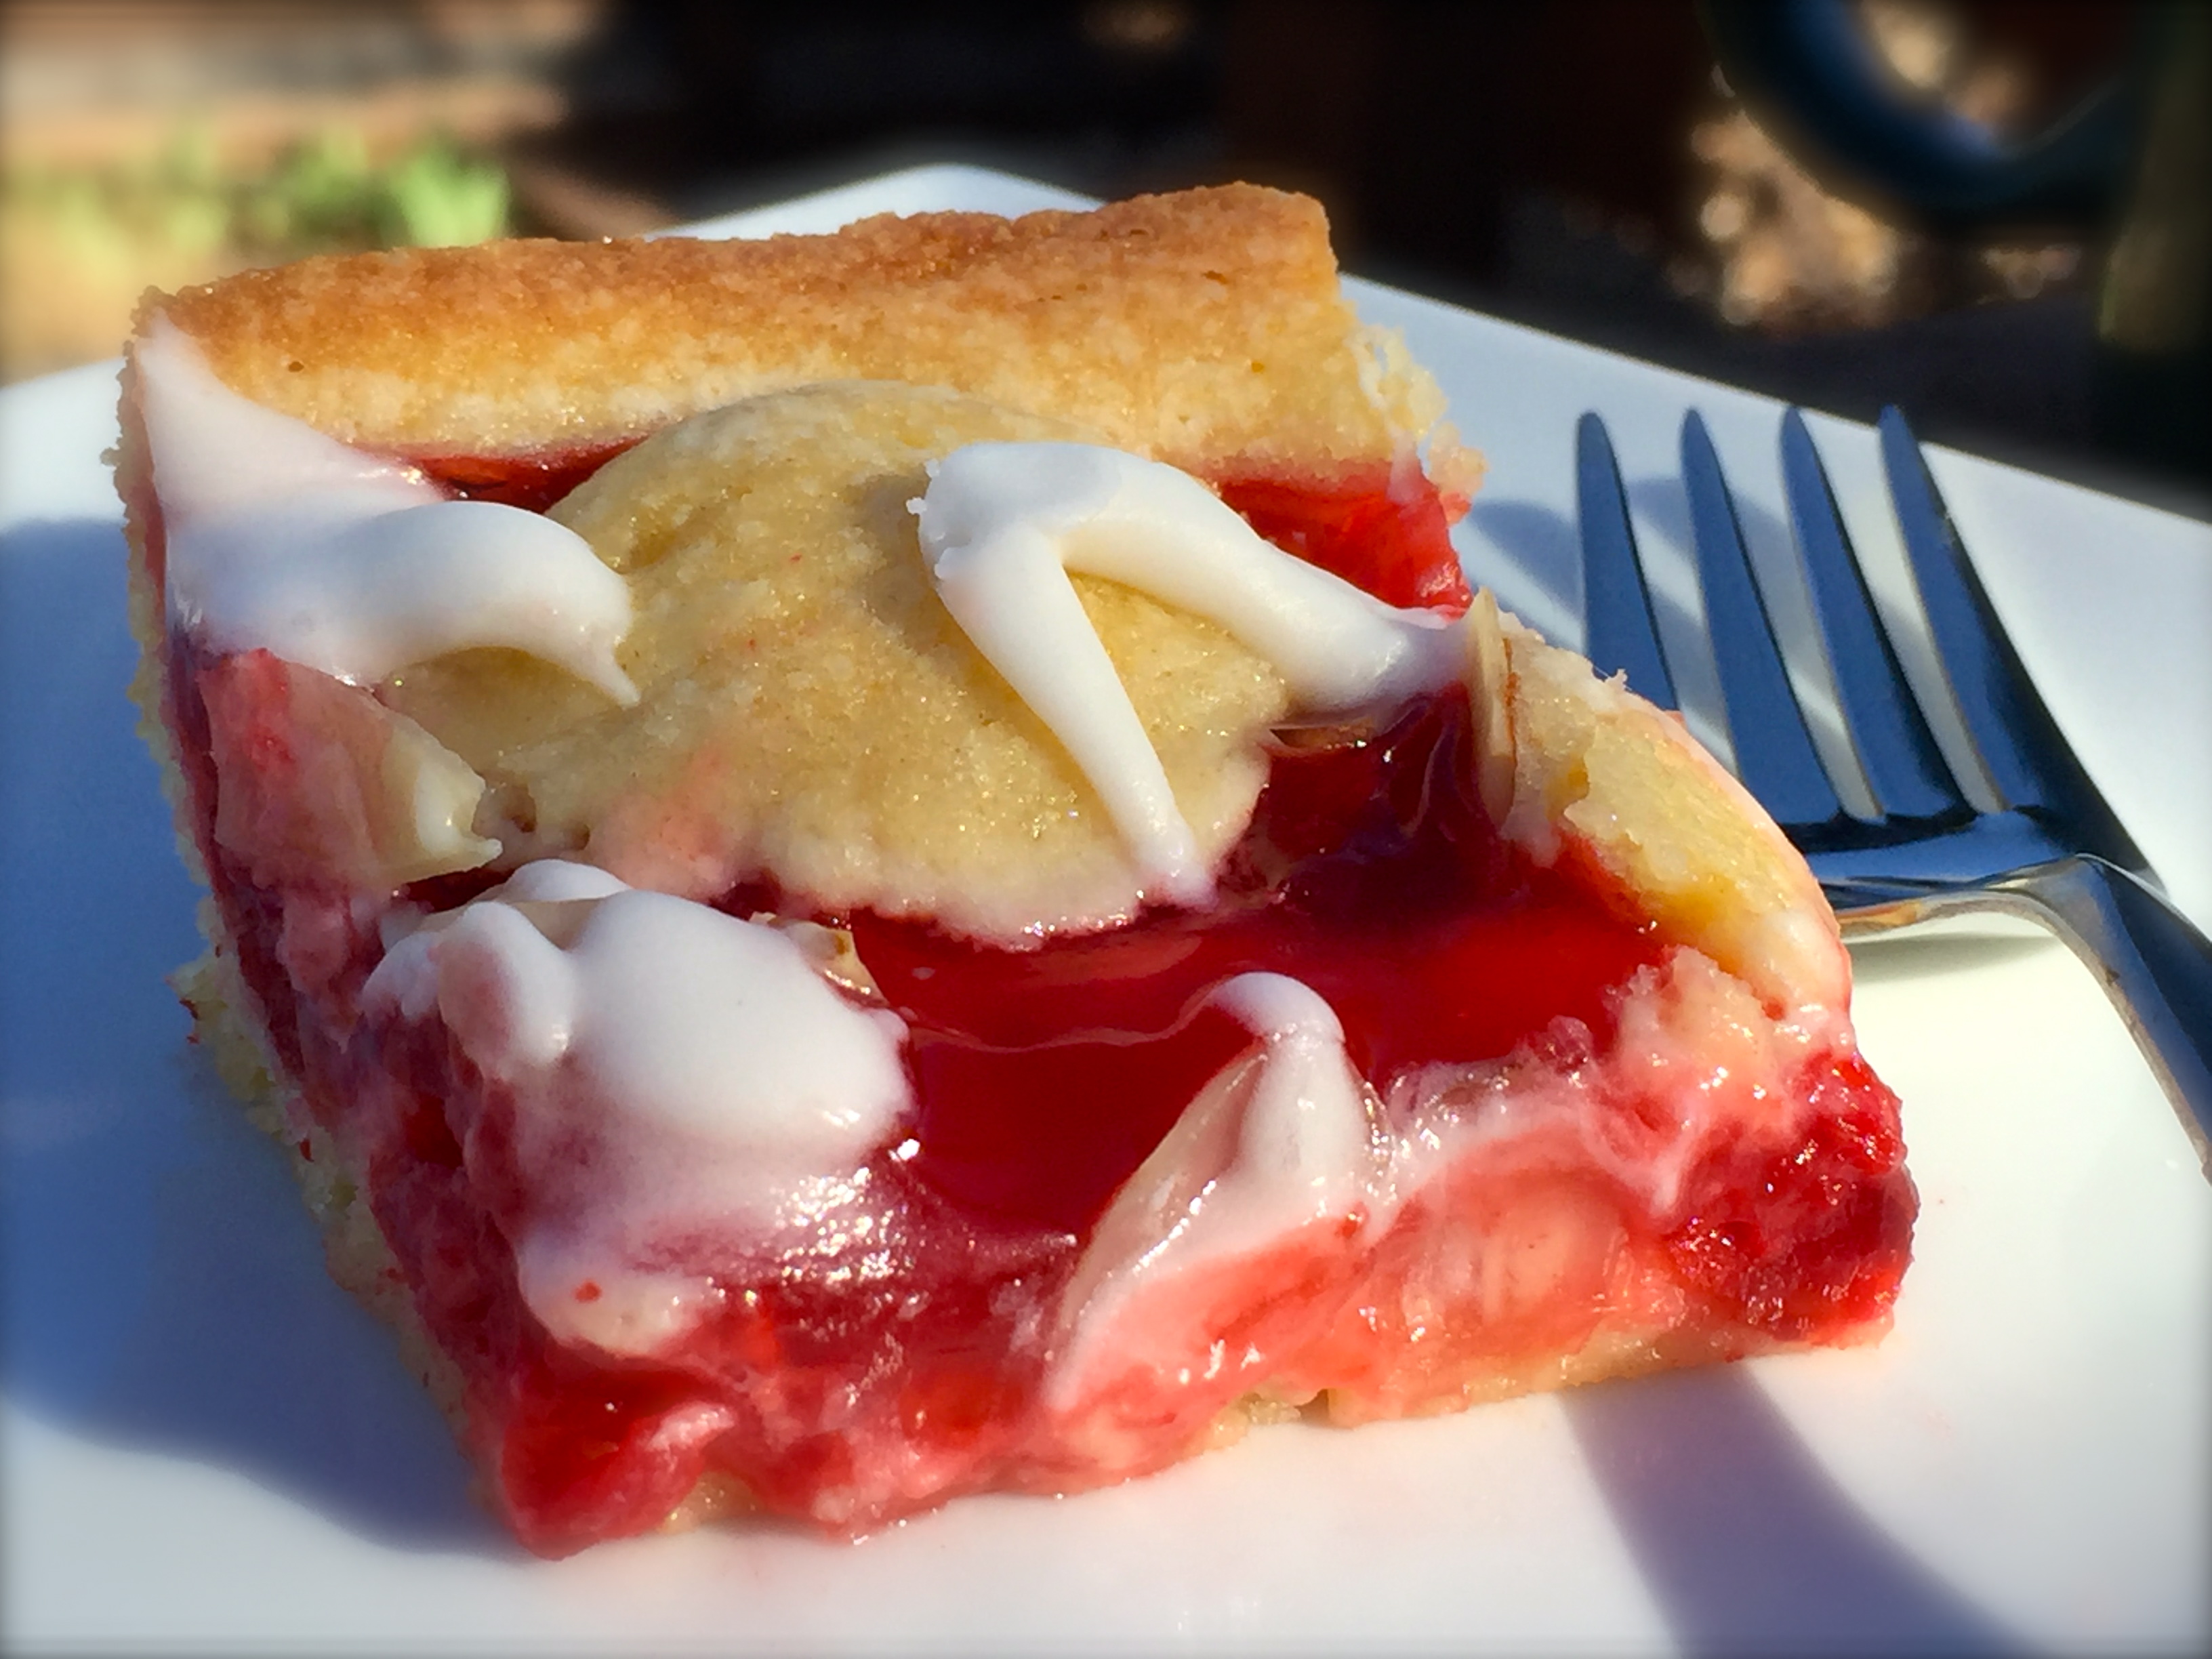
Lesson Learned 3 – The consistency of this cookie is more like a cake than a cookie: Initially I wasn’t sure how these cookies would turn out based on the moistness of the batter. To my surprise and delight they were like small heavenly bites of cake. The cookies are soft and delightful, very different from the consistency of say a chocolate chip cookie. And the white chocolate chips divinely compliment the flavor of the cookie. I brought these to work and they disappeared within one hour.

White Chocolate Strawberry CookiesLesson Learned 4 – For extra decadence try drizzling some melted white chocolate over the top of the cookies: This time when I made these cookies I didn’t think to do this. The amount of white chocolate you use making this recipe does not use up the entire bag. Why not melt the remainder of the chocolate and drizzle it over the cookies after they cool? Next time I most certainly will do this. I can’t believe I didn’t think about doing this when I first made them. Oh well, live and learn…

This recipe is a delightful change to traditional cookies that are often hard and crunchy. The combination of strawberries and white chocolate is to die for. I also like the fact that this recipe only makes about two dozen cookies so it is a manageable amount for family and friends. And as always I recommend you try this recipe and tell me what you think…

WHITE CHOCOLATE STRAWBERRY COOKIES...

  • Servings: 2 Dozen
  • Difficulty: Easy
  • Print

INGREDIENTS:

White Chocolate Strawberry Cookies1 1/4 cups flour, sifted

1/2 tsp. baking powder

1/8 tsp. table salt

1/4 cup unsalted butter, room temperature

4 oz. cream cheese, room temperature

3/4 cup sugar

1 large egg, room temperature

1 tsp. vanilla

3/4 chopped strawberries, drained

2 tsp. lemon juice (1/2 – 1 small lemon juiced)

1 – 2 Tbs. flour, for dusting the strawberries

5 oz. white chocolate chips, chopped (I recommend using a mini food processor to chop them)

White chocolate chips, melted –  to drizzle over the cooled cookies (optional)

DIRECTIONS:

Preheat the oven to 350 degrees. Line your baking sheet(s) with parchment paper.  Chop the strawberries, place them in a colander and sprinkle them with the lemon juice. Set them aside and allow them to drain.

Whisk together the dry ingredients – the flour, salt and baking powder. Set aside.

Beat the butter and sugar until creamy. Add the cream cheese and beat until light and fluffy. Add the egg and vanilla. Mix well. Gradually add the flour mixture and stir until combined. Do not over mix.

Stir in the chopped chocolate. Sprinkle the strawberries with flour and toss them so they all are coated with a thin layer of the flour. Carefully fold the strawberries into the batter.

Place the batter in the refrigerator for about 15-30 minutes.

Once slightly chilled, make the cookies by dropping a heaping tablespoon of the batter on the baking sheet leaving approximately an inch between each cookie. (I recommend no more than a dozen cookies per baking sheet). Bake for 15 minutes or until the edges become golden brown.

Let the cookies cool for a couple of minutes on the baking sheet before transferring them to a wire rack to cool. Once the cookies are cooled, put the remaining white chocolate chips in a microwaveable dish and microwave  on high for about 10 – 15 seconds. Stir the chips until melted. (Microwave at 5 second intervals after this if the chips need to be heated through a little more. Be careful not to overheat the chocolate). Place the chocolate in a gallon size bag. Cut the end of the bag (make sure the cut is small) and use it as a pastry bag to drizzle the melted chocolate over the cookies.

White Chocolate Strawberry Cookies

White chocolate Strawberry Cookies


Cherry Pie Squares…

I was looking for a way to use a can of cherry pie filling I had in my pantry and I didn’t  want to make a traditional pie so I decided to make these instead. I love these because you satisfy your cherry pie craving with a tasty little morsel. These squares are easy to make and impressive looking. Your friends will think you are an accomplished baker when you make these.

So let’s talk cherry pie squares…

Lesson Learned 1: You need less batter on top than you think: Initially I only used 1 1/2 cups of batter for the bottom crust of he squares. That left me with quite a bit of batter for the top. I found in making this that a little batter goes a long way. It is better to dot the top with small dollops of batter far enough away from each other so they spread out but not necessarily touch. The pictures below show the amount of batter I put on top and my final product. Next time I make these I will use smaller amounts of dough to dot the top and probably set aside 1 3/4 cups for the bottom crust.  That way I will have a little more dough for the crust and the small dollops will still be more than enough for the top.

The batter on top of the pie filling

Cherry Pie Squares

Lesson Learned 2 – A little bit of baking spray goes a long way: The best way to insure that the squares don’t stick to the pan is to either spray the pan with baking spray or line it with parchment paper. This time I chose to use baking spray. Don’t overdo spraying the bottom of your pan with the spray. You don’t want to make the crust soggy. Just spray lightly. Next time I make these I am going to line the pan with parchment paper instead of spraying the bottom. I tend to prefer that method.

Lesson Learned 3 – The batter is very sticky: When spooning the crust batter into your baking dish you might want to take large spoonfuls and put them in various parts rather than taking the full amount and just putting it in the middle. You will need to pat the batter down with your hands to cover the entire bottom of the baking dish. I suggest spraying your hands with baking spray. It makes this job much less difficult. After I covered the entire bottom I smoothed the batter with an icing knife.

The bottom crust of the cherry pie squares

Lesson Learned 4 – Leave about an inch around edges when adding the cherry pie filling: The cherry pie filling will run during the baking process. Leaving some space around the edges will allow the batter to rise around the edges making it easier to remove the squares when the time comes.

Adding the cherry pie filling

Lesson Learned 5 – If you can use heavy cream when making the glaze: I found that if you use heavy cream in a glaze the consistency and flavor are much better. Don’t go out and buy heavy cream just for the glaze if you don’t already have it. But if you do I think you’ll find you’ll prefer glazes made with heavy cream to those that are not.

After I made these I gave some to my neighbors. Everyone of them asked for the recipe. I think you will enjoy these a lot! Try them and let me know what you think.

CHERRY PIE SQUARES…

  • Servings: 20 Squares
  • Difficulty: Easy
  • Print

INGREDIENTS:

1 1/2 cups unsalted butter, room temperature

Cherry Pie Squares1 cup sugar

1/2 tsp. salt

2 eggs, room temperature

1/2 tsp. vanilla extract

1/4 tsp. almond extract

1 1/2 cups flour, sifted

1/2 tsp. baking powder

1 can cherry pie filling, 21 ounces

Sliced almonds

GLAZE:

1/2 cup powdered sugar

1/4 tsp. almond extract

2-4 Tbs. of heavy cream

DIRECTIONS:

Preheat the oven to 350. Spray a 9 x 13 pan with baking spray or line with parchment paper. Set aside.

Cream together butter and sugar. Add the eggs one at a time and beat until completely combined. Add the vanilla and almond extracts and beat until well combined.

In a separate bowl whisk together the flour, baking powder and salt. Add the flour mixture to the butter and sugar mixture and mix until just combined. Do not over mix. Take 1 3/4 cup of the batter and smooth over the bottom of the baking dish. Spoon the cherry pie filling over the batter, leaving about an inch of batter around all the edges. Dollop the remaining batter on top of the pie filling. Sprinkle the top with sliced almonds.

Bake for 35 minutes or until the crust is golden brown. Let cool completely. Mix all of the glaze ingredients together and drizzle over the top. Cut and serve.

Cherry Pie Squares

Cherry Pie Squares

Cherry Pie Squares


Juicy Oven Baked Pork Chops…

For a very long time I had not idea how to cook pork chops. When I was a child my mother would make a roast pork dinner and she always wanted to make sure it was cooked thoroughly so of course her roasts were always dried out. (sorry Mom…) That’s the way I grew up thinking how pork should be cooked. Needless to say, I was not a big fan of pork at the time – too dry and tasteless.

It’s only been within the last couple of years that I’ve learned how to cook pork. Most people think the meat has to be opaque white which is a fallacy. Once it gets to that point it is overdone and will most likely be dry and tasteless. When pork is done perfectly it should look like the picture below…

Juicy Oven Baked Pork Chops

Look at how juicy this piece of pork is. Pork that is done correctly will have a little bit of pink marbling in the meat as you can see in the picture. Most people, including myself, used to think that pork was not cooked thoroughly when it had a little pink in it. That couldn’t be further from the truth. I tested these chops in their thickest part with a meat thermometer and it read 140 degrees which is ideal. Let me tell you this pork chop was melt in your mouth delicious. And preparing it this way was not all that difficult. I want to share this recipe because it is so easy and I guarantee perfect results every time. But there are a couple of little secrets you need to be aware of and I’ll share them in my lessons learned.

So let’s talk juicy oven baked pork chops…

lodge-cast-iron-skilletLesson Learned 1 – Take my advice and buy a cast iron skillet: Recently I’ve been doing a lot of cooking in my cast iron skillet and I’ve learned to  love it! Cast iron is your best method for cooking. It may take a little longer to heat up (and really not all that much longer) but once it does it provides even heat that will not dissipate quickly. Plus it moves seamlessly from stove top to oven. And if that isn’t enough it is also one of the cheapest skillets you can buy. Depending on what size skillet you get you’ll pay somewhere between  $15 – $30. Now that’s a bargain! The main downside to a cast iron skillet is that it’s heavy to lift. But in my mind that does not outweigh the benefits. Just look at it as building up your upper body strength while preparing an absolutely delicious meal!

I have a 10 inch skillet and that is big enough for two pork chops the size required for this recipe so I’m writing this recipe for two. If you get a larger skillet you can easily do four chops. Nothing else in the recipe has to be adjusted significantly. Just make sure you know how many chops will fit in your skillet without crowding them.

You need to use center cut bone-in chops for this recipe. They should be about 1 inch thick. Chops of that size take up quite a bit of room in the skillet. So if you want to do more than two chops in one skillet get a skillet larger than 10 inches.

Handy Trick: One other trick I learned was to put the skillet in the oven and leave it there while the oven is preheating. Once the oven has reached 400 degrees you take the skillet out of the oven (make sure you use mitts because the pan will be hot) put it on the stove over medium high heat and then sear the chops one one side before turning the chops over and putting the skillet back in the oven. It’s a pretty nifty trick.

Lesson Learned 2 – Try brining your chops: If you’ve never tried brining you really should. Brining basically is marinating meat in a salt based liquid that has optional ingredients you can add to enhance the flavor of the meat. The purpose of brining is to break down the fibers in the meat ergo making it more tender. I recommend brining your chops for at least 4 hours, but even if you can only do it for 30 minutes it will make a difference in the meat.

Brining Your Pork Chops

Depending on the type of dish you use to brine the chops you may need more water than I suggest to make sure they’re covered. The chops need to be completely covered for the brining process to work. If you need to add more liquid than what I specify in the recipe just remember to add a tablespoon of salt for every additional cup of water. Also make sure that the salt is completely dissolved in the water before putting it over the chops.

The rest of the recipe is so simple it’s almost funny. This is quick and easy way for making the most unbelievably moist and tender chops you’ll ever have. Try it and tell me what you think.

Juicy Oven Baked Pork Chops…

  • Servings: 2
  • Difficulty: Easy
  • Print

INGREDIENTS:

Juicy Oven Baked Porch ChopsFor the Brine:

3 cups water, divided

3 Tbs. Kosher Salt

2 Garlic cloves, smashed

1/2 tsp. black peppercorns

1 bay leaf

For The Pork Chops:

2 center cut bone-in pork chops, 1 inch thick each

1 Tbs. olive oil, optional

Salt and Pepper

DIRECTIONS:

Approximately 4 hours ahead of time brine the chops. Take 1 cup of water and bring it to a boil. Add the salt, garlic cloves, peppercorns and bay leaf. Stir continuously until all the salt is dissolved. Take the mixture off the heat. Add the remaining two cups of cold water. Do not put the pork chops in the brining liquid until the liquid has come to room temperature (this make take about 5 minutes or so). Place the chops in a shallow dish and cover them with the brining liquid. (the liquid should completely cover the chops). If you need to add more liquid refer to lessons learned above. Cover with plastic wrap and refrigerate until time to cook.

Put the cast iron skillet in the oven. Close the oven door and preheat the oven to 400 degrees. While the oven is heating remove the pork chops from the brine and pat them dry. Salt and pepper both sides of the chops.

When the oven has preheated remove the skillet and place it on top of the stove. Turn the heat under the skillet to medium high. At this point you can add a little olive oil to the pan if you desire. (I have a well seasoned skillet and did not need to add any olive oil. If you’re not sure how well seasoned you skillet is, add a little olive oil so the chops won’t stick to the pan). Sear the chops on one side for 3-4 minutes.

Turn the chops over and put the skillet back in the oven. Continue roasting the chops for an additional 7-9 minutes (the chops should register 140 -145 degrees in the thickest part of the meat). Remove the chops from the pan and place them on a plate to rest for about 5 minutes. Cover the chops with foil during this resting period. Serve immediately after the resting period.

Juicy Oven Baked Pork Chops

Juicy Oven Baked Pork Chops

Parmesan Crusted Halibut…

My husband and I have been trying to eat fish more regularly and so I’ve been experimenting with various methods of cooking different types of fish. Not all fish are created equal. I have to admit that it can be a little unnerving trying to master the art of cooking fish as it can go from underdone to overdone in the wink of an eye. But this particular recipe is very easy and if you follow the instructions you will have a delicious mouthwatering piece of fish.

Most of the work in this recipe is in the prep (that seems to be a recurring theme for me, doesn’t it). Creating the breading station and preparing the fish is what takes up the most time. But bottom line, within 20 minutes you can go from prep to table and that’s pretty quick. Your side dishes may take more time than it does to make this halibut recipe.

So let’s talk parmesan crusted halibut…

Lesson Learned 1 – Halibut is expensive: Compared to talapia, cod and catfish, halibut can be pricey. The filets I use in this recipe are frozen and between 5 and 7 ounces. They cost about $10 each. So depending on your budget halibut may be a special treat versus a dinnertime staple. I usually buy them when they go on sale at my local supermarket. Every once in a while they go on sale for 20% off and I stock at that time. Halibut freezes nicely so you don’t have to worry about getting it fresh which also tends to be more expensive than frozen. My advice is to check the specials at your local supermarket. Every once in a while halibut goes on sale and that is definitely the time to buy it.

Lesson Learned 2 – Follow the directions in this recipe: Although halibut is more expensive than other types of fish it has a nice meaty texture and is very flavorful if prepared correctly. That is why I cannot stress enough to follow the directions in this recipe. The overall tendency with fish (or maybe it’s just my tendency) is to cook it longer than you should. If you’re not sure it’s done, take a fork and try to flake off the end of one piece. If it flakes (as seen in the picture below) it’s done. Trust me, after you make fish more often you’ll be able to eyeball it to see if it’s done.  You can always put it back in the oven if it’s not but you don’t want to spend $10 for a piece of fish and overcook it.

Parmesan Crusted Halibut

If you’re planning on serving fish to company and are concerned about presentation make sure you are adept at cooking that type of fish so you don’t have to do the fork test. I can’t tell you how many times my husband got a piece of “forked” fish but never minded because he knew it would be cooked appropriately.

My husband absolutely loves this recipe and I think you will too. Try it and let me know what you think…

PARMESAN CRUSTED HALIBUT…

  • Servings: 4
  • Difficulty: Medium
  • Print

INGREDIENTS:

Parmesan Crusted Halibut4 five to seven ounce halibut filets, skin removed

1 extra large egg

1 Tbs. water

1 cup panko bread crumbs

1/2 cup parmesan cheese, grated

1 Tbs. fresh thyme (just take the leaves off the stem – no need to chop them)

1/2 cup all purpose flour

Zest of one lemon (you can cut the remainder of the lemon into wedges and serve with the fish)

2 Tbs. olive oil

DIRECTIONS:

Preheat the oven to 350. Make a three part dredging station. Part 1 is the flour. Part 2 is the egg and water whisked together. Part 3 is the panko, parmesan, lemon zest and thyme combined.

Dredge a filet in the flour on both side. Shake off the excess flour. Dredge the filet on both sides in the egg mixture. Place the filet onto the bread crumb mixture and cover both sides pressing down on each side to ensure the breading adheres to the filet. Repeat this process with the other three filets.

Heat an ovenproof pan (preferably a cast iron skillet) over medium high heat. Once the pan is heated pour the olive oil into the pan and make sure the bottom of the pan is completely coated. The pan is sufficiently hot if the oil smokes. Place the filets into the oil and brown them for 3 minutes. Turn them over and put them in the oven for an additional 5 – 7 minutes depending upon the size of your filets.

Remove the filets from the pan and serve immediately.

Parmesan Crusted Halibut

Parmesan Crusted Halibut


Chicken Shepherds Pie…

After having made a delightful roast chicken (check out my roast chicken in a cast iron skillet recipe) I was faced with how to use the leftovers. Quite often I make a simple chicken salad consisting of cut up chicken, scallions, grapes, mayo and seasonings, but this time I wanted to do something different.

I’ve always liked the concept of shepherds pie. You basically take your leftover meat and mashed potatoes and create a pie that is oh so good – the true definition of comfort food. Most recipes I’ve seen suggest using frozen vegetables and if you’re in a hurry that will certainly work. But I like to use fresh vegetables whenever I can so I decided to do that instead. I also did not have any left over mashed potatoes so I just whipped up a batch. I’ve tried shepherds pies with store bought pre-prepared mashed potatoes or with instant mashed potatoes but I didn’t think the consistency was as good as when you use homemade mashed potatoes. But you can still use them if you want to.

I guess what I’m trying to say here is the beauty of this recipe is you can make it as simple or as intricate as you like. I still think taking the time to use fresh ingredients and home made mashed potatoes produces the best results. But the choice is yours.

So let’s talk chicken shepherds pie…

Sauteed vegetablesLesson Learned 1 – Use whatever vegetables you want or have on hand: This time I used the “trinity”, onions, celery and carrots along with some frozen peas. But really you can use anything you have. You just have to make sure that you sauté the vegetables to crisp tender before putting them into the pie dish. Next time I’m going to try using some broccoli and cauliflower heads chopped on the smaller side along with onions and carrots. I may even try adding pearl onions instead of chopped onions. It is important to cut the carrots small as they will take the longest to soften. I halved my carrots lengthwise and then halved them again before chopping them. That way they softened right along with the celery and onions. And if you’re using frozen peas (which I did) don’t add them until the very end. They thaw very quickly.

Lesson Learned 2 – Add the chicken at the very end: The chicken you use in this recipe is already cooked so your goal is to warm it through and not cook it to the point that you dry it out. All you really need to do is mix the chicken with the vegetables and then put the mixture into the dish(es) you will be using. The time the pie spends in the oven will be more than enough to warm the chicken through. You might want to take the chicken out of the refrigerator about a half hour before using it in the recipe. That way you will get the chill off of it and it will warm nicely in the oven.

Shepherds Pie FillingLesson Learned 3 – You can use individual pie pans or one 9 inch pie pan: I prefer giving everyone there own little pie but you can certainly bake this as one big pie as well and spoon out individual servings. Either way will work.

Lesson Learned 4 – Put the pie(s) on a foil lined baking sheet before placing them in the oven: I guarantee you, the pie filling WILL LEAK OUT of the pie dish. In order to avoid the filling dripping all over the bottom of your oven make sure the pans are resting on a foiled lined rimmed baking sheet. That way you’ll save yourself a lot of mess and clean up time.

Lesson Learned 5 – Use russet potatoes when making mashed potatoes: Russet potatoes have a lot more starch in them and hold up better in the baking process than other types of potatoes (at least that’s my opinion). Use russet potatoes and don’t make them too runny. Although I will write out some ingredients for making the potatoes use common sense when making them. If they already appear very soft after you mash them add very little liquid to them. If they are stiff, add a little bit of liquid at a time and see how they turn out when you mix them. Remember you can always add more of an ingredient if you need to. I think you get the best results when the potatoes have a slightly firmer consistency. If they’re too soft they will get even runnier in the oven, and you don’t want that.

Also another trick I learned is to add an egg yolk at the end of the mashing process. That gives the potatoes a richer color and more depth of flavor. Just make sure your potatoes are not hot to the point that they scramble the egg yolk. Chances are that will not be the case.

Also if you want to be fancy you can use a pastry bag and pipe the potatoes on the top of the pie. I chose not to. I used a frosting knife and after I dolloped some potatoes on top smoothed them over the vegetables. Try to create some peaks with your potatoes. The peaks are what will brown in the oven and give the eye pleasing look as seen in the second picture below.

Ready To Go Into The Oven

Ready To Go Into The Oven

Fresh Out Of The Oven

Fresh Out Of The Oven

This recipe is the epitome of comfort food. Try it and tell me what you think… Enjoy!

CHICKEN SHEPHERDS PIE…

  • Servings: 4
  • Difficulty: Easy
  • Print

INGREDIENTS

2 large russet potatoes, peeled and chopped

1 medium onion chopped

2 stalks of celery, chopped

1 cup of carrots, chopped small

4 cloves of garlic, divided: 2 whole and 2 minced

4 Tbs. unsalted butter, divided

3 Tbs. flour

1 1/2 cups unsalted chicken stock

1 1/2 cups roasted chicken, cubed or shredded

1/3 cup frozen peas

1 1/2 cups loosely packed emmenthaler cheese (a good melting swiss)

1 large egg yolk

1/4 cup heavy cream

2 tsps. dried oregano

Salt and pepper to taste

DIRECTIONS

Preheat oven to 375 degrees. Put the potatoes and two peeled cloves of garlic in a large pot and cover them with cold water (the water should be about an inch over the potatoes. Add a generous pinch of salt and bring the potatoes to a boil. Cook until tender about 20-25 minutes (the cooking time will vary depending on how large or small your cut the potatoes). The potatoes are done when they are fork tender.

Meanwhile in a large skillet melt 3 Tbs. of butter. Add the onion, celery and carrots. Salt and pepper to taste. Cook until crisp tender, approximately 5 minutes. Add the remaining 2 cloves of minced garlic and cook until fragrant, about 1 minute. Add the flour and stir for about a minute to remove any “floury” taste. Add the chicken stock and continue to cook until the liquid thickens about 10 minutes. Add the cheese and oregano and stir until the cheese is melted. Taste the mixture and add any additional salt and pepper as needed. Add the chicken and peas. Stir to combine. Turn off the heat and let stand.

Drain the potatoes and put them back into the pot. Add 1 Tbs. of butter and cover for a few minutes until the butter is melted. Using a hand masher or electric hand mixer, mash the potatoes until most of the lumps are gone. Add the heavy cream (you may want to add it incrementally instead of all at once so that the potatoes don’t wind up to runny) and finish mashing. Separate an egg and put only the yolk into the mashed potatoes. Stir until completely combined. Add any additional salt as needed.

Place the vegetables mixture into the pan(s). Top with the mash potatoes. Smooth the potatoes over the top of the vegetables until they are completely covered. Place the pan(s) on a foil lined rimmed backing sheet. Bake until the potatoes are lightly browned and the vegetable mixture is warm and bubbly, approximately 20-30 minutes.

Chicken Shepherds Pie

Chicken Shepherds Pie