Lemon Red Snapper With Herb Butter…

A couple of weeks ago a new Whole Foods store opened near my home. I’m not particularly a big fan of Whole Foods as some of their prices, in my opinion, are completely outrageous. But I do like the fact that if I need something, especially something out of the ordinary, I can always find it there. I also like the fresh seafood they carry. They often carry varieties of fish I can’t find in my local grocery stores. And the fishmongers will filet and debone any whole fish for you on the spot.

I went to the store on opening day and it was crazy. The place was packed but there were so many great things to see and sample. At one point they were cooking lobster tails and giving away samples of them. I actually found yellow grapefruit, which is my favorite. Most stores only carry pink grapefruit  and I prefer the tanginess of the yellow.

And when I walked by the seafood department I was so impressed with the variety of fish they had. For months I had been looking for red snapper filets and there they were, beautiful specimens, right in front of my eyes. I was so excited that I was finally going to be able to try out this recipe.

Now if you’ve not made a lot of fish and are unsure of your skill in this area, I would not start by making a recipe like this using red snapper as the fish. Not that this recipe is all that difficult but snapper is expensive (it cost me $20 for two filets). You might want to hone your fish making skills on less expensive types of fish like tilapia or cod before you venture into making red snapper. This recipe would work very well with either of those types of fish.

But lets talk about lemon red snapper with herb butter…

Lesson Learned 1 – Cut the lemon slices at least 1/4 inch thick: I cut my lemon slices about 1/8 inch thick and they cooked down more than I would have liked. They still infused the fish with great flavor, but you also use the lemon as a garnish when you serve the fish. By cutting the lemons 1/4 inch thick they will have more body after the cooking process.

Lemon Red Snapper With Herb Butter

Lesson Learned 2 – Not all filets cook the same: It’s never one size fits all when cooking fish filets. Some may be longer and thinner while others are shorter and thicker. The trick is to try to get filets that are similar in size so that they all cook for the same amount of time. The last thing you want to do is overcook an expensive cut of fish like red snapper.

My filets were longer and thinner but still about 1/4 inch thick at the center. When I researched how to cook the snapper the overall consensus seemed to be at 425 for about 13 minutes. But you can’t always follow that. It is important when making fish to develop an eye for determining when the fish is cooked. I judge my fish by looking at the thickest part. It will start to look opaque at each edge and as the fish cooks the opaqueness fills in. When it is almost completely opaque on the side I know my fish is done. These particular filets only took about 10 minutes. So learn how to develop that eye. The filets you choose may have to cook for 13 minutes. I can only tell you that it will take time as well as trial and error to get good at cooking fish.

Lemon Red Snapper With Herb Butter

Lesson Learned 3 – Don’t be afraid to make fish: I think the key to making fish is to err on the side of underdone. You can always put the fish back in the oven but you can’t do anything with an overdone dried out piece of fish. Be prepared to do that a few times.  It’s no big deal. I guarantee you that after a while you will develop that eye and become a master at cooking fish.

If you are looking to add more fish in your diet, this is a great recipe to start you on your way. Try it and let me know what you think…

LEMON RED SNAPPER WITH HERB BUTTER...

  • Servings: 4
  • Difficulty: Medium
  • Print

INGREDIENTS:

2 lemons

Lemon Red Snapper With Herb Butter

Lemon Red Snapper With Herb Butter

Non-stick cooking spray

4 (6 ounce) red snapper filets

1/4 tsp. salt

1/4 tsp. paprika

1/4 tsp. garlic powder

1/4 tsp. freshly cracked pepper

2 Tbs. butter, softened

2 Tbs. fresh thyme, chopped

1 Tbs. lemon zest (the zest of a medium sized lemon)

DIRECTIONS:

Remove the filets from the refrigerator and let them stand for about 20 minutes. (this will take the chill off of them and make the cooking time more true. It is completely safe).

Zest one lemon and set aside. Cut lemons into 8 quarter inch pieces. Place slices in pairs on a rimmed baking sheet covered in foil and coated with cooking spray.  Place 1 filet on top of each pair of lemons. Combine salt, paprika, garlic powder and pepper and sprinkle over the filets. Bake for 10-13 minutes or until the fish flakes easily when tested with a fork.

While the fish is in the oven, combine the butter, lemon zest and thyme in a small bowl.

When fish is done, plate fish and lemon slices. Top each filet with the herb butter, spreading it to allow it to melt. Serve immediately.

Herb Butter Mixture

Herb Butter Mixture

Herb Butter Mixture

Herb Butter Mixture

Lemon Red Snapper With Herb Butter

Lemon Red Snapper With Herb Butter

Raspberry Shortbread Thumbprint Cookies…

If you have been following me for a while you know every holiday season I bake cookies, and I mean lots of cookies. I can do anywhere from 6-9 different kinds. My one promise to myself is that every year I will try a new cookie recipe. Well here’s this year’s pick. Now I know I’ve made thumbprint cookies in the past, but I couldn’t remember why I stopped making them. Well, I remember now. The thumbprint cookie is an excellent subject for this type of blog since there is one big lesson learned that they just don’t seem to tell you in recipes. So, if you want to be successful making thumbprint cookies, this is the blog for you.

So let’s not waste any time – let’s talk thumbprint cookies…

Lesson Learned 1 – NEVER FILL THE THUMB IMPRINT ALL THE WAY WITH JAM!!! – I had completely forgotten about this and had a rude awakening when I put my first batch of cookies in the oven. Although you may be really tempted, never completely fill the thumbprint indentation with jam. During the baking process the jam will bubble up and if you fill the imprint completely you will wind up with jam spilling all over the sides of the cookies and onto the baking sheet. I’m not sure why they don’t make a point of telling you this in recipes, but they don’t.

Fill the imprint halfway or slightly less. Then when the cookies come out of the oven fill in the imprint to make the cookie look full and lush. That way you will have great looking cookies and not have to worry about cleaning baked-on jam off the cookie sheet. If you do get some baked-on jam, clean the cookie sheet right away. The longer you wait the harder it will get until you feel like you are trying to remove rocks.

Roll dough into 1 inch balls

Lesson Learned 2 – I’m not sure why they call them thumbprints when you really should use your index finger: I found if I use my thumb to make the imprint in the cookie one side becomes lower than the other. But if I take my index finger and stick it into the middle of the cookie I get a nice even indentation. You can also use the butt end of a wooden spoon to achieve the same results. Just another trick that will help with potential “jam spill over” and will make the cookies look uniform.

Index finger indentations

Lesson Learned 3 – Let the cookies cool before you drizzle on the glaze: As with any type of glaze, if you want it to be noticeable on your cookie and not melt in, you need to make sure the cookies have cooled before drizzling it on top. Also the thicker the glaze the more visible it will be. My glaze was somewhat thinner and it was not quite as noticeable but still did the trick.

These are very tasty cookies and they were a great addition to my cadre of traditional holiday cookies. Try them and see what you think. But make sure you heed my lessons learned…

RASPBERRY THUMBPRINT SHORTBREAD COOKIES...

  • Servings: 3 1/2 Dozen
  • Difficulty: Easy
  • Print

INGREDIENTS

1 cup butter, room temperatureRaspberry Shortbread Cookie

2/3 cup sugar

1/2 tsp. almond extract

2 cups flour

Seedless Raspberry Jam

Glaze:

1/2 tsp. orange zest

2 -3 Tbs. orange juice

1 cup powdered sugar

(You can also use the type of glaze listed below – I like the mixture of the orange and the raspberry)

1 cup powdered sugar

2-3 Tbs. of water

1/2 tsp. almond extract

DIRECTIONS:

Preheat oven to 350. In a large mixing bowl cream together butter and sugar. Beat in the almond extract. Gradually add the flour and mix well until the dough forms a ball. Cover and refrigerate for at least one hour.

Roll dough into 1 inch balls and place on an ungreased cookie sheet. Using your index finger make an indentation in the center of the ball. Fill the indentation only part way with jam (filling in half the hole or slightly less).

Bake for 14 – 18 minutes or until the edges of the cookies are slightly browned. Remove to wire racks to cool. Add additional jam into cookies if needed or desired. Let the cookies cool.

FOR THE GLAZE: Mix all the ingredients together. Drizzle the glaze over the cooled cookies. Refrigerate or freeze cookies that will not be consumed right away.

Right out of the oven

Cooling on the rack

Raspberry Shortbread Cookie

Raspberry Thumbprint Shortbread Cookies

Holiday Breakfast Casserole…

I’m so sorry I haven’t posted in a while. The holidays are always hectic and it is tough to sit down at the computer and document the things I’ve been making. The good thing is there will be lots to come after the first of the year! And just in case you didn’t see it on my home page, the picture below is a link to some of my all time favorite holiday recipes (mostly cookies but there are other things as well). Just click on the picture and you’ll have some great recipes to try this holiday season.

17 Favorite Holiday Recipes

17 Favorite Holiday Recipes

The recipe I’m sharing today is one I made the other night for dinner. After I made it I thought, wow – this would make a great Christmas morning breakfast. You can make it the night before, refrigerate it and just pop it in the oven in the morning. It is very flavorful and it couldn’t be easier to make.

So let’s talk lessons learned when making this holiday breakfast casserole…

Cooked breakfast sausage
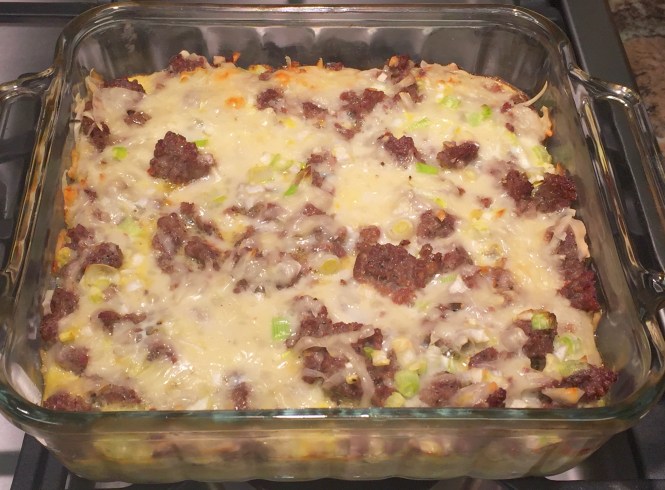
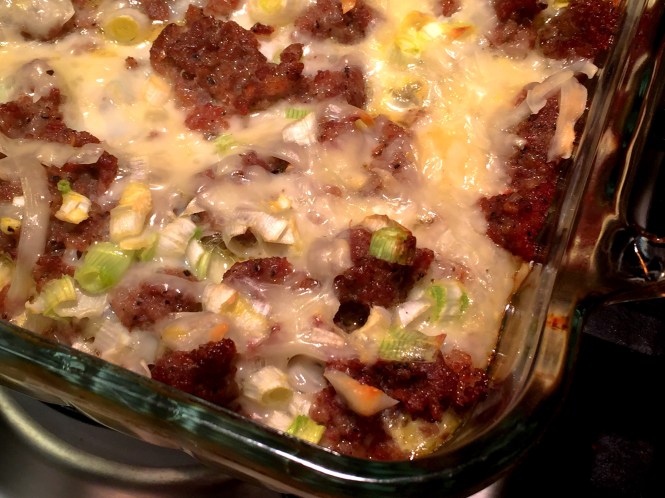
Lesson Learned 1 – You probably will not need an entire tube of breakfast sausage: This recipe is made in an 8 x 8 pan and serves four. Double it if you want to make it in a 13 x 9 pan. In the smaller pan you probably will not need the entire tube of sausage. Use as much as you like and if you are a true meat eater use the whole thing. We only needed about three quarters of the tube. We froze the rest to use later.

Lesson Learned 2 – Get the hash browns nice and crispy: The hash browns will soften in this recipe. By getting them crispy you add a nice flavor. If you don’t crisp them up they will get too soggy on the bottom of the casserole.

Crispy Hash Browns

Lesson Learned 3 – Substitute for fresh whenever you can: The recipe I based this on called for both onion and garlic powder. If you are in a rush you can certainly use them, but I used minced fresh garlic and chopped green onions instead. I think it made a world of difference in the flavor of the casserole.

Lesson Learned 4 – Add more cheese if you like: I made this recipe with a cup of shredded Jarlsberg. Next time I will use a cup and a half as I wanted it to be just a little cheesier. A cup works just fine. This is something you can experiment with and see what works best for you. But don’t use any less than one cup.

This casserole couldn’t be any easier, and as I mentioned earlier I actually made this for dinner but I felt with the holidays coming this recipe might be a good trick to have up your sleeve. Happy Holidays!

HOLIDAY BREAKFAST CASSEROLE...

  • Servings: 4
  • Difficulty: Easy
  • Print

INGREDIENTS:

1 pound breakfast sausage

1 20 oz. bag of unfrozen hash browns (I used Simply Potatoes)

1 large garlic clove, minced (you can use 1/4 tsp. garlic powder as a substitute)

2-3 green onions, chopped (you can use 1/4 tsp. onion powder as a substitute)

1 cup shredded cheese (use any good melting cheese – I used Jarlsberg)

4 extra large eggs (use 5 if they are small)

1 cup milk

Salt and pepper to taste

DIRECTIONS:

Preheat the oven to 375. In a large skillet cook the breakfast sausage until it is no longer pink. Add the garlic and cook until fragrant. Set sausage mixture aside.

In the same pan cook the hash browns until slightly crispy. Place them in the bottom of a lightly greased 8 x 8 pan. Top with sausage and cheese.

In a separate bowl combine the eggs, green onions and milk. (If using onion and garlic powder you would add them into this egg mixture). Pour over the hash browns, sausage and cheese. (Cover and refrigerate at this point if you plan on making this the next day.)

Bake for 35- 40 minutes or until the top is set and the edges start to brown. Let the casserole sit for 5 minutes and serve.

The Hash Browns Layer

The Hash Browns Layer

The Meat Layer

The Meat Layer

The Cheese Layer

The Cheese Layer

The Egg Mixture

The Egg Mixture

Ready To Go Into The Oven

Ready To Go Into The Oven

Holiday Breakfast Casserole

Right Out Of The Oven

Holiday Breakfast Casserole

Holiday Breakfast Casserole

Holiday Breakfast Casserole

Holiday Breakfast Casserole

Iced Cranberry Orange Walnut Cookies…

This is a fabulous holiday cookie recipe. Try it and I guarantee it will become one of your favorites!

youbetchcanmakethis's avatarYou Betcha Can Make This!

It’s cranberry season, my favorite time of year. I love cooking and baking with cranberries. Their tartness adds zip to both sweet and savory recipes. I especially like them in cookies. I think they balance out the sweetness in cookie recipes and add a festive flavor.

Now need I mention that it is also getting very close to holiday baking season, and every year I try out at least one new cookie recipe. I saw a version of this recipe in an Allrecipes magazine and tweaked it not only from an ingredient perspective but also to adapt it to high altitude baking.

High altitude baking can be tricky and unless you purchase a cookbook specifically written for high altitude baking you are most likely using ingredient amounts designed for sea level. The higher the altitude the lower the air pressure which makes it difficult for the baker. Baking depends on…

View original post 718 more words