The Moistest Banana Cake You’ll Ever Make …

There’s nothing like a cake that is so moist it melts in your mouth. But baking a cake from scratch and getting it that moist can be a challenge, especially living in high altitude like I do. Well, fear no more. I stumbled upon a baking method that produced one of the moistest cakes I’ve ever made.

Now I have a couple of different recipes for banana bread on this site, but this one hands down is the most moist and flavorful. The difference between this recipe and the others is how you bake the cake. In this recipe you preheat the oven to 350 and once you put the cake in the oven you turn the temperature down to 300 for the remainder of the baking process. I never tried a process like this before and the result was my husband saying this was the moistest cake I ever made.

So let’s talk about the moistest banana cake you’ll ever make…

ripe bananasLesson Learned 1: Make sure your bananas are really ripe: and by really ripe I mean the peels are really dark, dark brown as in the picture to the right. You don’t want a lot of yellow on your banana skins and you definitely don’t want any green. Most of the time the bananas you buy in the store are under ripe, mainly green and yellow. Those bananas have not reached their full peak of flavor. The skins need to look pretty dark. As the banana ripens it releases more sugar and becomes more flavorful. And as they ripen the skins turn darker. If you want the best tasting cake you need to use bananas with dark skins.

Now if you want to make this cake today but only have yellow and green bananas, there’s a way to ripen them on the spot. Just click on this link for my banana bread recipe and you’ll find a neat little trick that gives you ripe bananas anytime you want them.

Lesson Learned 2 – Beat the butter, sugars, eggs and vanilla until velvety: The picture below shows the correct consistency for this standard blend of ingredients for many recipes. The more velvety these ingredients, the better the rest of the ingredients will combine with it. Most people err on doing this process way too fast. I say beat the living daylights out if it. You’ll be pleased with the end result if you do.

Creamed butter, sugar, eggs and vanilla

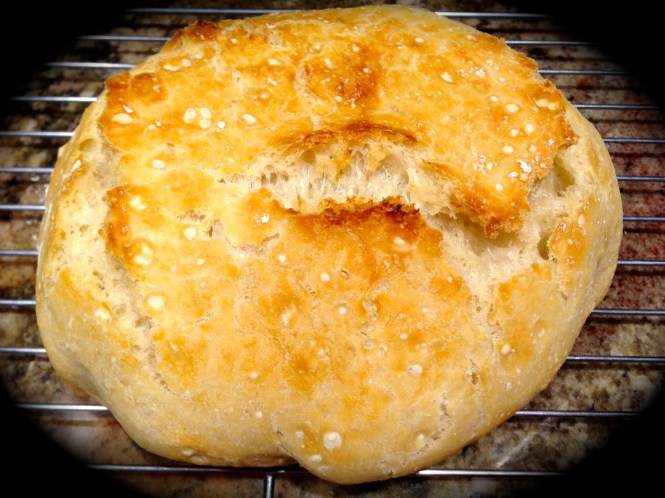
Lesson Learned 3 – With this recipe baking time will vary: The recipe that I based this on stated that it took 60 minutes for the cake to bake. It took my cake an hour and a half. Now I know a lot of that had to do with me living in high altitude, but this is definitely a cake you will need to keep your eye on. Not only is the atmosphere a factor in the cooking time, but also all ovens vary and your oven may take a shorter amount of time to bake this cake than mine. I started checking mine at 55 minutes and could tell right away it needed a much longer cooking time. In the end, the most sure fire way to determine if it is done is to insert a toothpick into the center of the cake. If it comes out clean, the cake is done. The picture below shows what the cake looks like when it is done.

completely cooked cake

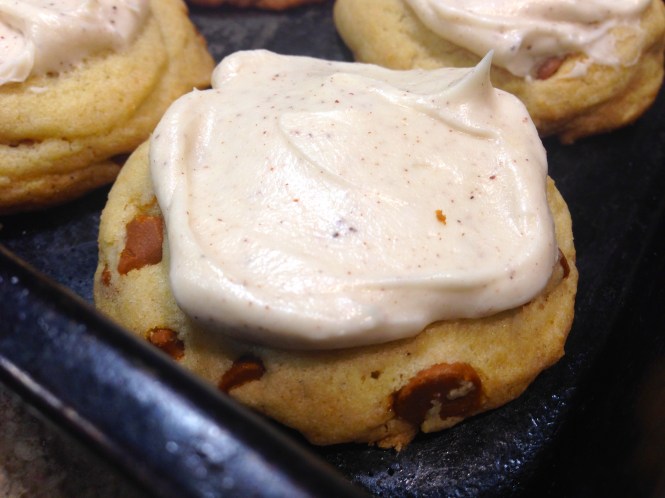
Lesson Learned 4 – This recipe makes more than enough frosting: Next time I make it I’m planning on cutting the frosting amount to 75% of what I will list here. With what I list I was able to put a thick amount of frosting on the cake (as seen below) and I still had some left over. Some people don’t like a lot of frost on their cake, and you certainly don’t want to minimize the flavor of the cake by overpowering it with frosting. You need to make the frosting based on how you like a cake frosted. So use your judgement on this one.

frosted cake

I was really pleased with how this cake turned out. I shared some with my co-workers and also with my neighbors and the consensus was this recipe is a winner. So try it and let me know what you think. You betcha can make this!

The Moistest Banana Cake You'll Ever Make...

  • Servings: 20-24 Squares
  • Difficulty: Easy
  • Print

INGREDIENTS:

1 1/2 cups mashed bananas (3-4 bananas)

2 1/2 Tbs. fresh lemon juice, divided

1 1/2 cups whole milk

3 cups flour

1/2 Tbs. baking soda

1/4 tsp. salt

2/3 cup unsalted butter, room temperature

1 cup sugar

1/2 cup brown sugar

3 large eggs, room temperature

1 tsp. vanilla

FROSTING:

8 oz. cream cheese, room temperature

1/4 cup unsalted butter, room temperature

3 cups powdered sugar

1 tsp. fresh lemon juice

zest from 1 lemon

1 tsp. vanilla

DIRECTIONS:

Preheat the oven to 350 degrees. Grease and flour or use cooking spray and prepare a 9 x 13 pan.

Take 1 1/2 Tbs. of lemon juice and combine with the milk. Set aside.

Mash the bananas and mix with 1 Tbs. lemon juice. Set aside.

Combine flour, baking soda and salt in a bowl. Whisk for a minute to combine. Set aside.

Beat together the butter and sugars until creamy. Beat in one egg at a time. Beat in the vanilla, until the entire mixture is smooth and velvety. Alternate adding the flour mixture and milk mixture beginning and ending with the flour mixture. Do not over mix but make sure everything is fully incorporated. Gently fold in the bananas. Pour mixture into the prepared 9 x 13 pan.

Put in oven and reduce the temperature to 300. Bake at least 55 minutes. (Do not open the oven for any reason during the first 55 minutes). At that point check the cake for doneness. If a toothpick inserted in the center of the cake comes out clean, it is done. If not, continue baking. The baking process could take as much as 1 1/2 hours.

Remove the cake from the oven and cool completely before frosting. To make the frosting place all of the ingredients in a medium size bowl and beat until creamy.

Banana Cake

Moist Banana Cake

Moist Banana Cake

Creamy Meatball and Tortellini Soup…

Is there anything as comforting as a hot hearty bowl of soup on a cold winter day? Enjoying a piping hot bowl of soup with some crusty bread when the weather outside is cold and snowy – well that to me defines food for the soul.

In the past, the only homemade soup I ever made was my mother’s chicken soup. I never thought about making any others. Then two years ago when I had a tomato crop that was just unheard of and left me tomatoes coming out of my ears, I tried to make homemade tomato soup. And it was fabulous. So I invested in an immersion blender and made homemade broccoli cheddar soup. And the rest is history. I love making homemade soups.

Add the evaporated milk and spinach

Prior to this recipe all my soups were made on the stove top. This time I decided to make soup in the slow cooker. As I mentioned in an earlier blog, I am getting more adventurous with my slow cooker, trying things with it that I’d never done before with it. So why not try to make some soup?The basis for this recipe I saw on Facebook and thought, wow this sounds and looks delicious. So I made it (with a few of my own tweeks). All I can say is this one is divine.

So let’s talk creamy meatball and tortellini soup…

Veggies Cut Into Chunky PiecesLesson Learned 1 – It bears repeating, cut your veggies into chunky pieces: Because you cook for extended periods of time in a slow cooker your veggies can break down if you don’t cut them chunky. You want to see and taste your veggies. So don’t be afraid to cut them into chunky pieces. They will cook I promise you.

Lesson Learned 2 – Use different settings to get different results: Sounds pretty logical doesn’t it. But I used to be a one size fits all girl when it came to slow cooker settings. If I started on low, I stayed on low. And the same for high. But I found you can be more creative with recipes when you vary your settings during the cooking process. For this recipe I cooked the basic parts of it, veggies, meatballs and broth, for 6 hours on low. During the last hour I set it on high. I added the evaporated milk, thickener and tortellini and let that cook for 45 minutes on high. Then I added the spinach and let it cook on high for another 15-20 minutes. Everything cooked perfectly.

Italian Sausage MeatballsLesson Learned 3 – Don’t be afraid to be creative: Originally I was going to add chunks of sausage links to the recipe but my husband has a hard time with the casings. So I removed the casings and formed portions of the meat into meatballs. That worked just fine. I also used sweet Italian sausage in my recipe but you can use hot Italian sausage and give the soup a little more kick if you like. You can also use ground beef, but I think the seasonings in Italian sausage give more zip to the flavor of the soup.

This soup tastes absolutely divine. Your should really try this. I guarantee you will love it! You betcha can make this!

CREAMY MEATBALL AND TORTELLINI SOUP...

  • Servings: 8-10
  • Difficulty: Easy
  • Print

INGREDIENTS:

Creamy Meatball And Tortellini Soup1 pound Italian sausage (ground or links cut into chunks)

1 onion, diced

2 thick carrots cut into 1/2 inch circles

2 stalks of celery cut into chunks

3 large garlic cloves, minced

1 Tbs. Italian seasoning

2 tsp. chicken bouillon powder

1/2 tsp. salt

4 cups chicken broth

1/4 cornstarch

1/4 cup water

1 12-ounce package of cheese tortellini

3 12-ounce cans of evaporated milk

4 cups baby spinach with stems removed

DIRECTIONS:

Form the Italian sausage into 1 inch meatballs. Place the onion, carrots, celery, garlic, italian seasoning, bouillon powder, salt and meatballs into a 6 quart slow cooker. Pour in the chicken broth. Cover and cook on low for 6 hours.

Mix together thoroughly the cornstarch and water. Combine cornstarch mixture with the evaporated milk. Add the evaporated milk and the tortellini to the slow cooker, stir to combine and cook on high for 45 minutes. Add the spinach leaves and stir to combine. Cook for an additional 15-20 minutes on high.

Serve immediately with crusty bread.

Veggies and Meatballs in the slow cooker

 Add the chicken broth

Creamy Meatball And Tortellini Soup

Creamy Meatball And Tortellini Soup

Prime Rib Roast…

Happy New Year! I hope your new year is filled with good health and happiness. Mine started off with a bang as I finally ventured into making a prime rib roast. It’s been on my list of “ok, now you have to try this… you betcha can do this” and I decided to jump into the deep end of the pool on the first day of 2017 and tackle this one.

I’ll admit now I was a little nervous. After all prime rib, even when it’s on sale is expensive. And the last thing you want to do is ruin an expensive cut of meat. So you see, even the cooks who have been at it for a while can still get nervous in the kitchen.

And talk about expensive… I decided to check out a prime rib roast at Whole Foods. I only needed a small one, just enough for me and my husband. So, I asked for a two rib roast, between 4-5 pounds. That would give me enough for two people with one dinner of leftovers. The butcher handed me a package for a 4.4 pound roast and the price tag on it was $68.00! I almost choked. As I walked through the store I had many internal conversations with myself trying to see if I could rationalize spending $68 on a cut of meat, albeit prime. When I finally got to the cash register I handed the roast to the checker and said I was sorry but I just couldn’t rationalize spending that much for a roast for two people. She couldn’t have been any sweeter. She said not to worry, it was no big deal and that Whole Foods wants its customers to be comfortable and satisfied with what they purchase. She was great. She took all my guilt away.

Two-Rib Rib RoastI finally worked with a butcher at Safeway who cut me a two rib roast and tied the bones to the bottom as I requested. The roast coast $44 for a 4.3 pound roast. Still expensive, and choice but not prime, but I could rationalize that for a special meal more than $68.00. In the end the roast was fabulous so I was glad I opted for the less expensive cut. My next step was researching various cooking methods and determining what I felt would work for me. So I have some really good lessons learned to share with this blog…

Lesson Learned 1 – Let the roast sit out and get to room temperature: Many people are afraid to do this as they think the meat will spoil. Nothing can be further from the truth. In order to ensure that your roast cooks evenly you have to get it to room temperature. For my 4.3 pound roast I let it sit on the counter for 4 hours. Obviously the larger the roast the longer the time. I spoke with a co-work who made a 9 pound roast over the holidays and she kept hers out for 6 hours. Don’t be afraid to do this. You will be rewarded with an evenly cooked roast and it is perfectly safe.

Lesson Learned 2 – Choose the roasting method that is right for you: When I researched various roasting options, two methods seemed to be most prevalent. Both required cooking the roast at a very high heat for about 20-30 minutes. The difference was the next step. Some recipes suggested turning off the heat in the oven and letting the roast sit in there for several hours, making sure not to open the oven. Others suggested lowering the heat and cooking the roast at a lower heat for a certain amount of minutes per pound. Since everything takes longer to cook in high altitude, I chose the latter. I just didn’t see my roast cooking to medium rare with the oven turned off.

Lesson Learned 3 – Make sure your oven is clean: I cooked my roast at 450 degrees (some recipes call for 500 degrees) for the first 25 minutes. I have a brand new oven and it is really clean. I still set off my smoke alarm. (I forgot to put on the hood fan). My point is, at this high heat the roast will smoke and if you have a dirty oven everything baked on to the walls of your oven will smoke as well, just adding to the problem. So don’t forget to turn on your hood fan and make sure that oven is clean.

Prime Rib With A Garlic, Rosemary & Thyme RubLesson Learned 4 – A rub on the roast makes a difference: I used a rub consisting of olive oil, fresh garlic, fresh rosemary, thyme, and salt and pepper. What I found is the rub creates a delicious crust when cooked at those initial high temperatures. It added a fabulous flavor to the meat. I highly recommend the rub in this recipe. It tasted divine!

Lesson Learned 5 – Use a meat thermometer: The only way to truly know what’s going on with your roast is to use a meat thermometer. I like mine medium rare which means an internal temperature of between 130 – 135 degrees. Keep in mind when you take the roast out of the oven it will continue to cook as it rests, at least another 5 degrees. So if you want medium rare, take the roast out at 130 and you will be fine. This time I chose to make it rare as my husband likes it that way. That is an internal temperature of 120-125. You can easily just put a rare piece in a pan on the stove and heat it gently to bring it up to medium rare. Just keep an eye on it, as it will not take long to get it to medium rare.

Lesson Learned 6 – Let the meat rest: The roast looks so good when it comes out of the oven but you need to give it time to let its juices redistribute before you slice it. Otherwise all the juices will be on your plate and not in the meat. So let the roast sit for 20 minutes. Cover it with foil during that time and after 20 minutes it will be a perfect temperature for serving with the juices redistributed.

Lesson Learned 7 – Make your horseradish cream sauce to taste: Is there any better combination than prime rib and horseradish sauce? If you’ve never tried it you simply must. I will provide some basic guidelines for making this cream sauce but I found when I made mine that I needed to add a lot more horseradish. The jarred horseradish that I had was not overly spicy and so I needed more to get the flavor combination that I liked. But start out with a little horseradish and add from there. Depending upon the type of prepared horseradish you are using, a little may be enough. That was not the case for me.

As you can see there are many things you need to consider in order to make the perfect rib roast. But if you follow these lessons learned you will wind up with a flavorful roast cooked to perfection. Don’t be afraid to do a prime rib roast. You betcha can make this!

PRIME RIB ROAST...

  • Servings: 4
  • Difficulty: Medium
  • Print

INGREDIENTS:

Prime Rib Roast1 4-5 pound rib roast, bones tied to the bottom

1 cup red wine (I used merlot)

1 cup beef broth

2 Tbs. garlic, minced

2 Tbs. garlic infused olive oil (you can use plain olive oil)

2 Tbs. fresh rosemary, minced

2 Tbs. fresh thyme, minced

1 Tbs. kosher salt

1 tsp. freshly cracked black pepper

Horseradish Sauce:

1/4 cup sour cream

1 -2 Tbs. prepared horseradish

DIRECTIONS:

Remove the roast from the refrigerator and let stand for at least 4 hours. Preheat the oven to 450 and arrange the racks so that the roast will be in the center of the oven. Add the beef broth and wine to the bottom of the roasting pan.

Mix together the olive oil, garlic, rosemary, thyme salt and pepper. Spread the mixture on top of the roast. Place the roast on a rack on top of the beef broth/wine mixture. (At this point if you have an oven safe meat thermometer you will want to put it into the center of the meaty part of the roast making sure to avoid contact with the bones. If you only have an instant meat thermometer you will need to check the roast at various intervals at 1 1/2 hours after lowering the temperature of the oven).

Roast at 450 for 25 minutes. Turn the oven temperature down to 350 and continue to roast for approximately 15 minutes per pound (at high altitude I found I needed 20 minutes per pound). For medium rare remove the roast when the internal temperature is 130 degrees. Let the roast stand covered with foil for at least 20 minutes.

While the roast is resting place the roasting pan on a burner with the rack removed. Heat the beef broth/wine mixture and remove any fat from the drippings. This can be used as au jus for the roast or gravy for mashed potatoes if you are serving them as a side dish.

For the horseradish sauce, mix the ingredients together, tasting the sauce to ensure you have the right amount of horseradish. Add more if necessary. Chill the mixture until it’s time to serve.

rub

rub ingredients


beef broth and wine bath

Prime Rib Roast

Prime Rib Roast

prime rib dinner

What I’ve Learned After Three Years…

It’s been a little over three years that I have written this blog. It’s been fun, challenging and educational all at the same time. It started out as a blog sharing my thoughts and opinions, but I soon found out that I didn’t have as many interesting and provocative thoughts as I would like and no on really cared about my opinions.

During that time I became very interested in cooking and baking. I never had a talent for it and was never mentored in the kitchen so I learned many things the hard way. I decided I would be a recipe critic and review recipes I found on Pinterest. I did that a few times on my blog but quickly got bored with the idea.

Then it dawned on me that if I’d never been mentored in the kitchen there were probably a lot more out there like me who were struggling and just not intuitive in the culinary arts.  So I basically decided to make that the focus of my blog. I never looked back.

A staple of my posts are my lessons learned while making or perfecting a recipe. There are so many things that are not included in recipes that writers simply think one knows. That is not the case. My goal is to share those tidbits that, if unknown, can make or break one’s success in the kitchen. So in sticking to my format, let me share my lessons learned writing this blog over the past three years. Here we go…

Lesson Learned 1 – Have a focus for your blog: Once I had a focus posting became much easier and my readership increased. And if you are looking for people to follow your blog you need to post regularly. The goal I have with my blog is to post one new recipe a week. Sometimes I fall short, especially around the holidays. But most of the time I achieve my goal. I decided the best way to approach my blog was by helping folks avoid viewing cooking and baking as…

funny-cooking-quotes

Lesson Learned 2 – Market your blog and be patient: There are several ways to market your blog. I am not interested in paying for that service so I try just a few simple methods to get more readership. Anytime I publish a new blog I’ve set up parameters to upload the blog to my Facebook, Twitter and Tumblr accounts. I also have a Facebook page for the blog and I post links every time a new blog is published. I also use word of mouth as a tool. I happen to work part time in housewares retail and so I make sure my co-workers and even some customers hear about it. You never know who that connection will be that will get more readers to your blog.

Check out my Facebook page for this site. I could always use a few more “likes”. http://www.facebook.com/youbetchacanmakethis/

Lesson Learned 3 – Pictures, pictures, pictures: Your blog needs to be visually appealing as well or a new reader will immediately click off of your site. You heard the saying “A picture is worth a thousand words…” That couldn’t be more true. Don’t worry about needing expensive equipment. Every picture on this site was taken with an iPhone. Pictures tell a compelling story especially when it comes to cooking and baking.

Double Chocolate Zucchini Bread

Double Chocolate Zucchini Bread

Choose an eye catching featured image and incorporate as many pictures as makes sense. If you check out some of my posts you’ll see they have a minimum of 3 pictures. I also include the featured picture at the end of my blog. People who subscribe to my blog by email don’t see the featured picture as it is shown online and since that one is usually the best I want to make sure my subscribers get it to see it as well.

Strawberry & Raspberry Crumb Cake

Strawberry & Raspberry Crumb Cale

Plus, I don’t know about you but when I look at a recipe I want to see what the end product is supposed to look like. So make sure you use pictures. They are an effective tool.

Recipes on You Betcha Can Make This

Lesson Learned 4 – Never second guess what recipe will become popular: I remember when I posted the recipe for my cream cheese, bacon, spinach and scallion pinwheels. I thought to myself ” This is such a rudimentary recipe, everyone makes these so no one will be interested.” WRONG! This recipe is one of my most popular and it gets tons of hits especially around the holidays and Super Bowl. I almost didn’t publish that blog and now I know not to second guess myself. You never know what will be a hit with your readers.

Cream Cheese Bacon & Spinach Pinwheels

Cream Cheese Bacon, Spinach and Scallion Pinwheels

Conversely, when I posted the recipe below I thought it would be a big hit. And although it does get some face time, it wasn’t nearly as much as I’d expected. But I’ve also seen some of my recipes catch on at a later date. So, don’t give up hope. And don’t be afraid to post something simply because you think it will be of no interest. You may actually be surprised (as I certainly was) at the results.

Salmon and Cremini Mushroom Duxelle En Croute...

Salmon and Cremini Mushroom Duxelle En Croute…

Lesson Learned 5 – Take the time to proof read and edit your blog: I never post a blog the day I write it. I always come back the next day, reread it and incorporate edits. I’m always amazed to see my brilliant writing from the day before all of a sudden become not quite as brilliant. I also read my blog out loud. That way it slows down my reading and I catch typos or mistakes. You’d be surprised how many times I’ve left one ingredient out of a recipe. You certainly don’t want to post that. If you don’t take your writing seriously no on else will. So make sure when you post a blog you’re as grammatically correct and error free as you can possibly be. Also make sure that your blog flows and makes sense.

If you use these simple tricks chances are people will gravitate toward your blog. It takes time, so be patient. There was a point that I wondered if anyone was looking at my website. But now my stats assure me that they are. And it’s fun to know that people are looking at your site and trying your recipes.

So as we face the dawn of 2017 I look forward to another year of posting recipes. As always they will include any lessons learned so the newbies in the kitchen can become more proficient right out of the gate. I leave you with links to three of my personal favorites. May you all have a happy and healthy 2017!

Shepherds Pie Turkey Style...

Shepherds Pie Turkey Style…

Artisan No Knead Bread

Artisan No Knead Bread

Iced Cinnamon Chip Cookies

Iced Cinnamon Chip Cookies

happy-new-year-2017-images