Blueberry Muffin Breakfast Cake…

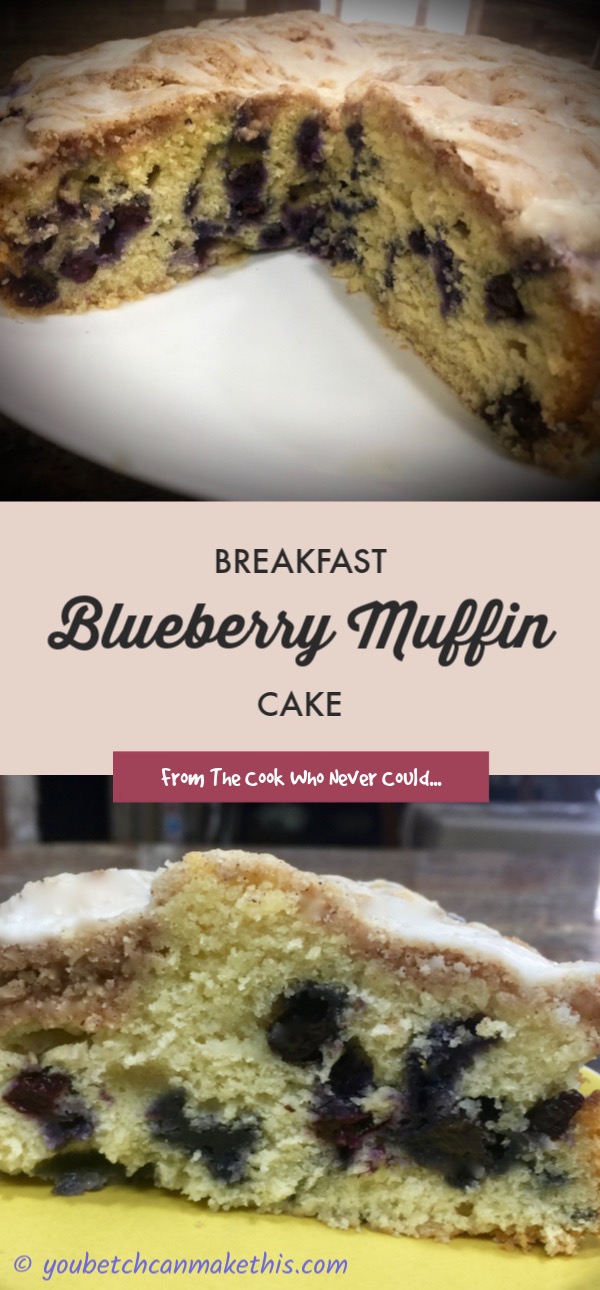
I had a large container of blueberries just sitting in my refrigerator. Isn’t it funny how what we have in our refrigerators and don’t want to waste often drives what we make? I had blueberries and I had to find a way to put them to great use.

I don’t know about you but I find making cakes in springform pans to be much easier. I like the idea that once the cake first begins to cool you can simply unhook the pan and the cake is released. I also like the fact that you can firmly attach a piece of parchment paper to the bottom of the pan before you add the batter and once the cake has cooled you simply pull the paper out from under the cake and it is safely on whatever plate you want it to be. I find this all very convenient.

But above and beyond the convenience of a springform pan, this cake is delightful and I can tell you having a piece of it with your morning coffee is utter heaven. So let’s talk blueberry muffin breakfast cake…

Lesson Learned 1 – My quest for the perfect crumble: I have to admit I’ve struggled with making a crumble that I truly enjoyed. I found most suggestions for making crumbles to be, for lack of a better term, yucky. More often than not I’ve felt that the crumble tasted too much like dried out lumps of flour. Have you experienced that as well? Well, no more. This combination for a crumble topping is the best yet. In my mind it balances the right amount of fat, sugar, flavoring and flour to give a sweet, but not overly sweet, topping for the cake that in no way tastes like flour. I suggest you use it on other cakes that you make with crumble toppings. I think I’ve finally found the right combination of ingredients for a crumble.

Lesson Learned 2 – The secret to making glaze: The secret to making glaze is there is no secret. I was watching the Pioneer Woman the other day and she and while she was making a glaze she admitted that there is no hard and fast recipe for one. It’s all done by eyeballing and consistency. The important thing to keep in mind is you can’t ruin glaze. Just remember if the glaze is too thick you add a little more liquid and if the glaze is too thin you add a little more powdered sugar. For this particular recipe I opted for a somewhat thicker glaze.

The other thing to remember with glaze is there is no correct consistency. There may be times when you want a thinner glaze and there may be times you want it thicker. And you can control that by adding less liquid for a thick glaze or more for a thin one. It’s as simple as that. So don’t fret over making glaze. It’s probably one of the most forgiving things you can make in the baking world!

Other than these few tips this recipe is pretty standard but it makes an over the top breakfast cake. Try it and let me know what you think…

Blueberry Muffin Breakfast Cake...

  • Servings: 10-12
  • Difficulty: Easy
  • Print

INGREDIENTS

Cake:

1 stick unsalted butter, room temperature

3/4 cup sugar

1 extra large egg, room temperature

1 tsp. vanilla

2 cups flour

2 1/4 tsp. baking powder

1/2 tsp. salt

3/4 cup whole milk

2 cups blueberries (approximately 1 pint)

Baking spray

Crumble Topping:

1 stick unsalted butter, room temperature

1/2 cup sugar

1 tsp. cinnamon

1/2 cup flour

1/4 tsp. salt

Glaze

1/2 cup powdered sugar

2 tsp. heavy cream or whole milk

1/4 tsp. vanilla

DIRECTIONS:

Preheat the oven to 350. Line the bottom of a 9 inch springform pan with parchment paper and clasp the top part of the pan shut. Set aside.

In a medium size bowl, put in all the crumble ingredients and cut together with a pastry cutter until the mixture is all combined and resembles clumps of sand. Set aside.

In a separate bowl whisk together the flour, baking powder and salt. Set aside.

In a stand mixer, cream together the butter and sugar. Add the egg and combine. Add the vanilla and combine. Add one half of the flour mixture and combine. Add the milk and combine. Add the remainder of the flour mixture and combine until totally incorporated. Gently fold in the blueberries making sure they are evenly distributed throughout the batter.

Spray the springform pan with baking spray including the bottom with the parchment paper (I use the one with flour). Pour the batter into the springform pan. Sprinkle the crumble all over the top of the batter. Use all of the crumble.

Bake for 40-45 minutes until golden brown and until a toothpick inserted in center comes out clean (it may have some blueberry on it, but that’s ok). Remove from the oven and let cool for 15 minutes. (Some of the crumble may seem a little wet due to the amount of butter in the crumble. That’s ok).

After it has cooled for 15 minutes, slide a knife around the edge of the pan and remove the outside of the springform pan. Allow the cake to cool completely before removing the parchment paper underneath the cake.

When the cake is completely cooled you can remove the bottom parchment paper and slide the cake onto a serving plate. Combine all of the glaze ingredients together and drizzle the glaze over the top of the cake.

Serve or store in an air tight container.


Stuffed Baby Peppers…

I don’t often think about a certain type of food as being cute, but I have to admit the thought crossed my mind when I first laid eyes on baby peppers. The next thought was how can I use these in a recipe and appetizer jumped out at me.

These little darlings make the perfect grab and go appetizer and I’ve found people tend to like the simplicity of that the most. The peppers are also very tender and sweet and a perfect compliment to a wide variety of cheese concoctions.

For this particular recipe I used a combination of a spreadable garlic and herb cheese, Boursin brand, and added some green onion and dill to boost the flavor of the cheese. It couldn’t have been easier. And when I served it at a gathering, the entire plate of peppers disappeared!

So let’s talk stuffed baby peppers…

Lesson Learned 1 – Sometimes the simplest things are the best: I used to think that recipes had to be complicated and flashy to merit writing about. And I’ve been proven wrong over and over again. The best example I can give is my cream cheese, spinach, bacon and scallion pinwheels. After I made them I hesitated to post the recipe because I thought it was so rudimentary and people would laugh at it. Boy was I wrong. To this day that recipe is one of the most popular recipes on my blog – and I would never have dreamed it to be when I wrote it.

This recipe, in my mind, falls in the same genre. It basically takes a pre-made spreadable cheese embellished with a couple of simple ingredients and some baby peppers and voila, a simple but great appetizer! This kind of appetizer is perfect for when you have to throw something together quickly. It’s super tasty, looks divine, and disappears in a snap. What could be better? So, bottom line, don’t shy away from what’s incredibly easy. In the end, it may be one of the most popular things you’ll make.

Lesson Learned 2 – Working with baby peppers: First let me suggest that you get a bag of multi-colored baby peppers. The array of colors on a plate makes for an easy but effective presentation. Second, baby peppers are incredibly easy to work with. They don’t have a lot of seeds or the strips of white pith inside so they are easy to cut and prepare. Just take your knife and cut the pepper in half from top to bottom, remove the few seeds you may find and if you have a little pith just take your knife and scrape it away. In no time flat you have a tasty bite size little boat to hold your cheese concoction.

Probably the biggest challenge with this recipe is stuffing the peppers – but you really don’t have to worry about being overly neat with the cheese stuffing. I used a melon baller, the smaller side, and just scooped some of the cheese into a pepper and spread it over the top. You wind up garnishing the peppers with some paprika and the remaining minced green onions and that gives them a decorative flair.

And that’s it. Now I chose to “beef up” the spreadable cheese I used, but you don’t even need to do that if you don’t have the time or ingredients. If you get a flavorful spreadable cheese, that can be sufficient. Just make sure you use a spreadable cheese, otherwise stuffing the peppers will definitely become a chore. Enjoy these tasty little morsels. You’ll have fun making them and you’ll have fun eating them!

Stuffed Baby Peppers...

  • Servings: 24
  • Difficulty: Easy
  • Print

INGREDIENTS:

1 5 oz. package of Boursin garlic and fine herb spreadable cheese

12 multi colored baby peppers, halved

1 Tbs. sour cream

2 green onions, chopped fine and divided

2 tsp. fresh dill, chopped fine

paprika, for garnish, optional

Fresh dill spears for garnish, optional

DIRECTIONS:

Cut the peppers in half from top to bottom. Remove any seeds and white pith.

In a small bowl combine the spreadable cheese, sour cream, about 2/3 of the chopped green onions, and all the chopped dill.

Using a small spoon or the smaller side of a melon baller, scoop some cheese inside a pepper and smooth it out to cover the entire upper surface of the pepper. Repeat until all peppers have been stuffed.

Sprinkle the tops of the peppers lightly with the remaining green onions and paprika. Plate (you can garnish the plate with fresh dill spears, optional) and serve.


Raspberry Riccota Coffee Cake…

Rasberry Cheese Coffee Cake

There’s nothing like the taste of a good coffee cake with your morning cup of Jo, or at least that’s how I feel. And I am particularly fond of baking with raspberries. Not only are they colorful but I also like their tartness which I feel balances the sweetness of a cake batter beautifully.

My husband is a sweets fanatic. He’s one of those that can eat sweets and not put on a pound, although I have to say he’s also very good at moderating what he eats. So I guess I can’t fault him for being good about what he eats and still including sweets in his diet.

Because of his sweet tooth, I like experimenting with things I bake to see what will interest him the most. This recipe got a thumbs up from him (with qualifications regarding the amount of raspberries which I will explain in lessons learned) and will definitely be something that I make again and again.

So let’s talk Raspberry Ricotta Coffee Cake…

Lesson Learned 1 – The batter in this recipe is thick: And I mean VERY THICK. I have to say I was a little surprised at how thick the batter was. I feared the cake would be a dried out mess, but I was wrong. I think the ricotta cheese, the cheese used in this recipe, makes the batter thicker but also makes the cake light and moist. I was pleasantly surprised.

The Thick Batter

Working with batter like this can be a challenge. This is the kind of recipe where you layer part of the batter in the pan, add the raspberries and then cover them with the remaining batter. I recommend you make this division close to half and half and here’s why. I had a hard time smoothing out the batter, especially the top layer. You will need as much batter as possible to get the job done. Dividing the batter in half did the trick.

I recommend taking the batter for the top layer and putting it in clumps all over as seen in the picture below:

That way it will help in the spreading out process. But even with this, spreading was still a little bit of a challenge. The raspberries underneath did not want to stay in place while I was attempting to smooth out the batter. Finally I just decided to wash my hands thoroughly and use my hands to press the batter down and out. That seemed to work a little better. Once the top was sufficiently covered I used my frosting spreader tool and smoothed out the top as seen below:

It really helped to start off with the clumps of batter spread out as much as possible over the top. I highly recommend you do that. Although getting it spread out was a little bit of a challenge it was much easier with the batter in various places versus trying to work from just one place.

Also make sure you use a stand mixer for the recipe. A hand mixer won’t work with the thickness of this batter. And mix the batter on low, otherwise you might face burning out the motor on your mixer. Yes, the batter is that thick, but no problem when you mix it on low.

Lesson Learned 2 – Really cover the center of the cake with raspberries: The recipe I based this on called for a heaping cup of raspberries, using 2/3 for the center and 1/3 for the top. In doing that the center of the cake looked like the picture below:

The Center Of The Cake

This was not nearly enough raspberries. Once the cake was baked it seemed like there were only a few raspberries in the center. Some slices did have a few more, but some seemed to have hardly any. Next time I make this I will add even more raspberries – so at this point I will recommend a heaping cup and quarter of raspberries with the greater majority being placed in the middle layer of the cake. The raspberries are what give the cake a special taste – that great balance of tart and sweet –  and I felt they should be more predominant in the cake. Baking it this way the cake turned out fine – but I will definitely add more raspberries the next time.

Lesson Learned 3 – Try adding a dollop of Cool Whip on the cake: My husband discovered this on his own. He thought the Cool Whip was a great addition to the cake. And yes, of course, you could always make some fresh whipped cream, but if you’re in a hurry a little Cool Whip will do just fine and will send the flavor over the top.

Lesson Learned 4 – The valuable lessons I’ve learned: Since the very beginning of writing this blog I’ve used the tag line “From The Cook Who Never Could…” and that, for a long time time, was so very true of me. I never had success in the kitchen because, first of all, I had no frame of reference. My mother was not a cook. Her idea of a meal was to overcook meat, have some kind of potato with it and open a can of corn or peas. Mind you, I am not knocking my mother here. She was a working mom at a time when most women were still staying at home and she had to figure out how to balance a job on the night shift with a husband and two children at a time when hardly anyone else was doing it. My dad helped a little, but his specialty was making bacon and eggs and oatmeal (he normally was in charge of the breakfast detail). So there was not a lot of opportunities for me to learn about cooking at home.

Once I became interested in cooking I found the hardest thing for me was bouncing back after my failures. I always expected things to turn out perfectly the first time and when they didn’t I blamed it on my lack of skills and became very disheartened. It’s only as I got older and began to really learn about the art and science of cooking and baking that I became much more forgiving of myself when things did not turn out as planned.

There is always something you can learn when you cook or bake something. And I hope you know that even the best of cooks don’t always get it perfect the first time around. That’s a lesson I learned the hard way.  So even with this recipe, when the concentration of raspberries was not what I would have wanted, I realized the cake in itself was still quite good and not a failure. It just needed, in my estimation, a little improvement.

Don’t make my mistake and blame yourself or your skills if something does not turn out the way you planned the first time.  And certainly don’t give up on yourself. Use what you learn and continue to improve your skills. It’s all part of the process.

So I hope you make this one – and I will write the recipe adding more raspberries. It’s a lesson I learned making this cake – one of many lessons I am sure I’ll continue to learn in the future. Enjoy!

Raspberry Ricotta Coffee Cake...

  • Servings: 10-12
  • Difficulty: Medium
  • Print

INGREDIENTS:

Coffee Cake:

1/2 cup unsalted butter, room temperature

3/4 cup granulated sugar

2 eggs, room temperature

1 tsp. vanilla

2 cups flour

2 tsp. baking powder (1 tsp for high altitude)

1/2 tsp. salt

1/2 tsp. baking soda

1 1/4 heaping cups of frozen raspberries

15 oz. whole milk ricotta cheese

Baking spray with flour

Glaze:

1/2 cup powdered sugar

1 tsp. almond extract

1 – 2 Tbs. milk or water

DIRECTIONS:

Preheat oven to 325  (350 for high altitude). Line the bottom of an 8 inch springform pan with parchment paper. Set aside.

In a small bowl combine the flour, baking powder, salt and baking soda. Whisk to combine. Set aside.

Using a stand mixer, beat the butter and sugar until light and fluffy (several minutes). Add the eggs one at a time and beat until well incorporated. Add the vanilla and beat to combine.

Add 1/3 of the flour mixture and beat on low until incorporated. Add 1/2 of the ricotta and blend until smooth. Add another 1/3 of the flour and beat on low until incorporated (due to the thickness of the batter it is important to only beat this on low). Add the remaining ricotta and blend until combined. Beat in the remaining flour on low until incorporated. Make sure the batter is well mixed.

Spray the springform pan with the baking spray. Pour in 1/2 of the batter and smooth out around the pan. Add 1 heaping cup of frozen raspberries and arrange evenly over the top. (If the top doesn’t look sufficiently full of raspberries add a little more from what you have remaining).

Spoon out the remaining batter in clumps over the top of the raspberries. Spread the batter out to cover the top. (NOTE: If using a spreader becomes too difficult, thoroughly wash your hands and use them to press the batter down and out). Smooth out the batter to evenly cover the top of the pan.

Take the remaining frozen raspberries and using your hands press them down across the batter on top.

Bake for 60-75 minutes or until the top is lightly browned and a toothpick inserted in the center comes out clean.

Cool at least 20 minutes before removing the cake from the pan.

Once cooled drizzle the glaze over the top. Make the glaze by combining the powdered sugar with the almond extract and milk or water. Use one tablespoon of liquid initially and check the consistency of the glaze. If the glaze it too thick add more liquid.

Cake Right Out Of The Oven

Rasberry Cheese Coffee Cake


Dijon Crusted Halibut…

Although we try to eat a lot of fish, I don’t usually buy halibut because it can be quite pricey. But the other day when I was at the grocery store they had just cut some fresh halibut and it looked so good I had to buy some.

I’m always a little nervous about making halibut because I don’t want to overcook it. It’s somehow easier for me to rationalize making a mistake with salmon (although I have that pretty much down to a science) than with halibut. But I just couldn’t resist how good and fresh the halibut looked and decided to try this recipe for making it.

So let’s talk Dijon crusted halibut…

Lesson Learned 1 – Do you leave the skin on or not: That is the perennial question, isn’t it? I prefer removing the skin but you can certainly leave it on. Some think that by leaving the skin on the fish tends to be more moist. In my experience I don’t know that to be the case. So the decision is up to you. I prefer removing the skin but the choice is up to you. Either way, it doesn’t seem to affect the overall cooking time of the fish.

Lesson Learned 2 – The hardest thing about this recipe is determining when the fish is done: The best way to determine that is to take a fork and try flaking off a small piece on the end of the fish. If it flakes off, it is done. The only advice I can give with cooking fish is it takes time and practice to perfect that skill. Basically you have to get to know the type of of fish you’re using and how your oven functions. I realize that may be little comfort where a more expensive fish like halibut is concerned, but once you’ve got the hang of it, you’ve got it!

The end of the fish is flaky – the fish is done.

Always cook the fish for the least amount of time that a recipe calls for and go from there. You can always put the fish back in the oven but you can’t change things when it’s overcooked. I know in my oven a 4-5 ounce salmon filet is cooked the way we like it at 375 for 20 minutes. (keep in mind I am at high altitude and cooking temperatures on average can be 15-25 degrees higher than on any given recipe designed for sea level).

Also, the cooking process determines the oven temperature and cooking times. This particular recipe is done entirely in the oven. Sometimes I make fish (and you can certainly do this with halibut) where I lightly brown the fish on both sides in a skillet on top of the stove and finish off the cooking process in the oven. Doing that normally changes the oven temperature and cooking time. So the cooking process will determine what temperature and how long you cook the fish.

This particular recipe is done entirely in the oven. When I made the fish I cooked it at 365 for 15 minutes and it turned out great. Again, keep in mind I am at high altitude and most recipes are not written that way so for my sea level friends I recommend baking the fish at 350 for 15-18 minutes. If you are unsure for any reason check the fish at 15 minutes. You should be just fine if you do.

And that’s it. Just a few last thoughts – I’m writing this recipe for 2 people put you can certainly make it for more.  Just increase the crust ingredients proportionately. Also, the combination of mayo, horseradish and lemon creates a wonderfully flavorful crust for the halibut. Once you make this, I’m sure you’ll want to make it again. It’s just that good! And guess what – the crust works equally as well on cod so you have a less expensive choice as well. Enjoy!

Dijon Crusted Halibut...

  • Servings: 2
  • Difficulty: Medium
  • Print

INGREDIENTS

1/8 cup mayonnaise

1 tsp. Dijon mustard

1 tsp. prepared horseradish

1 tsp. fresh lemon juice

1/4 cup bread crumbs, separated

2 tsp. grated Parmesan, separated

2 4-5 ounce halibut filets

1 Tbs. butter, melted

Olive oil cooking spray

DIRECTIONS:

Preheat oven to 350 degrees (365 for high altitude). Line a baking sheet with foil. Set aside.

In a small bowl mix together the mayo, mustard, horseradish and lemon juice. Stir in 1/8 cup (half) of the bread crumbs and 1 tsp. (half) of the Parmesan cheese. Spray the foil lined baking sheet with cooking spray. Arrange the filets on the baking sheet and spread the mayo/crumb mixture on top of them.

In a small bowl mix together the remaining bread crumbs, Parmesan and melted butter until thoroughly combined. Sprinkle this coating on top of the halibut filets.

Bake for 15-18 minutes, checking the filets at 15. The fish is done when it flakes easily off the end of the fish with a fork.

Coat The Fish With The Mayo/Bread Crumb Mixture

Add The Buttered Bread Crumbs On Top And Bake


Cauliflower And Carrot Soup…

Take it from me, if you’ve not been in the habit of making homemade soups you’re missing out on something special. I don’t know why it took me so long to get with the program, but now I’m a homemade soup junkie! I guess I never realized how incredibly easy it is to make homemade soup. Plus you can control everything that goes into it and I am a big fan of that.

Let me give you a little backstory regarding how I came about making this particular soup. A little while back, here in Colorado, we were forecast to have a blizzard. We were being told we could get anywhere from 4 inches to a foot of snow with blustery winds. As the day got closer it looked like we might be spared the heavy stuff. So at first I wasn’t overly concerned.  In my mind 4 inches of snow could hardly constitute a blizzard. But I was wrong.

I found out an interesting piece of information regarding blizzards. Blizzards are not forecast due to the amount of snow that falls. They are forecast due to heavy winds that accompany a snowfall. When you think about it, that makes sense. Regardless of the amount of snow if the winds cause white out conditions that is extremely dangerous. And so, a blizzard we did get with wind gusts up to 80 miles an hour but only 4 inches of snow. Some areas got almost two feet!

So, knowing that I would be home bound for at least a day made me go into full test kitchen mode. What a great way to test some recipes and get them in the queue for publishing. And that’s exactly what I did – and cauliflower soup was one of the recipes I played with on that day.

So let’s talk Cauliflower and Carrot Soup:

Lesson Learned 1- The cut size of the vegetables is key: I used a 2 1/2 pound head of cauliflower and two cups of sliced carrots. It is important to cut up the cauliflower into small florets. If you don’t they won’t cook in time. I also took baby carrots and sliced them thinly on the diagonal. I wanted to make sure the carrot pieces were not overly thick so they would also cook in the allotted time. The picture below gives you some idea of the cut sized I used. They cooked perfectly in the time allotted.

Carrots Onions And Roasted Garlic

Lesson Learned 2 – Take the time and roast the garlic: Have you ever roasted a head of garlic before? It’s really quite easy and the result is fabulously sweet, flavorful garlic. The process is extremely simple. Cut off the top of the entire garlic bulb about 1/4 – 1/2 inch down, place the bulb in foil (do not remove the skins), drizzle the top of the bulb with olive oil, cover it with foil (I recommend adding an additional layer of foil to protect against oil leaking out of the wrapper) and roast at 400 degrees for 45 minutes to one hour. When you take the garlic out of the oven you want the individual garlic cloves to be fork tender – that’s how you know it’s done.

I roasted my garlic in the toaster oven and put it on a foil lined sheet as extra protection from leaking oil. Once the garlic cooled I merely turned the cut side down and squeezed. The soft delicious cloves popped right out. I then coarsely chopped them and added them to the cauliflower and carrots. Preparing the garlic this way versus sauteing them raw with the onions gives the soup a much richer flavor. It is worth the extra step. But, if for some reason you don’t have the time, mince two large cloves of garlic and add them to the onions once they’ve caramelized. Continue to saute for about a minute or until the garlic is fragrant. Then add the vegetables and follow the recipe from that point.

Cut The Top Off The Garlic Bulb

Place In Foil And Drizzle With Olive Oil

Roasted Garlic Cloves

Lesson Learned 3 – Take the time to cook the onions to a golden brown: Onions are more flavorful when you take the time to caramelize them. So do yourself a favor and take that time. Just be aware that it can take about 20 minutes to get them to that beautifully warm color. But in the end, it also makes a big difference in the flavor of the soup.

Lightly Caramelized Onions

The rest of the process is pretty basic and within about 40 minutes or so you have this delicious homemade soup. Give it a try and tell me what you think. I’d love to hear how you did with this recipe.

Cauliflower And Carrot Soup...

  • Servings: 6-8
  • Difficulty: Easy
  • Print

INGREDIENTS:

2 1/2 pound head of cauliflower, cut up into small florets

2 cups thinly sliced baby carrots (sliced on the bias)

1 sweet onion, chopped

1 head of roasted garlic cloves, chopped (or two raw cloves, diced)

3 Tbs. flour

4 cups of chicken or vegetable stock

1/4 cup heavy cream

6 oz. of grated white cheddar cheese

Salt and Pepper To Taste

Olive Oil for roasting the garlic and sauteing the onions

DIRECTIONS:

Preheat oven to 400 degrees. Cut off the top of a bulb of garlic. Place the bulb in foil and drizzle with olive oil (approximately one tablespoon). Wrap the garlic in foil (I recommend wrapping it twice) and let it cook for 45 minutes to one hour or until the cloves are fork tender. Unwrap the bulb and set it aside to cool. Once cool, turn the cut side down and squeeze the bulb from the sides until the cloves pop out. If a few a the cloves are stubborn, don’t worry. What pops out will be sufficient for the soup. (If you do not have time for this step simply mince two raw cloves of garlic and saute them with the onions after they have caramelized. Once the garlic is fragrant you can add the vegetables and proceed from there.)

Preheat a dutch oven over medium heat and add about 1 tablespoon of olive oil. Add the diced onions and saute until they are golden brown, about 15-20 minutes. While the onions are sauteing, prepare the carrots and cauliflower florets. (If you roast the garlic, chop the cloves and mix them with the vegetables.)

When the onions have caramelized, add the vegetables to the onions and saute for a few minutes. (You can add a little more olive oil, if needed). Sprinkle the vegetables with the flour and mix well. Add the chicken stock while stirring the vegetables.

Cover the dutch oven with a lid, leaving a small crack for the steam to escape. Cook for approximately 20 minutes, stirring occasionally. Test the vegetables for desired consistency. If need be, let them cook for a little while longer until the desired consistency is achieved.

Stir in the heavy cream and cheese. Stir until thoroughly combined. Take off the heat and serve. (Optional: You can garnish with some croutons and some shredded Romano or Parmesan cheese).