Homemade Garlic Dill Pickles…

It was so much fun at the Farmers Market this past weekend. It’s that time of year when you start to get a lot of great things there like fresh herbs, green beans, early girl tomatoes and of course cucumbers and zucchini.

I stopped at a stand that offered a deal of $10 per bag, fill it with what you want (and a fairly large bag I might add). Needless to say I loaded up. Since I don’t have the space to grow zucchini anymore I got a couple of them so that I could make my Double Chocolate Zucchini Bread. They had some fabulous fresh green beans and I got some of them as well – great for steaming. They also had some Yukon gold potatoes that I couldn’t resist. And they also had some great looking pickling cucumbers and so I thought I’d try my hand at that.

Pickling is a rather easy process and if you decide not to can for preserving purposes the pickling process is even easier. I really had no idea how many little cucumbers I should get as I wanted to try to fill two pint jars, so I guessed at four and I happened to be right (this time).

So let’s talk making homemade garlic dill pickles…

Lesson Learned 1 – Make the cucumber slices of equal thickness: Best to use a mandolin slicer for this job. I set my slicer to 3/16 of an inch (use whatever setting you have that is close to 1/4 inch) and all the slices came out perfectly proportioned. Of course you can use a knife and if some of the slices are not the same thickness it won’t harm the process but I think this is a perfect thickness for the pickle slices. They’re pretty much the same size as you buy in jars at the store. And as I like to always remind you, be very careful using a mandolin slicer and use the finger protector so you still have them once you’re done slicing!

Lesson Learned 2 – Pack the jars as firmly as you can without crushing the slices: You want all the slices to be able to soak up the pickling brine and once you add the brine they will tend to separate from each other a little. Four cucumber pickles, medium sized, for two pint jars should be sufficient for what you need to have the pickles layered firmly in the jar and still be able to close the lid.

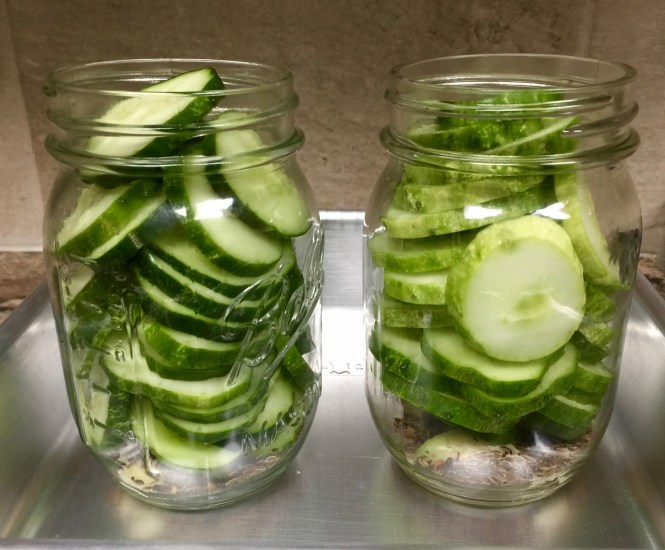
Pack the jars tightly without crushing the slices

Lesson Learned 3 – Once the jars are filled and sealed turn them over a couple of times: I like to see that the pickling spices are sitting throughout the jar and not just stuck on the bottom. I’ve not read anywhere that you have to do that, but I think it creates better all around pickling.

Lesson Learned 4 – Leave the refrigerated jars of pickles alone for at least 48 hours: I know you will be tempted to see what they taste like long before that, but you want to give the pickling spices and brine plenty of time to get acquainted with the cucumber slices. And if you can leave them alone for 72, well that’s even better. Believe me, it’ll be worth the wait.

Other than measuring out the spices and boiling the vinegar water and salt, that’s basically it. It couldn’t be easier and you control the ingredients. So much better than buying jars at the store.

Homemade Garlic Dill Pickles

  • Servings: Many
  • Difficulty: Easy
  • Print

INGREDIENTS:

4 medium sized pickling cucumbers

4 large cloves of garlic, peeled and smashed

4 teaspoons dill seed

1/2 tsp. red pepper flakes (optional)

1 cup apple cider vinegar

1 cup water

1 1/2 Tbs. kosher salt

DIRECTIONS:

You will need two wide-mouth mason jars with lids for this recipe. Make sure the jars and lids are clean.

Wash and dry the cucumbers. Make sure any blossoms or remnants of blossoms are removed. Cut the cucumbers into 3/16 inch coins. Divide the garlic, dill seed and red pepper flakes in half. Put equal amounts into the bottom of each jar. Pack the cucumbers into the jars as much as you can without crushing any of them and so the lid of the jar can be closed and sealed.

Bring the pickling brine (apple cider vinegar, water and salt) to a rolling ball, whisking it until the salt is incorporated into the liquid.

Pour the hot liquid into the jars, filling each to about 1/2 inch from the top. (I found I used all the brine but depending how you pack your pickles you may not use all of it). Gently tap the jars on the side to remove any air pockets and add more brine if necessary.

Place the lids on top of the jar and screw on the rings until tight. Let the jars stand until they reach room temperature. Refrigerate the jars for a minimum of 48 hours. Refrigerate the jars after opening.

Juicy Oven Baked Pork Chops…

For a very long time I had not idea how to cook pork chops. When I was a child my mother would make a roast pork dinner and she always wanted to make sure it was cooked thoroughly so of course her roasts were always dried out. (sorry Mom…) That’s the way I grew up thinking how pork should be cooked. Needless to say, I was not a big fan of pork at the time – too dry and tasteless.

It’s only been within the last couple of years that I’ve learned how to cook pork. Most people think the meat has to be opaque white which is a fallacy. Once it gets to that point it is overdone and will most likely be dry and tasteless. When pork is done perfectly it should look like the picture below…

Juicy Oven Baked Pork Chops

Look at how juicy this piece of pork is. Pork that is done correctly will have a little bit of pink marbling in the meat as you can see in the picture. Most people, including myself, used to think that pork was not cooked thoroughly when it had a little pink in it. That couldn’t be further from the truth. I tested these chops in their thickest part with a meat thermometer and it read 140 degrees which is ideal. Let me tell you this pork chop was melt in your mouth delicious. And preparing it this way was not all that difficult. I want to share this recipe because it is so easy and I guarantee perfect results every time. But there are a couple of little secrets you need to be aware of and I’ll share them in my lessons learned.

So let’s talk juicy oven baked pork chops…

lodge-cast-iron-skilletLesson Learned 1 – Take my advice and buy a cast iron skillet: Recently I’ve been doing a lot of cooking in my cast iron skillet and I’ve learned to  love it! Cast iron is your best method for cooking. It may take a little longer to heat up (and really not all that much longer) but once it does it provides even heat that will not dissipate quickly. Plus it moves seamlessly from stove top to oven. And if that isn’t enough it is also one of the cheapest skillets you can buy. Depending on what size skillet you get you’ll pay somewhere between  $15 – $30. Now that’s a bargain! The main downside to a cast iron skillet is that it’s heavy to lift. But in my mind that does not outweigh the benefits. Just look at it as building up your upper body strength while preparing an absolutely delicious meal!

I have a 10 inch skillet and that is big enough for two pork chops the size required for this recipe so I’m writing this recipe for two. If you get a larger skillet you can easily do four chops. Nothing else in the recipe has to be adjusted significantly. Just make sure you know how many chops will fit in your skillet without crowding them.

You need to use center cut bone-in chops for this recipe. They should be about 1 inch thick. Chops of that size take up quite a bit of room in the skillet. So if you want to do more than two chops in one skillet get a skillet larger than 10 inches.

Handy Trick: One other trick I learned was to put the skillet in the oven and leave it there while the oven is preheating. Once the oven has reached 400 degrees you take the skillet out of the oven (make sure you use mitts because the pan will be hot) put it on the stove over medium high heat and then sear the chops one one side before turning the chops over and putting the skillet back in the oven. It’s a pretty nifty trick.

Lesson Learned 2 – Try brining your chops: If you’ve never tried brining you really should. Brining basically is marinating meat in a salt based liquid that has optional ingredients you can add to enhance the flavor of the meat. The purpose of brining is to break down the fibers in the meat ergo making it more tender. I recommend brining your chops for at least 4 hours, but even if you can only do it for 30 minutes it will make a difference in the meat.

Brining Your Pork Chops

Depending on the type of dish you use to brine the chops you may need more water than I suggest to make sure they’re covered. The chops need to be completely covered for the brining process to work. If you need to add more liquid than what I specify in the recipe just remember to add a tablespoon of salt for every additional cup of water. Also make sure that the salt is completely dissolved in the water before putting it over the chops.

The rest of the recipe is so simple it’s almost funny. This is quick and easy way for making the most unbelievably moist and tender chops you’ll ever have. Try it and tell me what you think.

Juicy Oven Baked Pork Chops…

  • Servings: 2
  • Difficulty: Easy
  • Print

INGREDIENTS:

Juicy Oven Baked Porch ChopsFor the Brine:

3 cups water, divided

3 Tbs. Kosher Salt

2 Garlic cloves, smashed

1/2 tsp. black peppercorns

1 bay leaf

For The Pork Chops:

2 center cut bone-in pork chops, 1 inch thick each

1 Tbs. olive oil, optional

Salt and Pepper

DIRECTIONS:

Approximately 4 hours ahead of time brine the chops. Take 1 cup of water and bring it to a boil. Add the salt, garlic cloves, peppercorns and bay leaf. Stir continuously until all the salt is dissolved. Take the mixture off the heat. Add the remaining two cups of cold water. Do not put the pork chops in the brining liquid until the liquid has come to room temperature (this make take about 5 minutes or so). Place the chops in a shallow dish and cover them with the brining liquid. (the liquid should completely cover the chops). If you need to add more liquid refer to lessons learned above. Cover with plastic wrap and refrigerate until time to cook.

Put the cast iron skillet in the oven. Close the oven door and preheat the oven to 400 degrees. While the oven is heating remove the pork chops from the brine and pat them dry. Salt and pepper both sides of the chops.

When the oven has preheated remove the skillet and place it on top of the stove. Turn the heat under the skillet to medium high. At this point you can add a little olive oil to the pan if you desire. (I have a well seasoned skillet and did not need to add any olive oil. If you’re not sure how well seasoned you skillet is, add a little olive oil so the chops won’t stick to the pan). Sear the chops on one side for 3-4 minutes.

Turn the chops over and put the skillet back in the oven. Continue roasting the chops for an additional 7-9 minutes (the chops should register 140 -145 degrees in the thickest part of the meat). Remove the chops from the pan and place them on a plate to rest for about 5 minutes. Cover the chops with foil during this resting period. Serve immediately after the resting period.

Juicy Oven Baked Pork Chops

Juicy Oven Baked Pork Chops