Skillet Irish Soda Bread…

There’s no doubt about it, the recipes that are handed down from generation to generation are the best. And sometimes that’s an impossible task as the old fashioned cooks would simply say, “Oh I just eyeballed what I needed and used a pinch of this and a little of that” leaving you to try to assimilate the exact ingredients to recreate the recipe.

This recipe is one of those handed down gems. A neighbor of mine served it at her St. Patrick’s Day party and the rest is history. I remember looking at all the wonderful things she laid out on her table but only eating the soda bread with some fresh Irish butter. It was heaven. I found out later it was her Mother’s recipe and she had been making this for years!

I’ve tasted many iterations of soda bread over the years and, to be honest, most of them were less than stellar. There was only one other time that I can remember having fabulous soda bread. That was when I was working at the Chicago Park District and one of my co-workers, Carol Diver, brought some to work. Carol was Irish through and through with an infectious laugh and a heart as big as all outdoors. And her soda bread was to die for. Unfortunately Carol is not longer with us and I’d never asked her for her soda bread recipe. But from then on, her soda bread was the standard to which I held all others. As time went on none would ever compare, until now.

So this time I made sure to get the recipe and with permission I am sharing it with you. I made it the other night and it was just as fabulous as I remember, moist with just the right amount of sweetness. I hope you enjoy this recipe and make it often.

So let’s talk Irish Soda Bread…

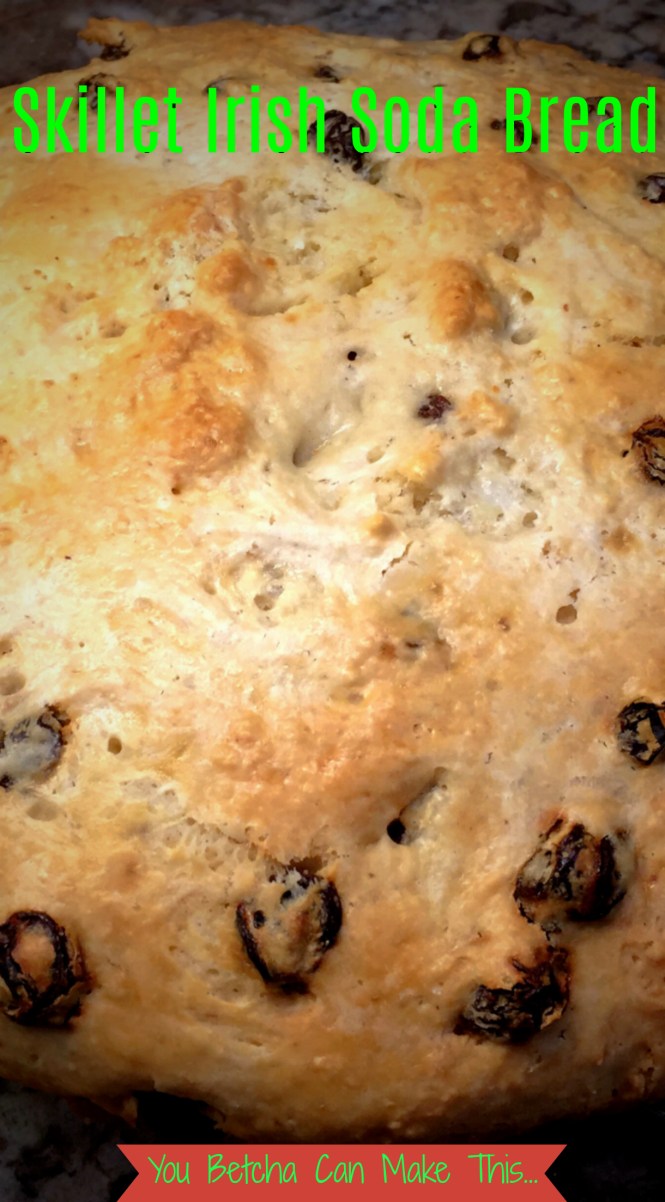
The dough did not reach the sides of a 10 inch skillet

Lesson Learned 1 – The size cast iron skillet you use is important:  The recipe I got said it made two loaves and my neighbor said she used a 10 inch skillet to bake the bread. But once I made the dough and put it in my 10 inch cast iron skillet I knew that couldn’t be the case. The only way there would be enough dough for two loaves is if you used a smaller cast iron skillet – probably an 8 inch skillet. With a 10 inch skillet there is only enough dough for one loaf.

With using a larger skillet it will take longer to cook, approximately 1 1/4 to 1 1/2 hours. If you use a smaller skillet I would begin checking it at 45 minutes. You want a nice gold brown on the top. Once you see that you know the bread is done.

Don’t get me wrong, the bread turned out beautifully and was so delicious as you can see from the pictures in this blog.  I just think the directions I got were for a smaller pan than what I used.

Lesson Learned 2 – Do not use self rising flour in this recipe: The second time I made this I decided to experiment and use self rising flour – BIG MISTAKE! The bread did not rise and the top of it looked like a battle had been fought on it, all lumpy and messy looking. And although I baked it for the correct amount of time, it did not cook through and was gooey inside. So take a tip from me, stick with regular flour and you’ll be just fine.

That’s the only advice I have for making this as the recipe is pretty straightforward. And let me reiterate, this is the best Irish Soda bread I have ever tasted since I had my friend’s, Carol Diver’s, bread all those years ago. I know you will enjoy this one!

Skillet Irish Soda Bread...

  • Servings: 12-14
  • Difficulty: Easy
  • Print

INGREDIENTS:

4 cups all purpose flour

1 cup sugar

1 tsp. salt

1 tsp. baking soda

2 Tbs. cold butter

1 1/2 cup raisins

1 1/2 cup buttermilk (you may need to add a little more)

Shortening, to grease the skillet

DIRECTIONS:

Preheat oven to 325.

Whisk together the flour, sugar salt and baking soda until well combined. Cut in the butter. Add raisins and buttermilk and mix until moist. (You may need to add more buttermilk. I found I needed to add about a 1/4 cup more to get all the ingredients moist).

Lightly grease a cast iron skillet with shortening (use a 10 inch skillet for one large loaf or an 8 inch skillet for two loaves). Transfer dough to the skillet. Brush the top of the dough with a light coating of buttermilk. If desired, cut a cross on the dough.

Bake for 45 minutes for the smaller loaves and 75 minutes for a large loaf. Check the loaves at 45 minutes and 60 minutes respectively to see if you need to add extra time.

Let bread sit in skillet for about 5 minutes after taking it out of the oven. Remove the bread from the skillet and let it cool on a wire rack.

Serve with Irish butter for a delectable treat!

SaveSave

SaveSave

SaveSave

SaveSave

SaveSave

SaveSave

SaveSave

SaveSave

SaveSave

SaveSave

SaveSave

SaveSave

SaveSave

SaveSave

SaveSave

SaveSave

SaveSave

SaveSave

SaveSave

SaveSave

SaveSave

SaveSave

SaveSave

SaveSave

SaveSave

SaveSave

SaveSave

SaveSave

SaveSave

SaveSave

SaveSave

SaveSave

SaveSave

SaveSave

SaveSave

SaveSave

SaveSave

SaveSave

SaveSave

SaveSave

To Die For Honey Mustard Chicken…

For those of you who have read my blog you know that chicken is my favorite. I cannot think of any way you can make chicken that I wouldn’t like. And since my husband is eating less and less red meat these days, my new recipes tend to center around chicken, turkey, fish, pasta and ground beef. You won’t hear me complain.

So I am always on the lookout for new chicken recipes and I found one on, yes you know, Pinterest and thought I’d try it. I’ve experimented with various honey mustard chicken recipes in the past but I liked this one because it suggested doing a honey mustard rub on the chicken as well as baking it in a honey mustard sauce. Needless to say, when my husband says “this one’s a keeper” I know this has been the best recipe yet.

Recipe Rating – A++ – this recipe is so flavorful and the sauce is just divine, great for crusty bread dipping. It isn’t difficult to make and is now one of my all time favorite ways of making chicken.

Lesson Learned 1 – Chicken thighs or breasts: The original recipe called for using chicken thighs. My husband is not a big fan of chicken thighs (I know, he’s probably the only one in the world). So I decided to make this with boneless breasts. It turned out perfectly. Most people shy away from cooking with chicken breasts. They think they are too dry. But the problem really is that most people cook chicken breasts far too long. I cooked mine at 375 for 25 minutes and they were moist and tender (I also kept the skin on the breasts). Chicken breasts lend themselves well to this recipe as the sauce gives them tremendous flavor. So don’t shy away from using chicken breasts – just be careful not to over cook them.

IMG_1123Lesson Learned 2: Buy chicken breasts with the rib meat attached and bone them yourself: I’ve found that I can save money buy purchasing chicken breasts with the ribs attached and bone them myself. It is a little bit of work but I think it’s worth it. Plus it’s getting harder and harder to find boneless chicken breasts with the skin still on them. I like to cook them with the skin on as I think that adds moistness and flavor. You don’t have to eat the skin, but I think it’s a great flavor enhancer in the cooking process. Just be careful when boning the breast. You want to finish with all of your fingers. The main thing is to use a very sharp boning knife. If you don’t have one then don’t do this. You’ll wind up either cutting yourself of getting frustrated because the process is taking to long. Sections of the ribs lie very close to the meat and you need to have a knife that can easily slice between the marrow and meat. Believe me, the only way to do this is with a high quality, very sharp boning knife.

IMG_1137Lesson Learned 3 – Let the meat marinate with the mustard rub on it for at least an hour: The skin and breast meet will be slippery so the rub will slide around on you. Get as much as you can on both sides and then cover it with plastic wrap and let it marinate in the refrigerator for at least an hour. As soon as you brown the meat the rub will come off. Don’t worry, it’s just more flavoring for the sauce.

Lesson Learned 4: The best sauce ever: I’ve made different versions of honey mustard sauces but I have to say I prefer this one. I like it because it has a nice balance of mustard and honey and also uses a little chicken stock. The stock tempers the sauce thickening process.  A sauce made with IMG_1131honey that is not diluted in this manner can stick to the pan and cause a baked-on mess. This sauce is so good that you’ll want to eat it with a spoon or dunk your bread in it. I also recommend using a seasoned cast iron pan when making this for a variety of reasons. First, cast iron is one of the best conductors of even heat. It takes cast iron a little longer to heat up but it holds heat well and it provides even heat. Second, a well seasoned cast iron pan is even better than a non-stick pan and that’s a plus when cooking with a honey based sauce. Third, cast iron moves seamlessly from stove to oven and I really like that. Some people treasure their cast iron pans so much they hand them down through generations. Yes, the pans are heavy, but they are relatively inexpensive (unless you invest in enameled cast iron like Le Creuset) and are oh so worth it!

I know I will be making this recipe often, it’s that good. This time I served it with rice and a steamed vegetable medley, but this would also be great with a baked potato and a vegetable of your choice. I can’t wait to make this again. I really hope you try it!

To Die For Honey Mustard Chicken

  • Servings: 2
  • Difficulty: Easy
  • Print

IMG_1147INGREDIENTS:

2 boneless chicken breasts, skin on preferred (you can use chicken thighs)

3 Tbs. Dijon mustard

3 Tbs. whole grain mustard

3 Tbs. honey or more to taste

3 Tbs. chicken stock

1 Tbs. olive oil

2-3 rosemary sprigs

INGREDIENTS FOR THE RUB:

1 Tbs. olive oil

1 Tbs. whole grain mustard

salt and pepper to taste

DIRECTIONS:

Mix together ingredients for the rub. Rub both side of the chicken breast with the mixture. Cover with plastic wrap and let the chicken marinate in the refrigerator for at least one hour.

Preheat oven to 375. In a large bowl whisk together the mustards, honey and chicken stock. Add additional chicken stock to taste and until the sauce reaches the desired consistency. Set aside.

Heat a cast iron pan. Add oil and sear both sides of the chicken breast until golden brown, approximately 2-3 minutes per side. Add mustard sauce, sprinkle with rosemary. Place in oven and roast until the chicken is cooked through – approximately 25 – 30 minutes.

Spoon sauce over chicken when serving.

Ready To Go Into The Oven...

Ready To Go Into The Oven…

Fresh Out Of The Oven...

Fresh Out Of The Oven…

Succulent Chicken Breast With Honey Mustard Sauce...

Succulent Chicken Breast With Honey Mustard Sauce…

Serving Suggestion" With Rice and Steamed Vegetables...

Serving Suggestion” With Rice and Steamed Vegetables…