Easy Chocolate Ganache…

My husband has an incurable sweet tooth. The other day he informed me we had nothing sweet in the house to eat and I was not in the mood to whip up something from scratch. I looked in the pantry and found a box of Duncan Hines decadent chocolate cake mix and told him I would make that. Unfortunately I opened my mouth before carefully reading the outside of the box. Staring me right in the face in clear letters on the front of the box were the words “frosting not included”. Now what… Luckily I thought I might have the ingredients for making chocolate ganache (which I did) so I thought ok, now’s the time to tackle your fears and make it. I had not other choice.

I’m not quite sure why I was afraid to make ganache but I always thought it was difficult and tricky. To my surprise it was unbelievably easy. So I thought I would dedicate this blog to a very simple way of making ganache that turns out silky, luscious and ever so decadent looking, not to mention absolutely incredibly delicious.

So let’s talk making chocolate ganache…

Lesson Learned 1 – There are many ways to make ganache: I am going to share with you the simplest way. The ratio is easy to remember 1:1. Use as many ounces of heavy cream as semi-sweet chocolate. It couldn’t be easier.

Lesson Learned 2 – Cut the chocolate squares into very small pieces: I used a 4 ounce box of Bakers semi-sweet chocolate. With my chef’s knife I cut off pieces and chopped them into small bits. If you decide to go the chip route, I would use the mini semi-sweet chips. You need the hot cream to melt the chocolate and if the pieces are too big that won’t happen.

Chocolate Covered In Hot Heavy Cream

Lesson Learned 2 – You can warm your heavy cream in the microwave: In order to get the desired consistency of the ganache, the cream has to melt the chocolate. So you have to get the cream hot enough to do that but you don’t want to scald the cream. That won’t work either.

Many recipes that I looked at recommended warming the cream on the stove. You can certainly do that especially since it gives you slightly more control in determining when the cream is hot enough. And you can certainly do that with this recipe, although I didn’t. I heated my cream (4 ounces) in the microwave for 45 seconds. After that time I found it still wasn’t hot enough. I heated it for an additional 15 seconds and it was bubbling. I was worried that I’d scalded the cream but I think what happened was the cream had just started to bubble, so I was still ok. The next time I think I’ll just nuke it for 50 seconds straight and go from there.

If you use a larger 1:1 ratio you will need to nuke the cream for a longer period of time. With this you’ll simply have to keep checking it. With 4 ounces I recommend 50 seconds. For larger amounts I would start checking at 1 minute and go from there.

Lesson Learned 3 – Let the chocolate and heavy cream sit for at least 3 minutes: Once you add the hot heavy cream you may be tempted to start whisking the mixture right away. Don’t. The cream has to melt the chocolate in order for you to get the desired consistency of the ganache. Be patient and let the cream do it’s work. I guarantee you it’s worth it.

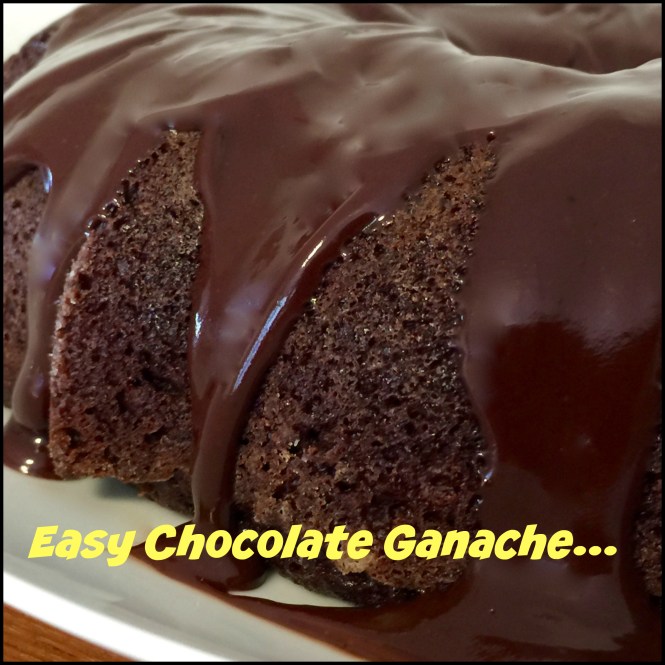
This recipe makes enough to generously frost one bundt cake, one 9 x 13 sheet cake or one 9 inch round layer cake. So next time you need some frosting try this instead of buying the canned stuff. It looks impressive and it tastes divine!

Easy Chocolate Ganache...

  • Servings: 1 Bundt Cake
  • Difficulty: Easy
  • Print

INGREDIENTS:

4 ounces semi-sweet chocolate squares cut into small pieces

4 ounces heavy cream, heated

DIRECTIONS

Chop up the chocolate into very small pieces. Heat the heavy cream in a microwave safe dish for approximately 50 seconds. Test with your finger to make sure it is sufficiently hot to melt the chocolate. If not, microwave at additional 5 second intervals until cream is hot but not scalded.

Pour cream over chocolate pieces. Let the hot mixture sit for at least 3 minutes. Whisk mixture until cream is incorporated and the chocolate is dark and smooth. Drizzle the chocolate over the top of your bundt cake. Let ganache set for at least 15 minutes before serving.


SaveSave

SaveSave

SaveSave

SaveSave

SaveSave

SaveSave

SaveSave

SaveSave

SaveSave

SaveSave

SaveSave

SaveSave

SaveSave

SaveSave

SaveSave

SaveSave

SaveSave

SaveSave

SaveSave

Spud Pockets…

A friend of mine, who is a professional chef, once said that when it comes to great recipes the simpler the better. Ain’t that the truth.  Over the course of the past six weeks my husband and I have been in the midst of a sell/buy process, selling our home of 15 years and downsizing to a condo. With downsizing comes a myriad of emotions but in the end it is quite cathartic as well as hugely stressful.

Spud Pocket IngredientsDuring this time I’ve not had the opportunity to uphold my goal of one new recipe a week, but I am back in the swing and will definitely try to post regularly, although I still cannot guarantee once a week. I do promise to get back to my routine, I just can’t determine when as of yet.

So, getting back to simpler is better, as you can imagine during a process like this you resort to very basic and quick meals. Often meals consisted of “eating out” but that gets to be a bit much after a while as well. So my challenge was to try to figure out how to make something fast but not just the same old thing. So I did a little experimentation with this recipe and my husband loved it. So let’s talk spud pockets…

Lesson Learned 1 – Simple is always the best: This recipe couldn’t be any simpler – potatoes, green onion, heavy cream, butter, fresh chopped parsley – that’s it! You could add some smoked paprika for additional color and flavor, but I haven’t unpacked my herbs and spices yet so I had to forgo the paprika. You would not believe how tender and flavorful the potatoes turn out.

spud pocketsLesson Learned 2 – Use whatever kind of potatoes you have on hand: When I went to the grocery store the red potatoes looked fantastic. So instead of using a russet potato I used red potatoes. I liked the fact that the skin added some nice color to the dish as well.

Lesson Learned 3 – Keep the potatoes in the oven longer if you want crispy bottoms: I made these potatoes two days in the row. The first day I kept the potatoes in the oven for 50 minutes, the second day for 65. Keeping them in for 65 minutes gave them a nice crispy bottom. Make sure you spray your foil with cooking spray to help get them out of the foil pocket. Even with the spray you may have to scrape a few out, but that nice crunch on the bottom of the potato is well worth it.

spud pocketsLesson Learned 4 – Use two sheets of foil so the pocket is reinforced: – I took two sheets of foil and placed one sheet on top of the other. Then I put the potato mixture in the center, crimped the two longer ends together and rolled the smaller sides upward. There was no leaking in the oven this way. And the smells that came out of the oven were divine!

Lesson Learned 5 – This is a very economical recipe: One large red potato is more than enough for two people. I happened to have some heavy cream in the refrigerator so I used that. You could use milk or half and half, but the heavy cream really gives more depth of flavor.  One bundle of green onions made four pockets and you only need a small dollop of butter on top of each. I had a small bundle of fresh parsley and I used only about a quarter of it for four servings. A little goes a long way.

I’m telling you this recipe could not be any easier. You just chop the potatoes into half inch cubes, dice the green onions (use the green parts too) and parsley. Combine them all together, put the potatoes on a piece of reinforced foil (I used two sheets of foil), add a dollop of butter, a splash of heavy cream, some salt and pepper and that’s it! If you want a quick recipe that is sure to please, this is the one for you. You can also serve these rustic style right in the foil. Either way this is an easy go-to recipe. Enjoy!

Spud Pockets

SPUD POCKETS...

  • Servings: 4
  • Difficulty: Easy
  • Print

INGREDIENTS:

2 large potatoes, cut into 1/2 inch cubes

1 bundle of green onions, chopped

4 Tbs. chopped fresh parsley

8 Tbs. heavy cream, 1-2 per pocket

2 Tbs. butter, 1/2 Tbs. per pocket

Salt and freshly cracked black pepper, to taste

Light sprinkle of smokey paprika per pocket, optional

Olive oil cooking spray

DIRECTIONS:

Preheat the oven to 400 degrees. In a large bowl combine the cubed potatoes, onions and parsley. Evenly distribute the mixture onto reinforced aluminum foil (two sheets, one on top of the other, per pocket- make sure to spray the foil with cooking spray first). Pull the sides up on the foil. Splash heavy cream over the potatoes. Put a pat of butter over each bundle. Close the foil by taking the large ends together and turning them over on each other to crimp them. Then pull up each smaller side and crimp the foil upward and toward the center of the bundle.

Bake for 45-65 minutes (you will get nice crispy bottoms if you cook them for 65 minutes). Remove the potatoes from the foil packet and serve immediately.

spud pockets

Serving suggestion: Filet of beef with steamed vegetables and spud pockets.

Serving suggestion: Filet of beef with steamed vegetables and spud pockets.

Cherry Pie Squares…

I was looking for a way to use a can of cherry pie filling I had in my pantry and I didn’t  want to make a traditional pie so I decided to make these instead. I love these because you satisfy your cherry pie craving with a tasty little morsel. These squares are easy to make and impressive looking. Your friends will think you are an accomplished baker when you make these.

So let’s talk cherry pie squares…

Lesson Learned 1: You need less batter on top than you think: Initially I only used 1 1/2 cups of batter for the bottom crust of he squares. That left me with quite a bit of batter for the top. I found in making this that a little batter goes a long way. It is better to dot the top with small dollops of batter far enough away from each other so they spread out but not necessarily touch. The pictures below show the amount of batter I put on top and my final product. Next time I make these I will use smaller amounts of dough to dot the top and probably set aside 1 3/4 cups for the bottom crust.  That way I will have a little more dough for the crust and the small dollops will still be more than enough for the top.

The batter on top of the pie filling

Cherry Pie Squares

Lesson Learned 2 – A little bit of baking spray goes a long way: The best way to insure that the squares don’t stick to the pan is to either spray the pan with baking spray or line it with parchment paper. This time I chose to use baking spray. Don’t overdo spraying the bottom of your pan with the spray. You don’t want to make the crust soggy. Just spray lightly. Next time I make these I am going to line the pan with parchment paper instead of spraying the bottom. I tend to prefer that method.

Lesson Learned 3 – The batter is very sticky: When spooning the crust batter into your baking dish you might want to take large spoonfuls and put them in various parts rather than taking the full amount and just putting it in the middle. You will need to pat the batter down with your hands to cover the entire bottom of the baking dish. I suggest spraying your hands with baking spray. It makes this job much less difficult. After I covered the entire bottom I smoothed the batter with an icing knife.

The bottom crust of the cherry pie squares

Lesson Learned 4 – Leave about an inch around edges when adding the cherry pie filling: The cherry pie filling will run during the baking process. Leaving some space around the edges will allow the batter to rise around the edges making it easier to remove the squares when the time comes.

Adding the cherry pie filling

Lesson Learned 5 – If you can use heavy cream when making the glaze: I found that if you use heavy cream in a glaze the consistency and flavor are much better. Don’t go out and buy heavy cream just for the glaze if you don’t already have it. But if you do I think you’ll find you’ll prefer glazes made with heavy cream to those that are not.

After I made these I gave some to my neighbors. Everyone of them asked for the recipe. I think you will enjoy these a lot! Try them and let me know what you think.

CHERRY PIE SQUARES…

  • Servings: 20 Squares
  • Difficulty: Easy
  • Print

INGREDIENTS:

1 1/2 cups unsalted butter, room temperature

Cherry Pie Squares1 cup sugar

1/2 tsp. salt

2 eggs, room temperature

1/2 tsp. vanilla extract

1/4 tsp. almond extract

1 1/2 cups flour, sifted

1/2 tsp. baking powder

1 can cherry pie filling, 21 ounces

Sliced almonds

GLAZE:

1/2 cup powdered sugar

1/4 tsp. almond extract

2-4 Tbs. of heavy cream

DIRECTIONS:

Preheat the oven to 350. Spray a 9 x 13 pan with baking spray or line with parchment paper. Set aside.

Cream together butter and sugar. Add the eggs one at a time and beat until completely combined. Add the vanilla and almond extracts and beat until well combined.

In a separate bowl whisk together the flour, baking powder and salt. Add the flour mixture to the butter and sugar mixture and mix until just combined. Do not over mix. Take 1 3/4 cup of the batter and smooth over the bottom of the baking dish. Spoon the cherry pie filling over the batter, leaving about an inch of batter around all the edges. Dollop the remaining batter on top of the pie filling. Sprinkle the top with sliced almonds.

Bake for 35 minutes or until the crust is golden brown. Let cool completely. Mix all of the glaze ingredients together and drizzle over the top. Cut and serve.

Cherry Pie Squares

Cherry Pie Squares

Cherry Pie Squares