Lasagna Roll Ups

I recently came across a recipe for lasagna roll ups. The recipe intrigued me because one of the go-to recipes I regularly make and really enjoy is chicken roll ups, so I thought making a lasagna version might be interesting. I particularly liked the idea of rolling the noodles with a ricotta mixture instead of layering them flat as in traditional lasagna. The original version of this recipe was for veggie lasagna which I knew would probably not be a big hit with my husband so I decided to work with the concept and create a recipe that would appeal to the carnivores of the world. But you can certainly make this a veggie dish and it will be fabulous.

Lesson Learned 1 – There is a lot of prep work to this recipe: If you’re not a prep person, this might not be the recipe for you. I find it cathartic to chop, mince, slice and dice but not everyone feels that way. You also have to cook the lasagna noodles ahead of time and arrange them individually on wax or parchment paper so they remain straight and don’t stick together before you roll them up with the cheese. The key to this recipe is making sure everything is prepped up front, including cooking and separating the noodles. If you do that, assembling it is a breeze. All I can say is that regardless of the work, this recipe is worth it.

IMG_3630
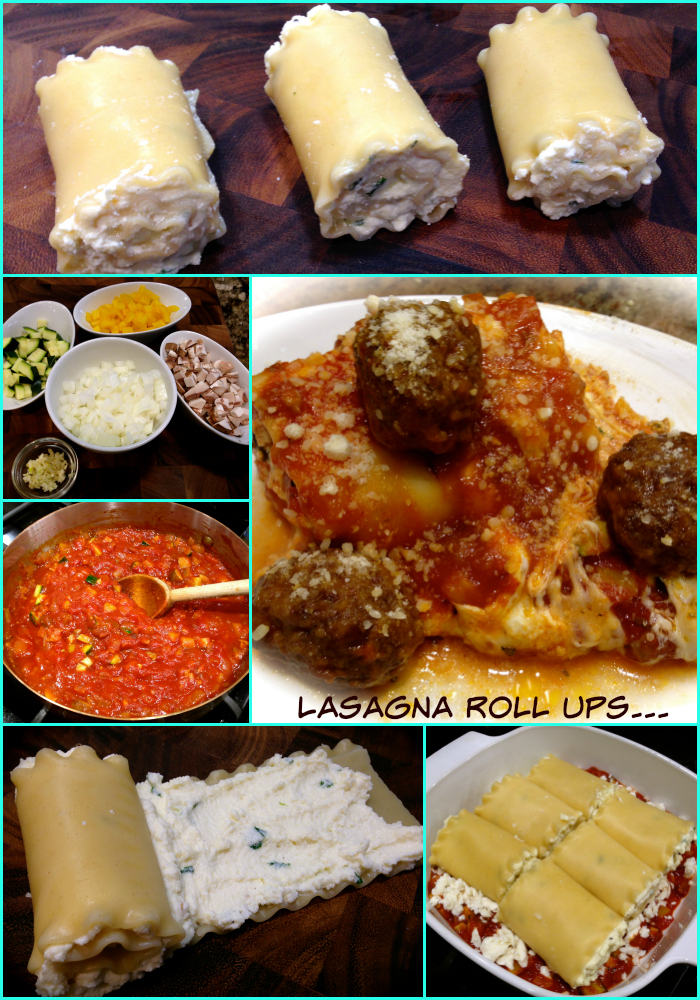
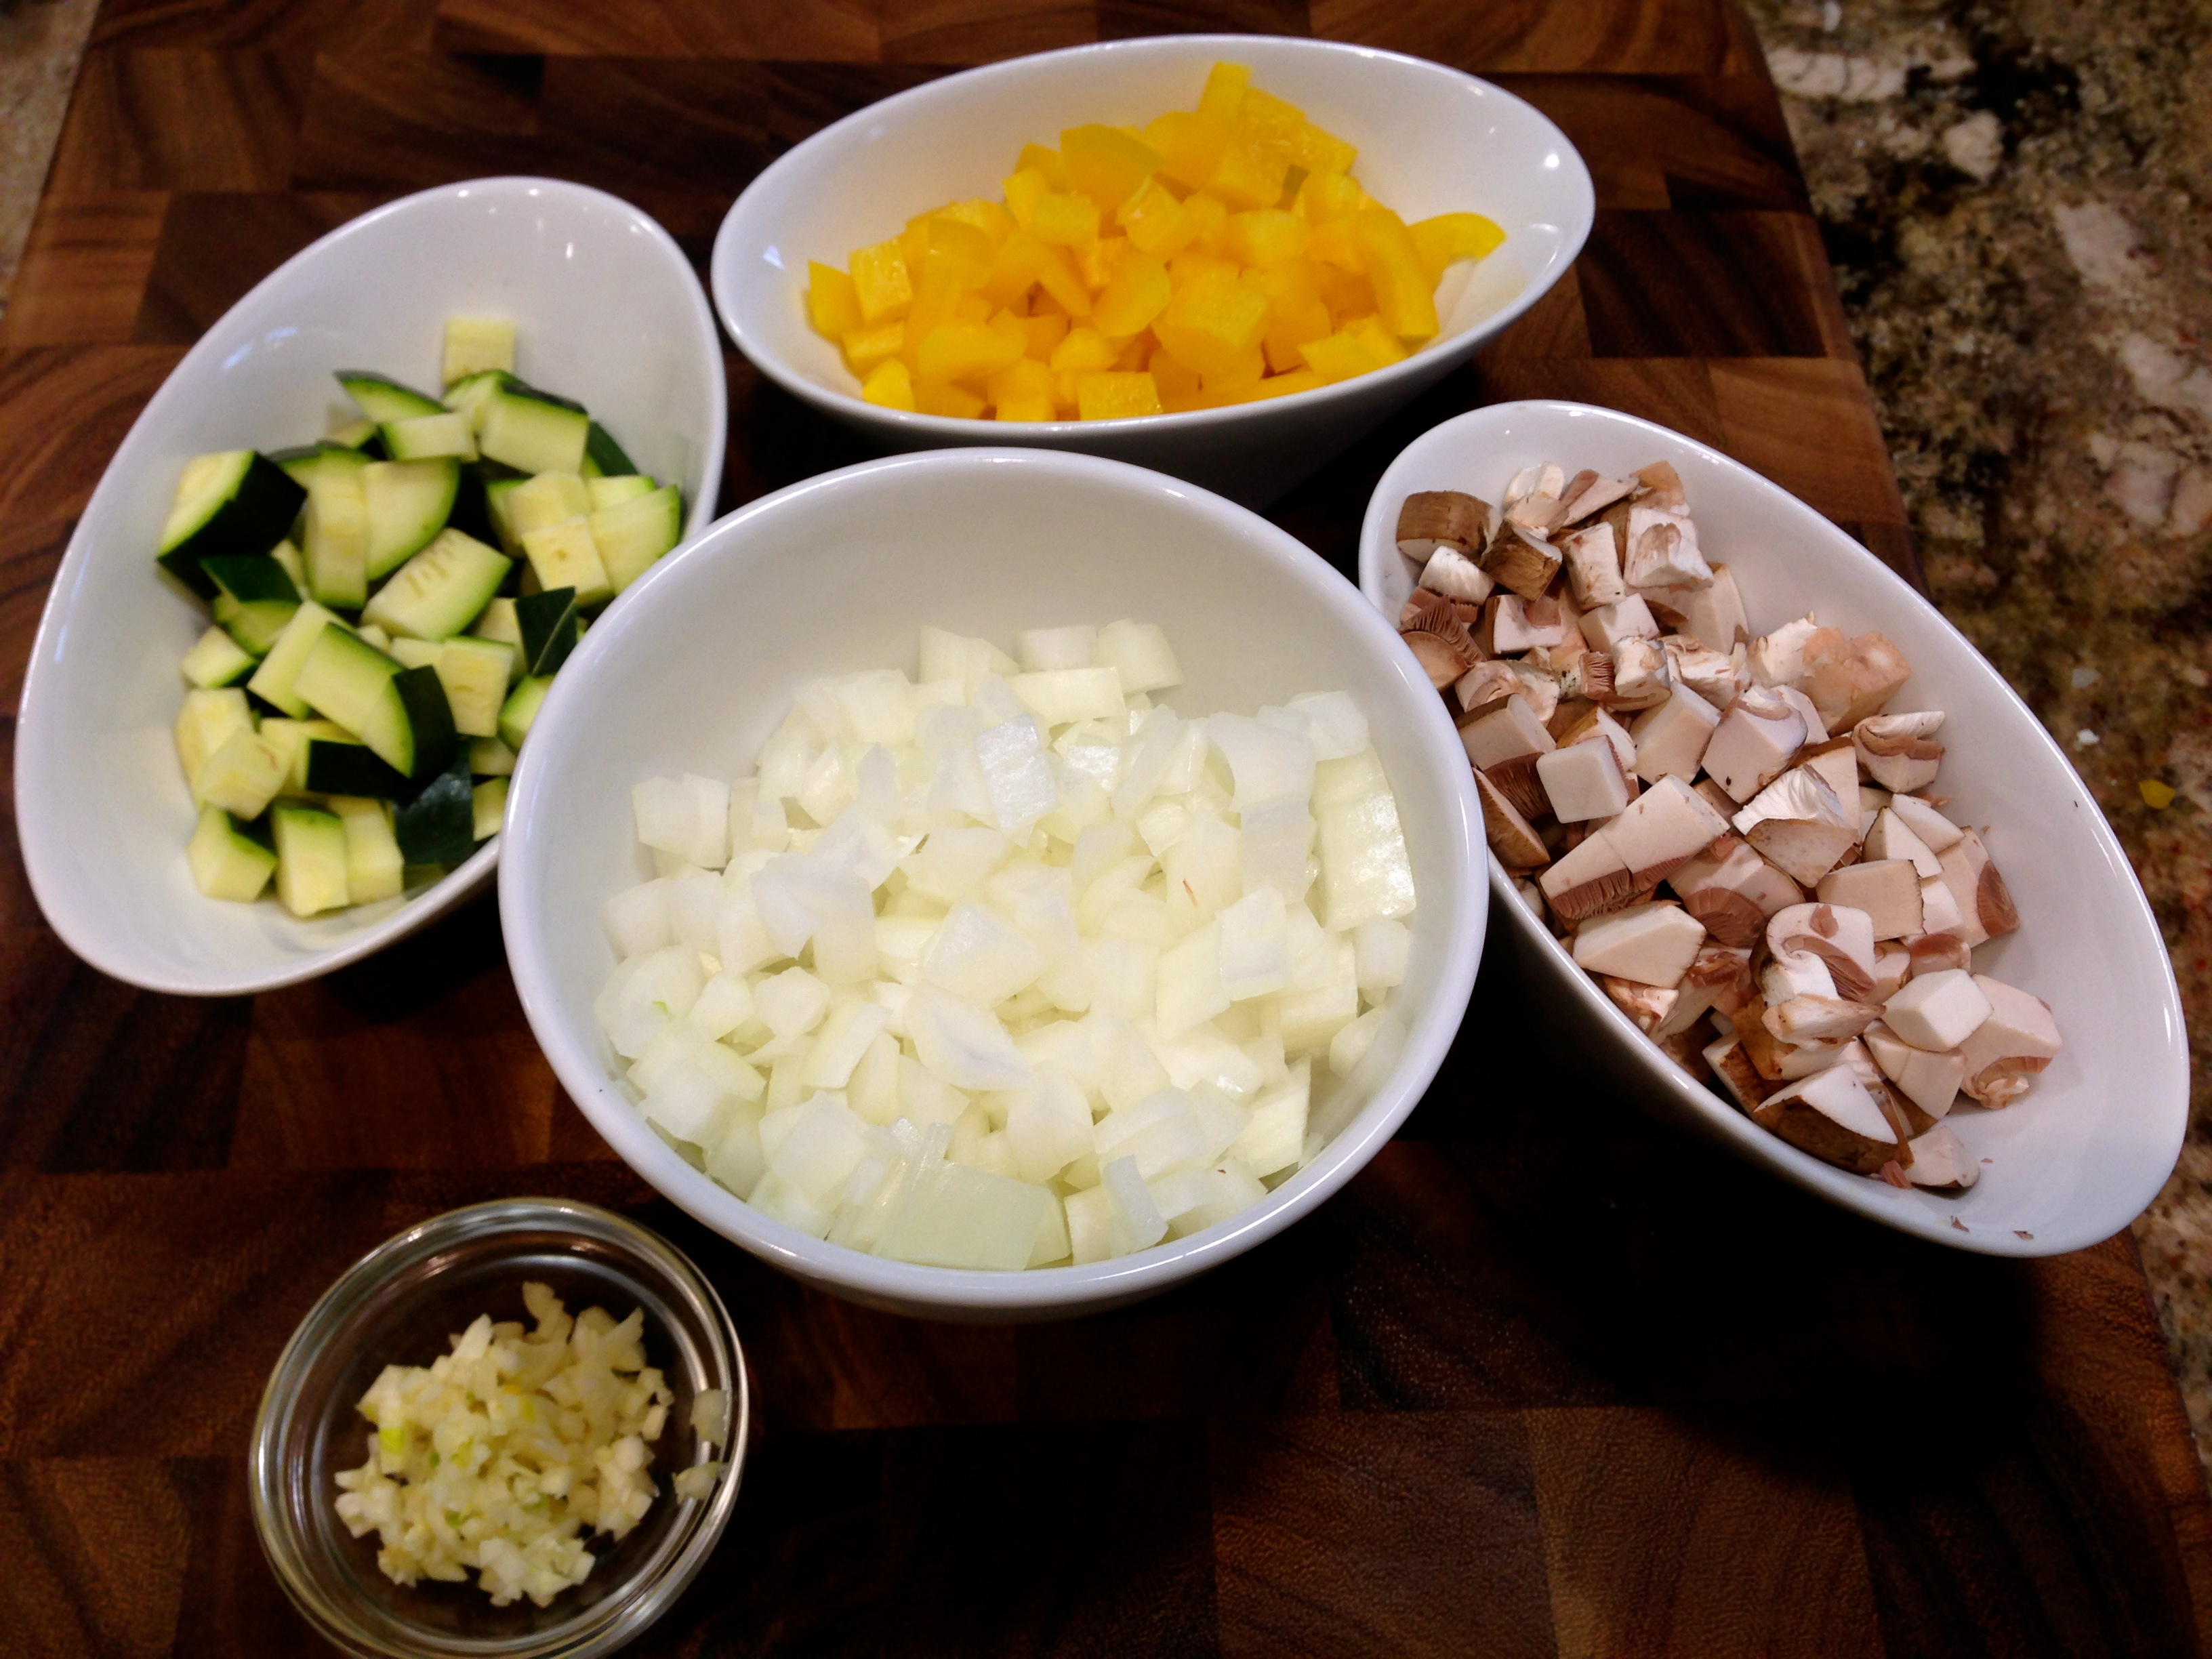
Lesson Learned 2 – Cut all the veggies for the sauce to a similar size: This is important so that you don’t overcook or undercook any of them. Don’t throw them all in at the same time. Saute the onions, peppers and mushrooms first, then add the garlic followed by the squash. By the time the squash is crisp tender everything else will be ready as well.

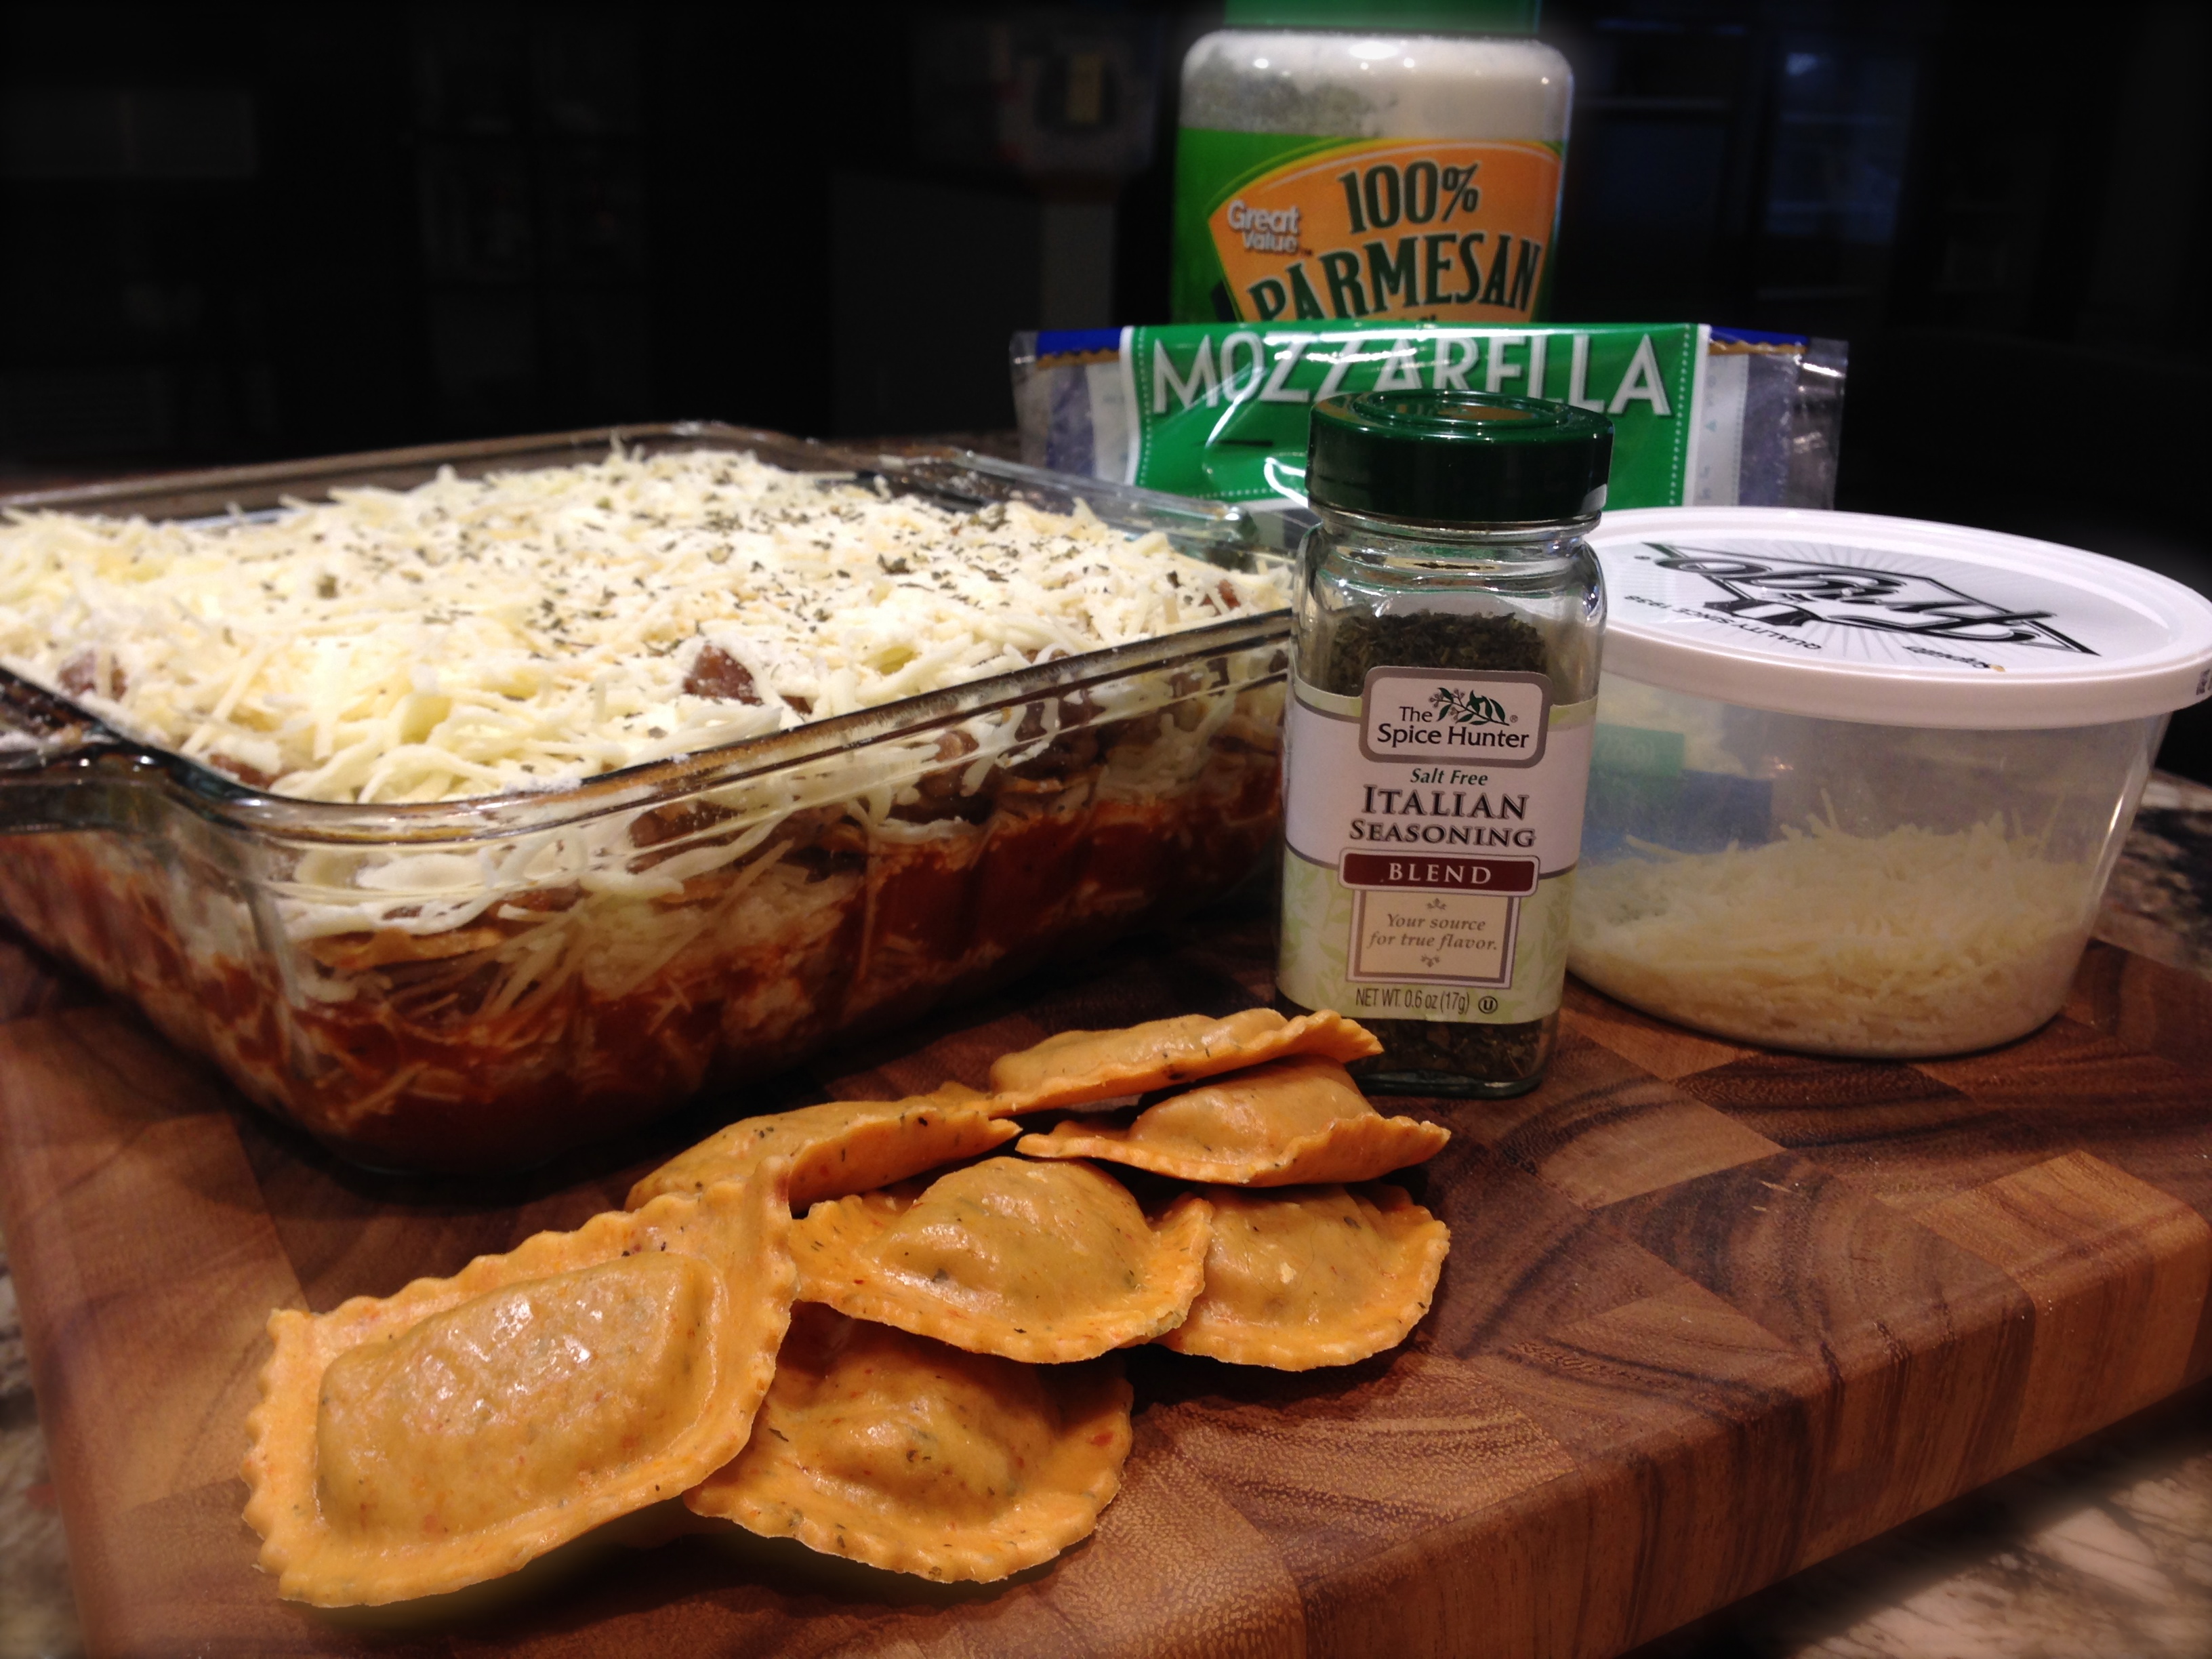
Lesson Learned 3 – Use fresh mozzarella and shred it yourself: I think fresh mozzarella tastes better and it definitely melts better giving you that gooey consistency that we all love. It takes a little extra time but it’s worth it. Then again, if you don’t have the time or want to shorten the prep process you can always use shredded mozzarella.

Lesson Learned 4 – Establish a process for assembling this: You can organize cooking and assembling this recipe any way you want but the key is to be organized when you make it. Think through what process might work the best for you before making this dish. That way you won’t feel overwhelmed by all of the various steps.

Lasagnajpg

Lasagna Roll Ups

This recipe is enough to serve six. And although the lasagna noodles look small when you take them out of the package, they plump substantially when you cook them. One noodle roll up is more than enough for the average appetite.

The original recipe was designed to be frozen once assembled and baked off frozen at a later time. You can certainly do that but if you do make sure to use a meat thermometer to test the temperature of the center of the lasagna to ensure it’s heated all the way through.

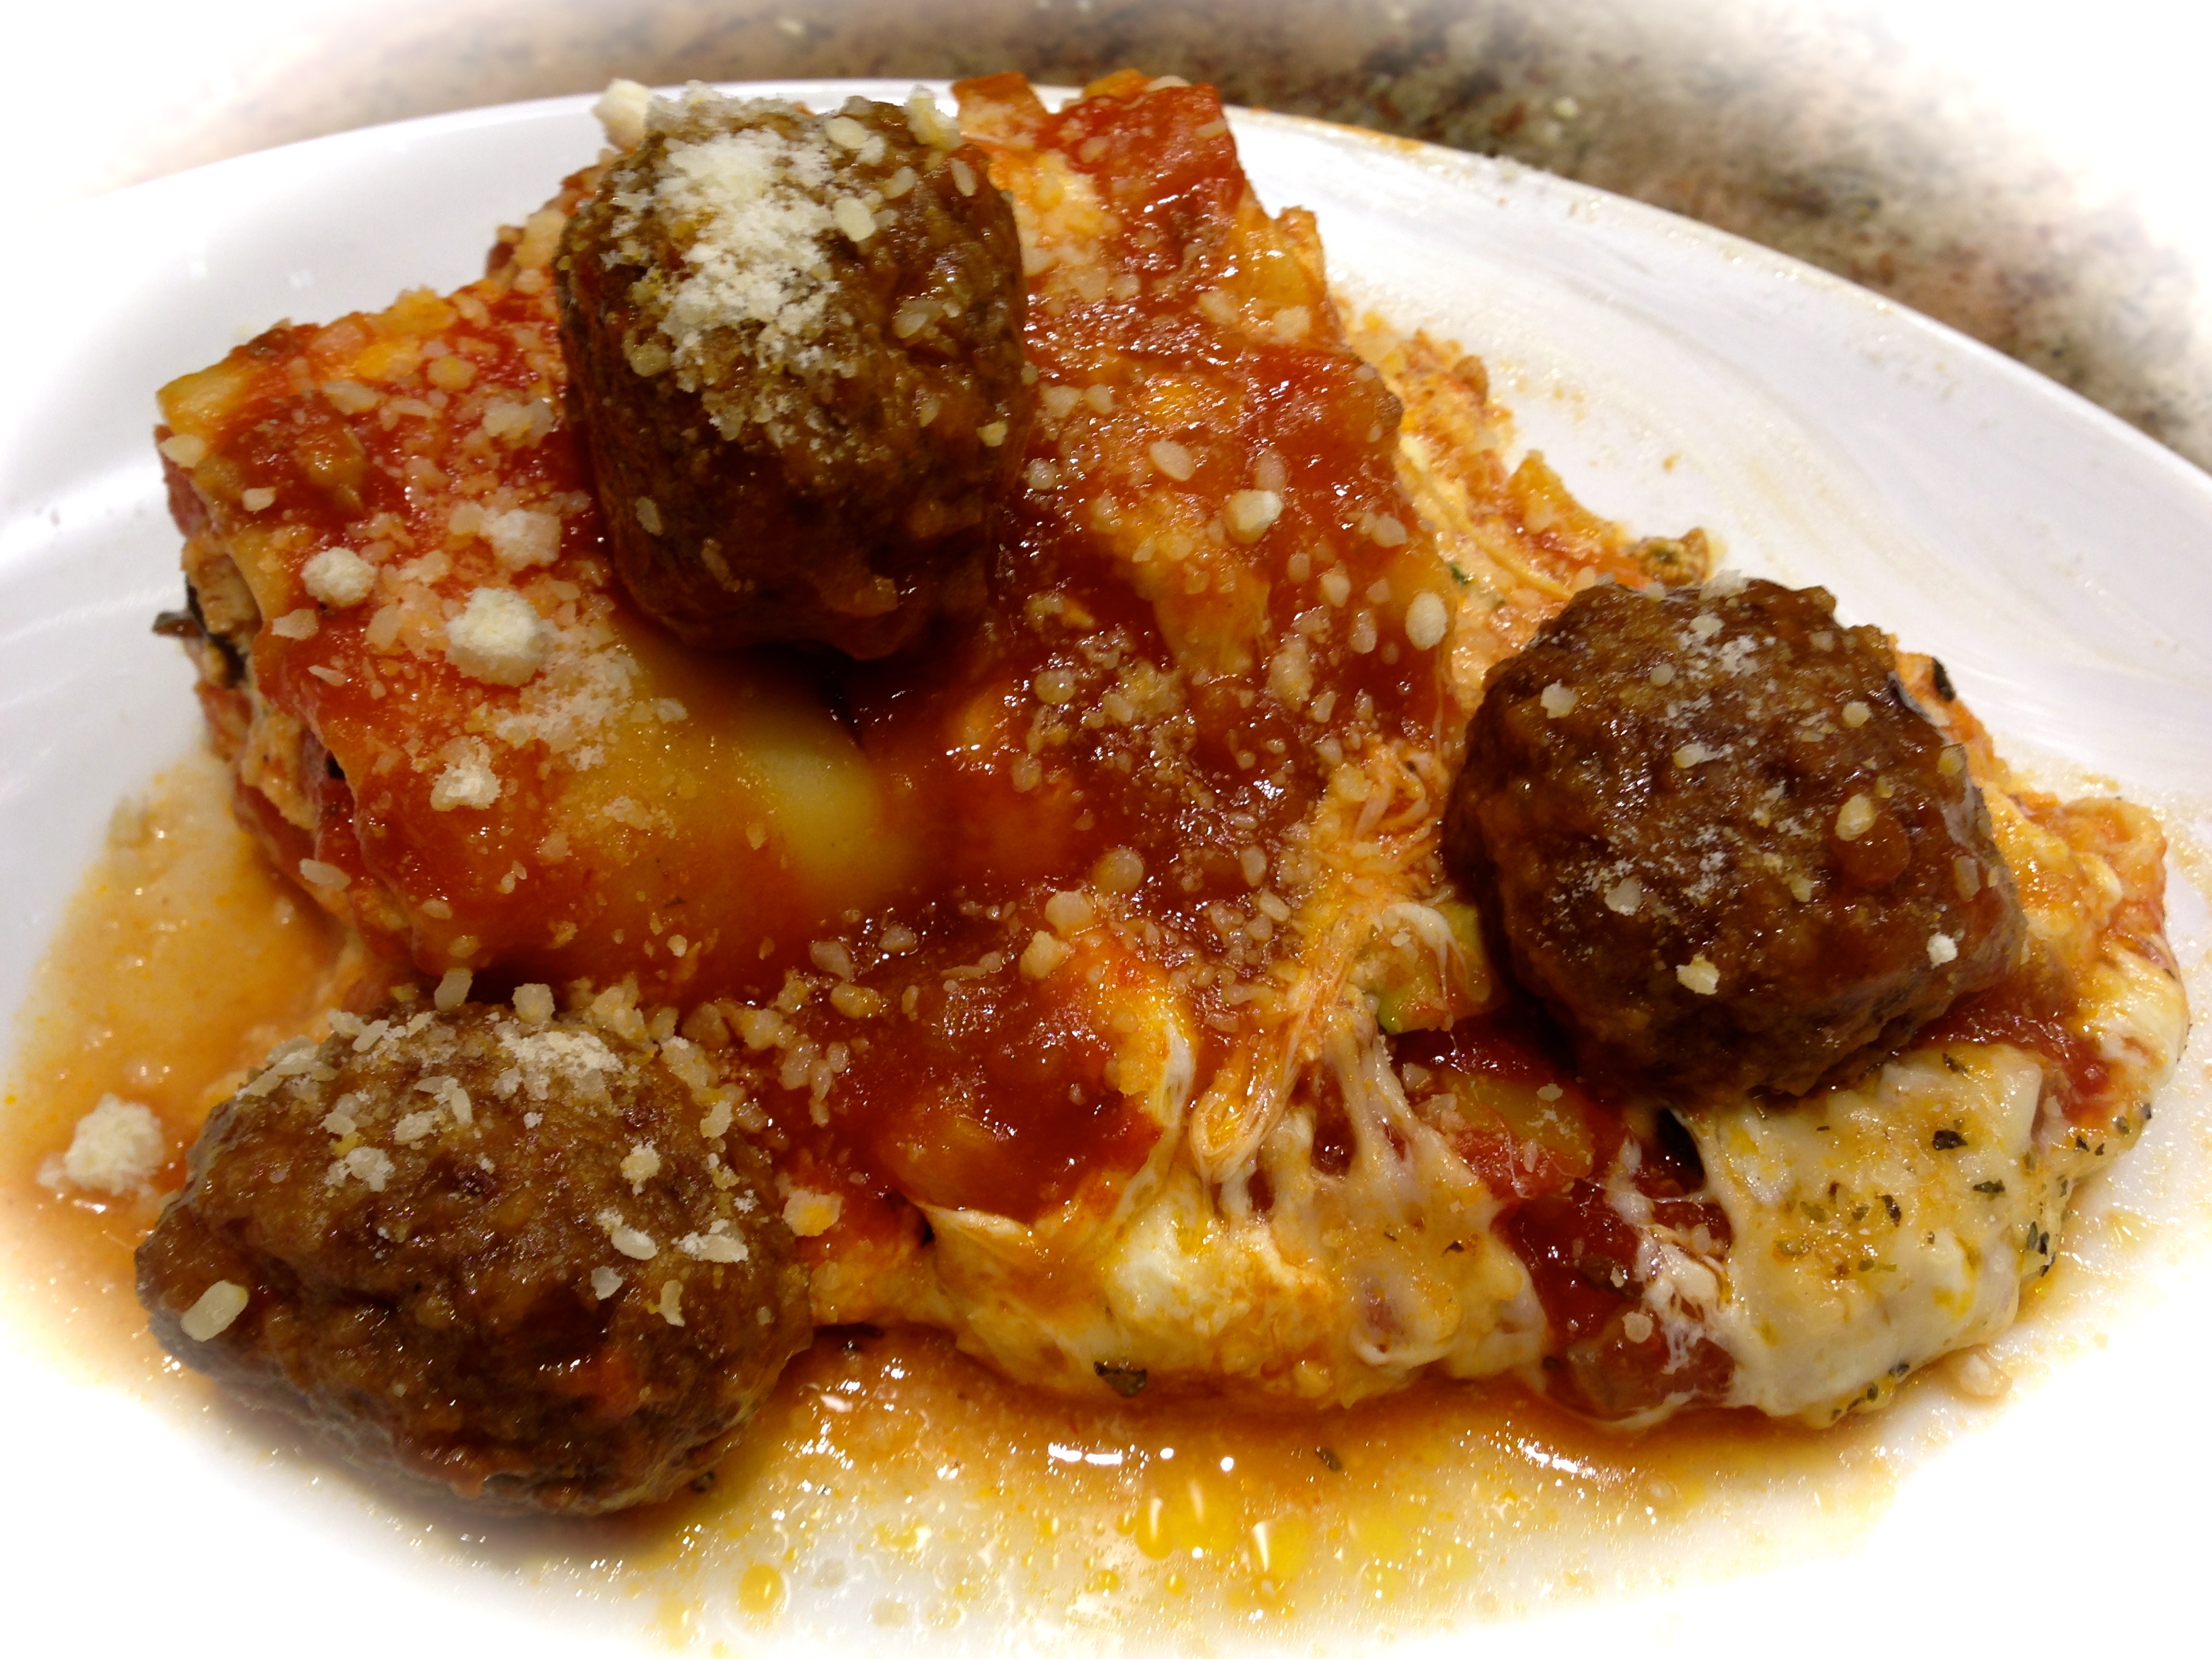
My husband REALLY liked this recipe. In order to make it more carnivore friendly I added my homemade meatballs on top when I served it. I cooked the meatballs separately and just heated them through before I served them on top of the lasagna. If you don’t have time to make meatballs you can add partially cooked ground italian sausage to the sauce or just do what I did and use a sauce that already had sausage in it. Or you can simply leave it as a veggie dish. Any way you adapt this recipe, I know you will like it.

Lasagna Roll Ups…

  • Servings: 6
  • Difficulty: Medium
  • Print

INGREDIENTS:

PASTA:

6 lasagna noodles cooked according to packaged instructions

SAUCE:

2 Tbs. olive oil

2 cloves of garlic, minced

1 small onion, diced

1 small sweet pepper, diced

4-6 large cremini mushrooms, chopped small

1/2 medium size zucchini, diced

1/2 cup white wine

1 24 ounce jar of pasta sauce (I used Classico with sausage)

1 6 oz. can of tomato paste

16 oz. shredded mozzarella cheese

Grated parmesan for sprinkling on top

2 tsp. Italian seasoning

Salt and pepper to taste

RICOTTA FILLING:

16 oz. ricotta cheese

1/4 cup grated parmesan

1 egg

1 TBS. flat leaf parsley, chopped

Salt and pepper to taste

DIRECTIONS:

Preheat the oven to 375 degrees. Cook the noodles according to the package instructions. Drain them and place them flat on a wax or parchment paper lined sheet pan. Make layers of individual noodles as needed separating each layer with a sheet of wax or parchment paper. Set aside.

In a large skillet heat the olive oil. Saute the onions, mushrooms and peppers for about 2 minutes. Add the garlic and cook until fragrant (about 30 seconds to a minute). Add the zucchini and cook for a few minutes. Pour in the wine and salt and pepper the mixture to taste. Pour in the jarred sauce. Add a can of tomato paste. Stir until combined and warmed through. Turn off the heat and set aside.

Combine all of the ingredients for the ricotta filling. Taste before adding salt and pepper as the parmesan is salty. Salt and pepper to taste. Line up the flat lasagna noodles and divide the ricotta mixture into six equal portions. Spread the mixture over each flat noodle. Roll each noodle tightly with the filling.

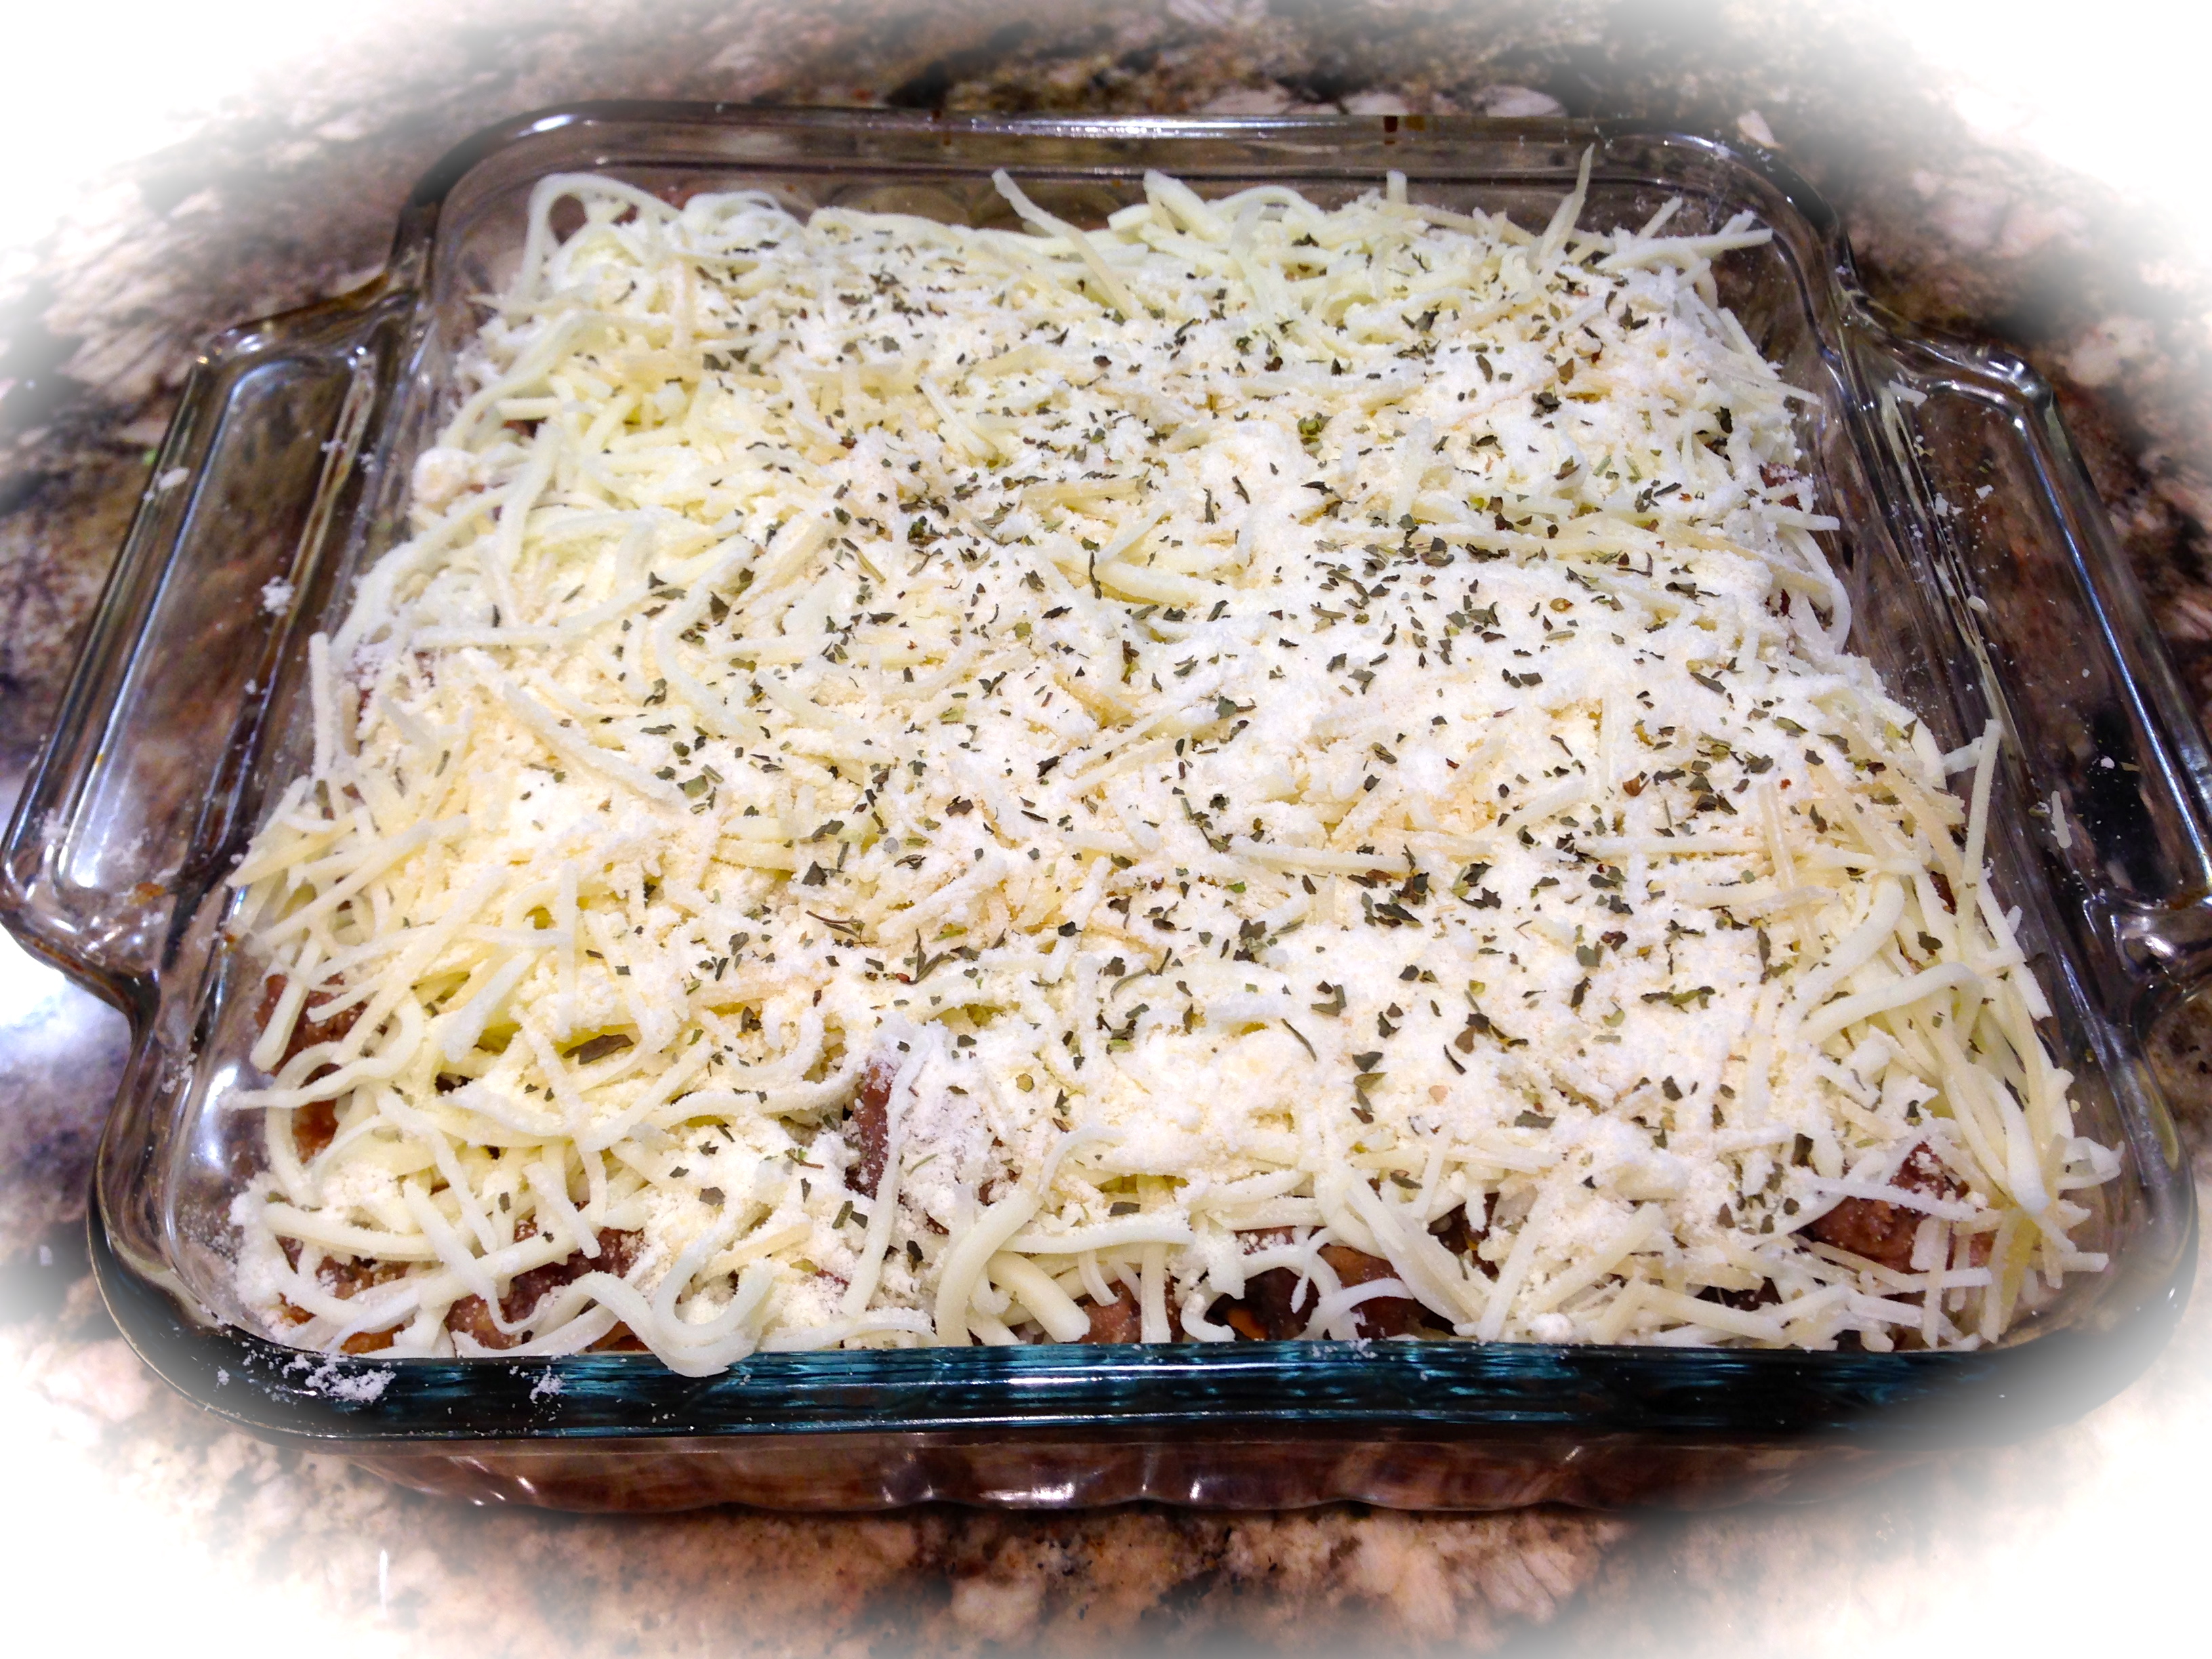
Pour 1/3 of the sauce on the bottom of a 2 quart casserole dish. Sprinkle some mozzarella and parmesan over the sauce and top with a teaspoon of Italian seasoning. Place the rolled lasagna noodles on top making two rows of three each. Pour the remaining sauce over the noodles. Generously top with mozzarella and parmesan. Sprinkle the remaining Italian seasoning on top of the cheese.

Tent the casserole dish with foil and bake for 45 – 50 minutes. Remove foil and bake for additional 5 minutes or until the cheese on top is browned and bubbly. You can also turn on the broiler for the last 3 – 5 minutes and put the casserole dish under the broiler. If using the broiler, keep an eye on the casserole so as not to burn the cheese on top.

Let sit for 5 minutes and serve.

IMG_3724

Ravioli Lasagna…

Ravioli Lasagna

My part-time job at Crate and Barrel requires me to work longer than normal hours over the holidays. No worries, I love the hustle and bustle of the holidays and there’s no better place to experience that than working retail. The challenge for me is how to plan dinners that don’t consist of take-out, pizza or soup and sandwiches. That menu faire gets boring rather quickly. I found one solution in a Costco cookbook – that’s right a Costco cookbook!

Ingredients

Ingredients

If you are a Costco shopper you know that every year they give away a pretty substantive cookbook. The recipes in the book are designed to use the products they sell, but all in all there are some pretty decent recipes included. Over the years they’ve even featured recipes by prominent celebrity chefs such as Ina Garten, Sandra Lee, Ree Drummond and Michael Symon. What I like about the cookbook is that every recipe has a picture of the finished product. I am not a big fan of recipe books that don’t have pictures. I need something visual to help me understand what I am trying to achieve. The books provide a myriad of recipes from appetizers, main courses, celebrity chef favorites, desserts and beverages. And the fact that it is free is just icing on the cake. They usually give the books away at holiday time, so be on the look out for them. This year they started giving them away on Black Friday and continued as long as quantities lasted. I made my husband make a special trip to get ours as every year I have been able to glean a couple of family favorites from each of them.

The recipe I’m going to share comes from a book they produced three years ago. The title of the book is always the same, “Creative Cooking the Costco Way,” and this recipe is called Baked Ravioli (Lasagna Style). I like this recipe because it is simple, it can be adapted in a variety of ways, and it’s one that can be made a day ahead so it’s perfect for those nights when you want something more for dinner without a lot of thought or effort. I’ve been making a version of this for over three years now so I’ve got this one down pat. Here is my rating and lessons learned:

Rating: A – a great go to recipe, can be adapted in a variety of ways, easy to prepare and definitely something your better half can start while you’re still at work (with my husband I write the directions on a post-it and put it on the door of the microwave so it’s there in plain view for him to see).

Lesson learned 1: Don’t be afraid to play with this recipe. You can basically use any type of ravioli you like. I first started out using Bertoli four cheese ravioli and then branched off into some of the more gourmet-type blends. The ravioli used in the pictures in this blog were half-moon mushroom and cheese ravioli, but you can use any kind you want. This time I also added some additional left over mushrooms that I partially sauteed as well as some partially cooked italian sausage that I crumbled, cooked and put in the layers. No need to cook your additional ingredients completely through as the dish will bake in the oven for at least an hour. Depending on the ingredients you use, this dish can also be meatless.

Before baking...

Before baking…

Lesson Learned 2: If you are making it the day before, make sure you take it out of the refrigerator and let it sit on your counter for at least an hour and a half before baking it. If you don’t it will take much longer to bake and will not cook evenly.

Lesson Learned 3: I like to make sure that my oven is not only preheated but at the desired temperature for at least 10-15 minutes. That way I feel I have a true temperature. My oven takes about 15 minutes to get to 400 so I usually plan on a preheat time of 25 minutes.

Lesson Learned 4: Don’t forget to use a little bit of cooking oil and sauce to cover the bottom of the pan before doing the layering. If you don’t you won’t be able to get the finished product cleanly out of the pan.

Lesson Learned 5: I like to make sure that the ravioli is positioned tightly together, even with a slight overlap. That way you have a nice firm layer when it’s cooked.

Lesson Learned 6: Make sure to tent the foil over the dish for at least the first 50 minutes of the cooking process. After that, remove the foil so that the cheese can become golden brown.

You can make this recipe as simple or as intricate as you want. All of the work goes in to putting it together. Once that is done it’s simply a matter of popping it in the oven, baking it and enjoying it. Serve this with some garlic bread and a salad and you’ve got a delicious and easy meal. Try this one – I guarantee you will use this as a go-to recipe just like I do!

Ravioli Lasagna...

  • Servings: 4-6
  • Difficulty: Easy
  • Print

THE INGREDIENTS:

Cooking oil (I use olive oil) – just enough to very lightly grease the bottom of your pan

1 – 29 ounce jar of a red sauce of your choice

1 large package of ravioli (again your choice, the ingredients and shape – square or half moon – do not matter)

Italian sausage or meatballs (again the amount your choice, depending on how much you want in the recipe. I normally take two sausage links, crumble and partially cook the meat, drain it on paper towels and then put it over the ravioli when I make the layers).

Other ingredients to taste – (I often add partially sauteed mushrooms or peppers. No need to cook them through, just give them a good start).

Mozzarella, Parmesan and Romano Cheeses

Italian seasoning

DIRECTIONS:

Preheat oven to 400 degrees. Grease the bottom of your pan (for the two of us I use an 8 inch square pan) and spread a layer of sauce over the bottom. (You don’t need a lot, just enough to lightly coat it). Put down a layer of ravioli flat side up on the sauce. Position the ravioli close together, even with a slight overlap. Add any additional ingredients you have prepared (I did mushrooms and italian sausage on this one). Put another layer of sauce on top and then add a layer of mozzarella, romano and parmesan. Sprinkle with italian seasoning and pat the layer down lightly. Repeat the layering. Pat down again and cover with tented aluminum foil. (If you are making ahead, just cover with foil and put in the refrigerator. Just don’t forget to tent the foil before putting it in the oven as you don’t want all the cheese to stick to the foil).

Bake for one hour or until completely heated through. For the last 10 minutes of the baking process, remove the foil so that the cheese can brown. Let stand for five minutes before serving.

Ravioli Lasagna

Ravioli Lasagna