After my post last week that featured one of my favorite go-to recipes, chicken roll ups, I thought I would be off of the chicken bandwagon for awhile. But lo and behold the very next day I got my copy of Cooking Light in the mail and what was this months feature but “12 ways for perfect chicken!” On the cover was an enticing picture of chicken smothered in mushrooms and pearl onions and I thought, I just gotta make this one. And so I did, last night.
I am always on the look out for a good chicken recipe and this issue features an abundance of them, but I was drawn to the recipe pictured on the cover. I’d never cooked with Brandy before and was a little fearful and skeptical. I looked online to see if there was a viable substitute for brandy, as I don’t drink it and would use it only for cooking, but the information I found stated there really was no substitute. Wine was mentioned as an alternative but it would not provide the same flavor. So off to the liquor store I went. I actually found a small bottle of Korbel brandy for $10 and so I figured I could live with that. Other than fresh thyme and pearl onions, all the other ingredients I already had in the house so this seemed like a no-brainer. So here is my rating and lessons I learned making the dish for the first time.
Rating: A- for the recipe B- for the instructions. As I’ve mentioned several times I am not an intuitive cook so I need for the directions to be explicit and correct. I tend to take things literally, but more and more I am beginning to trust my instincts. I enjoyed this recipe, would definitely make it again and maybe even experiment using wine instead of brandy. I’ll explain all that in my lessons learned.

Lightly Dust With Flour and Cook In Olive Oil Until Almost Done
Lesson Learned 1: The time of this recipe was overestimated in my opinion. The recipe calls for halving boneless skinless chicken breasts, thus making a “cutlet”. So how do you define cutlet? I’m thinking about a quarter of an inch thick, right? When I halved a breast I wound up with 2 pieces that were a half inch thick. I decided to use that thickness instead of pounding them out based on the cooking time for the recipe, 43 minutes (how they came up with 43 versus 42 or 44 gives me a chuckle), taking into consideration I was not making as many “cutlets” as called for in the recipe so I was cooking a lesser amount of meat but at a greater thickness. My pieces of chicken were probably double the size of what I assume a cutlet should be (and that’s another thing that aggravated me, the recipe never defined the thickness of the cutlet – you just can’t assume every knows). I found that using that time as a guide for the rest of my meal wound up giving me slightly overdone chicken. I think one of the common errors most cooks make is overdone boneless skinless chicken breasts. Next time I make this I’ll reduce the cooking time by 7-10 minutes. Because I planned the rest of my meal around that 43 minute timeframe, I wound up keeping the dish on a very low simmer until everything else was ready and I think that lent to having slightly overdone chicken breasts. Mind you, they were not bad, but I do know the difference between a chicken breast that is juicy and tender and one that is overdone. (OK, I’ll get off of my soap box now).
Lesson Learned 2: Cooking with brandy did not wow me. I’m not sure what I expected the flavor to be, but it really did not supply the depth of flavor I thought it would. The recipe calls for cooking the brandy down until it’s almost evaporated (which I did) but the chicken stock that I added next seemed to overpower it. Next time I might leave a little more brandy in the pan or try this with either red or white wine. Most of the information I looked at regarding a substitute for brandy recommended using white wine, but I think red wine (like a good merlot) could also make this recipe interesting.
Lesson Learned 3: You also have to be careful cooking with brandy as it can produce a large amount of flame coming out of your pan. The recipe states that you should take the pan off the heat add the brandy and then put it back on the heat. I would highlight something like that in a recipe and even do a warning that if you don’t you could produce a large flame and injure yourself. Again, not everyone is a seasoned chef and I think a pointed warning would be helpful.

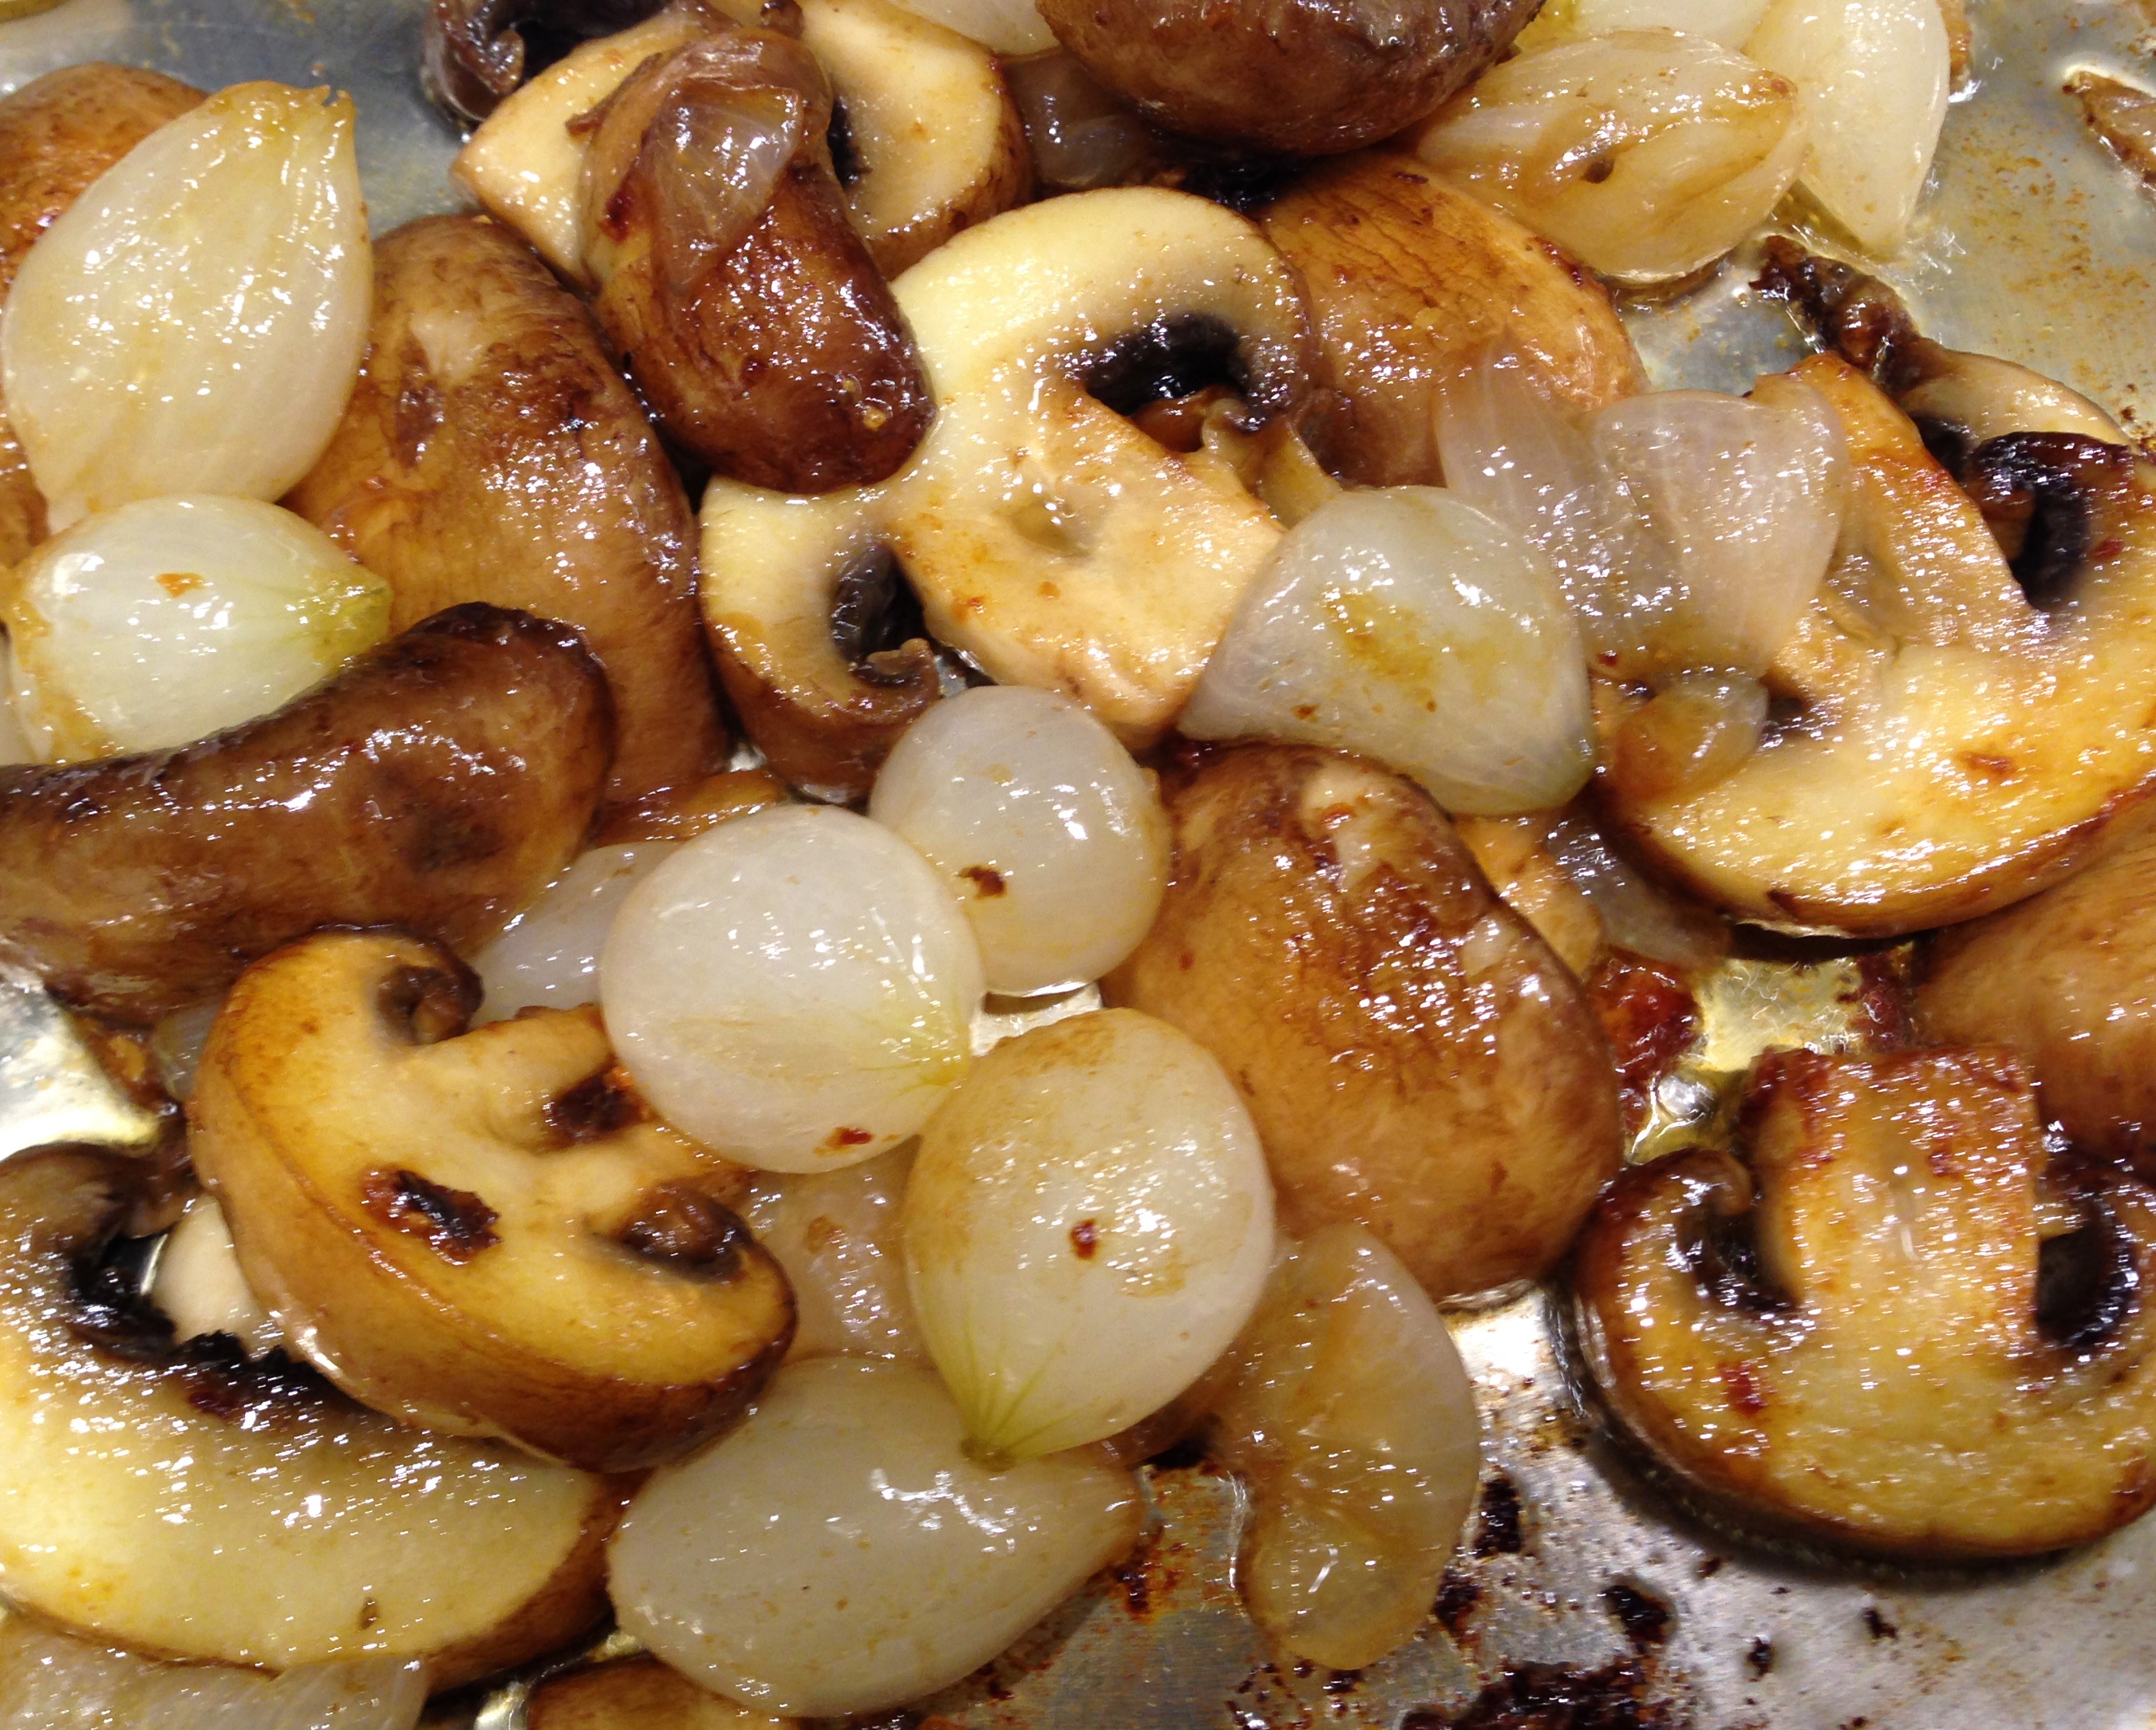
Cook Mushrooms Until Browned and Onions are Slightly Caramelized
Lesson Learned 4: This recipe called for button mushrooms. I never use button mushrooms anymore now that baby portobello mushrooms are so easy to get. I think button mushrooms are virtually flavorless and baby bellas stand up to the cooking process better and have a much better texture. So I substituted baby portobello mushrooms for button mushrooms and I highly recommend it.
Lesson Learned 5: The original recipe cooked 8 cutlets and called for 1 teaspoon of fresh thyme leaves. One teaspoon was not enough even for my recipe for two people. I would recommend two teaspoons of fresh time for four servings. With one teaspoon I could barely see the thyme much less taste any flavor from it.
Lesson Learned 6: Adding the butter at the end gives a nice silkiness and shine to the sauce. Don’t skip that part.
Even with some of the issues, this recipe is a keeper and one I will continue to play with. What I also like about this recipe is the progressive cooking process allows you to do your clean up in stages, so by the time I served dinner the only prep dish that needed to be washed was the skillet. I liked that aspect a lot. So here is my version of that recipe:
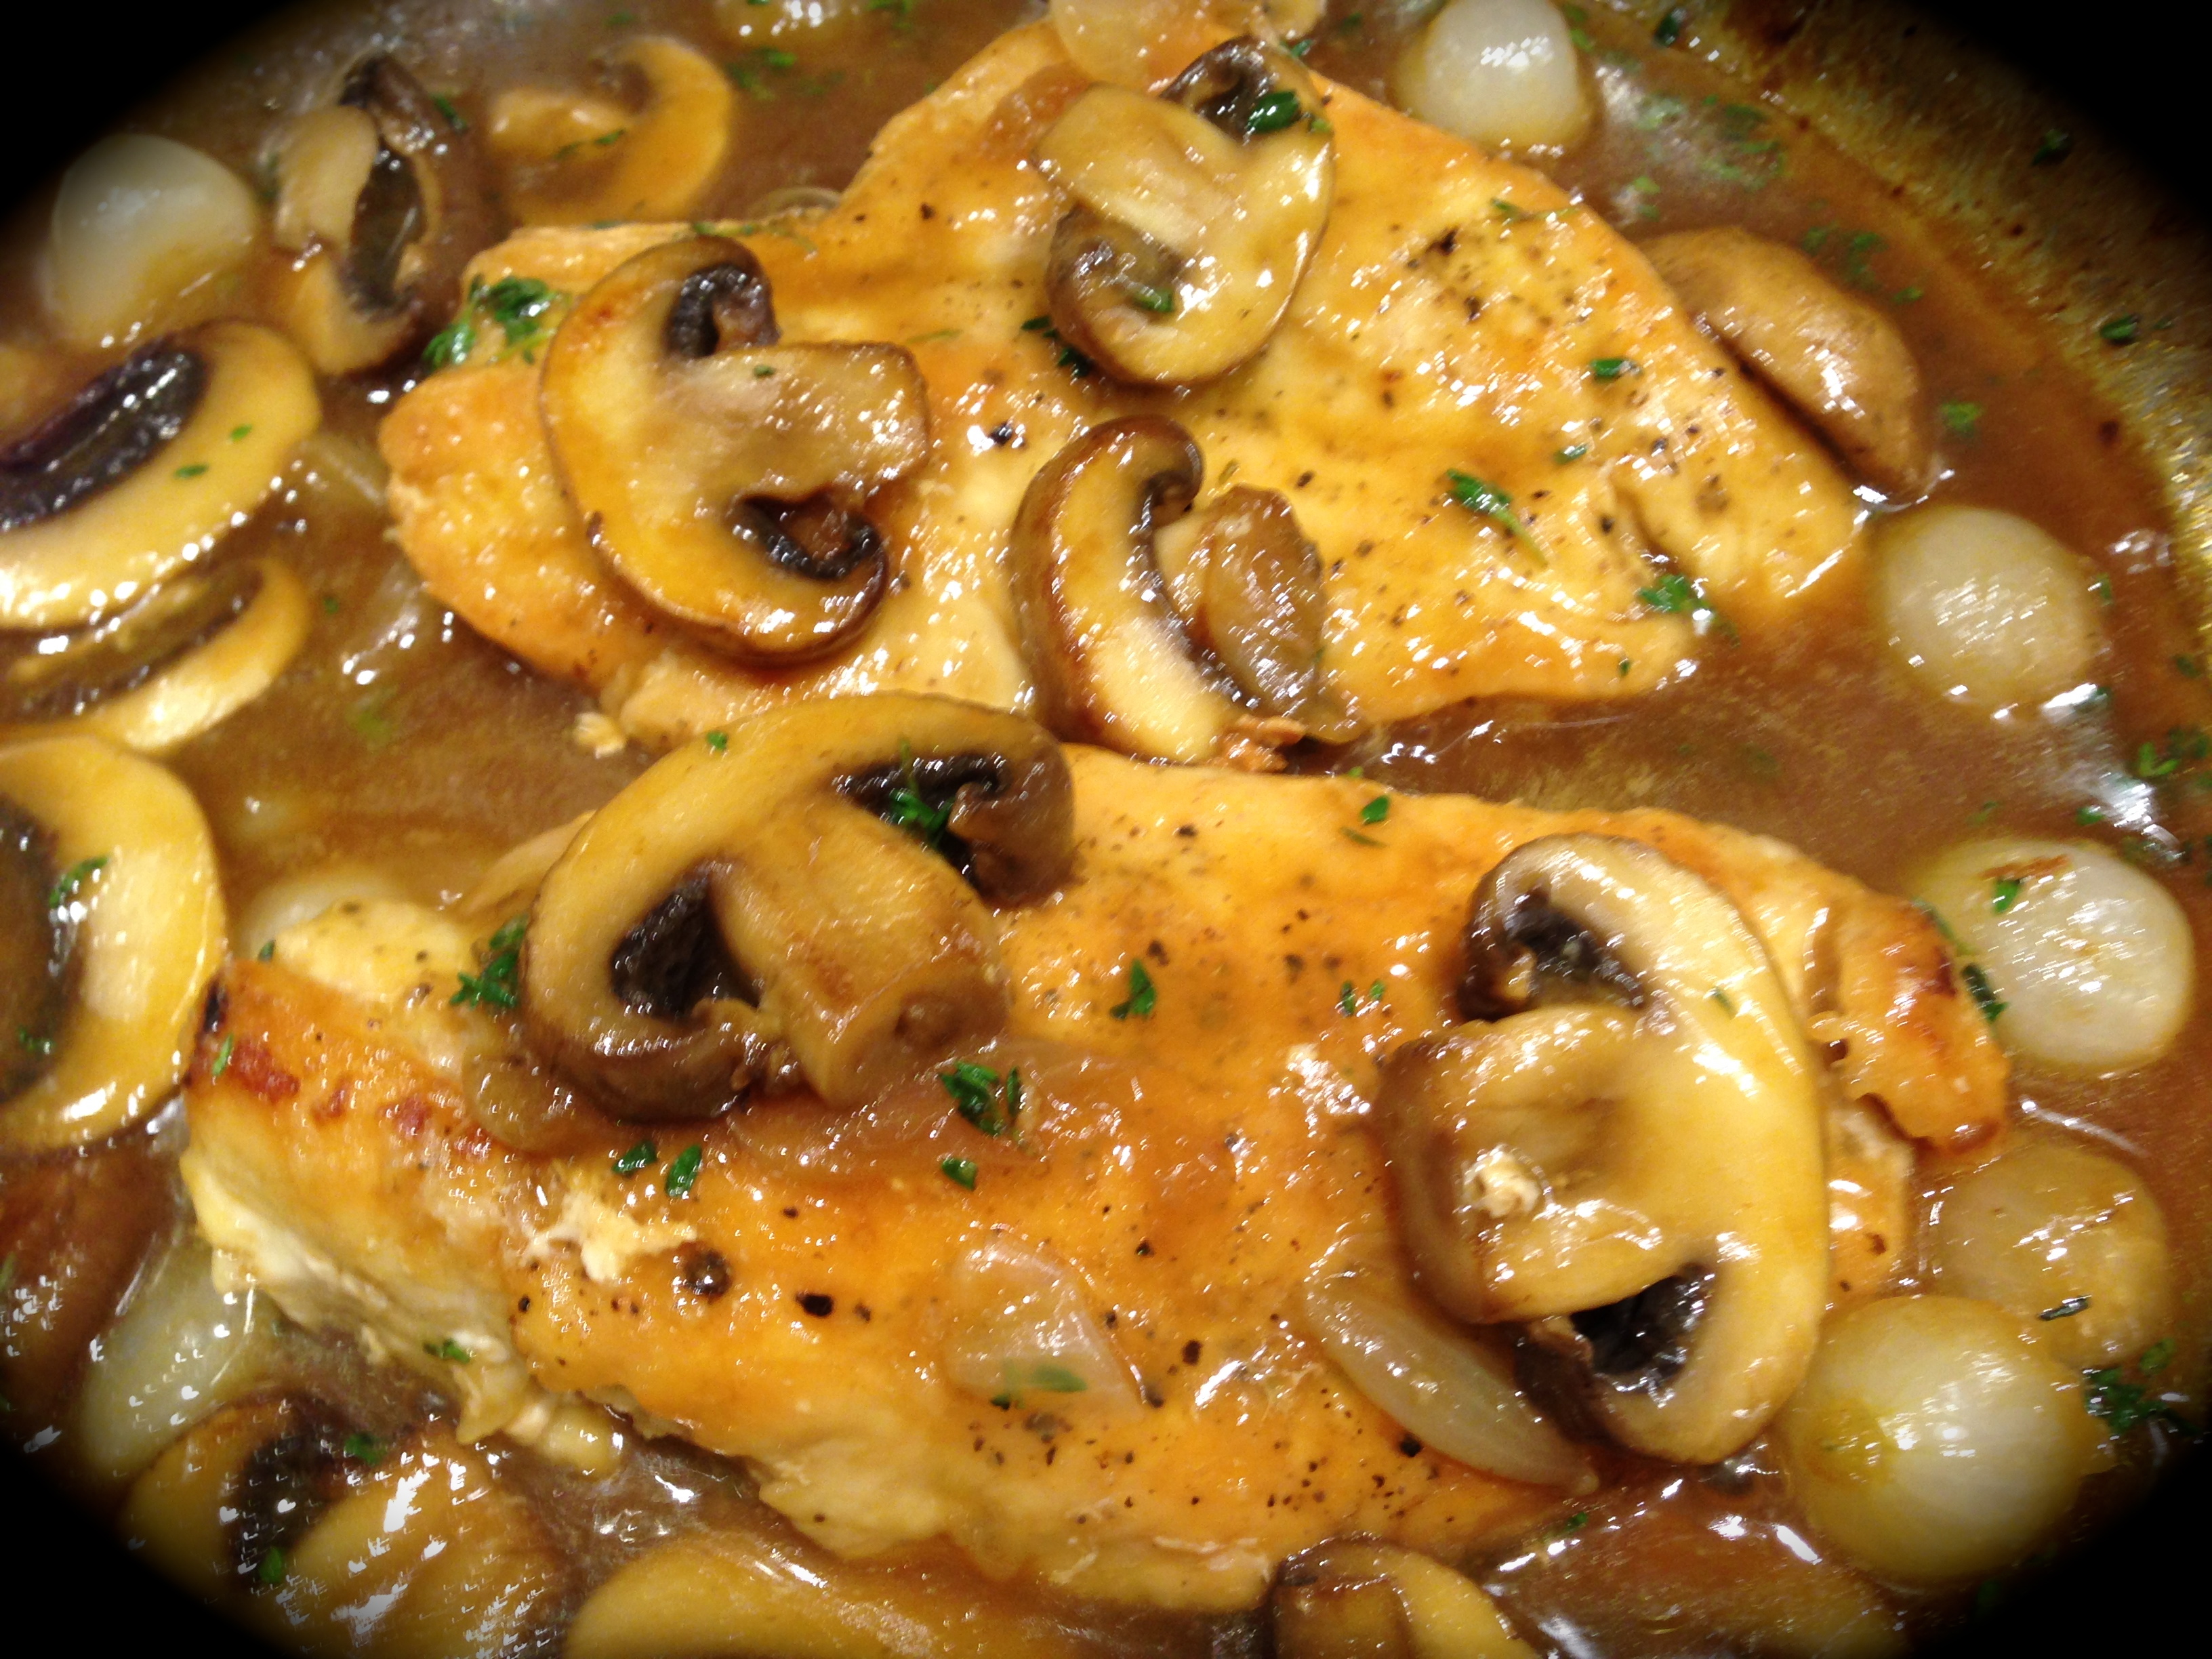
Brandy Chicken With Mushrooms and Pearl Onions
INGREDIENTS:
2 boneless skinless chicken breasts halved (ideally 1/2 inch thick)
1 jar of pearl onions or 1 box of frozen pearl onions (thawed and drained)
6 – 8 ounces of baby portobello mushrooms sliced
2/3 cup of brandy
1 cup of chicken stock
2 tsps. cornstarch
1 TBS butter
2 teaspoons of fresh thyme
1/4 cup all purpose flour
Olive oil
salt and pepper
DIRECTIONS:
Halve the chicken breasts horizontally. Pat dry and season with salt and pepper. Dredge chicken breasts in flour and shake off the excess.
Heat skillet with just enough olive oil to lightly coat it. Cook chicken breast for 4 minutes on each side until almost cooked through. Remove them from the skillet and wrap them in foil to keep them warm.
Add some additional oil in the pan. Add mushrooms and cook for 2-3 minutes and then add the onions. Continue to cook until mushrooms are nicely browned and onions begin to caramelize. Remove from the pan and set aside.
TAKE THE PAN OFF THE HEAT AND ADD THE BRANDY (this is important so as not to produce a flame). Put the pan back on the heat and cook down the brandy by half. Whisk together the chicken stock and cornstarch until smooth and add it to the skillet. Continue to whisk the mixture for a couple of minutes until smooth and mixture begins to bubble.
Return chicken, mushrooms and onion to the pan, reduce heat and simmer for 3-5 minutes. Add salt, butter and thyme. Serve once the butter has melted.

Brandy Chicken with Mushrooms and Pearl Onions


 Lesson Learned 2 – Cook the breakfast sausage until you see only a little light pink: Remember the quiche is going to bake for an hour so the sausage will continue to cook during that time. I like to cook my sausage first, mix it with the cream cheese and let it sit a little before I put it in the pie crust. I normally use that time to put the egg mixture together.
 Lesson Learned 4 – Use a good melting cheese: You can use a wide variety of melting cheeses in a quiche. I like this particular recipe because it pairs a little cream cheese with another melting cheese. I used muenster in this recipe but you can also use cheddar, gruyere, swiss, or mozzarella. That’s the beauty of making a quiche. The choice is yours!
 1 9 inch frozen pie crust