
There are certain meals that just become necessary to make once the weather gets cooler – pot roast, beef stew, roast chicken… And one of my all time favorite cooler weather meals has to be chili. It is so easy to make and I serve it with shredded cheddar cheese and diced sweet onion and boy or boy, does it ever stick to your ribs! Chili is the ultimate in comfort food on a crisp Fall evening.
What I like about chili is it’s so easy to make. There are a couple of hints to making a chili that suits our needs that I will share. But bottom line, the chili pot is your canvas and you can make chili basically any way you want. I will share with you my go-to recipe.
So let’s talk chili…

Chili Ingredients
Lesson Learned 1 – The onions: I use a large sweet onion when I make my chili. I dice the onion and use about three quarters of it in the chili itself. The rest I set aside and use as a raw topping when I serve the chili. I’ve found the best way to use these onions to enhance the flavor of the chili is to caramelize them. That takes a little time. The pictures below show how I dice the onions and the onions when they first become translucent. The photo below them shows when they are caramelized. Technically you can use them either way but I’ve found if you take the extra time and let them caramelize they add more flavor to the chili.
The challenge when you caramelize onions is the extra time. Normally I can get them the way I want them (as pictured below in the bottom photo) in about 15 minutes. If you want to cook your chili faster that may not be an option. But if you can take your time with this first step you will definitely taste the benefits of doing so.


Lesson Learned 2 – The importance of seasoning during the initial stages: I find if I season the onions and the meat with salt and pepper each time during the first two steps the flavor of the chili is greatly enhanced. Besides is their anything better than the smell of onions seasoned with salt and pepper cooking on the stove? So after I season the onions and let them caramelize I add the meat and season the meat with salt and pepper as well. It may seem like a lot of seasoning but it actually is not.
After that I don’t add any more salt and pepper until the very end after all the ingredients have been added and combined. At that time I taste the chili to see if it needs anymore salt and pepper. Very seldom do I have to add any at the end. Seasoning the first two layers and then adding the other seasonings makes a big difference in the end result. Don’t forget to do this.
Lesson Learned 3 – When to add the garlic: I’ve tried adding the garlic a couple of different ways and have landed on a preferred choice when I make chili. You can always add the garlic once you caramelized the onions but I prefer adding them to the ground beef just before I start adding the other ingredients. I allow them to cook in the meat for a minute or so until fragrant and then I continue adding the rest of the ingredients. I find this totally prevents the garlic from burning and better infuses the garlic into the chili.
Lesson Learned 4 – Chopping the green pepper: I guess I don’t actually chop the green pepper – it’s more like dicing. I like the pieces small so that they add flavor to the chili but aren’t necessarily highly visible. The green pepper flavor, in my estimation, balances some of the heat of the chili and adds a nice freshness to it. The pictures below show how I prepare the green pepper:


Lesson Learned 5 – Chili seasoning: I’ve experimented with a lot of different ways to season my chili and finally chose my preferred method. I use McCormick Mild Chili Seasoning Mix because we prefer our chili on the mild side but you can make it has hot as you like. McCormick has a few varieties of seasonings and if you can’t find a seasoning mix that gets you the heat you crave you can always add red pepper flakes. This seasoning mix contains a blend of chili pepper, paprika, cumin, onion salt and garlic. I also add about a teaspoon of chili powder and this combination of seasonings gives us the kind of chili we prefer.
Lesson Learned 6 – The mushrooms: I am a big fan of fresh mushrooms especially now when you can buy them in bulk. This time I had a jar of canned mushrooms in the pantry that I wanted to use so I went that route. Either way, add the mushrooms at the very end so that they don’t overcook. Generally I add fresh sliced mushrooms to my chili.
Lesson Learned 7 – A little bit of tomato paste helps thicken the sauce: Here’s a handy dandy little trick. Add about a tablespoon of tomato paste to the ground beef before you add the seasonings. This will help thicken the sauce. Look for tomato paste that’s sold in a tube. That way you’ll have no waste and can use it whenever you need versus wasting a whole small can.
Lesson Learned 8 – Simmering the chili: I’ve found the best way to meld all the flavors in the chili is to let it simmer for about an hour. Put your heat on very low and stir the chili occasionally making sure none burns on the bottom of the pan. Then the chili is ready to serve. And, of course, if you have the luxury, you can always let it sit overnight to let the flavors meld.
So that’s basically it. Once you’ve browned the ground beef and added the seasonings it’s just drop in and stir from there…

Stir in the diced tomatoes

Drop in the beans

Add the mushrooms and green pepper
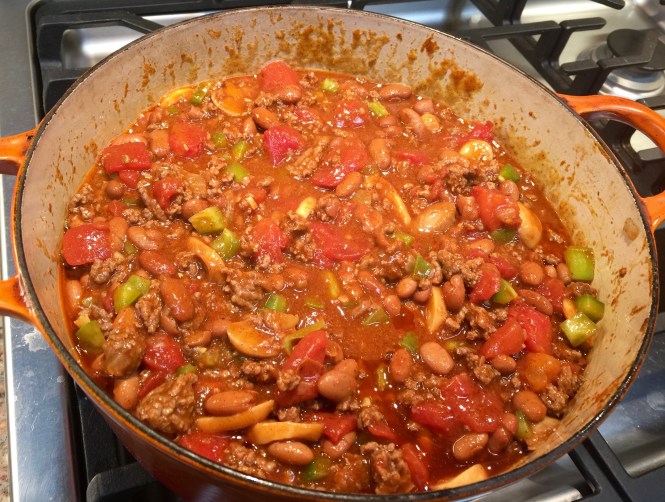
Stir and simmer for about an hour and you’re done. I serve this chili over rice, my husband’s preference, or over elbow macaroni, my preference. Or you can serve it plain. I add shredded cheddar and raw diced onion to mine, but you can top it with sour cream, guacamole, diced jalapeños, or whatever you like. I’ve been making this recipe for years and have it down to a science. It is unbelievably easy to make and so good. Try it. I know you’ll love it!
Easy Peasy Chili...
INGREDIENTS:
2 Tbs. butter (or 1 Tbs. butter and 1 Tbs. olive oil)
1 large sweet onion, diced
2 cloves garlic, minced
2 pounds ground beef, 85% lean
1 Tbs. tomato paste
I pkg. McCormicks mild chili seasoning
1 tsp. chili powder
1 28 oz. can of diced tomatoes
1 20 oz. can of chili beans in chili sauce
1 10 oz. can of sliced mushrooms, drained
1 green pepper, diced
Kosher salt
Freshly cracked black pepper
Serve with rice or elbow macaroni, optional
Toppings can include: Shredded cheese, raw onion, sour cream, guacamole, sliced jalapeño peppers, or whatever your preference
DIRECTIONS:
In a 5.5 quart dutch oven melt the butter. On a medium heat add the onions and cook until caramelized, approximately 15 minutes. Season the onions with salt and pepper while cooking. Push the onions to the side and add the ground beef. Layer the cooked onions on top of the beef. Break up the ground beef with a spoon and cook through, seasoning the ground beef at the beginning with salt and pepper. Once cooked, stir in the garlic and cook until fragrant, approximately 1 minute.
Stir in the tomato paste and thoroughly combine. Stir in the chili seasoning and chili powder. Add the diced tomatoes. Stir to combine. Add the chili beans. Stir to combine. Cook for about a minute. Add the mushrooms and the green pepper. Gently stir to combine. Taste to see if any additional salt and pepper is needed.
Cover and simmer for one hour. Serve with desired accompaniments.


Such an easy way to prepare chili, but still so flavourful and colorful!
LikeLiked by 1 person
Sometimes the easiest way is the best. I know it is with this recipe. Thanks!
LikeLiked by 1 person
Looks great and tasty 🙂
LikeLiked by 1 person
It is very good – we love it!
LikeLiked by 1 person