
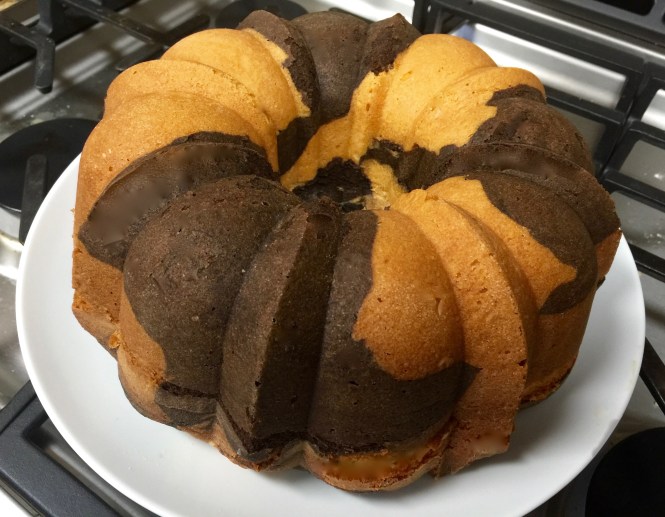
I love this recipe not only because it produces a moist, flavorful cake but also because it’s a ton of fun to make. And the finished product looks as good as it tastes.
I like experimenting with different cakes and when I read about the process for this one I thought I’d give it a try. I’ve made swirl cakes before where you basically have one little cinnamon swirl going through the cake but this way of making a swirl cake is much more dramatic. You create the dramatic swirls by dividing the batter and making one half chocolate and keeping the other half as is. Then you spoon in the batter alternating the colors and use a knife or another similar object and swirl them together. It was great fun (I know I need to get a life…). And the result, as you can see from the many pictures in this blog is a more dramatic density of swirls. It is a fun cake to make and eat.
So let’s talk marble pound cake…
Lesson Learned 1 – The easy way to grease and flour a bundt cake pan: If you’re like me you love the way a bundt cake looks but you dread greasing and flouring the pan. Well I’ve found a way to make that process somewhat easier. First there’s no getting around it you need to grease the pan and pay attention to getting the grease into the many crevices. I usually use shortening to do that. I think I actually use less grease with shortening than I do with butter.
Then comes the flouring part and that was always a challenge because you need to get the flour up as high as you can and with the wide opening of the pan you can get flour all over the place if you’re not careful. Well, no more. All you need do is take some good cling wrap (and I mean the stuff that really clings – we buy ours at Costco and it is restaurant quality grade). Cover the top of the pan as shown in the picture below.

Once you do this you can turn the pan completely upside down and shake it all around and spread the flour easily throughout the entire pan. See for yourself…

After that you simply turn the pan upside down on the counter and tap the sides of the pan with a wooden spoon all the way around. I would do that a couple of times. Then remove the cling wrap from the sides of the pan, lift the pan up and you’ll be left with all the excess flour all on the cling wrap as seen in the picture below…

Then all you need to do is fold up the edges of the cling wrap and toss it with the flour inside. Believe me, this little trick saves a lot of time and mess. You’ll love it.
Lesson Learned 2 – Add the eggs individually and beat each of them for a long time: There is no leavening in this recipe (baking powder, soda). Leavening is traditionally used to make a cake rise in the oven. The only leavening agent in this recipe is the eggs.
Think of an egg as basically having three qualities – fat, foam and fat & foam. The fat is the yolk which primarily serves as a binder. It helps to make batters smooth and moist. The foam is the whites. Beat them into submission on their own and you get light stiff peaks that can be used for airiness in a recipe or to make a meringue.
The particular recipe relies on the fat and the foam. When mixed with sugar (like in a cake or cookie batter), eggs help trap and hold air — not quite as well as whipped egg whites, but enough to give the finished product some lightness and lift. And that’s what you are needing in this recipe. That is why it is important to make sure each egg is blended thoroughly. Do not add all the eggs in at the same time. It never mixes as well as you think and could affect the cakes ability to rise.
Also don’t crack the eggs directly into the batter. Since you are using so many eggs you don’t want to get to the fifth or sixth one and then find out you have a bad one as it drops in. Your batter will be ruined. In order to prevent this, crack each egg into a small dish before you add it to the batter. That way you can make sure you’re not adding a bad egg. I’ve only had this happen to me a couple of times, and it’s not fun. Believe me you don’t want to put yourself into a position of having to toss out all of those ingredients and start all over because you had one bad egg.
Lesson Learned 3 – Alternating the batters in the pan: I think I had the most fun with this part of the process. Once you create the two batters you alternate them by large spoonfuls in the pan.

After that you swirl the batters together being careful not to touch the edges or the bottom of the pan. I used a skewer that I used to grill vegetables. It was long enough and thin enough to give me control and to create some great swirls. Judge for yourself…

You add another layer of alternating batters, swirl again and you’re ready to pop the cake into the oven.
 Lesson Learned 4 – Use instant espresso powder to enhance the flavor of the chocolate: In any recipe that includes chocolate I’d recommend adding at least a quarter teaspoon of espresso powder. It brings out the chocolate flavor so much more. Try making a chocolate recipe without it and then make the same recipe with it. You’ll be amazed at how much it enhances the flavor of the chocolate.
What I really like about this cake is it looks as good as it tastes. And I found it fun to make. I loved making the swirls! So try this one and tell me what you think. I just know you’ll love it.
Marble Pound Cake...
INGREDIENTS:
1 1/2 cups unsalted butter, room temperature
8 ounces cream cheese, softened
3 cups sugar
6 large eggs, room temperature
3 cups flour
2 tsp. kosher salt
2 tsp. vanilla
1/4 cup unsweetened cocoa powder
1/4 tsp. espresso powder
1/3 cup hot water
powdered sugar for sprinkling on top
DIRECTIONS:
Preheat the oven to 350. Grease and flour a 10 cup bundt pan. Set aside.
Cream the butter, cream cheese and sugar for approximately 5 minutes. The mixture should be light and fluffy.
Add in the eggs one at a time and combine each thoroughly. Add the vanilla and combine.
Mix together the flour and the salt. Add the flour a few large spoonfuls to the batter at a time until combined.
Whisk together the cocoa, espresso powder and hot water. Take half of the cake batter and stir it into the cocoa mixture.
Drop dollops of batter into the bundt pan alternating the chocolate and vanilla batters. Swirl the batters together being careful not to scrape the bottom or sides of the pan. Repeat the same process. (You should get two layers of alternating batter).
Bake for 70 minutes or until a toothpick inserted into the thickest part of the cake comes out clean.
Cool for 30 minutes before inverting the cake onto a serving plate. Dust the top with powdered sugar.


I love pound cake! Looks wonderful! Thanks for sharing 🙂 I recently made buffalo chicken dip with a little twist. You can check it out here
LikeLiked by 1 person
The dip looks great. I think I’ll try it. And yes, this cake looks impressive and tastes divine. Thanks for sharing.
LikeLiked by 1 person
Good
LikeLiked by 1 person
Yes it is.
LikeLike