Double Chocolate Sour Cream Sheet Cake…

What can I say – my husband loves chocolate. Whether it be truffles, cookies, pies, cheese cake or simply semi-sweet morsels right out of the bag, if something contains chocolate chances are he’ll love it. So that means I’m always looking for variations on chocolate sweets, especially cakes and sweet breads.

So here is another chocolate cake recipe. I like this recipe for a variety of reasons. First it’s very simple and quick to make. Second adding the semi sweet morsels sends the cake over the top. Third the frosting is not overly sweet and so it compliments the cake beautifully.

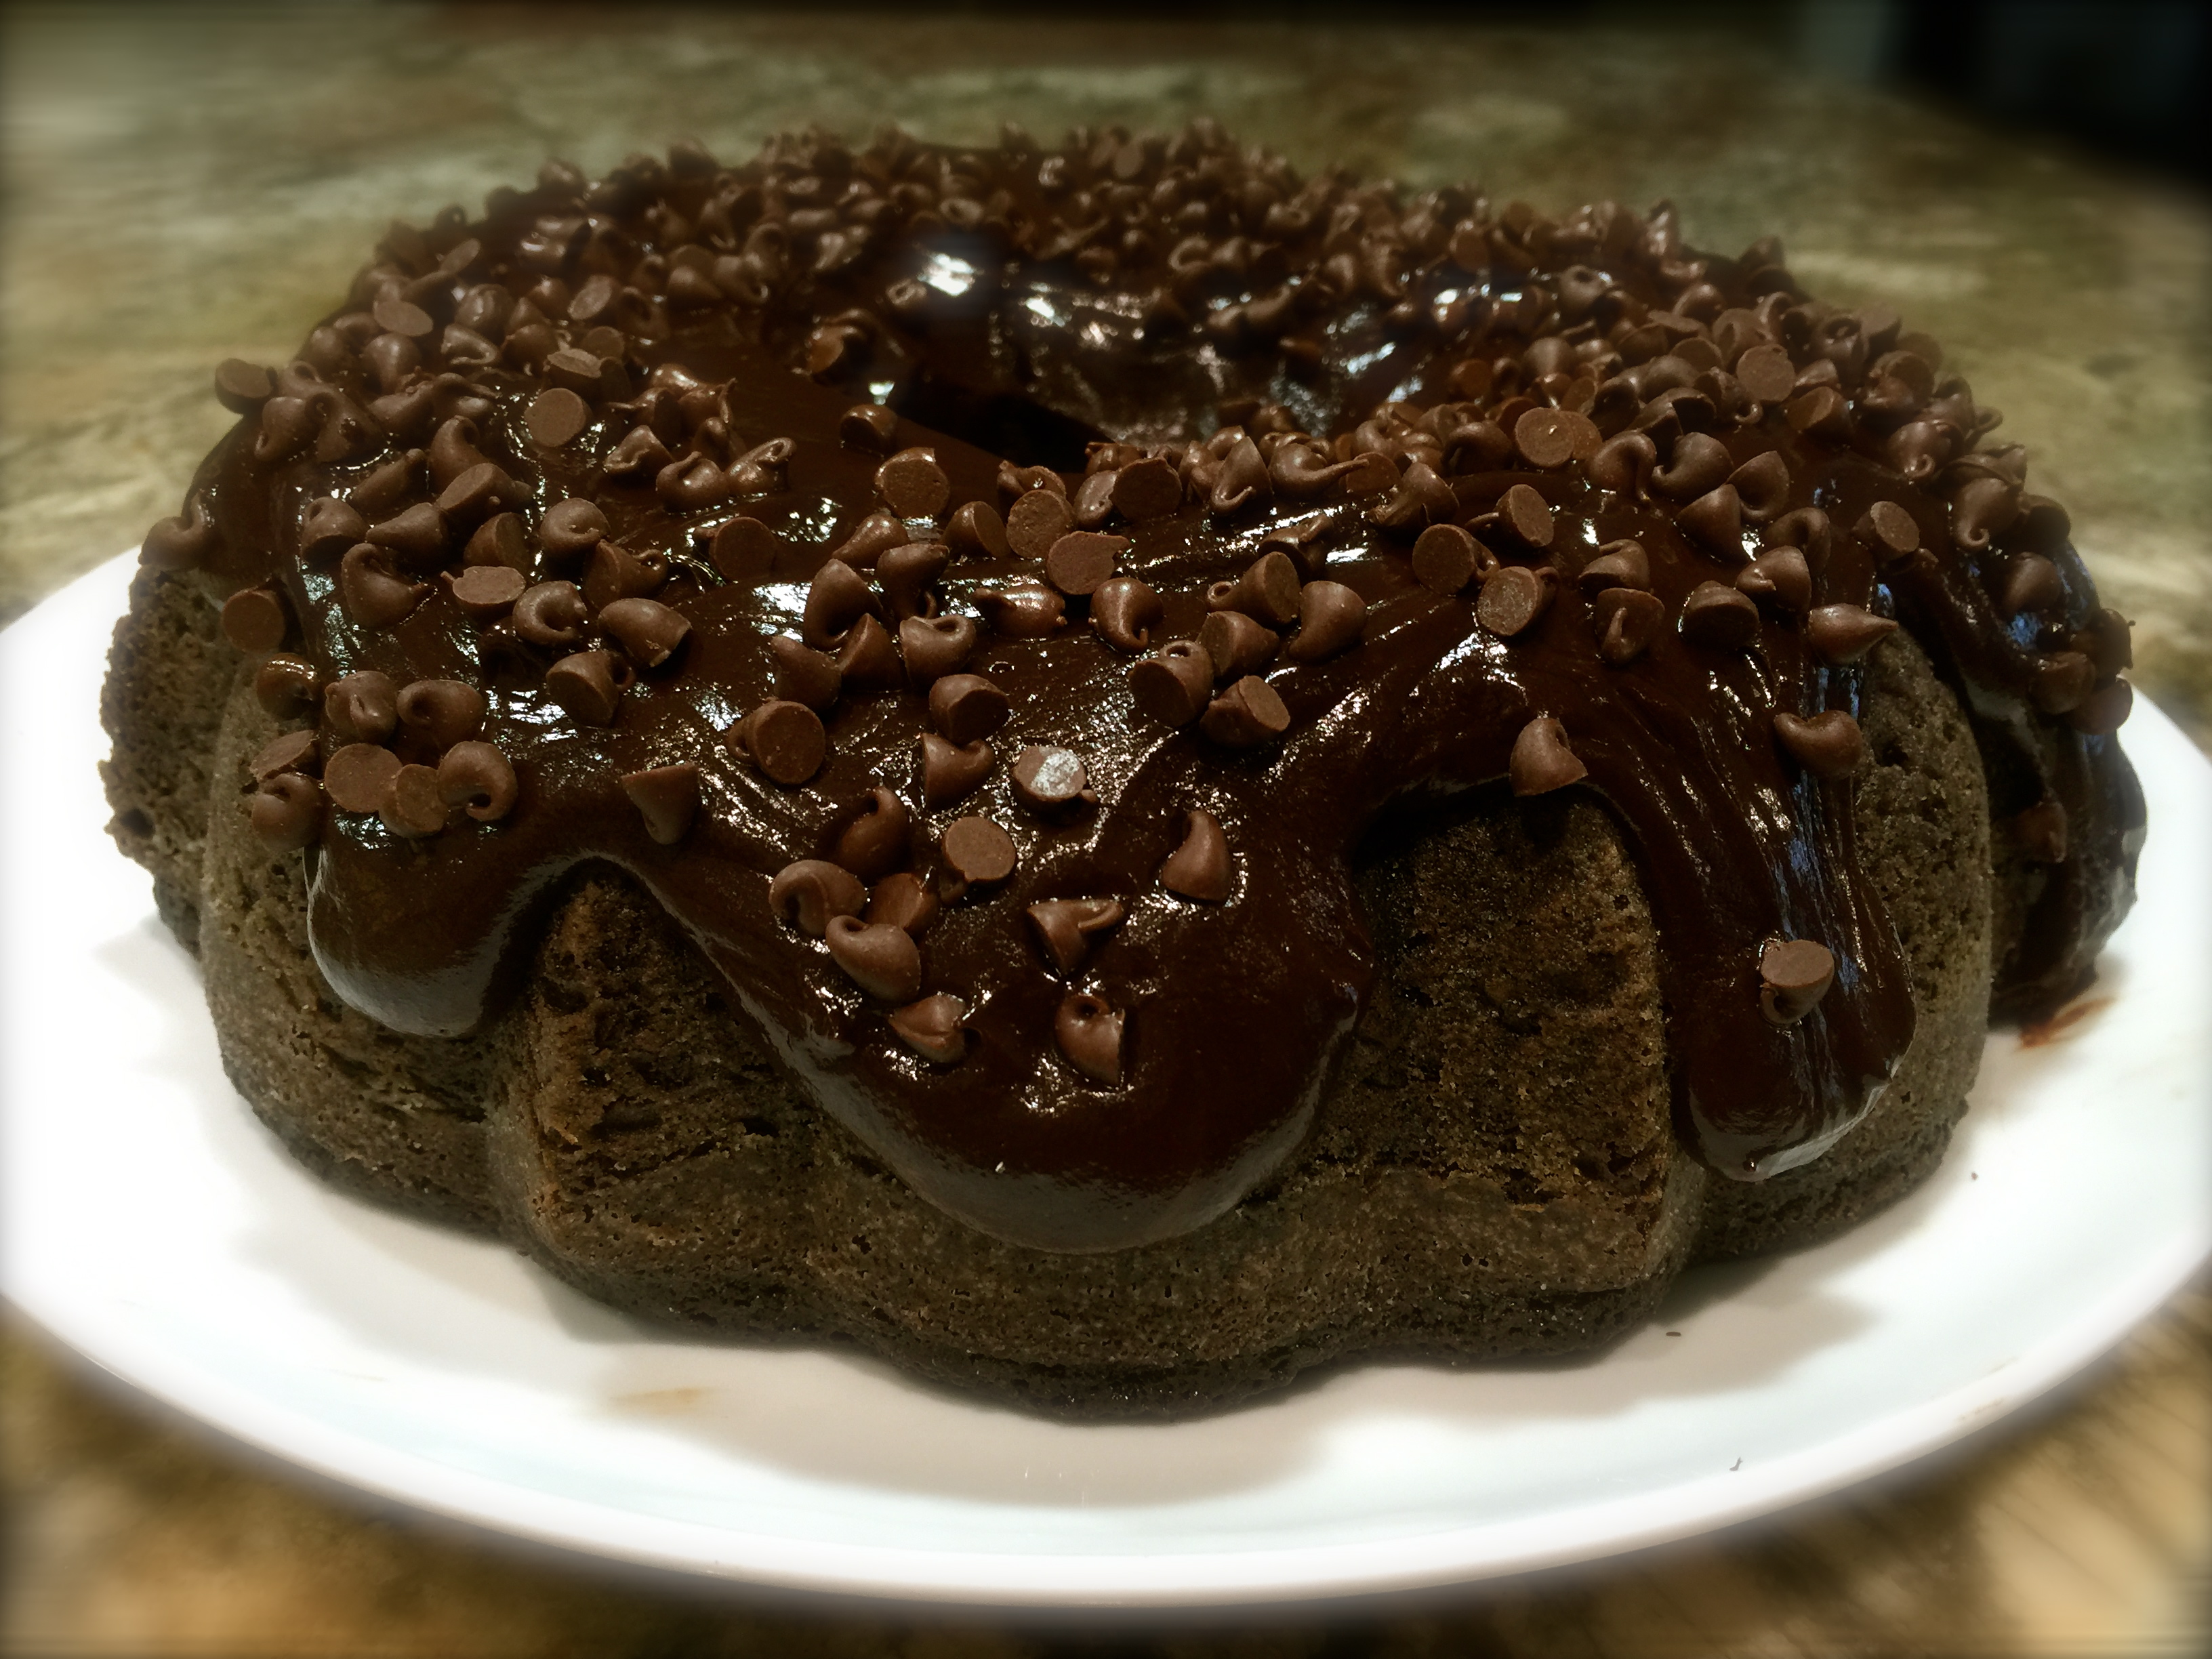
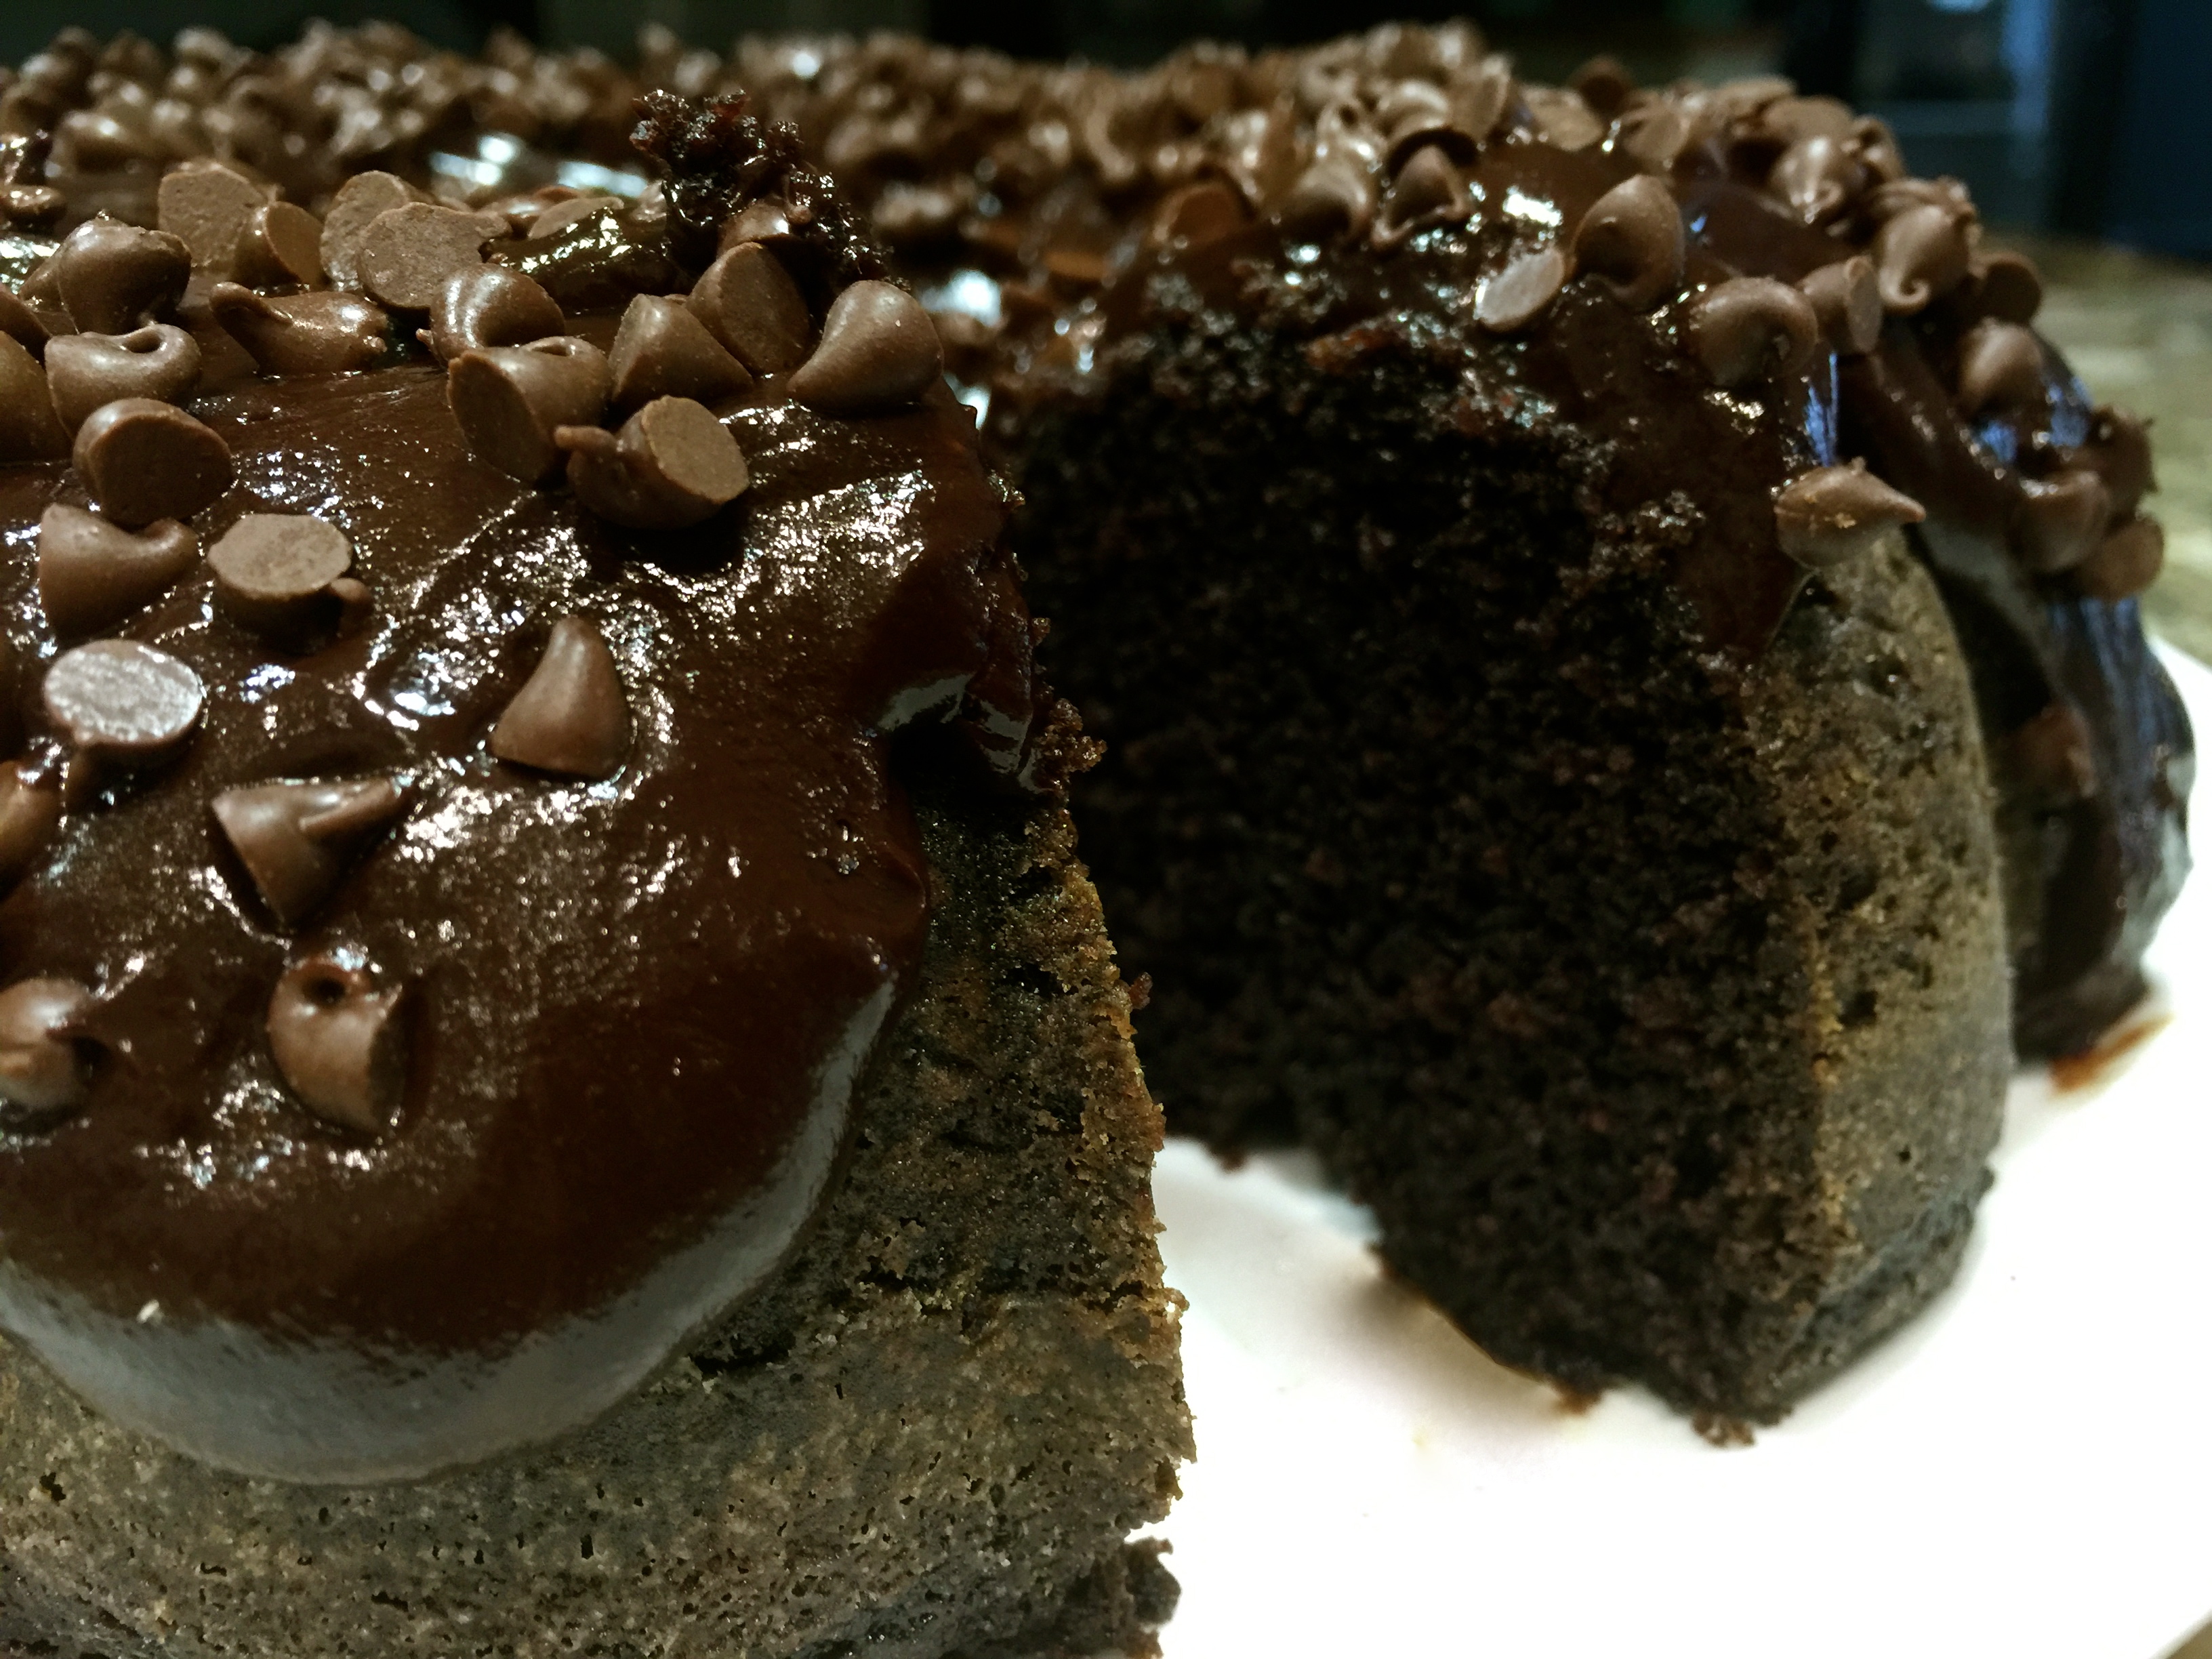
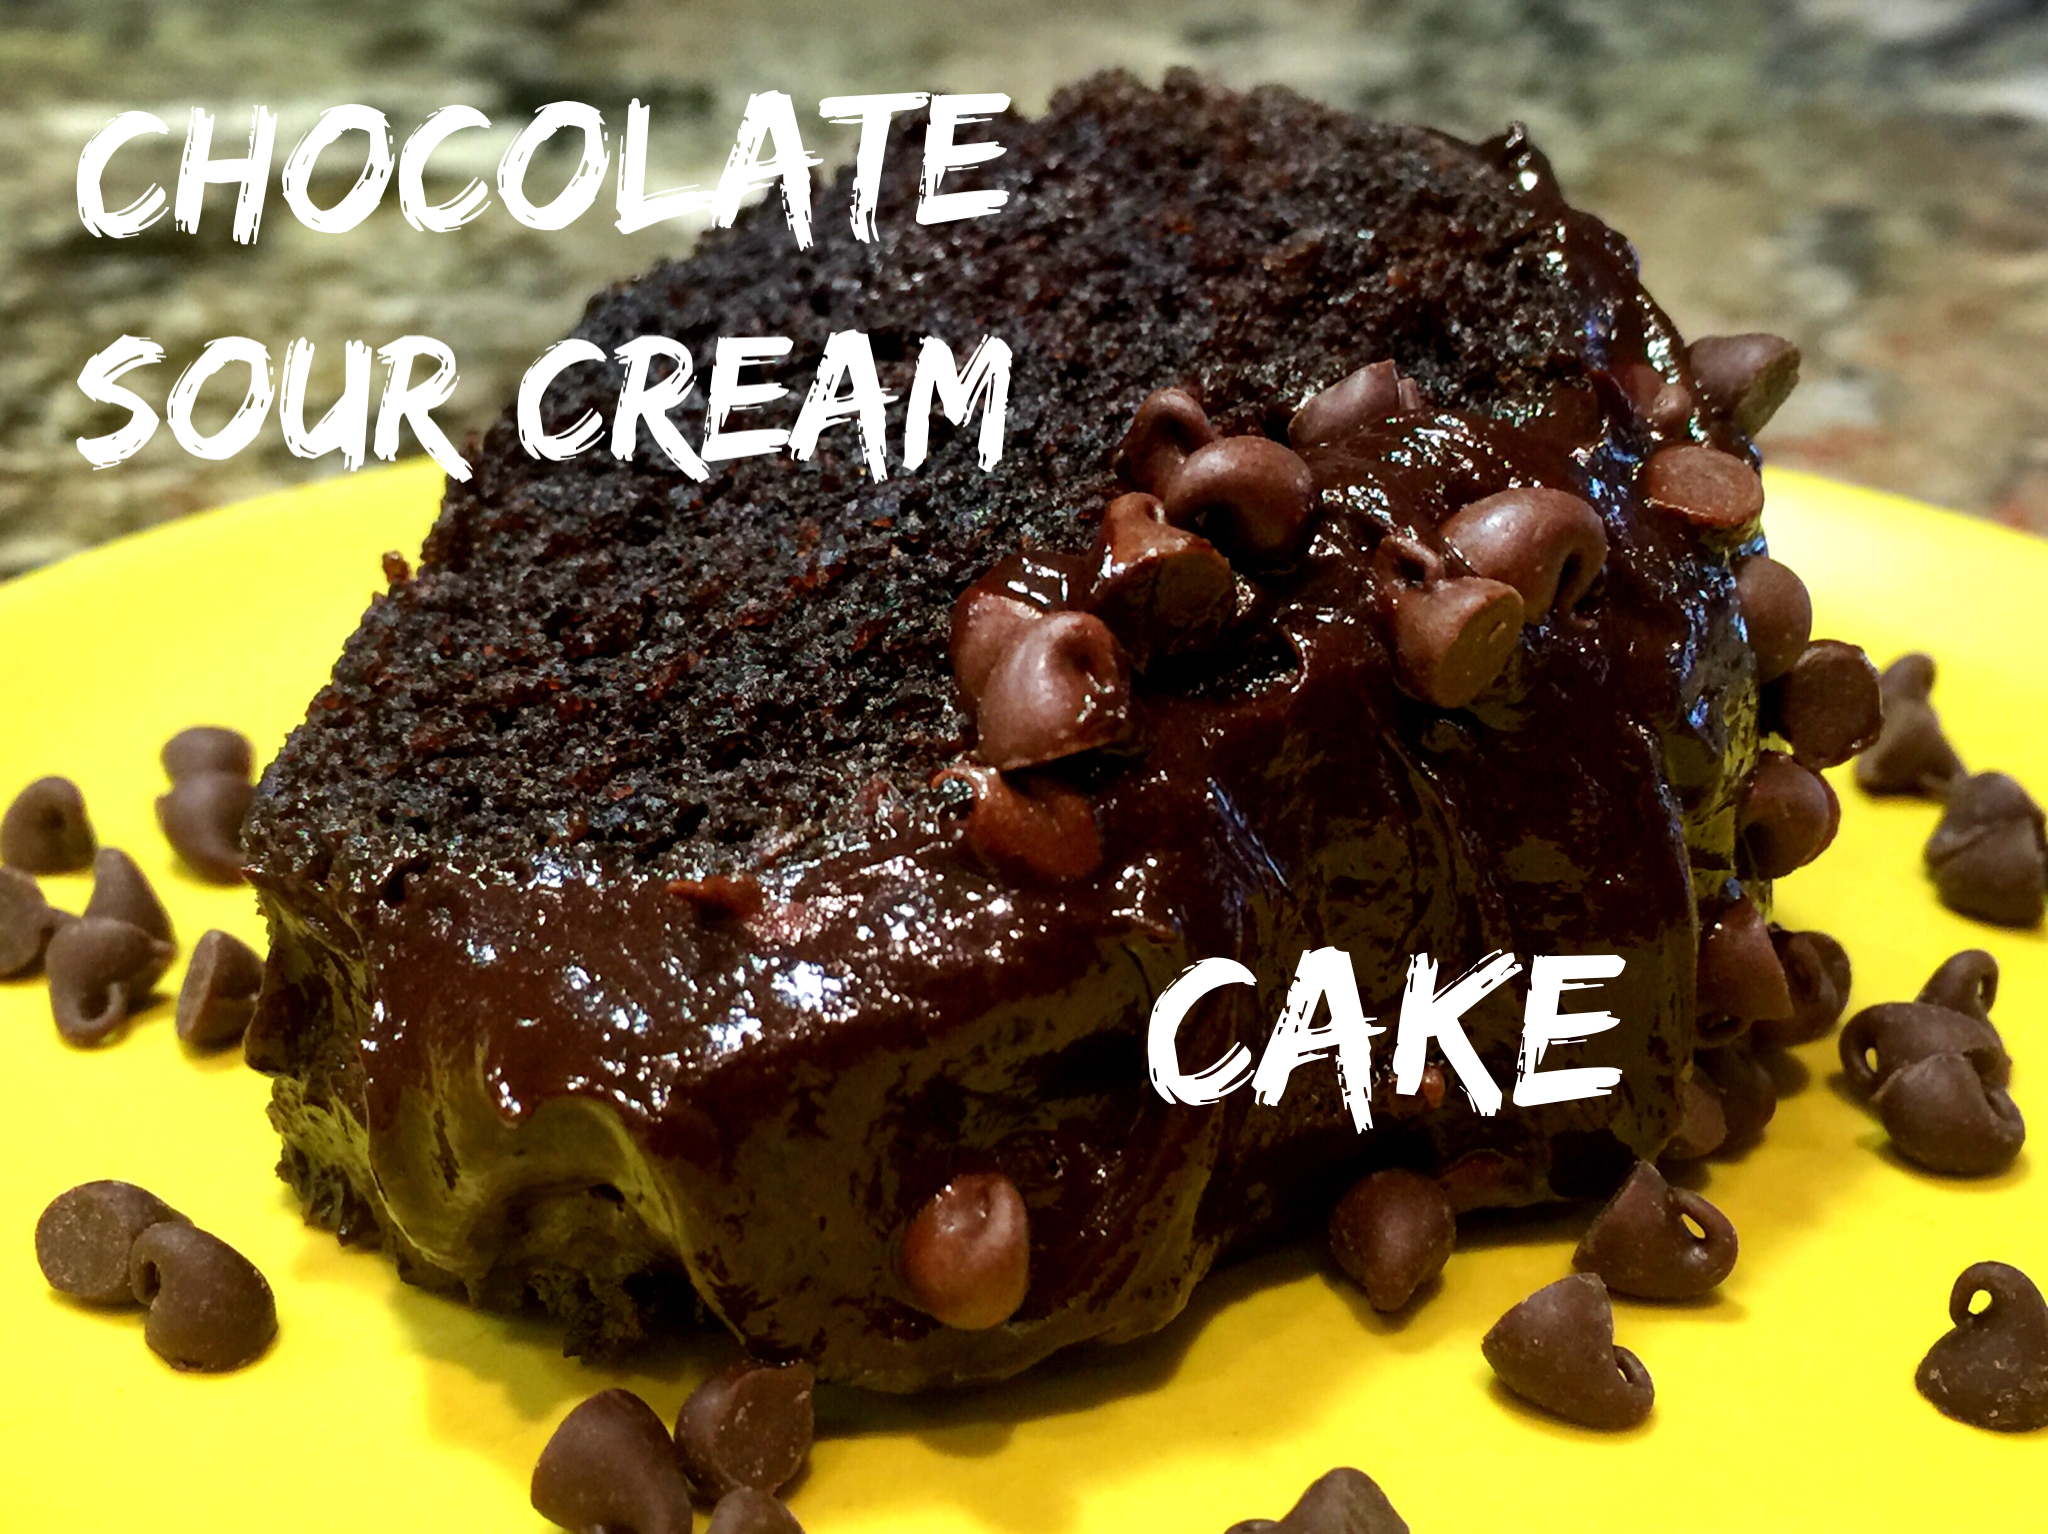
So let’s talk double chocolate sour cream cheese cake…

Lesson Learned 1 – Never stray from the basics on this: By that I mean a couple of things. First, make sure whenever you bake your eggs are at room temperature. The reason is simple. Room temperature eggs blend more completely in the batter which results in a better texture for the cake. Don’t have the time to do this? Oh yes, you do – just follow my simple tips and tricks. Second, coat the semi-sweet morsels with a teaspoon of flour. By that I mean put the morsels in a bowl, pour the flour on top and mix the flour into the morsels until they are all lightly coated. When you add chocolate morsels or fruit like blueberries to cake batter they all sink to the bottom of the cake when it is baking. This little trick will help you get your morsels more evenly distributed throughout the batter.

Lesson Learned 2 – Less is more when making the frosting: Always be aware that if you add too much liquid up front when making frosting it can become too runny. With this recipe I would add 1 Tbs. of milk at a time until you get the desired consistency. Be aware that you will really need to mix this frosting well after you add any liquid. I used a stiff whisk and at first I did not think the frosting would achieve the consistency I wanted. But as I kept whisking I found that it turned out great. I only used 2 Tbs. of milk but with frosting you never know. The main point here is to make sure you mix the frosting ingredients thoroughly before adding any additional milk.

Ready To Go Into The Oven

I wish I could say I had a ton of lessons learned about this recipe but bottom line it’s a very traditional method of making a sheet cake so other than following the basics as I’ve listed above the rest is just a matter for following the directions.
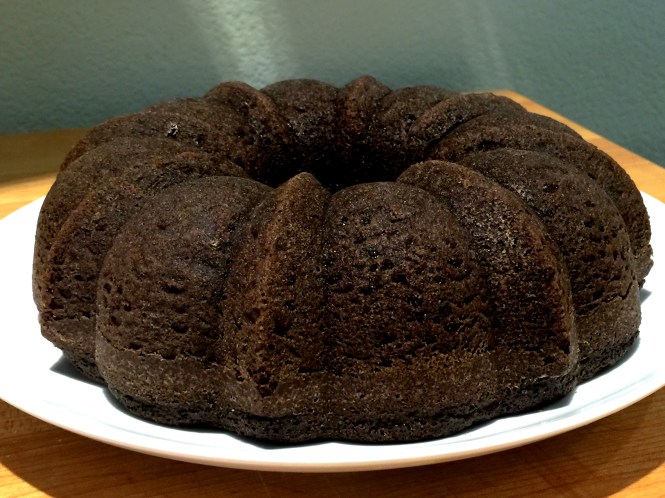
Out Of The Oven

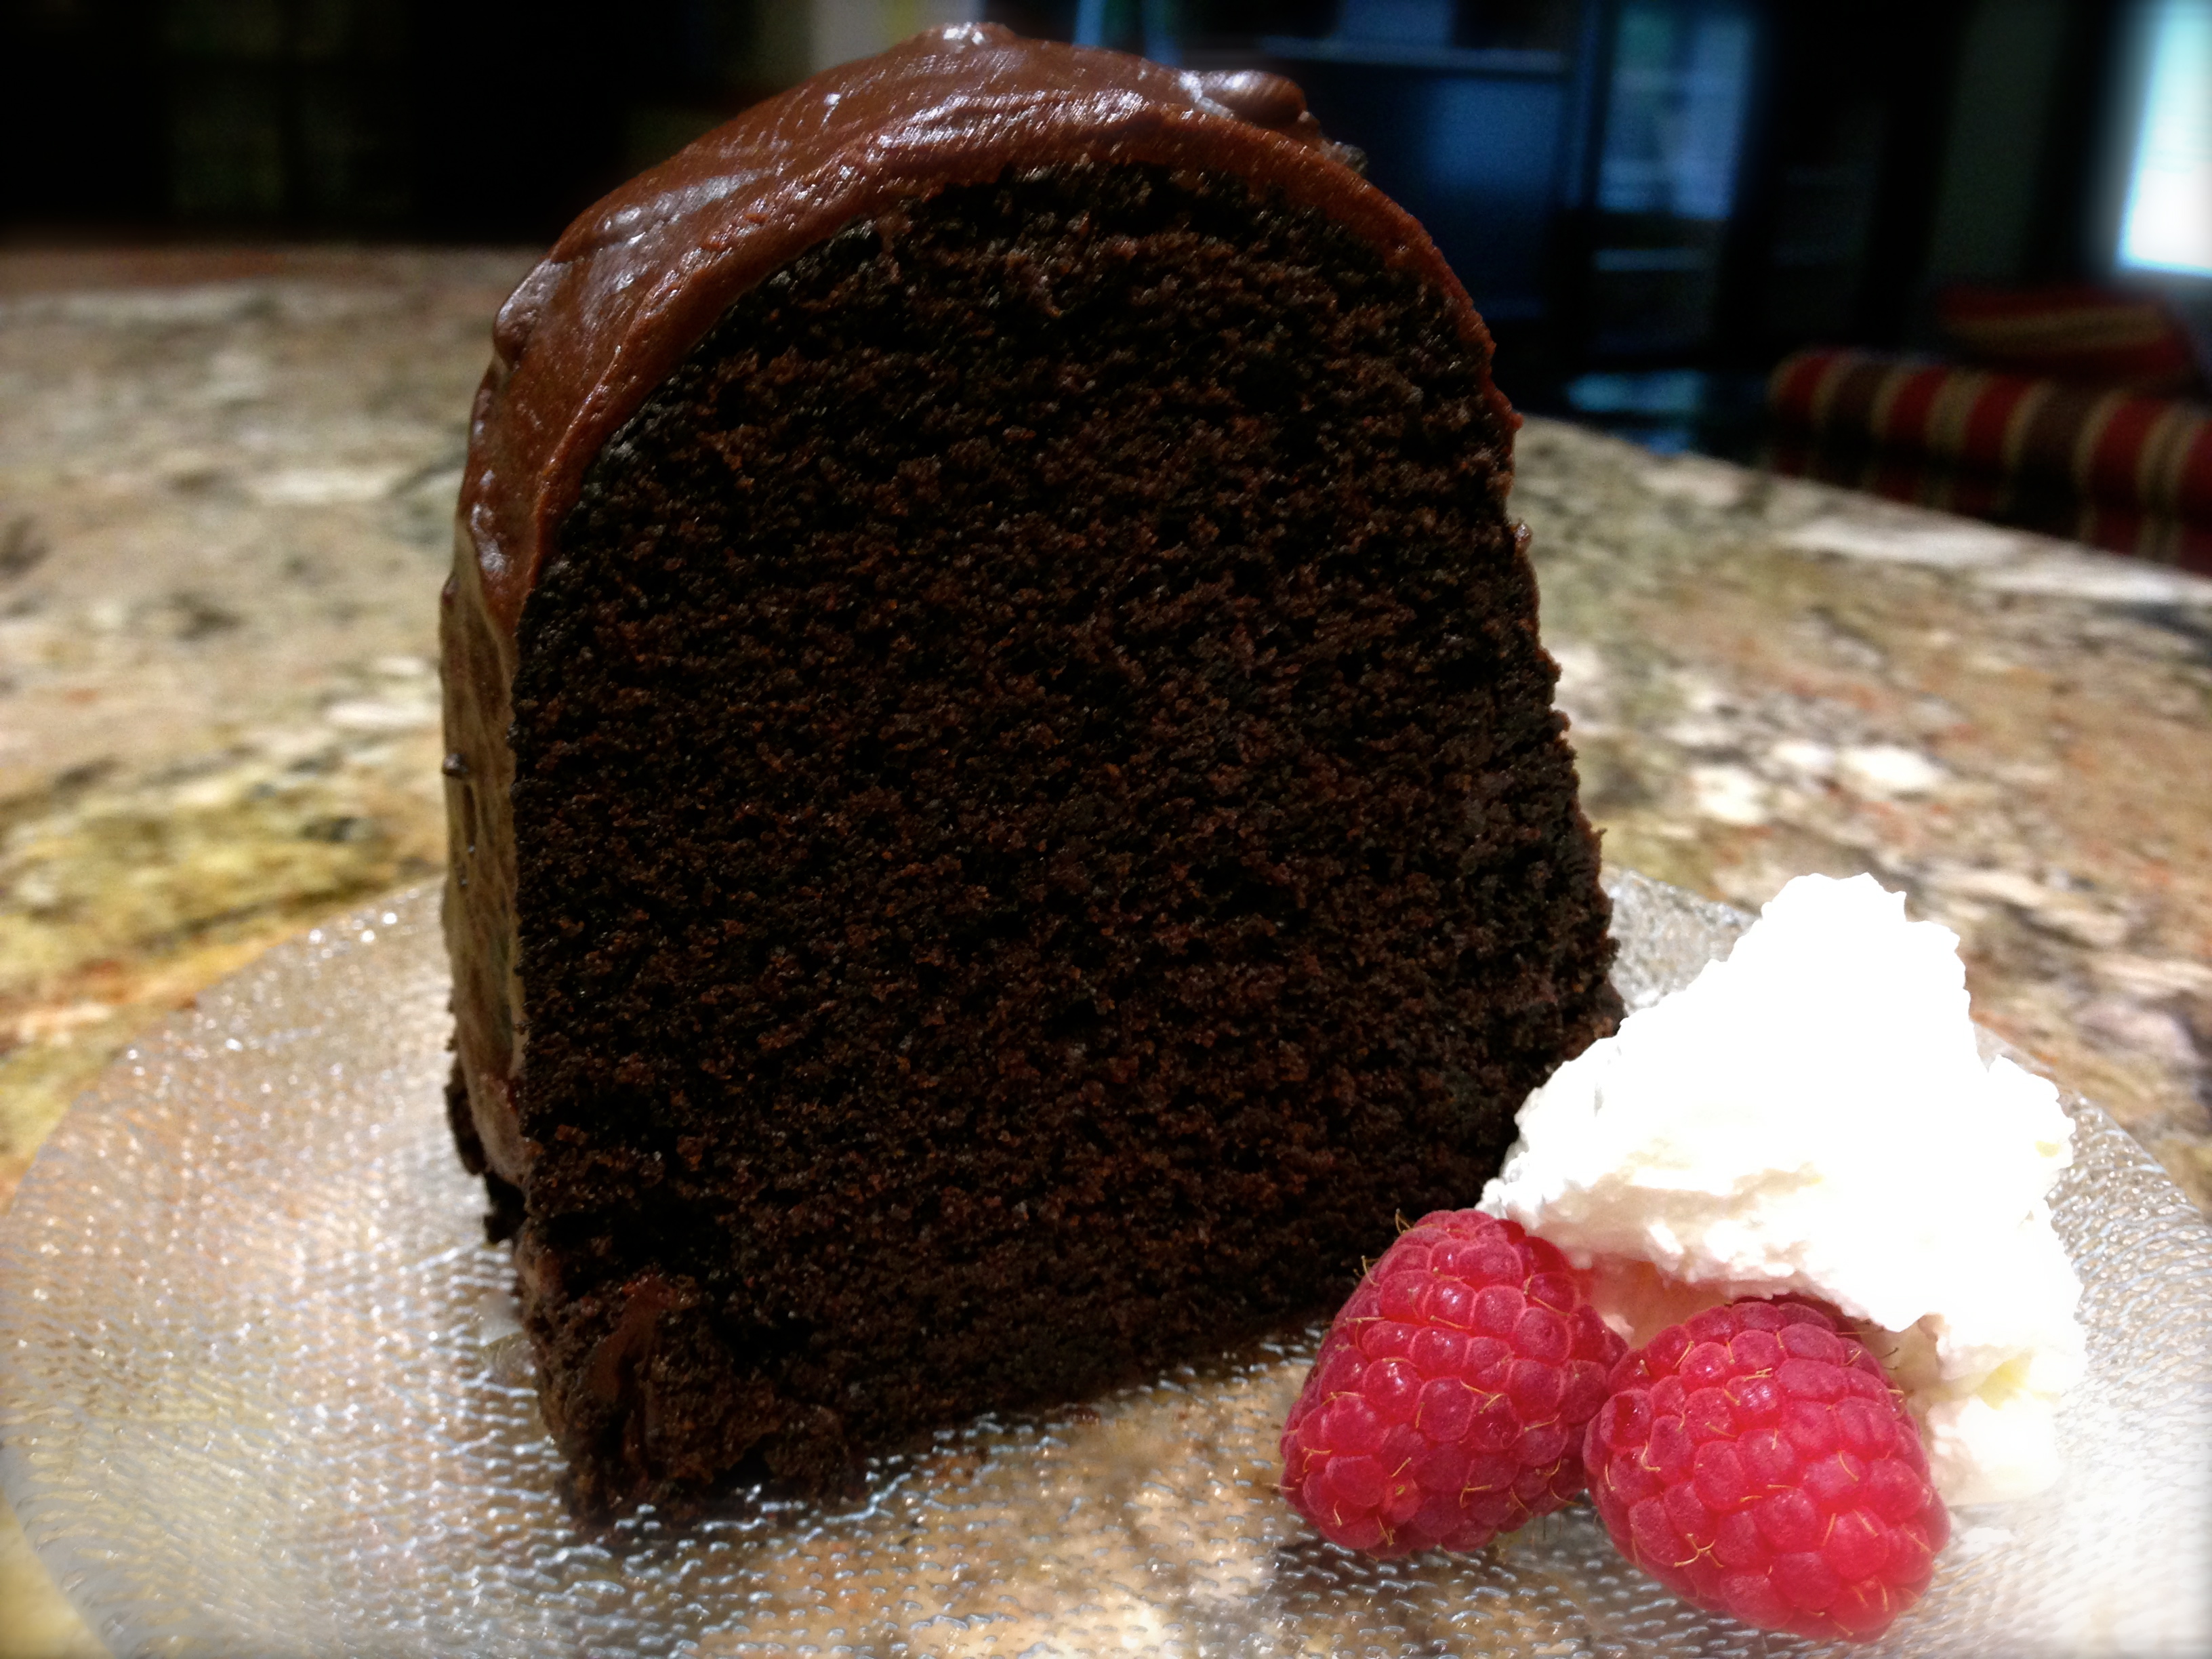
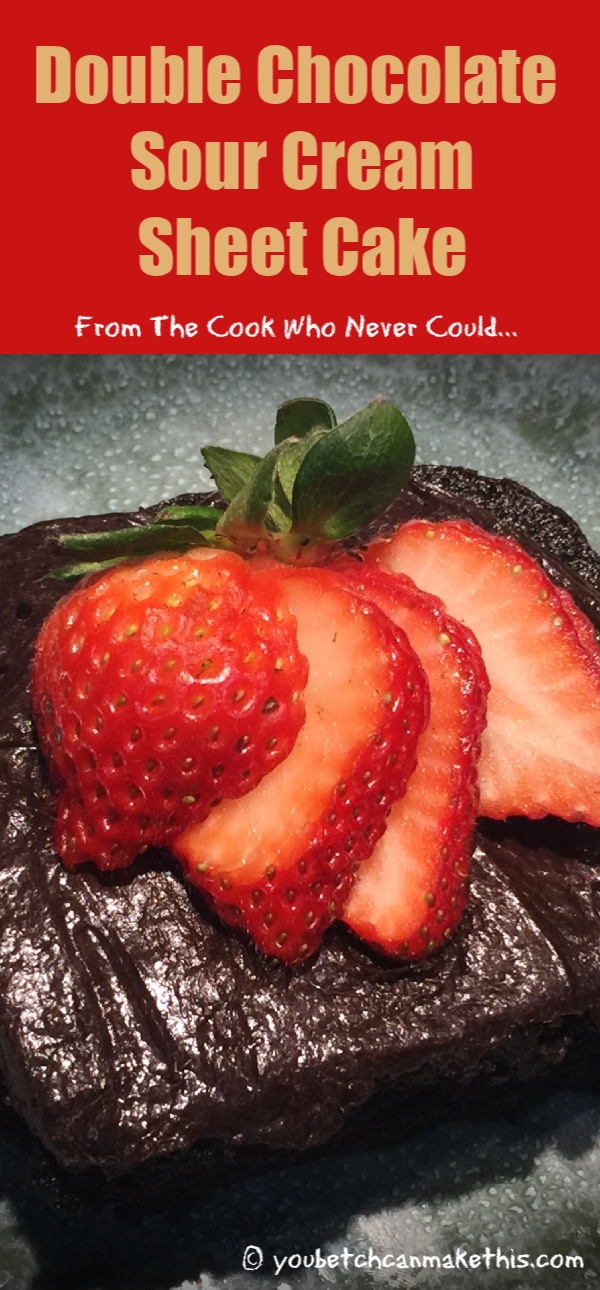
This is a great cake to make when you need something quick. It’s easy but totally decadent. You can serve it with sliced strawberries or if you really want to take it over the top add a little whipped cream or ice cream. This is a great cake to make for a party or just simply for the family. If you’re like me and want a go-to cake recipe, this is the one for you. Try it and tell me what you think…

Double Chocolate Sour Cream Sheet Cake...

  • Servings: 15
  • Difficulty: Easy
  • Print

INGREDIENTS

CAKE:

3/4 cup unsalted butter

2/3 cup dark cocoa powder

3/4 cup water

1 3/4 cups sugar

1 tsp. vanilla

2 eggs, room temperature

1 3/4 cups flour + 1 tsp.

1 1/4 tsp. baking soda (1 tsp. high altitude)

1/4 tsp. salt

3/4 cup sour cream

1 cup semi-sweet chocolate morsels

FROSTING:

6 Tbs. unsalted butter

1/4 cup dark cocoa powder

1 1/2 cups powdered sugar

2 – 3 Tbs. milk

Baking spray

DIRECTIONS:

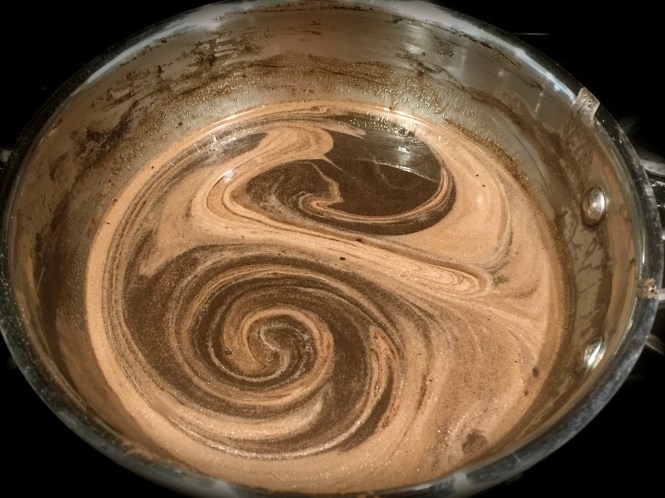
Preheat the oven to 350 degrees. Put the butter, cocoa and water into a medium size saucepan over medium heat and whisk until the cocoa is dissolved and the butter melted. Pour into a mixing bowl and let it cool slightly.

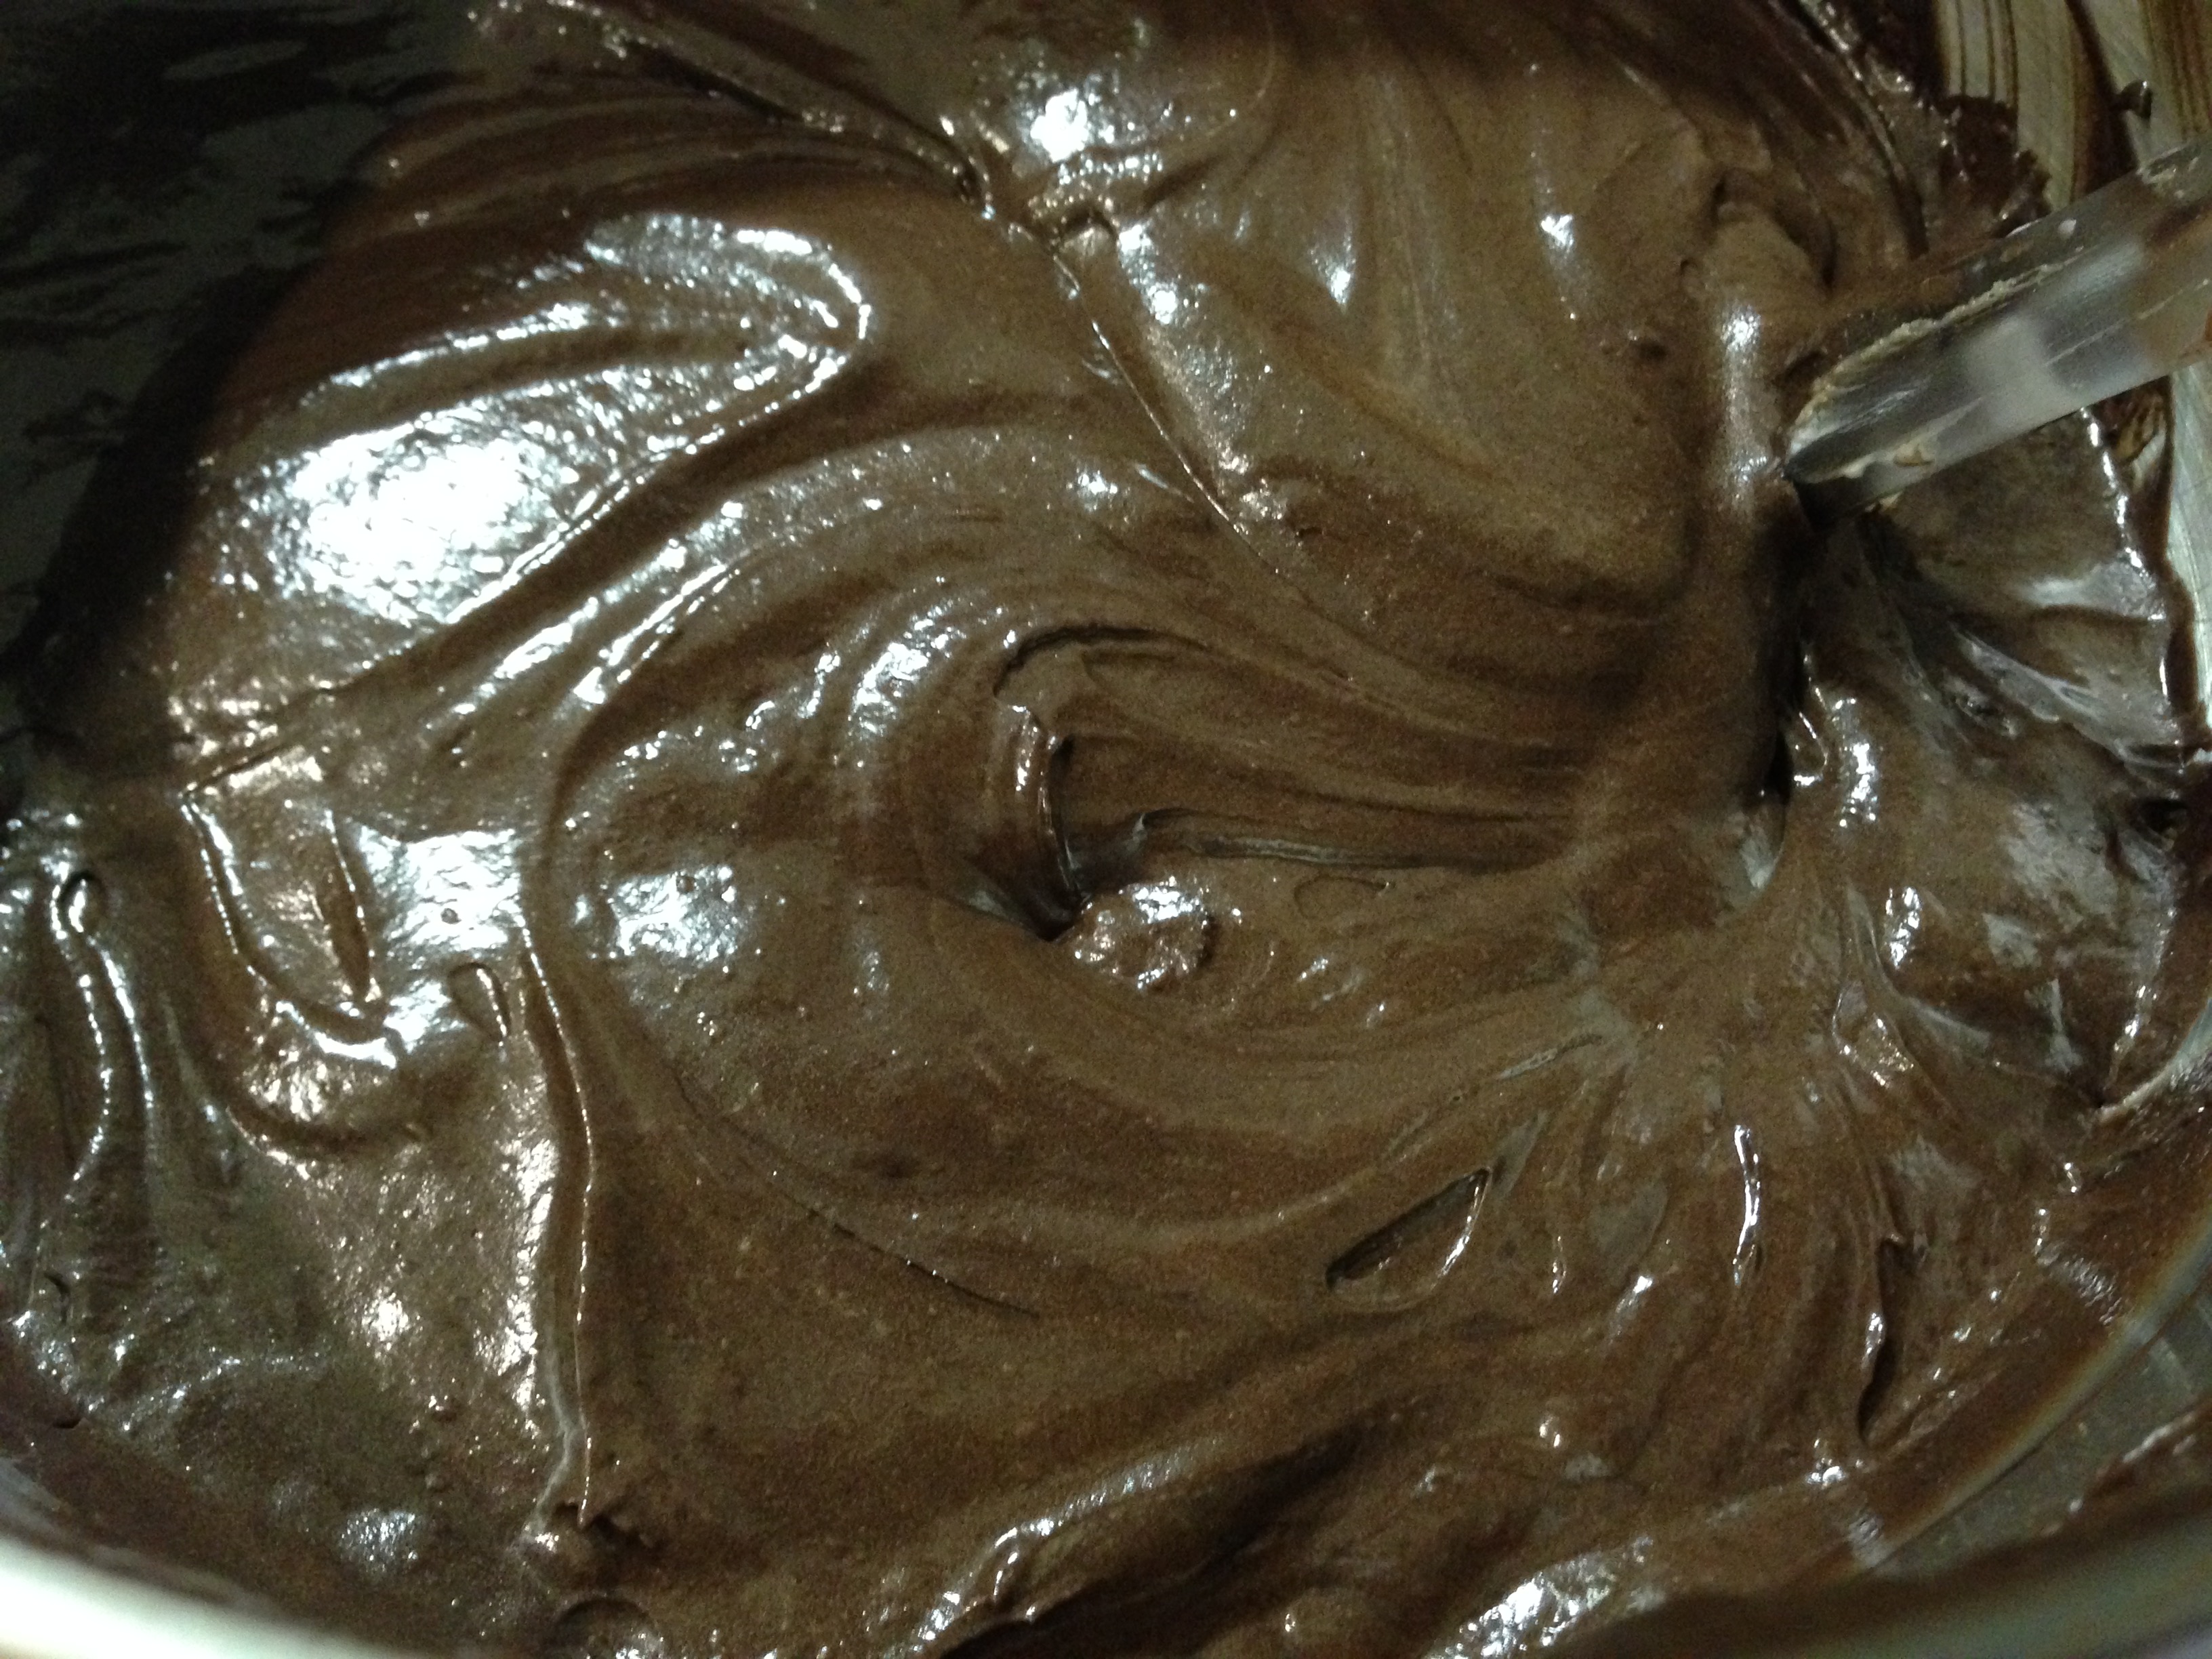
Once slightly cooled mix in the sugar, the eggs (one at a time) and the vanilla. In a small bowl combine the flour, baking soda and salt. With your mixer (you can use a hand mixer) on low beat in the flour mixture until combined. Do not over mix.

Fold in the sour cream and chocolate morsels by hand.

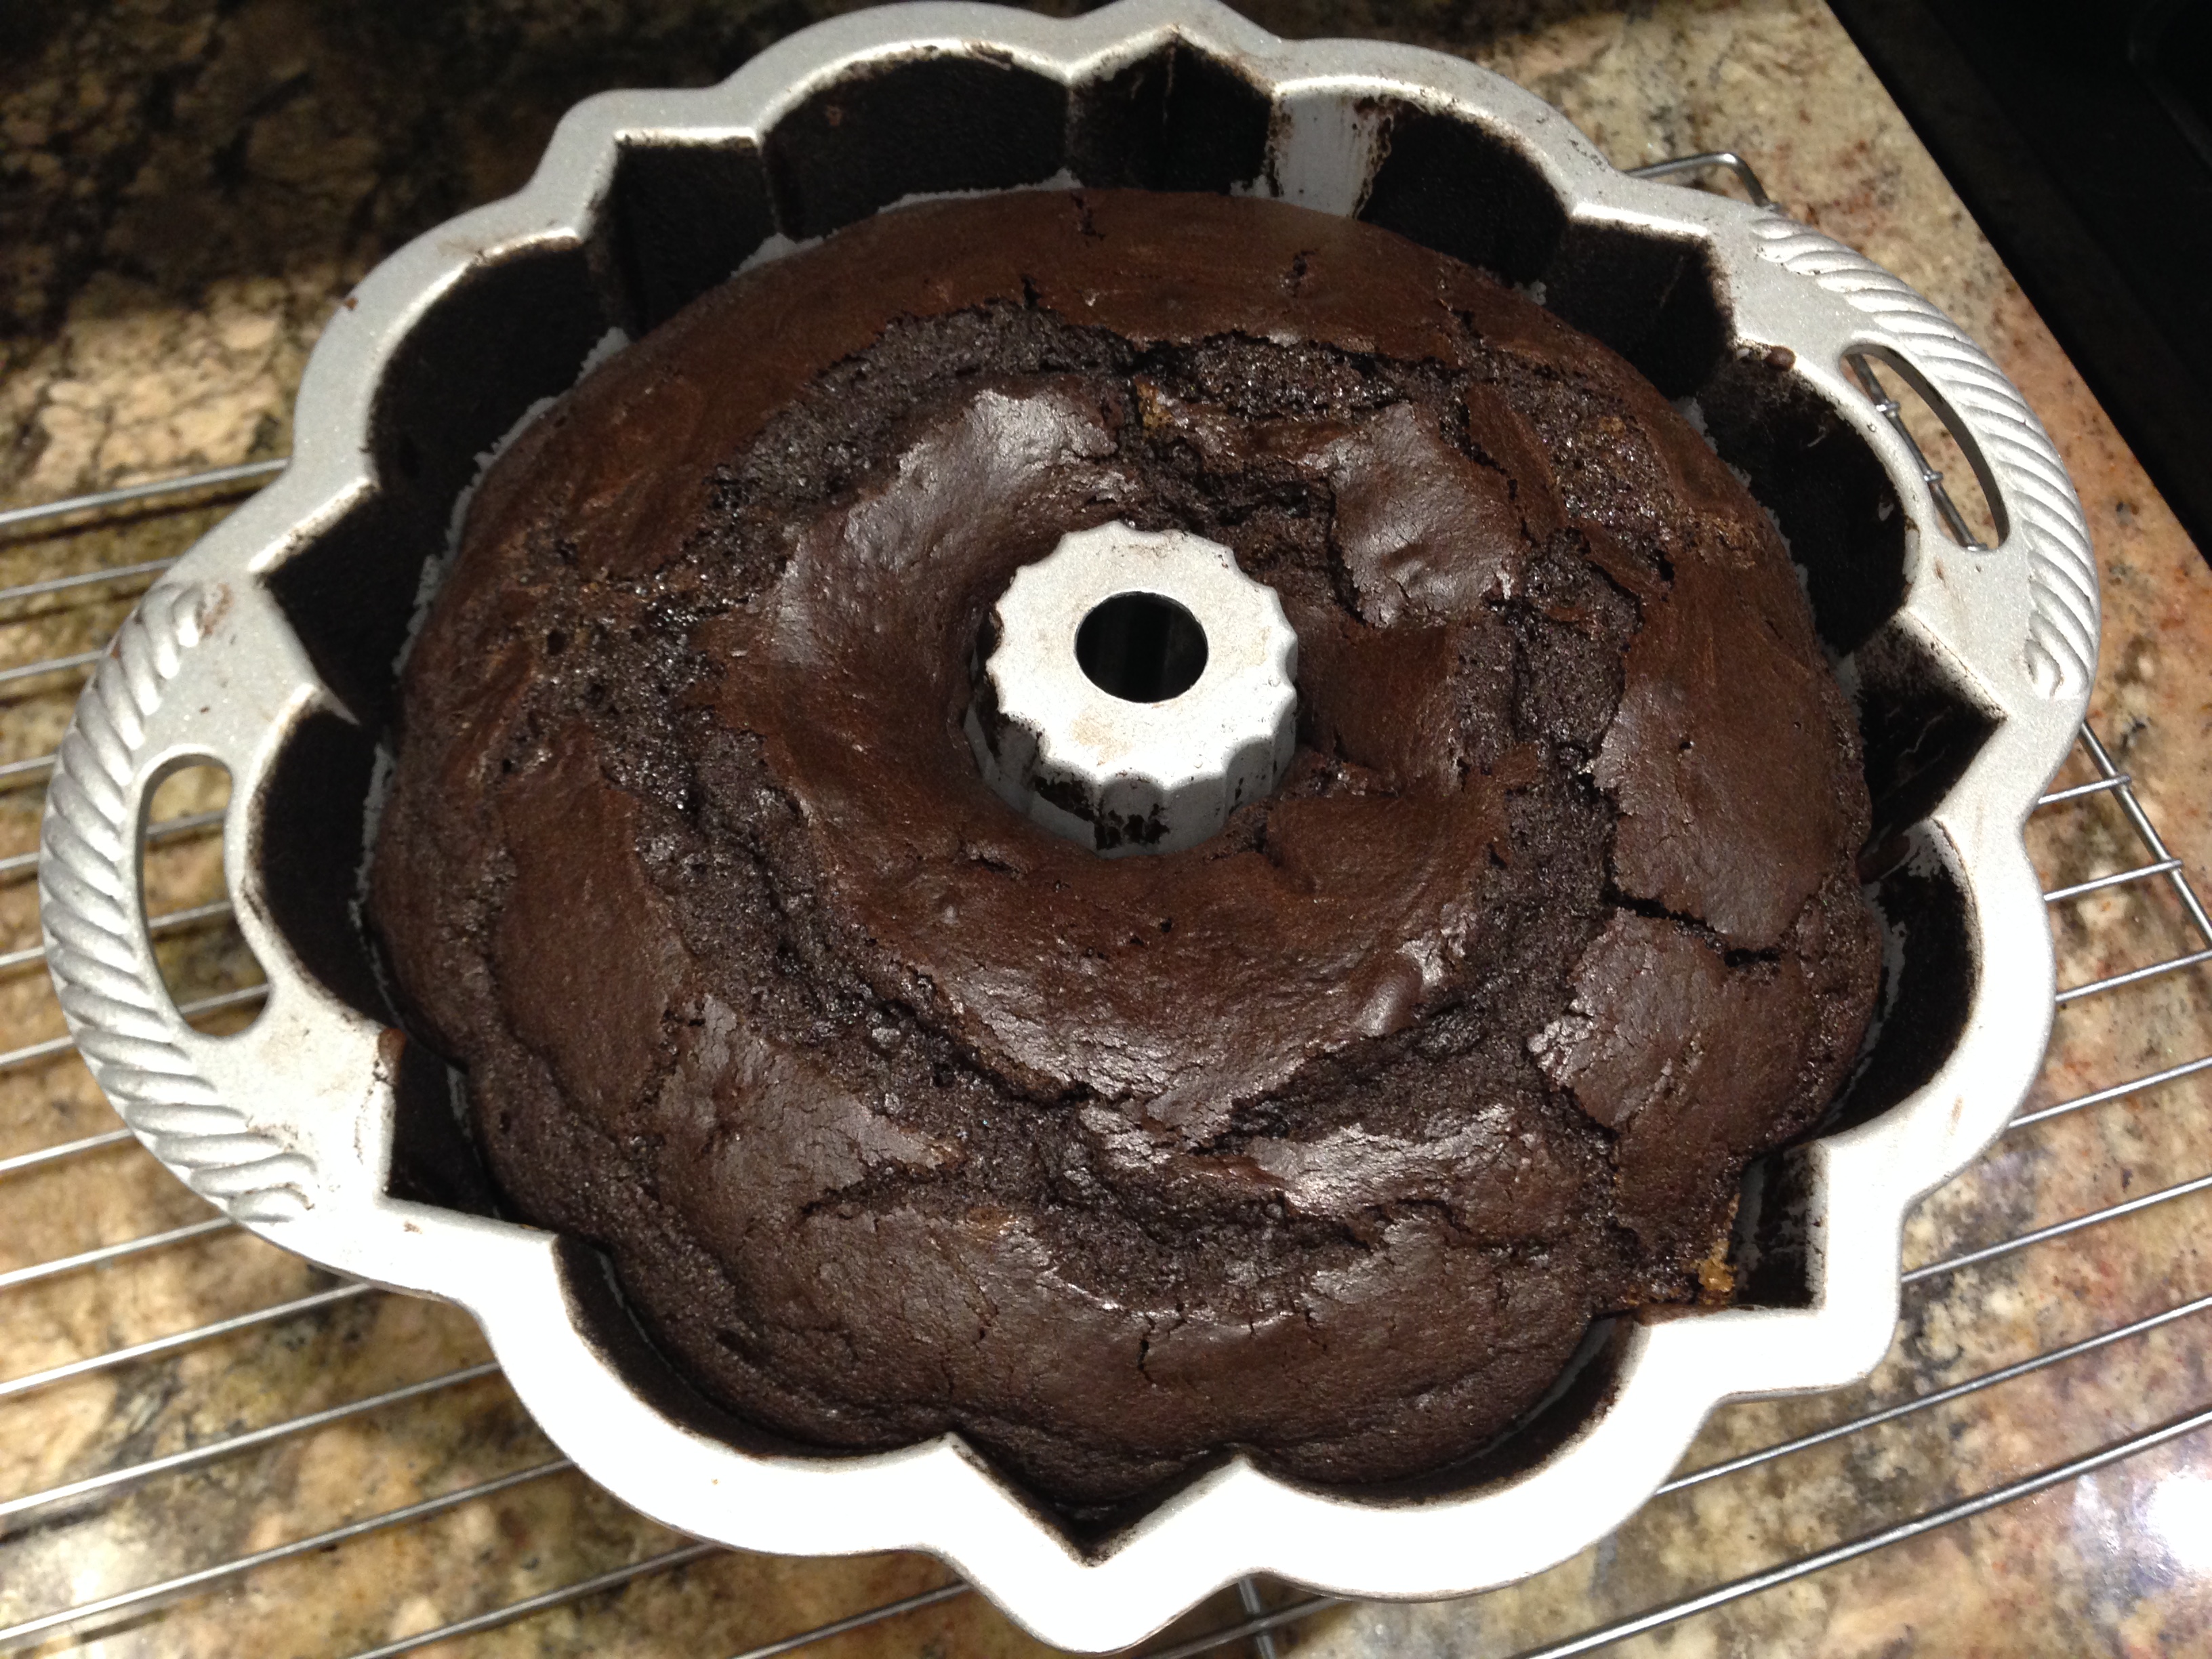
Spray a 9 x 13 pan with baking spray (the one with flour). Pour the batter into the prepared pan. Bake for 35 minutes (check the cake at 30 minutes). The cake is done when a toothpick inserted in the center comes out clean.

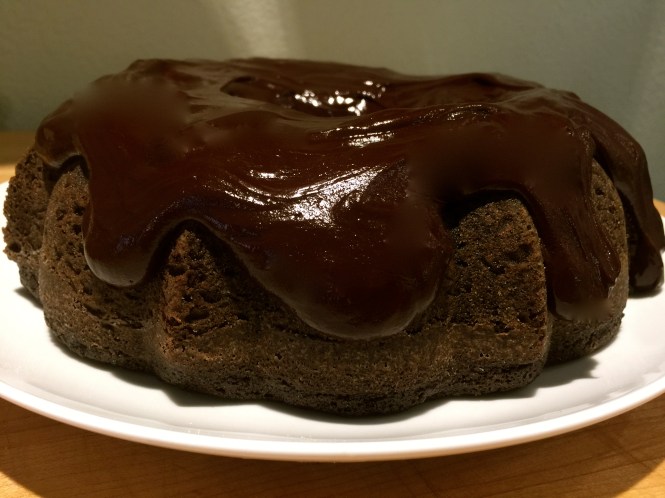
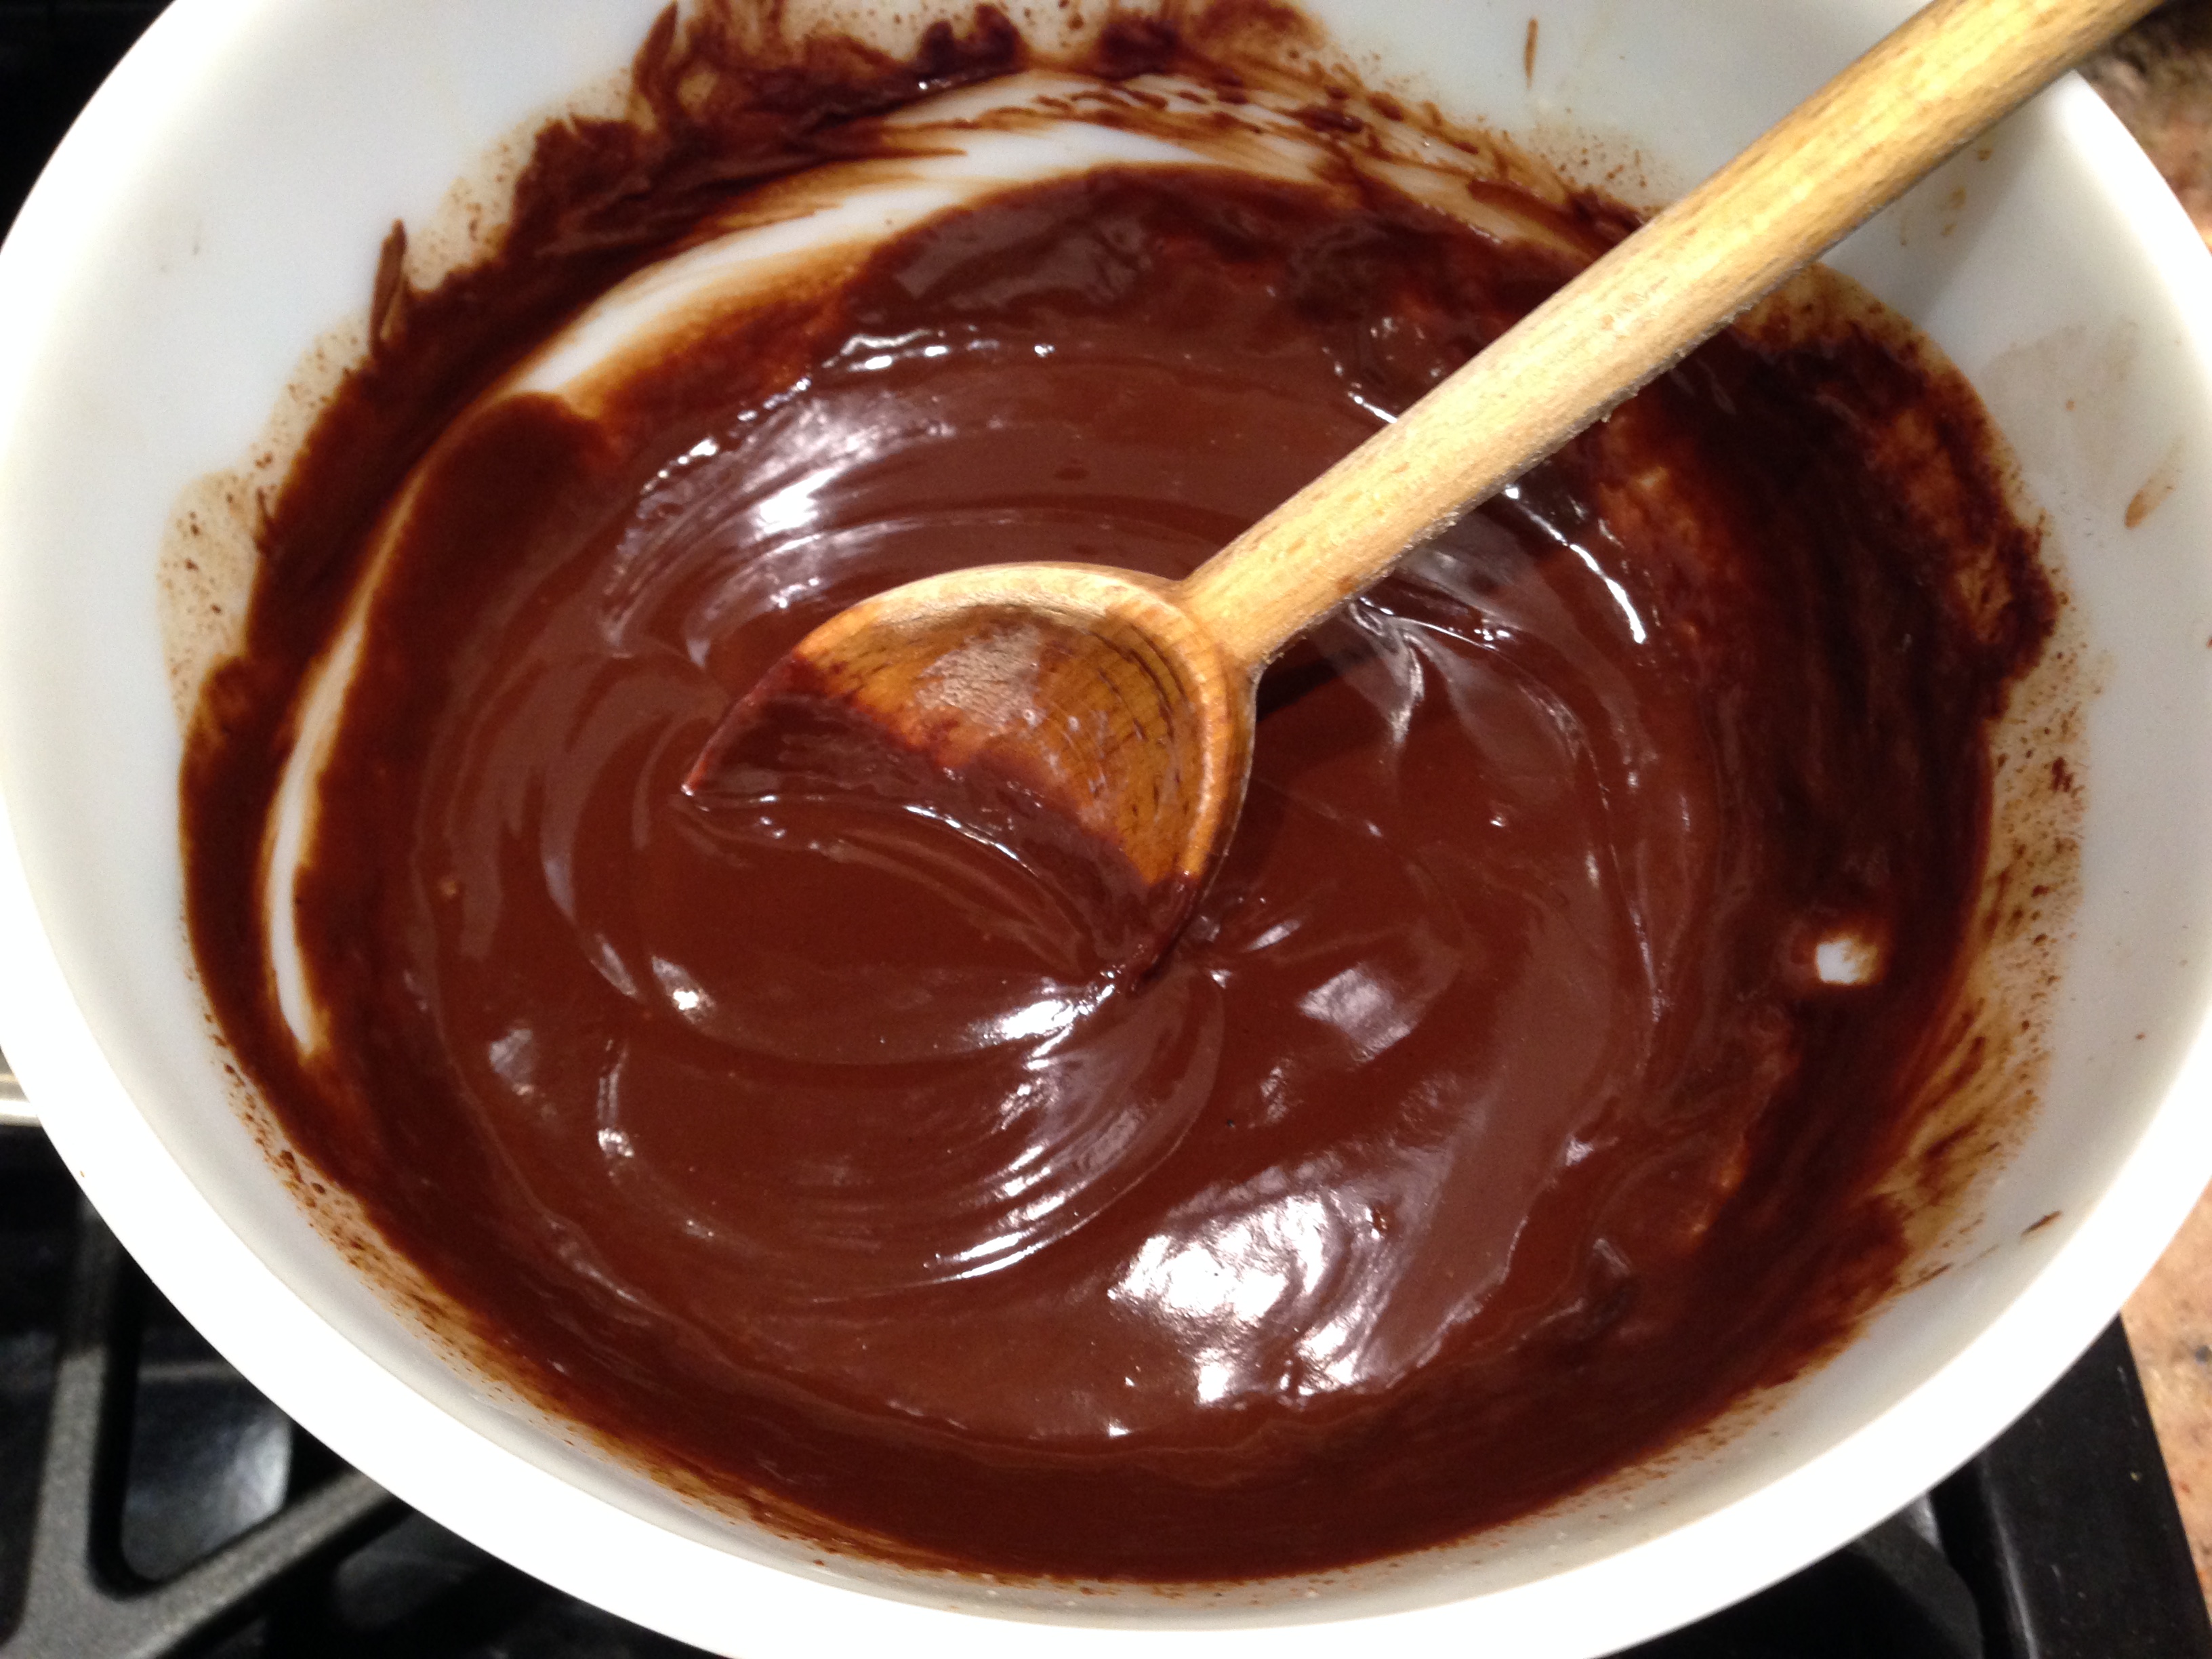
Frosting: In a small saucepan melt together the cocoa powder and butter. Pour the mixture into a small bowl and let it cool slightly. Beat in the powdered sugar 1/2 cup at a time, alternating with a tablespoon of milk until the desired consistency is reached. Frost the cooled cake.


Easy Chocolate Ganache…

My husband has an incurable sweet tooth. The other day he informed me we had nothing sweet in the house to eat and I was not in the mood to whip up something from scratch. I looked in the pantry and found a box of Duncan Hines decadent chocolate cake mix and told him I would make that. Unfortunately I opened my mouth before carefully reading the outside of the box. Staring me right in the face in clear letters on the front of the box were the words “frosting not included”. Now what… Luckily I thought I might have the ingredients for making chocolate ganache (which I did) so I thought ok, now’s the time to tackle your fears and make it. I had not other choice.

I’m not quite sure why I was afraid to make ganache but I always thought it was difficult and tricky. To my surprise it was unbelievably easy. So I thought I would dedicate this blog to a very simple way of making ganache that turns out silky, luscious and ever so decadent looking, not to mention absolutely incredibly delicious.

So let’s talk making chocolate ganache…

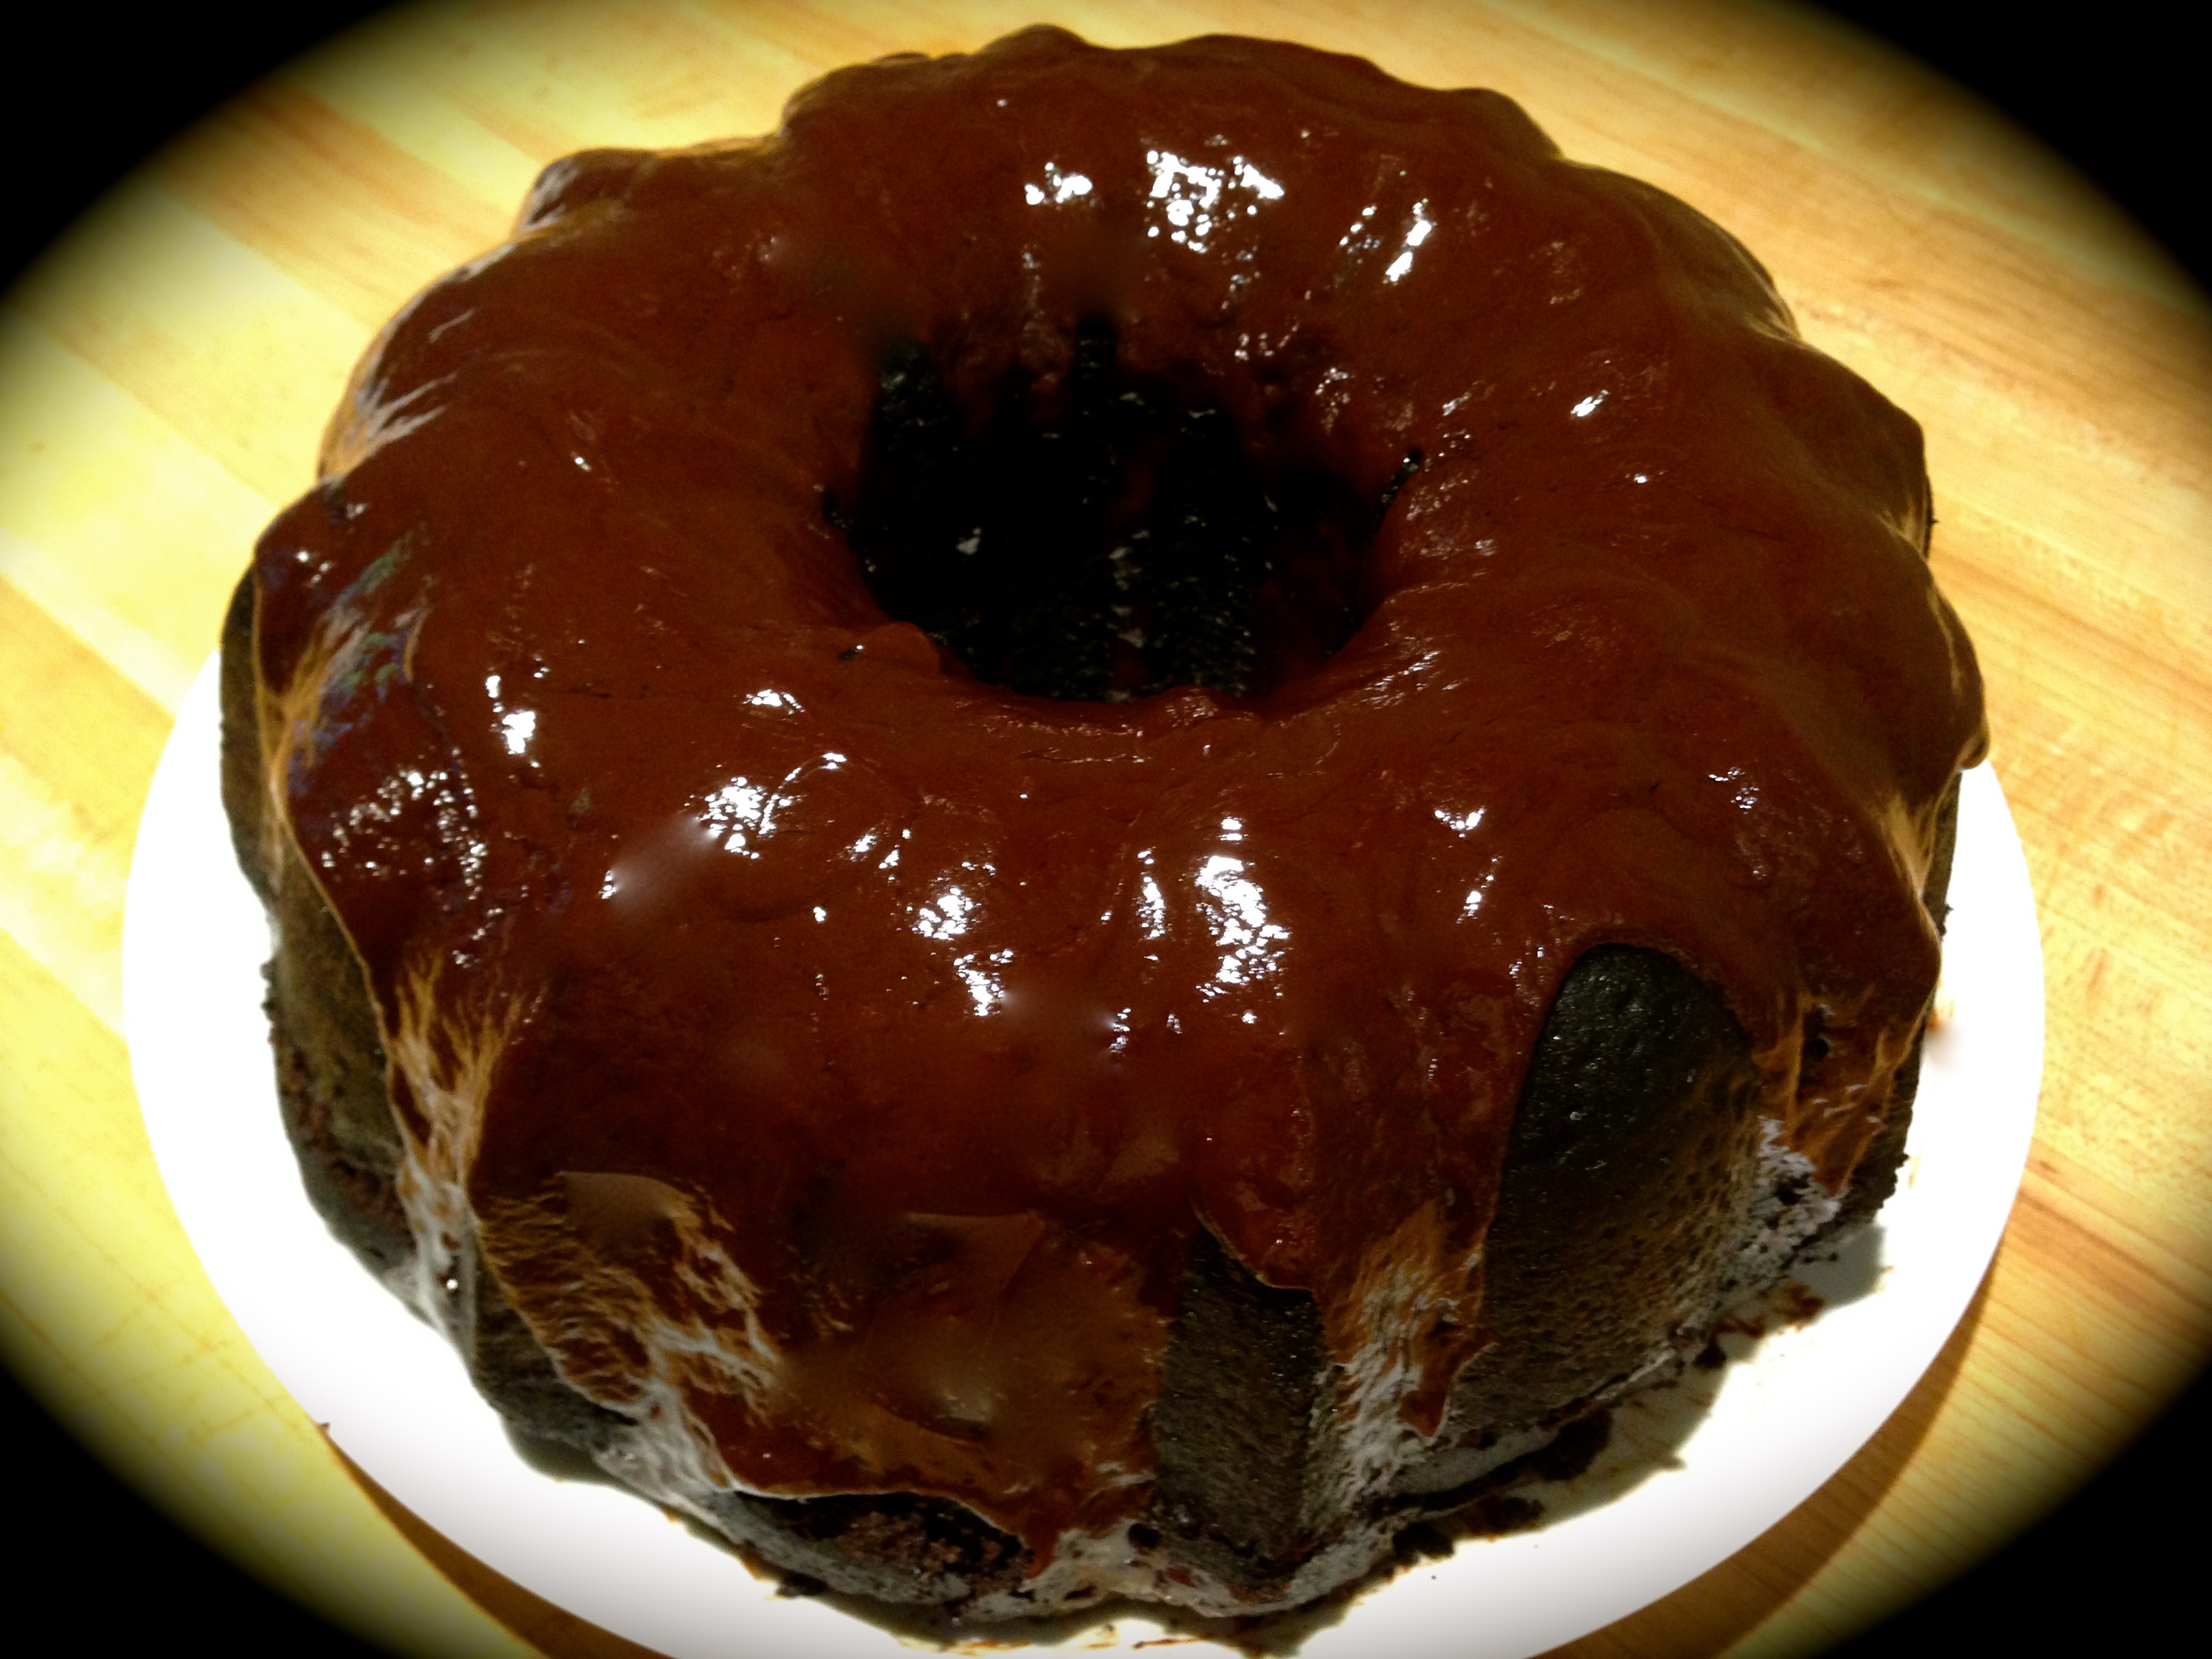
Lesson Learned 1 – There are many ways to make ganache: I am going to share with you the simplest way. The ratio is easy to remember 1:1. Use as many ounces of heavy cream as semi-sweet chocolate. It couldn’t be easier.

Lesson Learned 2 – Cut the chocolate squares into very small pieces: I used a 4 ounce box of Bakers semi-sweet chocolate. With my chef’s knife I cut off pieces and chopped them into small bits. If you decide to go the chip route, I would use the mini semi-sweet chips. You need the hot cream to melt the chocolate and if the pieces are too big that won’t happen.

Chocolate Covered In Hot Heavy Cream

Lesson Learned 2 – You can warm your heavy cream in the microwave: In order to get the desired consistency of the ganache, the cream has to melt the chocolate. So you have to get the cream hot enough to do that but you don’t want to scald the cream. That won’t work either.

Many recipes that I looked at recommended warming the cream on the stove. You can certainly do that especially since it gives you slightly more control in determining when the cream is hot enough. And you can certainly do that with this recipe, although I didn’t. I heated my cream (4 ounces) in the microwave for 45 seconds. After that time I found it still wasn’t hot enough. I heated it for an additional 15 seconds and it was bubbling. I was worried that I’d scalded the cream but I think what happened was the cream had just started to bubble, so I was still ok. The next time I think I’ll just nuke it for 50 seconds straight and go from there.

If you use a larger 1:1 ratio you will need to nuke the cream for a longer period of time. With this you’ll simply have to keep checking it. With 4 ounces I recommend 50 seconds. For larger amounts I would start checking at 1 minute and go from there.

Lesson Learned 3 – Let the chocolate and heavy cream sit for at least 3 minutes: Once you add the hot heavy cream you may be tempted to start whisking the mixture right away. Don’t. The cream has to melt the chocolate in order for you to get the desired consistency of the ganache. Be patient and let the cream do it’s work. I guarantee you it’s worth it.

This recipe makes enough to generously frost one bundt cake, one 9 x 13 sheet cake or one 9 inch round layer cake. So next time you need some frosting try this instead of buying the canned stuff. It looks impressive and it tastes divine!

Easy Chocolate Ganache...

  • Servings: 1 Bundt Cake
  • Difficulty: Easy
  • Print

INGREDIENTS:

4 ounces semi-sweet chocolate squares cut into small pieces

4 ounces heavy cream, heated

DIRECTIONS

Chop up the chocolate into very small pieces. Heat the heavy cream in a microwave safe dish for approximately 50 seconds. Test with your finger to make sure it is sufficiently hot to melt the chocolate. If not, microwave at additional 5 second intervals until cream is hot but not scalded.

Pour cream over chocolate pieces. Let the hot mixture sit for at least 3 minutes. Whisk mixture until cream is incorporated and the chocolate is dark and smooth. Drizzle the chocolate over the top of your bundt cake. Let ganache set for at least 15 minutes before serving.


SaveSave

SaveSave

SaveSave

SaveSave

SaveSave

SaveSave

SaveSave

SaveSave

SaveSave

SaveSave

SaveSave

SaveSave

SaveSave

SaveSave

SaveSave

SaveSave

SaveSave

SaveSave

SaveSave

Chocolate Cherry Cream Cheese Cake…

What can I say about this one. It is simply over the top. Not only does it taste divine but it’s gorgeous. What more can you ask for from a cake? Now I’ll admit this cake takes a little more work than most but the result is breathtaking. This is possibly the most professional looking cake I’ve ever made. And we know looks are important but bottom line it has to taste good. Well let me tell you in the taste department I would consider this to be divine. I mean what’s not to love – chocolate, flavorful cream cheese, cherry pie filling, vanilla glaze – it just doesn’t get much better than that.

So let’s talk chocolate cherry cream cheese cake…

Lesson Learned 1 – Be organized when you make this cake: Really you should be organized when you make any cake but this one has so many components to it that your experience making it will be so much more delightful if you plan this out before you make it. Think about this one in stages.

  1. Get everything out in plenty of time that needs to be room temperature. In this recipe that means the eggs and sour cream. No need to worry about the butter because you melt that.
  2. Get the oven preheating. I believe it is better for your oven not only to be preheated but to be at the desired temperature for at least 5-10 minutes so that once you pop the cake pan in you can count on the oven truly being the correct temperature all throughout.
  3. Put together the dry ingredients (flour, sugar, kosher salt and baking soda) and set them aside.
  4. Measure out all of the remaining ingredients. I use little bowls to organize what needs to be measured. That way when you come to a certain juncture in the process you are all ready to go. This includes opening up the can of cherry pie filling and measuring out the amount needed. As you do that, try to opt for more cherries than filling as some fillings tend to be more juice and less cherries.
  5. Count out, drain and rinse your maraschino cherries. For my pan I needed 16 cherries, so a small jar of cherries will work just fine.
  6. Assemble the chocolate mixture.
  7. Make the batter by combining the chocolate mixture with the dry ingredients. Now you’re ready to go.
  8. Wait to spray your bundt pan until the very end. For this recipe I recommend using a baking spray with flour. Coat the bundt pan liberally. You want it to be glistening all over before you begin assembling the cake.

Because there are so many components to this recipe I guarantee you will be a lot happier and have more fun making this cake if you organize yourself.

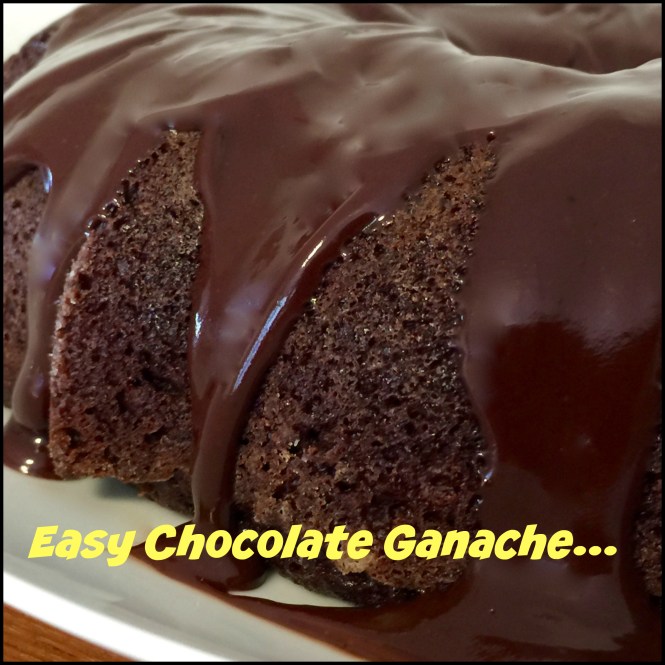
Lesson Learned 2 – Making the glaze: Making glaze for any type of cake or pastry couldn’t be easier. All it requires is some confectioners sugar, some liquid and perhaps some sort of additional flavoring. You can use water, milk, or heavy cream for your liquid and you can use a little extract, juice or zest to enhance the flavor of the glaze. More often than not I use milk as the liquid and in this particular recipe I used a little vanilla extract to enhance the flavor.

Keep in mind you need very little liquid to create a glaze. Normally it works out to about 1 cup of confectioners sugar to about a tablespoon or so of liquid and then, if using a liquid extract, only about 1/8 teaspoon of that. But don’t get bogged down in the measurements. If your glaze is too thick just add a little more liquid to thin it out. If it becomes too runny, add a little more confectioners sugar. Glaze is very forgiving and can be made to the correct consistency with some easy minor adjustments.

One caveat – don’t use the additional flavoring to thin out a glaze. The flavor can become overpowering if you do that. And lastly, I don’t always have heavy cream around the house, but when I do I use it as my liquid. That is when you get the richest flavor. I just can’t convince myself to buy a pint of heavy cream for the needed tablespoon I will use in a glaze. But it’s all up to you.

This cake is so good and so worth the effort. Try it – I just know you will like it!

Chocolate Cherry Cream Cheese Cake...

  • Servings: 12-14
  • Difficulty: Medium
  • Print

INGREDIENTS:

2 cups flour

1 1/2 cups sugar

1 tsp. kosher salt

1 tsp. baking soda

1 cup water

3/4 cup unsalted butter, melted

1/3 cup cocoa powder

1 Tbs. espresso powder

3/4 cup bittersweet chocolate chips

1/2 cup sour cream, room temperature

2 eggs, room temperature, slightly beaten

1 tsp. vanilla extract

1 1/2 tsp unsalted butter, melted

1 Tbsp. brown sugar

16 maraschino cherries, rinsed and drained

3/4 cup cherry pie filling

CREAM CHEESE FILLING:

2 – 8oz. packages cream cheese, softened

1/2 cup + 2 Tbsp. sugar

1 tsp. vanilla extract

3 Tbs. flour

1 egg, room temperature

GLAZE:

1 cup confectioners sugar

1 – 2 Tbs. water, milk or heavy cream

1/8 tsp. vanilla

DIRECTIONS:

Preheat oven to 350 degrees. Make the cream cheese filling by beating together the cream cheese, sugar and vanilla until fluffy. Add the flour and egg and beat until smooth. Set aside.

In a large bowl combine the flour, sugar, salt and baking soda. Whisk until thoroughly blended. Set aside.

In a saucepan melt the 3/4 cup butter. Add the water and stir to blend. Add the cocoa and espresso powder and whisk until there are not lumps. Add the chips and stir until they are completely melted and the mixture is smooth.

Add the chocolate mixture to the dry mixture and whisk until combined. Blend in the sour cream. Add the eggs and vanilla and mix until combined.

Spray a 10-12 cup bundt pan thoroughly with baking spray with flour. Melt the 1 1/2 tsp of butter and pour it evenly into the bottom of the pan. Evenly sprinkle the brown sugar on top of the melted butter. Place two cherries on top of the brown sugar in each of the larger grooves of the bundt pan.

Fill the bundt pan with half the chocolate batter. Spoon in the cream cheese filling on top making sure not to have the filling touch the sides. Spoon the cherry pie filling on top of the cream cheese, making sure the filling does not touch the sides of the pan. (You may have some leftover cream cheese and cherry pie filling). Pour the remaining batter evenly on top making sure to cover the cream cheese and the cherry pie filling completely.

Bake for 50-60 minutes or until a toothpick inserted in the center comes out clean. Cool the cake in the pan on a wire rack for 10 minutes. Put a plate over the bottom of the pan and flip the cake out of the pan onto the plate and let cool completely.

Mix together all of the ingredients for the glaze. Drizzle the glaze over the cooled cake.

Pour the melted butter evenly over the bottom

Put the brown sugar on top of the butter

Place the cherries in the larger grooves

Layer the ingredients

The cake right out of the oven

SaveSave

SaveSave

SaveSave

SaveSave

SaveSave

SaveSave

SaveSave

SaveSave

SaveSave

SaveSave

SaveSave

SaveSave

SaveSave

SaveSave

SaveSave

SaveSave

SaveSave

SaveSave

SaveSave

SaveSave

SaveSave

SaveSave

SaveSave

SaveSave

SaveSave

SaveSave

SaveSave

SaveSave

SaveSave

Chocolate Peanut Butter Fudge…

I made this fudge over the holidays. Having never made fudge before I wasn’t quite sure what to expect. It was unbelievably easy and so delicious. As a matter of fact it was so good that my husband jokingly gave strict orders as to how much of it I could give away as gifts.

Probably the hardest part of this recipe is mixing together the chocolate and peanut butter mixtures but for something so pleasing to the eye and so yummy this couldn’t be simpler. So let’s talk chocolate peanut butter fudge…

Lesson Learned 1 – Of the two mixtures, the peanut butter one is a little trickier to handle: The peanut butter chip and condensed milk mixture takes a little longer to prepare and it’s much thicker than the chocolate mixture.  As seen in the pictures below, the peanut butter part of the fudge gets quite thick before you even work to combine it with the chocolate. The key to working with the peanut butter mixture is to keep it as warm as possible when you combine it with the chocolate mixture and begin to swirl both together. The warmer that mixture the easier the swirling will be.

thickened peanut butter mixture

ingredients for peanut butter mixture

Lesson Learned 2 – The peanut butter mixture should act as your base: You will need to work with the peanut butter mixture first. Make sure the large dollops of the mixture cover most of the bottom of the pan. The chocolate mixture is not as thick and will not serve as a good base for the fudge. Below is an example of how you should distribute the mixtures in preparation for swirling them.

Peanut butter and chocolate dollops

The next time I make this fudge I will make sure the peanut butter mixture is a more equally distributed. As you can see I had more at the bottom of the pan than the top. I needed to make the spaces in between the peanut butter dollops a little tighter but even so, I am being a perfectionist here. My fudge turned out wonderfully even with the distribution of the mixtures the way it was in this picture.

Lesson Learned 3 – Lining your pan with parchment paper: When you are preparing the fudge the ingredients are messy and sticky. You need to put the ingredients in a pan that is lined with parchment paper both on the bottom and up the sides. That way the fudge won’t stick and can be removed from the pan easily when done. Let me clue you in. Parchment paper has a mind of its own and even though you may tear off enough to line the pan it won’t easily stay in place on its own. It needs a little encouragement. A little trick I learned is to take some cans you have in your pantry, like soup or veggies, and place them on top of the parchment paper while preparing the fudge ingredients (as pictured below)…

cans in the pan

The weight of the cans holds the parchment paper down in the shape you need it to be. By doing this, when it comes time to add the ingredients to the pan just remove the cans and the parchment paper will be hold the shape of the pan and be easy to handle.

Lesson Learned 4 – For the best looking results don’t over combine the two mixtures: This is a very tasty fudge and part of the fun is to make it look inviting as well. By not over combining you let the beauty of both ingredients compliment each other and clearly shine through.

This recipe is so easy and the end result is divine. I hope you enjoy it!

Chocolate Peanut Butter Fudge

  • Servings: Approximately 25 Pieces
  • Difficulty: Easy
  • Print

INGREDIENTS:

Chocolate Peanut Butter Fudge1/2 cup semi sweet chocolate chips

1 14 oz. can sweetened condensed milk, divided

1/2 stick of butter cut into Tbs. size cubes

1 10 oz. bag of peanut butter chips

1/8 tsp. salt

DIRECTIONS:

Line an 8 inch square baking pan with parchment paper.

Melt the chocolate chips with 1/4 cup condensed milk and 1 Tbs. of butter over low heat stirring consistently until well combined, approximately 3 minutes. Turn off the heat, cover and keep warm.

In another pan melt the peanut butter chips, remaining condensed milk 3 Tbs. butter and salt. Stir constantly until smooth, approximately 5 minutes.

While still warm dollop large mounds of the peanut butter mixture all throughout the bottom of the prepared pan. Add small dollops of the chocolate mixture in several places on top. Combine both by swirling them together with a knife. Chill the fudge uncovered for at least an hour.

Take the fudge out of the pan by lifting up on the sides of the parchment paper and pulling it up. Peel away the parchment paper and cut the fudge into 1 inch squares.

Before Chilling The Fudge

Before Chilling The Fudge

 Chocolate Peanut Butter Fudge

Chocolate Peanut Butter Fudge

Chocolate Sour Cream Cake…

Sometimes when you’re grumpy the only thing that will bring you out of it is chocolate. Such was the case with me this week. For some reason I’ve had a major grump on lately and so finally I decided to do something about it – hence this recipe.

I’m a big fan of chocolate cake but I’m not a big fan of overly sweet chocolate cake. I find the cake mixes you buy in the grocery stores are borderline sickeningly sweet so I prefer to make homemade. This cake is full of chocolate flavor and not overly sweet. The flavor and texture remind me of a flourless chocolate cake. This cake is so good that once my husband and I took a bite of it we both agreed I needed to bring it to work otherwise we knew we would devour the whole thing in short measure all by ourselves. Better to let my co-workers devour it. And devour it they did.

So let’s talk chocolate sour cream cake…

Lesson Learned 1 – I found a neat trick for flouring a bundt pan: I don’t know about you, but I’ve always struggled with flouring a bundt pan once I’ve greased it. And especially with bundt pans, you need to make sure that the grease and flour hug every curve of the pan otherwise you’ll never get your cake out. I used to put flour in the pan and then stand over the garbage can and rotate it while tapping the sides. I knew I had to get the flour all the way to the top of the pan and I didn’t want to get flour all over the floor.

Then I read somewhere  an easier way to flour a bundt pan. Once you grease the pan and add some flour to it, cover the pan with plastic wrap. Then you can tap away to your heart’s content, get all of the sides floured and not worry about making a big mess. It was so much easier flouring the pan this way.

Lesson Learned 2 – The chocolate mixture will be thin and runny: This recipe calls for cooking the butter, cocoa powder and salt with some water. This combination makes a very runny mixture as evidenced in the picture below. Don’t worry about that. I found that providing the chocolate component to the recipe this way resulted in a somewhat thinner batter but an extremely moist cake. People were gushing as to how moist this cake is.

IMG_0165

Lesson Learned 3 – This cake does not rise a lot so use a smaller bundt pan if you want a taller cake: I used a 12 cup bundt pan and the cake was a nice size but not as tall as some bundt cakes I’ve made in the past. The only leavening you use in this recipe is 1 teaspoon of baking soda so the cake does not rise very high. The cake was still super moist and I preferred this portion size, but if you’re a fan of a taller bundt cake you can use a 10 cup pan to achieve that effect.

IMG_0284

Lesson Learned 4 – The frosting in this recipe is to die for: I approached the frosting differently and was genuinely pleased in both the flavor and consistency. The frosting in not overly sweet and has a nice thick texture to it. This frosting does not contain any confectioners sugar. It is a combination of chocolate, corn syrup (I used an organic light corn syrup with organic vanilla flavor), heavy cream and a touch of sugar. It was fabulous!

IMG_0210

I think this will become my go-to chocolate cake recipe. My husband loved it and my co-workers devoured it. I hope it becomes your go-to chocolate cake recipe as well!

CHOCOLATE SOUR CREAM CAKE…

  • Servings: 10-12
  • Difficulty: easy
  • Print

CAKE INGREDIENTS Chocolate Sour Cream Cake

1 cup unsalted butter, plus butter to grease the pan

1/3 cup cocoa powder, sifted

1 tsp. kosher salt

1 cup water

2 cups flour, plus some for the pan

1 3/4 cups sugar

1 tsp. baking soda

2 large eggs, room temperature

1/2 cup sour cream

1 tsp. vanilla extract

FROSTING INGREDIENTS

2 ounces semi sweet chocolate, chopped

2 ounces unsweetened chocolate, chopped

1 1/2 Tbs. corn syrup (I used organic light corn syrup with organic vanilla flavor)

1/2 cup heavy cream

1 1/2 Tbs. sugar

1/2 cup mini semi-sweet chocolate morsels, for decoration (optional)

DIRECTIONS:

Preheat the oven to 350 degrees. Grease and flour a 10 or 12 cup bundt cake pan and set aside.

In a small saucepan combine the butter, cocoa powder, salt and water and melt over medium heat. Continuously stir the mixture until everything is melted and combined. Remove from the heat and set aside.

In a large bowl whisk together the flour, sugar and baking soda. Add half the melted butter mixture to the flour mixture and whisk until blended. Add the remaining butter mixture and stir until combined. Add the eggs one at a time, whisking until each is completely blended. Add the sour cream and vanilla and whisk until combined.

Scrape the batter into the prepared bundt pan. Bake for 40 – 45 minutes (my cake was done at 42 minutes) or until a toothpick inserted in the center comes out clean. Cool the pan on a wire rack for 15 minutes and then invert the pan to remove the cake. Let the cake cool completely before frosting.

Put the chopped chocolates and the corn syrup in a bowl and set aside. Combine the heavy cream and sugar in a saucepan and, over medium heat, stir until the cream is hot and the sugar has dissolved. Pour the hot cream over the chocolate and whisk until smooth.

Pour the frosting over the cake. Decorate the cake with the chocolate morsels.

Chocolate Sour Cream Cake

Chocolate Sour Cream Cake

Chocolate Sour Cream Cake

Chocolate Chocolate Chip Bundt Cake…

Ok, I promise I won’t inundate you with bundt cake recipes, but since I’ve not had a bundt cake pan for years and just recently bought one I simply had to have one more go at it right away. This time I tried to make a chocolate cake, not only to test the pan again but to also foray into the world of making chocolate ganache. I learned some really interesting things along the way making this recipe and I want to share them with you.

Bundt pan dusted with cocoa powder...

Bundt pan dusted with cocoa powder…

Lesson Learned 1: Dusting the bundt pan with cocoa powder instead of flour: As I mentioned in a previous post, it is imperative to take the time to grease and flour a bundt cake pan in order for the cake to come out cleanly and beautifully. You cannot skimp on this step. When I grease a bundt pan I use unsalted vegetable shortening but this time instead of dusting it with flour I dusted the pan with cocoa powder. To be honest, I’m not sure I would do it again for a couple of reasons.  First, I found it very difficult to remove the excess cocoa powder from the pan much more so than removing excess flour. It seemed like not matter how hard I tapped the pan or slightly dropped it on my butcher block the cocoa powder would not dislodge to the degree I wanted. It definitely left a heavier coating in the pan. That’s not necessarily bad, but remember cocoa powder on its own has a bitter taste and that dusting will somewhat remain on the outside of the baked cake. If you dust the pan with cocoa powder you should frost the cake. That way none of the taste of raw cocoa powder will come through. If you decide to finish off your cake by sprinkling the top with powdered sugar then dust the bundt pan with flour.

Baked cake from pan dusted with cocoa powder...

Baked cake from pan dusted with cocoa powder…

Second, I’m not sure I liked the look of the cake when I removed it from a pan dusted with cocoa powder. As you can see from the picture, the cake had, at least it seemed to me, an odd sort of matted look. I’m thinking that if I dusted the pan with flour, the cake would have looked more chocolatey brown versus looking like it had been sprayed with a light dulling lacquer. Also when I touched the cake, a darkish film would come off on my finger – I’m thinking that was a result of the combination of shortening and cocoa powder. I was not too fond of that. But, don’t get me wrong, none of this affected the tasted of the cake. The frosted cake was delicious and you could not taste the cocoa powder in anyway. I just thought I would try something a little more out of the ordinary, and though I was not 100% delighted with dusting the pan with cocoa powder, I still think this was one of the best chocolate bundt cakes I ever made!

Lesson Learned 2 – This recipe makes a lot of batter: This recipe is designed for a 15 cup bundt pan so be prepared for that. If you don’t have that large of a pan (mine is a 12 cup pan) then you will need to think of other ways to use the remaining batter. Because this recipe uses 5 eggs it rises a lot, so don’t fill your pan more than three quarters full or the batter will drip over the sides. You can do a couple of things with the rest of the batter. You can make cupcakes or you can make a small loaf cake. I chose to make a small loaf cake putting the remaining batter in a 5 x 3 x 1 mini loaf pan. I just sprayed that pan with baking spray and baked it with the bundt cake. The cake took 70 minutes to bake (remember I am at high altitude so it takes longer sometimes – at sea level you can probably bake it for 60-65 minutes) and the loaf pan took 45 minutes.

IMG_4871Lesson Learned 3 – Making chocolate ganache: This was my first attempt ever at making chocolate ganache and I have to admit I should have researched it a little more before I made it. I found a process in one recipe and used it. And although the ganache turned out ok, it was not as silky as I would have wanted it. Then someone suggested I check out YouTube and I found a process I thought was better. I made my ganache over a double boiler, melting the chocolate and butter together and then adding heavy cream that has almost come to a boil and then combining the ingredients. The result is what you see in the pictures.

The Ganache...

The Ganache…

Next time I make ganache I will use the process I learned on YouTube. It is very simple. Just put your chocolate in a bowl and heat heavy cream until it’s just about ready to boil. Pour the heavy cream over the chocolate and let the chocolate and cream sit for two minutes. Do not touch it. After 2 minutes stir to combine. Then add about a tablespoon of butter and a pinch of salt. Stir and then frost. I think the texture will be smoother and silkier making the ganache that way.  I think my ganache was a little too thick but considering it was the first time I ever made it I think I did ok. It tasted wonderful, I just wanted it to be more glaze-like and smooth. And if you have any ideas on how to make the perfect ganache, I am all ears!

Lesson Learned 4 – Never quit trying: I almost didn’t post this recipe because I was not pleased with the way the ganache turned out. And then I thought, wait a minute, isn’t this blog not only about recipe successes but also things I learned along the way while making recipes? From my experience, the only way you learn is by trying. I don’t know of any cook or baker who has not had failures in the kitchen. And although the ganache wasn’t exactly a failure, it wasn’t what I wanted it to be. But hopefully what I am sharing when I post recipes will help minimize any slips ups you have when trying them and get you to success a lot quicker. To me, that is the purpose of this blog – to help those, like me, who never had anyone to mentor them and had to learn many things in the kitchen the hard way. And I have a feeling there are a lot of people like us out there, but just afraid to admit it.

Since I made two bundt cakes within the timeframe of one week I had a lot of cake around the house. So I brought most of this cake to work yesterday. Within a couple of hours it was gone. Only a few chocolate crumbs remained on the plate in the break room. So no matter if your ganache is beautiful or not, in the end the only thing that really matters is the taste. And I’ll clue you in on a little secret – this cake tastes divine!

Here is the recipe as well as the adjustments I had to make for high altitude. Enjoy!

Chocolate Chocolate Chip Bundt Cake…

  • Servings: 12-16
  • Difficulty: Easy
  • Print

INGREDIENTS:

Cake:

1 cup cocoa powder, (more if you dust the pan with it – otherwise use 1 Tbs. of flour)

1 Tbs. unsalted vegetable shortening for greasing the cake pan

7 ounces semisweet baking chocolate, chopped finely

1 cup boiling water

2 1/4 cups flour (plus 4 Tbs. for high altitude)

1 1/2 tsp. baking soda (1 tsp. for high altitude)

1 1/4 tsp kosher salt

2 1/2 sticks unsalted butter, room temperature

2 1/2 cups firmly packed brown sugar (2 1/8 cups for high altitude)

5 eggs, room temperature and slightly beaten

1 Tbs. prepared coffee, room temperature

4 tsp. vanilla

1 1/2 cups sour cream

1 1/2 cups semisweet chocolate chips (1 cup high altitude)

1/8 cup flour for coating the chocolate chips

Ganache:

6 oz. semisweet chocolate chips

1 Tbs. butter

1/2 cup heavy cream

A pinch of salt

DIRECTIONS:

Preheat oven to 325 degrees. Grease and flour the bundt pan. Set aside.

Combine the cocoa powder and chocolate. Add the boiling water and whisk until blended and smooth. Set aside.

Sift together the flour, baking soda and salt. Set aside.

With an electric mixer, beat the butter until smooth and creamy (at least one minute). Add the brown sugar and beat until blended. Increase the mixer speed and beat until light and fluffy (about 5 minutes). Add the eggs one at a time and beat until each is incorporated. Add the vanilla and coffee and beat until combined.

Reduce the speed of the mixer and add the flour and sour cream in three additions beginning and ending with the flour. Pour in the chocolate, cocoa mixture and beat until the there is no light color in the batter. Combine the flour and chocolate chips and, by hand, fold the chocolate chips into the batter.

Pour the batter into the pan being careful not to fill it more than 3/4 full. Bake for 60-70 minutes (70 minutes high altitude) or until a toothpick inserted in the center comes out clean. Transfer the pan to a wire rack and let cool for 15 – 20 minutes (I cooled mine for 20 minutes). Invert the pan onto the wire rack and lift off the pan.

Let the cake cool for at least 1 hour before frosting.

FROSTING:

Put the chocolate chips into a heat resistant bowl. Heat the heavy cream until almost boiling. Pour the heavy cream over the chips and let that mixture stand without touching it for two minutes. After two minutes stir the mixture until the chocolate and cream are combined and smooth. Add the butter and salt and stir to combine. Immediately pour over the cooled cake.

The cake batter...

The cake batter…

The cake right out of the oven...

The cake right out of the oven…

Chocolate Chocolate Chip Bundt Cake...

Chocolate Chocolate Chip Bundt Cake…

Salted Caramel Brownies…

Doesn’t salted caramel seem to be all the rage right now? Maybe it’s just me but I’m seeing this flavor trend just about everywhere these days – salted caramel pretzels, salted caramel ice cream, salted caramel peanuts – it just seems to be “the thing.” So as I looked for my next new weekly recipe, it didn’t surprise me that I found one for salted caramel brownies.

IMG_8658

Unsweetened chocolate and butter mixture…

I found a version of this recipe on a website called mybakingaddiction.com. I thought this would be great to make for my husband especially because he’s been in the doldrums since Haagen Dazs discontinued their test market salted caramel truffle ice cream. I thought this might make a good substitute for him, and I have to admit the recipe intrigued me.

I normally don’t do this but I made this particular recipe twice before blogging about it. I will explain why in my lessons learned.

Recipe Rating: B+ There are many reasons why I like this recipe and one very important reason why I think it still may need something. It’s easy to make, not overly sweet (which I like a lot) but the salted caramel taste was not as pronounced as I thought it should be. I’m not quite sure what can be done to enhance the salted caramel flavor.  That being said, it’s still a great brownie and you should try it and see if you agree with me.

LESSON LEARNED 1 – Use the ingredients called for in the recipe: I know you’re probably saying, c’mon Jan everybody knows that! And that’s true. But when I first made the recipe I thought to myself, “I’ve got a bunch of walnuts in the freezer – I’ll just use those instead of the Planter’s Salted Caramel Peanuts called for in the recipe”. Then as I’m eating the brownies I’m wondering why I’m not getting more of a salted caramel flavor. Well, last time I checked walnuts did not have a natural salted caramel flavor all on their own. So you see, I told you I can be challenged in the kitchen. I even had to laugh at myself over this one.

Chocolate squares and peanuts layered in the center of the batter

Chocolate squares and peanuts layered in the center of the batter

And that’s why I made the recipe twice. I had to see how different the flavor of the brownies would be with the salted caramel peanuts. Lo and behold, to my surprise they really didn’t make a huge difference. But I knew I had to make it with the ingredients called for in the recipe before I could talk about the flavor of the brownies. I expected there to be a much stronger caramel flavor using both the Ghirardelli Chocolate and Sea Salt Caramel Squares and the salted caramel peanuts. Using the Planter’s Peanuts changed the flavor somewhat, but not to the degree that I expected. So if you don’t have them or can’t find them you can use any kind of nuts you have on hand. It won’t make that much difference. Personally I had a very difficult time finding them in our local grocery stores but I eventually prevailed. The peanuts had a very strong salted caramel flavor right out of the can. That flavor seemed to get lost a little in the chocolate during the baking process but that’s not necessarily a bad thing.

LESSON LEARNED 2 – Unsweetened chocolate is really unsweetened: The recipe calls for melting in the microwave 4 ounces of unsweetened chocolate with 3/4 cup of unsalted butter. I’ve done this process before when making my triple chocolate brownie cookies but for some reason the chocolate looks so rich and good (as you can see by the picture near the beginning of the blog) that I’m always tempted to dip my finger in the chocolate and lick it. DON’T. Although it looks divine it does not taste good at all – so resist the temptation. You’ll be glad you did.

LESSON LEARNED 3 – Room temperature eggs: The reason cooks tell you to use room temperature eggs is they blend more thoroughly into a batter than cold eggs. The challenge is to remember to set them out so that they can become room temperature. Never fear – I have a neat little trick for you. Take whatever number of eggs called for in your recipe and put them in a container of warm water and let them sit for 5 minutes. Voila! you have room temperature eggs. No need to make the water overly hot, just warm feeling to the back of your hand will do. This is a great trick for people like me who never remember to take the eggs out ahead of time.

Brownie batter

Brownie batter

LESSON LEARNED 4 – Cooking with eggs: Eggs can be tricky. They can be bad without you knowing it until you crack them open. That’s why I always crack my eggs individually in a small dish before adding them to a batter. That way if I have a bad egg I’m not ruining a perfectly good batter. It’s only one additional dish and can save you a lot of time if you happen to have a bad egg.

Also, I break my eggs up with a fork before adding them to a batter, especially if it is a batter that you mix by hand (which this recipe is). That way I’m not counting on a silicone whisk to break up the eggs. The job has already been done.

Lesson Learned 5 – Do not over mix: This is easier said than done but it is very important for achieving a cake or cookie that is not tough. With this recipe it’s relatively simple. The last thing you do is mix in the flour until just combined. Not seeing the white of the flour is very easy to eyeball in this recipe. Just make sure you stop as soon as the flour has been completely incorporated.

Lesson Learned 6 – Working with Ghirardelli filled chocolate squares: Be careful when handling the chocolate squares. If you break them the caramel will ooze out. The caramel center is not solid like the chocolate. You want the caramel to ooze out in the baking process and not all over your hands. If you break them you will wind up with a sticky mess.

Lesson Learned 7 – Adding coffee to the batter: I can’t take credit for this trick. I learned it from watching Ina Garten on the Food Network. If you want to enhance the flavor of chocolate in any recipe, just add some fresh brewed coffee. You don’t have to add a lot. For this recipe I added 2 teaspoons of coffee. If you try the same chocolate recipe both with and without the coffee you will be amazed at the difference. The original recipe did not call for adding coffee, but my version of the recipe does.

Lesson Learned 8 – Storing the brownies in the refrigerator: My husband came up with this trick. He wanted to give our garbage men a little treat during their route so he cut a couple of brownies and put them in the refrigerator until he saw the garbage truck. There was only one man in the truck this week so he had an extra cold brownie. He decided to eat it himself and he told me he liked how it tasted cold. I tried it and had to agree. The brownie had almost an ice-cream like consistency when it was cold. But room temperature or cold, either way this is a good brownie recipe. If you want to be even more decadent, you can frost the brownies and sprinkle the top with some additional nuts. That would definitely be a killer brownie!

I recommend that you try this recipe and tell me what you think. It is a very good basic brownie recipe and more and more as I become less willing to make things from a box, I look to these types of recipes to give me the ability to make baked goods with fresh ingredients. I’d be very interested to hear your impressions on this one. Enjoy!

scb3

Salted Caramel Brownies…

  • Servings: 12
  • Difficulty: Easy
  • Print

INGREDIENTS:

4 ounces unsweetened chocolate coarsely chopped

3/4 cup unsalted butter cubed

1 cup sugar

3 large room temperature eggs

1 teaspoon vanilla extract

2 teaspoons brewed coffee

1/2 teaspoon kosher salt

9 Ghirardelli Dark Chocolate and Sea Salt Caramel Squares (1 package)

1/2 cup Planters Salted Caramel Peanuts, chopped

1 TBS. powdered sugar

DIRECTIONS:

Preheat the oven to 350 degrees. Line an 8×8 baking dish with foil and spray lightly with nonstick spray. Microwave unsweetened chocolate and butter for 2-3 minutes or until butter is melted at 50% power (I stopped at each minute interval and stirred the mixture). Stir until chocolate is fully melted. Whisk in eggs, vanilla, coffee and salt. Gradually add flour until just combined.

Spread half the batter into the prepared pan. Add a layer of the chocolate squares and sprinkle peanuts over the entire layer. Cover with the remaining batter.

Bake for 30-35 minutes – do not over bake. (It took me 35 minutes)

Cool for 15 minutes then remove brownies in the foil and set on a cooling rack. Let cool completely, remove the foil and dust with powdered sugar. Cut into squares and serve. (You could also serve these brownies with a dollop of caramel flavored whipped cream or a scoop of vanilla ice-cream).

scb5