Hard Salami Roll Ups With Olive Garnish…

A bunch of residents in my condo association have taken to meeting every Thursday for “happy hour”. It started last summer when the outdoor pavilion was finally constructed on our grounds and spilled over to the winter months with various residents opening up their condos to host. It’s a great way to get together and chit chat over a glass of wine and appetizers. Everything is BYO and it has evolved over time to quite the weekly thing to do.

So the challenge is what to make for an appetizer every week. No one is expected to bring anything but you know how that works. Someone in the group always brings cooked shrimp, someone always brings jalapeño poppers (frozen and made in the oven), various dips make appearances, the usual various kinds of chips, and one guy even brings 3 different bottles of good red wine (he is a wine aficionado and has a large free standing wine cellar in his garage loaded with various wines – he loves to share them).  Now I’m not one to go to something like this empty handed, as you may well imagine, so each week I try to think of something I can do that will be different from the usual stuff that shows up at these events. (I will admit there have been a couple of times when I was not in the mood and I just opted for some store bought guacamole or a good quality unusual kind of dip). I’ve brought my Cream Cheese, Spinach, Scallion and Bacon Pinwheels and my Basic Bruschetta, and this time I wanted something easy to make, easy to pick up and eat and interesting to look at. Hence my hard salami roll ups…

I based this recipe on something I saw online but wanted to add a little more zip to the cream cheese filling. I opted to add a few scallions and season the mixture with garlic Fleur de Sel and that took the filling over the top. Fleur de Sel is French sea salt. It’s grains are courser in texture than kosher salt and is typically used to brighten up a dish once it has been prepared. It was the perfect addition to the filling.

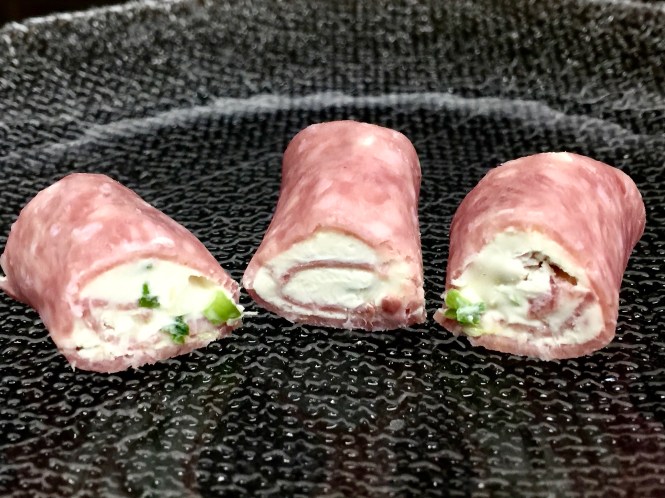
Needless to say these tasty little morsels were gobbled up pretty quickly so I knew I had a hit on my hands. They are a little time consuming to make but the end result is a tasty little morsel that your guests can just pop in their mouths. Everyone loved them.

So lets talk hard salami roll ups…

Lesson Learned 1 – Buy good salami: I used Boars Head salami sliced fresh from the deli. You want to make sure you use good salami as it is a key flavor ingredient in this recipe. Although it may be a little more expensive remember the old saying – garbage in, garbage out. You want the salami sliced thin but not paper thin. If you cut it almost like a shaving it will be very difficult to work with.

Lesson Learned 2 – the process for making these is just the same as making any type of tortilla roll up: In order to do roll ups you have to master the technique of how to apply the filling and learn how to perfect the roll. It’s really very simple and there only a few things to remember.

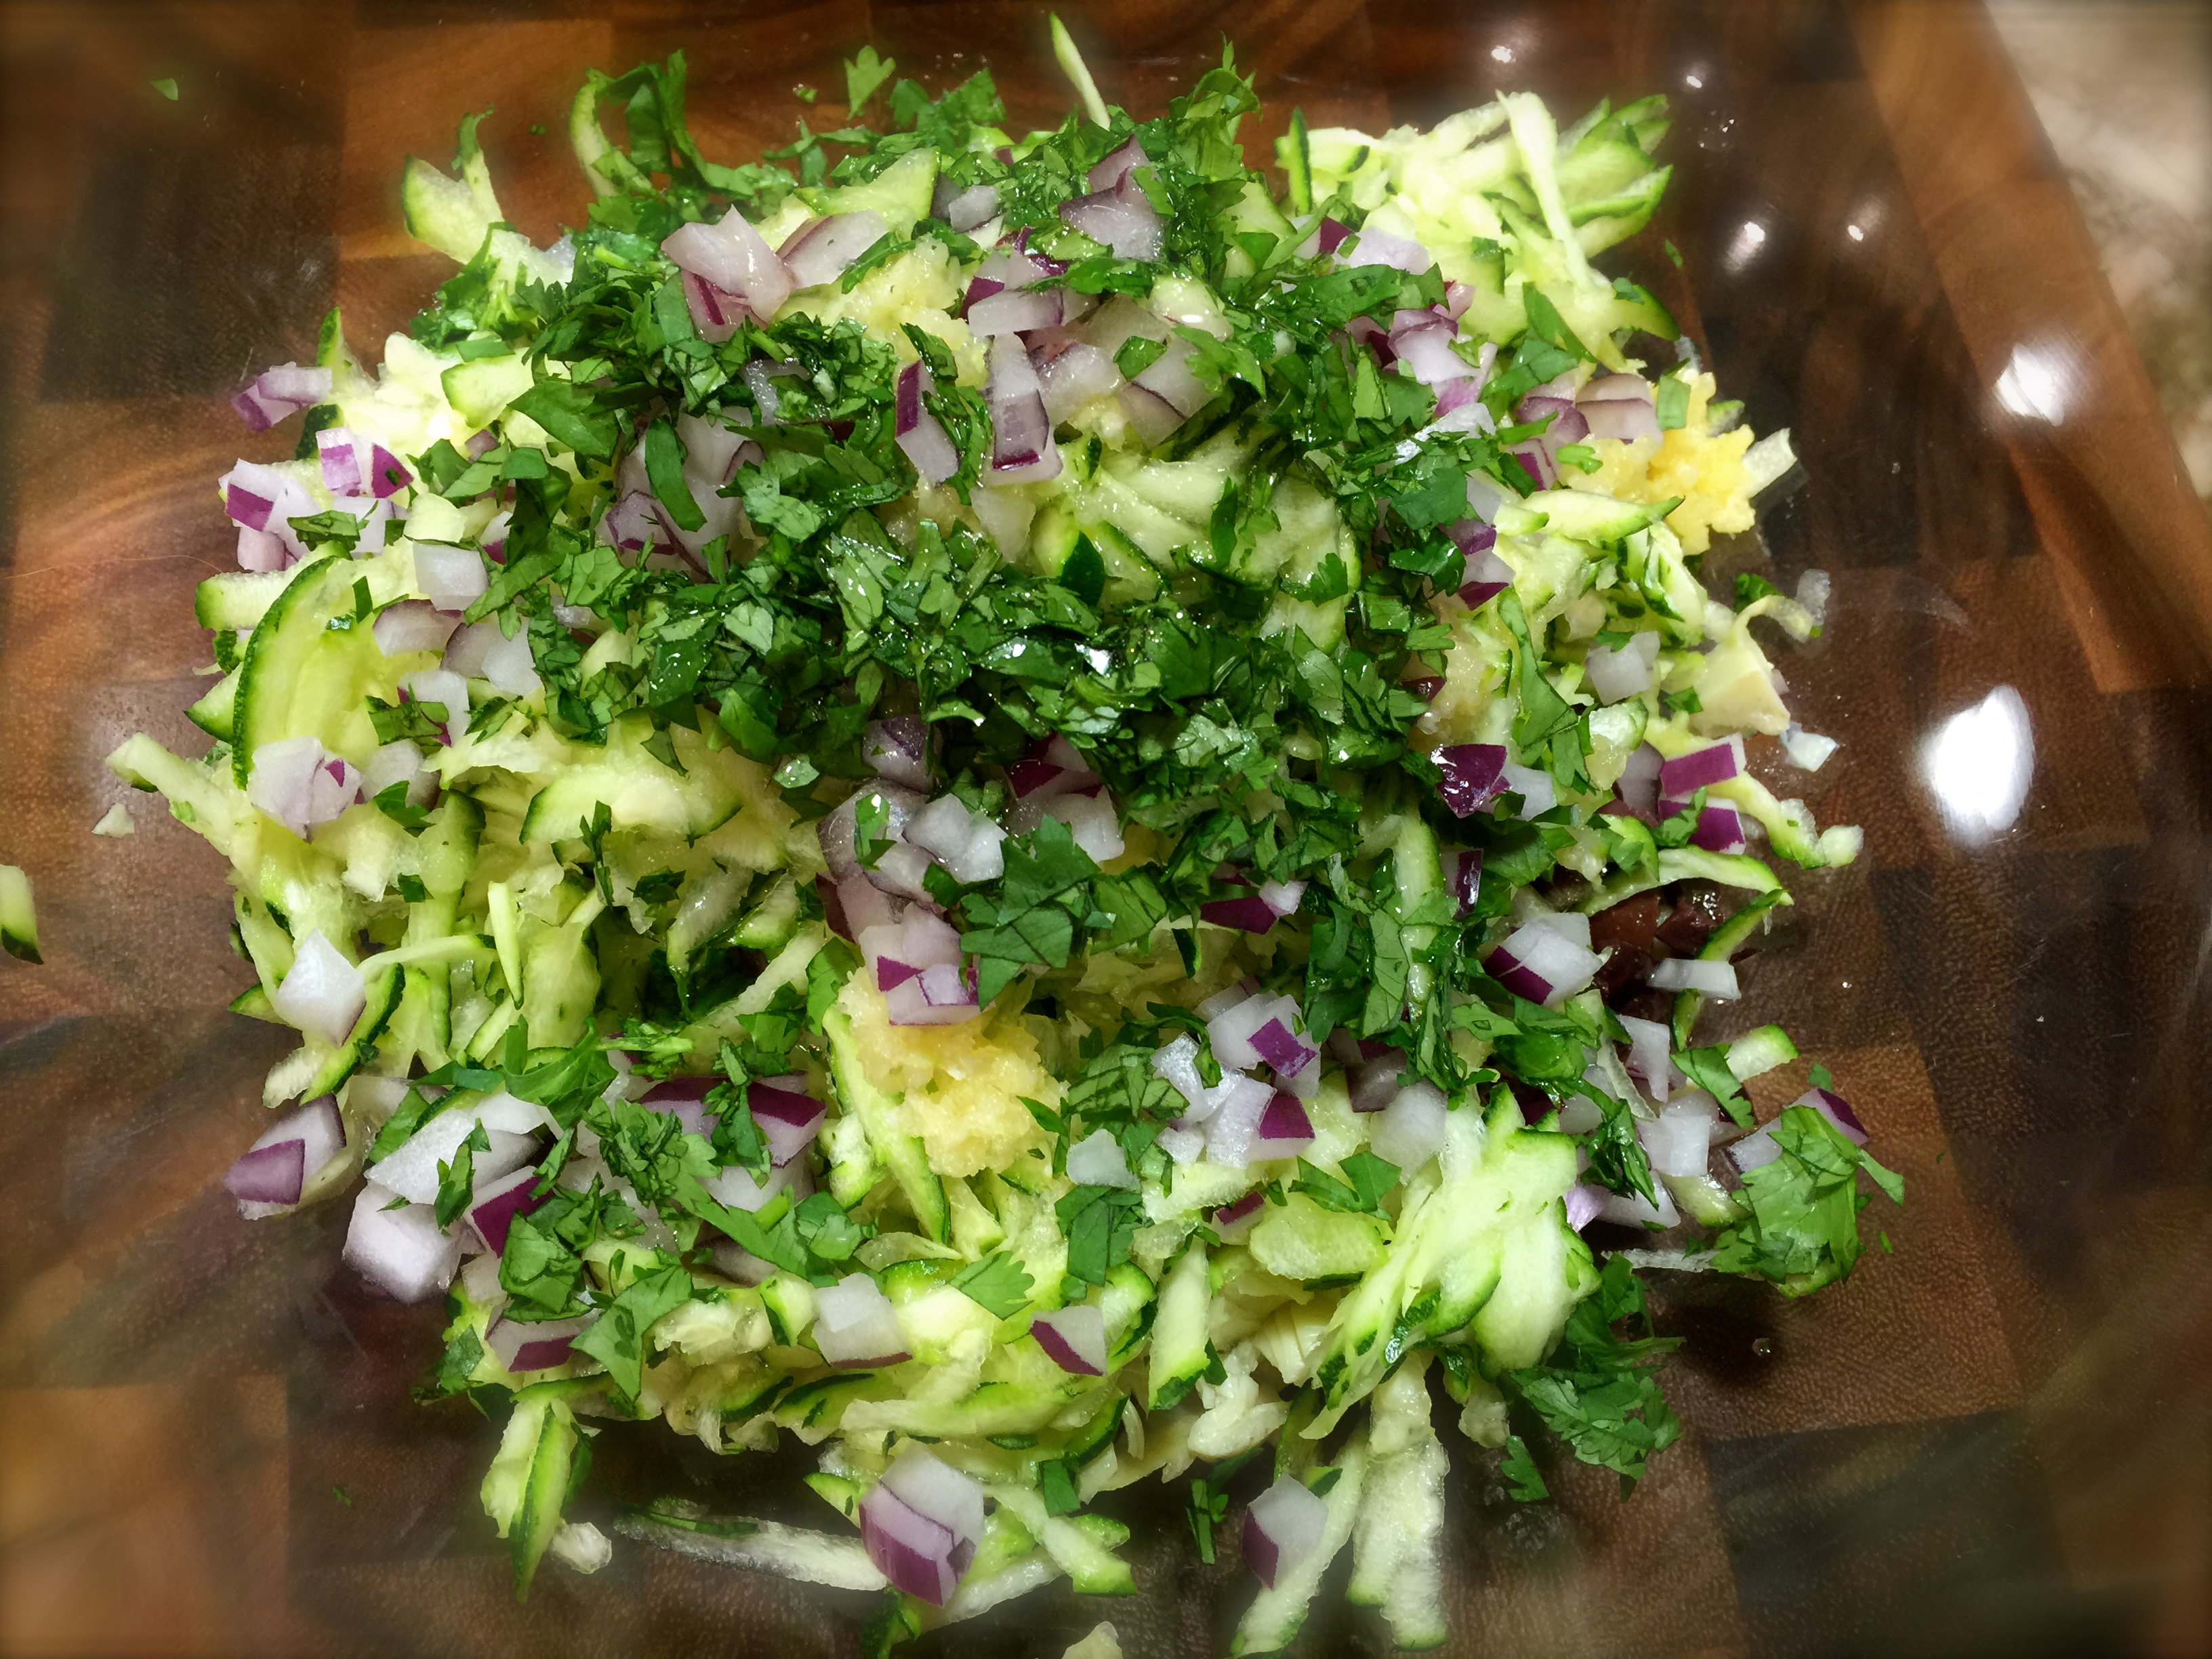
First is how to apply the filling on the roll up. You don’t want to put the filling on too thick. The picture below gives you an idea of how to do the filling. It is important to leave open edges all the way around so you don’t have filling oozing out of the sides or end seam when you roll up the salami. The thickness of the filling comes from how it spreads inside the salami during the rolling process so you don’t have to worry about that.

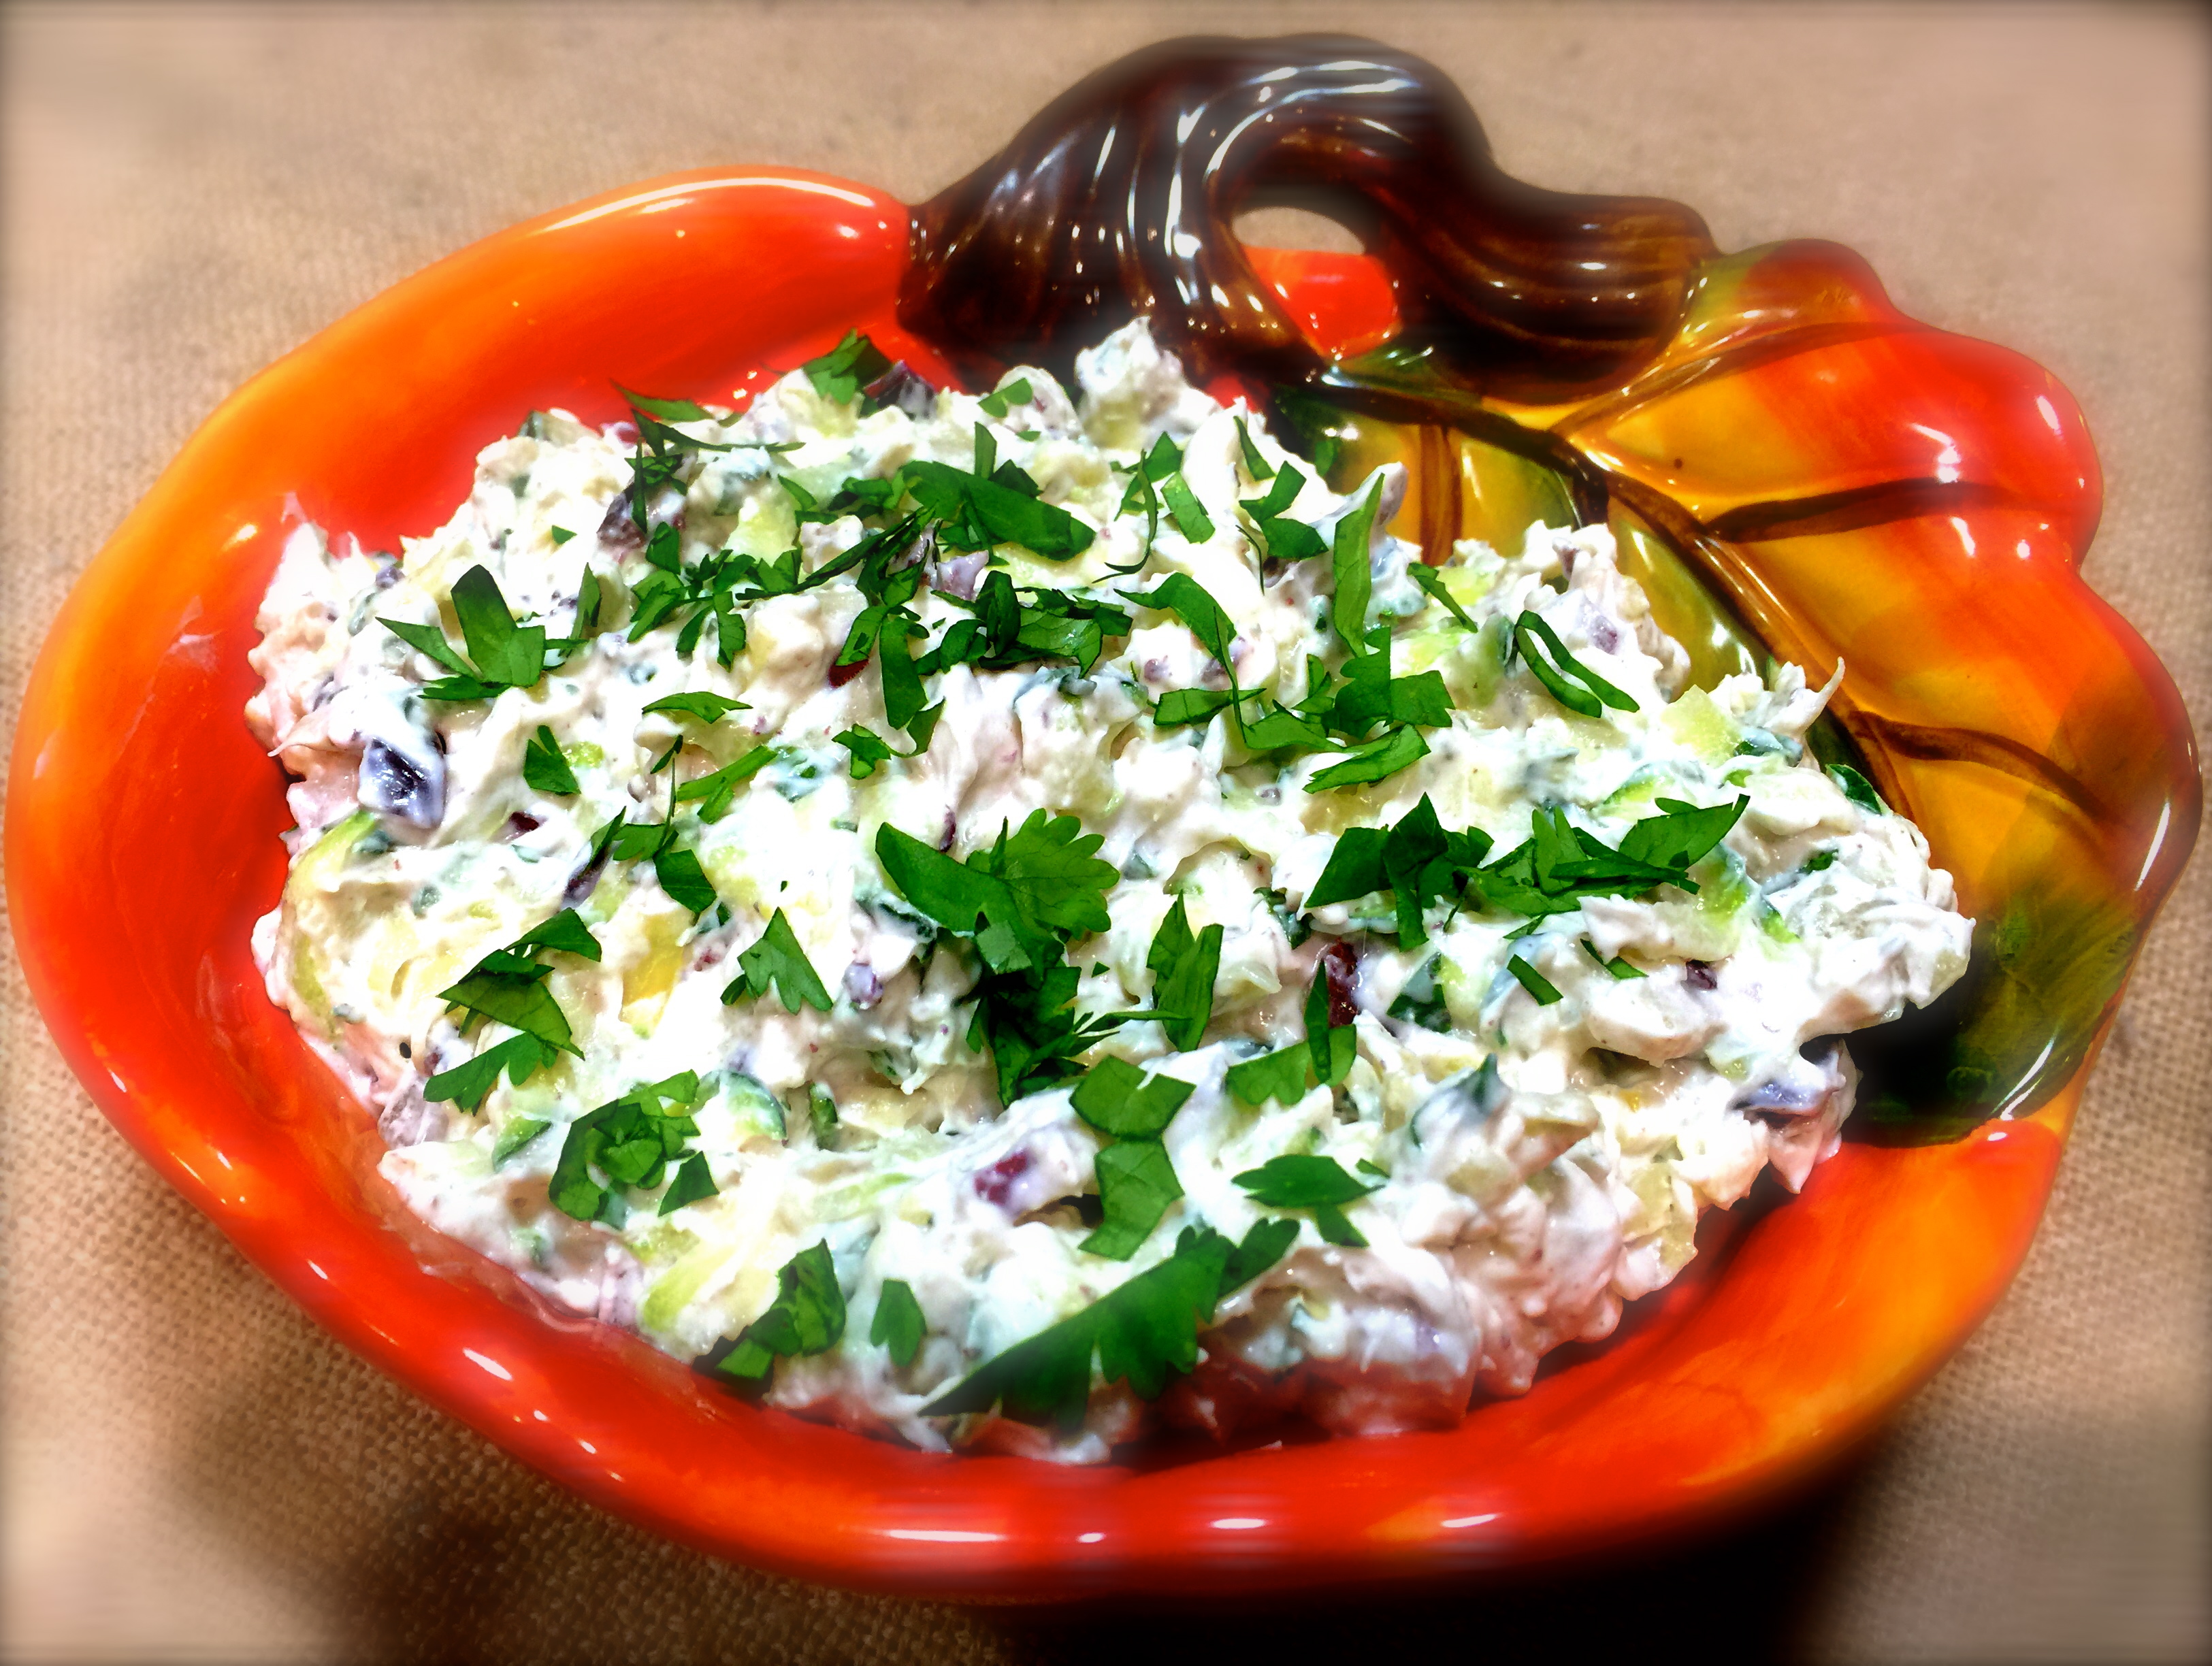
Second is how to do the rolling. Whether it’s salami, a tortilla or whatever you are using as the base of the roll up the process is the same. Think of the roll up in terms of top, bottom and two sides. First you want to take a small amount of the two sides and and fold them in toward the center. Then you take the bottom and begin rolling the salami onto itself. The picture below clearly shows how the sides have been folded in and the rolling process started at the bottom.

Continue rolling until you have created a log as pictured below.

I use this technique when making my pinwheels or when making enchiladas, it’s always the same. If you are careful in terms of how you put in your filling and master the folding and rolling, it becomes a breeze!

Lesson Learned 3 – What if you don’t have garlic Fleur de Sel: The answer is simple – just use garlic salt. But be careful. Garlic salt has a much finer consistency so you may want to cut the recipe portion in half at first, mix it in and then taste the filling to make sure it isn’t too salty. Remember the olive garnish will be salty as well so you don’t want the filling to negatively add to that.

Lesson Learned 4 – Make sure you chill the rolls after you make them: You create the filling by getting the cream cheese softened to room temperature and mixing it with the other ingredients. Once you create your rolls the cream cheese is too soft to cut the rolls into pieces without creating a big squishy mess. You need to chill the rolls for at least an hour so the cream cheese can harden again. (I put them altogether in a refrigerator bag as seen in the picture below).  That will make the pieces much easier to cut. Also be sure to use a very sharp knife when cutting the pieces to avoid squashing the rolls.

Lesson Learned 5 – For a smaller appetizer just cut the recipe in half: Cutting the recipe in half also makes plenty of roll ups as well. You will have some cream cheese mixture left over but you can use it on a bagel for breakfast or on a baked potato at dinner. I’m sure the remainder won’t go to waste. Think about how many people will be at your gathering and plan from there.

I had a lot of fun making these and it was the perfect appetizer finger food. I found some colorful cocktail forks and all the guests had to do was pick one up, pop it in their mouth and dispose of the fork. It was fun to make and easy to eat. Try it and let me know what you think.

Salami Roll Ups With Olive Garnish...

  • Servings: 50-60
  • Difficulty: Easy
  • Print

INGREDIENTS:

1/2 pound of good hard salami, sliced thin but not paper thin

1 8 oz. package of cream cheese, softened to room temperature

3-4 scallions, chopped

1/4 tsp. garlic Fleur de Sel

1 24oz jar of green olives stuffed with pimento

Decorative cocktail forks

INSTRUCTIONS:

Beat together the softened cream cheese and scallions until well combined. Add the Fleur de Sel and stir to combine.

Place a small amount of the cream cheese mixture on a piece of salami, making sure to leave room all around the edges. Take the two sides and fold them in slightly toward the center. Begin rolling the salami from the bottom all the way to the top making sure the sides stay folded in during the rolling process. Repeat the same process with the other slices of salami. Place the rolls in a refrigerator bag and chill for at least one hour.

Remove the rolls from the bag and cut into bite-sized pieces (approximately 3 slices per piece of salami). Pierce an olive with a cocktail fork and push it in to the top of the roll up. Serve.

SaveSave

SaveSave

SaveSave

SaveSave

SaveSave

SaveSave

SaveSave

SaveSave

SaveSave

SaveSave

SaveSave

SaveSave

SaveSave

SaveSave

SaveSave

SaveSave

SaveSave

SaveSave

SaveSave

SaveSave

SaveSave

SaveSave

SaveSave

SaveSave

SaveSave

SaveSave

SaveSave

SaveSave

SaveSave

SaveSave

SaveSave

SaveSave

SaveSave

Zucchini Artichoke Olive Dip…

This past weekend a farewell party was being hosted for a co-worker who is moving to New York City. We were all asked, if we wanted, to bring something for the table. I knew I would be working all day the day before and the day of the party so I wanted to bring something that was not necessarily the usual faire and that I could make ahead. I decided on this recipe.

dip ingredientsThis is what Rachel Ray would call a chop and drop recipe. All the work is in the chopping and once that’s done you just stir the ingredients all together and refrigerate it. It’s a perfect make-a-head appetizer for any party.

So let’s talk zucchini artichoke olive dip:

Lesson Learned 1 – Make sure your cream cheese is room temperature: This is a pretty hearty dip, almost a spread, so it’s important the cream cheese be room temperature, otherwise you’ll never get the ingredients completely blended. If the cream cheese is room temperature it mixes easily and you want to make sure everything is thoroughly combined as you have raw garlic and onion in this dip. You certainly don’t want concentrated clumps of raw onion or garlic anywhere.  The only way you’ll achieve that is with room temperature cream cheese.

zucchini artichoke olive dip

Lesson Learned 2 – any kind of olives will do: I had kalamata olives in the refrigerator, but you can use pimento stuffed olives or black olives, a combination of olives or whatever you prefer or have on hand. Be sure to add only 1/4 cup of finely chopped olives to begin with and then taste the dip when it’s all mixed. Olives tend to have a lot of salt in them and you don’t want to overpower the dip by adding too many. You can always add more if you think the dip needs more.

zucchini artichoke olive dip

Lesson Learned 3 – refrigerate this dip for at least 4 hours: This is the kind of dip that tastes even better if all the ingredients get well acquainted, so keep it in the refrigerator for at least 4 hours, although overnight is preferable.

garlic-press-and-sliceLesson Learned 4 – Use a garlic press to mince the garlic: Since you are adding raw garlic, it’s important that it be finely minced. The best way I’ve found to do that is with a garlic press. If you chop by hand you run the risk of having a larger chunk(s) of raw garlic somewhere in the dip. Using a press minces the garlic evenly and allows for it to be thoroughly incorporated into the other ingredients.

Lesson Learned 5 – Start out by using only a small amount of fresh cilantro: Cilantro has a very strong flavor but it also adds depth of flavor to this dip. I recommend starting out by adding only 2 tablespoons of finely minced fresh cilantro. After you taste the dip, if you feel it needs more cilantro you can always add it. I found 2 tablespoons to be more than enough.

Lesson Learned 6 – Squeeze the excess water out of the shredded zucchini: Zucchini, like cucumbers, has a lot of water in it. You don’t want a runny dip so it’s important to squeeze the excess water out. I just took handfuls and squeezed them over the sink until no water dripped out. You can wrap the zucchini in a towel and squeeze the water out that way as well. But, if you have clean hands it’s so much easier just using your hands and you’re not left with a dirty dishtowel.

This is so easy to make and it has a slightly different combination of ingredients than most artichoke dips. Try it at your next party. It’s sure to be a hit!

Zucchini Artichoke Olive Dip…

  • Servings: 30
  • Difficulty: Easy
  • Print

INGREDIENTS

2 packages of cream cheese (8 oz. each), room temperature

3 cups shredded zucchini (2 medium sized zucchini)

1 jar marinated artichokes drained and chopped (you can add more if you like)

1/4 cup finely chopped olives (I used kalamata olives)

4 large garlic cloves, minced

3 Tbs. finely chopped red onion

2 Tbs. minced fresh cilantro

2 Tbs. lime juice (1 medium sized lime)

2 Tbs. good olive oil (I used garlic infused olive oil)

Appetizer crackers or a french bread baguette, sliced.

DIRECTIONS: 

Combine all of the ingredients except the crackers and/or sliced baguette into a large bowl. Combine thoroughly. Refrigerate for a minimum of 4 hours, overnight is preferable.

Serve with appetizer crackers or a french bread baguette, sliced.

Zucchini Artichoke Olive Dip

Pesto Orzo With Roasted Red Peppers and Olives…

Pesto Orzo Roasted Red Pepper Ingredients

Pesto Orzo Roasted Red Pepper Ingredients

I admit, I am not one for making up recipes – creativity in the kitchen is not yet one of my culinary skills. But this recipe is an invention of mine – totally made up on the spot (and I’m sure there is a similar recipe for this out there somewhere) and has now become a side dish staple in our house.

It really evolved from two things, that being a cooking class in which I learned the art of roasting a red pepper (no more store bought jars for me) and a huge crop of basil that forced me to figure out how to make pesto. From there the recipe took shape.  So let’s talk a little bit about home-made roasted red peppers and pesto. Once you’ve made them yourself you will seldom, unless time dictates, go back to buying it pre-prepared at the grocery store.

Flame Roasting A Red Pepper

Flame Roasting A Red Pepper

I first became aware of using roasted red peppers in recipes from watching the Food Network. It seemed that every chef I liked used them in a variety of different recipes but they mostly just got them out of a jar. Don’t get me wrong, the jarred roasted red peppers are great and are a real time saver, but if you want to control the flavor and minimize waste there is nothing like making it yourself. It’s so easy and I have to say rather fun as well.

The trick is you will need fire of some sort to do this, so a gas stove or other source of flame is necessary. All you do is put it on the fire and let it turn black, and I do mean black. Just keep an eye on it and when one side turns black rotate it until the entire pepper is black. That’s it. Then you put it in a container, cover it with plastic wrap and let it sit for at least 20 minutes. After that, you take a paring knife and scrape off the black matter and voila, you have a roasted red pepper! It can’t get simpler than that. I’ll put the complete recipe down below. Oil and herbs round out the flavor, but it is so easy and I like the fact that you control the amount you want to have versus buying a jar of peppers and having half of it sit in the refrigerator until you wind up throwing it out. This is easy and it has real cost savings as well.

The blackened pepper...

The blackened pepper…

The next part is the pesto. The prime ingredient in pesto is fresh basil. I like to grow mine in containers on my deck. Once you figure out how to grow basil you will get it prolifically, trust me. The first year I grew it I was not aware of cutting it back before it began to flower. That resulted in a very small basil crop. The second year I did a little research, did the appropriate trimming and I wound up with basil coming out of my ears. Using your basil to make pesto is a great way to have it year-round. I make mine and freeze it in batches and when I want some I just scoop what I need out of the container and let it thaw. I hear some people freeze it in ice cube trays and just pop cubes of pesto out when they want them. I had way too much basil to even try that. My freezer would’ve become nothing more than a haven for ice cube trays! Pesto freezes very well and every summer I wind up freezing a supply that takes me through to the following summer. I’ve included the pesto recipe below.

Homemade Pesto

Homemade Pesto

The rest is relatively simple, just a matter of cooking the pasta and combining the ingredients. My husband is a big rice fan and I’m not (being born and raised a potato girl) so I’m always looking for ways to either make a substitute for rice or jazzing up rice. Because of that I’ve become quite adept at risotto, my favorite form of rice, but that is for another blog. I found this recipe to be a great substitute for rice. As a matter of fact, my husband originally thought it was rice as orzo is a rice shaped pasta. Try this. I think you’ll really enjoy this one. Here is my recipe rating and lessons learned: Rating: A +++++ – now c’mon, you didn’t think I could rate a recipe made up by me any less than this, could you? But I bet if you try it you’ll agree. The combination of flavors is a perfect compliment to almost any dish. Lesson Learned 1: When I learned about roasting peppers on the stove I was told to let it sit covered for a minimum of 20 minutes before scraping off the burnt edges. I recommend waiting as long as you can. The longer you let it sit the easier it is to scrape it off. If you wait an hour or more it comes off in no time flat. Lesson Learned 2: When making the pesto recipe, initially add only half of the olive oil into the food processor. After that drizzle in the rest. You may find that adding all of the recommended amount may make the pesto too oily. I don’t like my pesto floating in oil, but some do. You can always add more olive oil but you can’t take it away once you’ve added it. Lesson Learned 3: The pesto recipe calls for a half of a clove of garlic. I like my garlicky and so I put in two cloves. Don’t throw them in whole. Just cut them in quarters – that way you will ensure they mix properly in the food processor. You don’t want to be chomping on raw garlic. Lesson Learned 4: The recipe calls for a 1/2 cup of cheese. You can add more to taste if you like. Lesson Learned 5: After you drain the pasta put it back in the pot you cooked it in and mix all the ingredients together under a very low flame. That way any residual liquid will evaporate so you won’t have a watery concoction.  

Pesto Orzo With Roasted Red Peppers and Olives

  • Servings: 4-6
  • Difficulty: Easy
  • Print
INGREDIENTS: 1 1/2 cups uncooked orzo pasta i large red bell pepper 1/4 cup of pesto olive oil (1-2 tsp.) 1/4 cup of kalamata olives chopped 1 TBS garlic and herb bread dipper seasoning DIRECTIONS: Place red pepper over open flame and blacken on all sides. Place in a heat resistant bowl, cover with plastic wrap and let sit for at least 20 minutes. Remove pepper from bowl and scrape off all of the black matter. Cut open, remove the seeds and yellowish veins and cut into lardons (lardons are simply small rectangular slices – see picture below). Add seasoning and desired amount of olive oil. Mix together and set aside. Chop the kalamata olives into small bite size pieces.

Lardons of red pepper mixed with olive oil and seasonings.

Lardons of red pepper mixed with olive oil and seasonings.

In a 3-4 quart saucepan cook pasta according to package directions. Once cooked, drain the pasta and put it back in the pot under a very low heat. Add the pesto (recipe below), roasted red pepper and olives. Stir to combine. Serve immediately.

Basic Basil Pesto

  • Servings: 12
  • Difficulty: Easy
  • Print
INGREDIENTS: 4 cups loosely packed basil leaves 2 cloves garlic 1 small shallot, cut into pieces 3 TBS. pine nuts 1/4 – 1/2 cup olive oil 1/2 cup grated romano or parmesan cheese salt, if desired DIRECTIONS: Wash basil leaves and remove excess water. Place the basil, shallot, pine nuts, cheese and 1/4 cup oil in a food processor. Process, stopping to scrape down the sides of the food processor at least once. Check the consistency of the pesto. If too thick, drizzle in more oil while processing until the pesto reaches the desired consistency. Use or freeze. If not using immediately, store in an airtight container in your refrigerator or freezer.

Mix all ingredients together under a low heat

Mix all ingredients together under a low heat

Orzo Pasta with Roasted Red Pepper and Olives

Orzo Pasta with Roasted Red Pepper and Olives