
Fish has become a staple in our household. Years ago I hardly ever made fish – I was too afraid of it and frankly not all that enamored with it. But now it has become a mainstay in our diet. Not only is it good for you but there are also a variety of ways to cook fish that make it super delicious. This recipe is one of those.
I’ve mostly cooked cod, red snapper, halibut, tilapia, trout, swordfish, and salmon. The main kind of fish I cook for me and my husband is salmon. I’ve got cooking salmon down to such a science that if I prepare it a certain way it always comes out perfect. This is a recipe for cod and I am still perfecting my cod prowess. But I made this the other night and it turned out wonderful so now I have a baseline to work from.
So let’s talk Parmesan and garlic herb baked cod…
Lesson Learned 1 – Cod is plentiful, easy to find and a great choice for this type of recipe: Whenever I go to the grocery store I can always get salmon, tilapia (although lately I’ve shied away from this because of everything that has been written about it) or cod. Finding other fish can be iffy for me. Trout is somewhat plentiful, halibut and red snapper are iffy (and halibut is very expensive) and swordfish I normally can only find frozen. But I’m in Colorado and not near the ocean so I’m sure in various parts of the country availability of various types of fish is much different.
I’d like to stop for a moment here and talk about frozen fish. Years ago frozen fish was not very good. The freezing process tended to dry out the fish and so you basically started out with dry fish once it was thawed – not good. Today the flash freezing methods they use keep the fish extremely fresh which makes frozen fish rival fresh fish and at a much better price. So don’t be afraid of frozen fish anymore.

The Herb Mixture
I also found that thawing frozen fish matters. I’ve been in a hurry and just put the frozen fish on the counter to thaw. That tends not to be a recommended process but when you’re in a hurry you do what you can do. But I found that if I thaw the fish in the refrigerator overnight the fish tends not to dry out in the baking process. Now I’m not sure if that’s true or if it’s just me, but I recommend thawing your fish overnight in the refrigerator if you can.
I found a package of six flash frozen 4-5 ounce cod pieces at Whole Foods at a great price. But cod is easy to find just about anywhere and often you can find it fresh. And no matter what way you make it, cod is the type of fish that easily takes on any flavor palate you choose. That’s what makes it so versatile.
One last point – don’t be afraid to let the fish sit outside of the refrigerator a bit before you bake it. I normally let my fish sit out for about one half hour. That way some of the chill is taken out of the fish. I find it bakes better that way.
Lesson Learned 2 – The art of cooking fish: As I mentioned earlier, I used to shy away from fish and one of the main reasons why was the fear of over or under cooking it. And when you have two pieces of halibut that cost over $20 you really don’t want to mess up. But even if you pay much less, cooking fish can be tricky and if you have enough failures you may just say enough is enough. But don’t do that. Once you get the hang of it, you’ll make great fish meals more and more.
If you’re really nervous just keep in mind that baked cod should be cooked to an internal temperature of 155 degrees. To test the temperature just use a food thermometer and stick it in the thickest part of the fish keeping the tip near the center of the filet. I’ve cooked fish enough that I’ve learned to eyeball it by either looking at the sides to see how opaque the color of the fish is or by sticking a fork on the edge to see if it’s flaky. But that skill comes with time and I recommend using a food thermometer if you’re new at it.
And while we’re talking food thermometer I would recommend getting a good one. The more inexpensive ones can work but they can register temperatures incorrectly, especially over time. Invest in a good food thermometer and it will become you’re best friend.

Ready To Go Into The Oven
Lesson Learned 3 – Grate your own Parmesan for this recipe: There is a BIG difference between jarred Parmesan cheese and grating your own. First the quality of the cheese can be much better as you choose what kind of Parmesan wedge you’ll use. Second the consistency is different. Homemade grated Parmesan tends to have slightly bigger pieces, tastes more robust and stands up better to the melting process in the oven. Now I know it takes a little extra time to do it but it is so worth it. I just zip out my little mini food processor, cut my Parmesan into small pieces and let the food processor do the rest. It’s so easy really and so worth it. I always make more than I need and use it for other things. Once you grate your own you may find that you’ve become a Parmesan snob and always grate your own versus buying it in the jar. It wouldn’t surprise me.
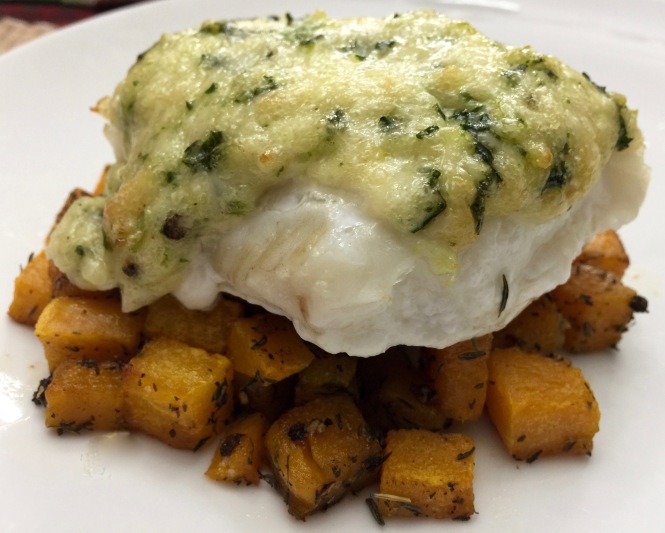
And that’s basically it. The recipe I am sharing is for two but you can certainly make more – just increase the amounts for the mayonnaise mixture. Also if you use larger sized filets you’ll need to increase the baking time. I served this with my cinnamon roasted butternut squash, a side salad and some garlic knots. It was a fantastic meal. Try it and tell me what you think!
Parmesan And Garlic Herb Baked Cod...
INGREDIENTS:
2 four to five ounce cod filets
1/2 cup mayonnaise
1/2 cup freshly grated Parmesan
1 scallion chopped, including the green parts (you can substitute 2 Tbs. shallots)
1 garlic clove, grated
1 Tablespoon fresh Italian parsley, chopped
DIRECTIONS:
Preheat oven to 375 degrees. Line a baking sheet with foil and spray the foil with cooking spray. Place the cod filets on the foil and set aside.
In a small bowl mix together the remaining ingredients. Spread the mixture evenly over the top of the fish. Bake for 8-10 minutes or until the fish starts to look opaque and will flake.
If you desire the topping to be more browned, at 8 minutes switch the oven to broiler and brown the tops of the fish until lightly golden (not longer than 2 minutes). Remove from oven and serve.

