Best Ever Shrimp Dip (No Lie)…

I know, there are so many shrimp dip recipes out there and to me they all seem to taste the same. Well I’ve officially broken that mold. True, in order to achieve star status for this dip you have to do a little more work but it’s not that hard and it’s so worth it!

What’s the key? Well the combination of flavors for sure creates this great shrimp dip. But one of main differences I think is I prepared the shrimp from scratch. It all started with having most of a 16 ounce bag of uncooked jumbo shrimp in the freezer that I wanted to use. So instead of buying cooked shrimp or using mini cocktail shrimp (I found a lot of dip recipes call for them) I prepared the shrimp by hand.

In my mind that was the key. It gave the shrimp so much more flavor and the texture was much more robust. You could tell and taste that there was shrimp in the dip. Don’t get me wrong, the ingredients in total played a significant role in the dip’s flavor, but preparing and cooking the shrimp by hand was, for me, the key.

So let’s talk the best ever shrimp dip…

Lesson Learned 1 – This is MAJOR – prepare the shrimp from scratch: Don’t use precooked shrimp. Now of course if you have precooked shrimp on hand you can use it. But the flavor is so much more intense when you cook the shrimp and rough chop it yourself. I used frozen uncooked jumbo shrimp. The shrimp was already de-veined but there were still a few remnants of shell on the flesh. Once the shrimp was defrosted I removed the shells, cut off the small tails and cooked them before chopping them up. I seasoned the shrimp with Old Bay seasoning and garlic infused olive oil.

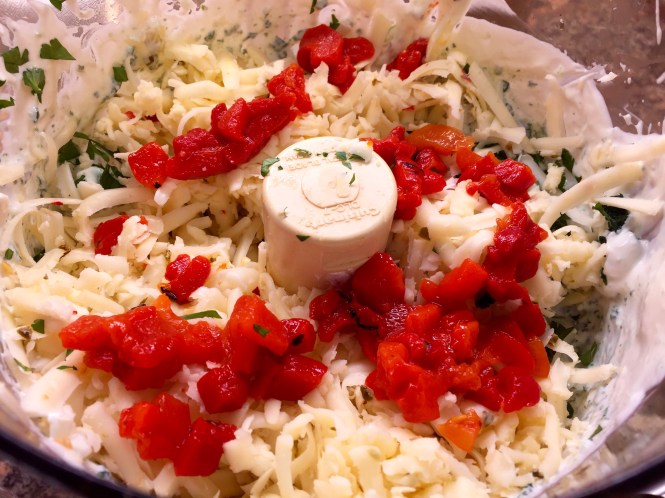
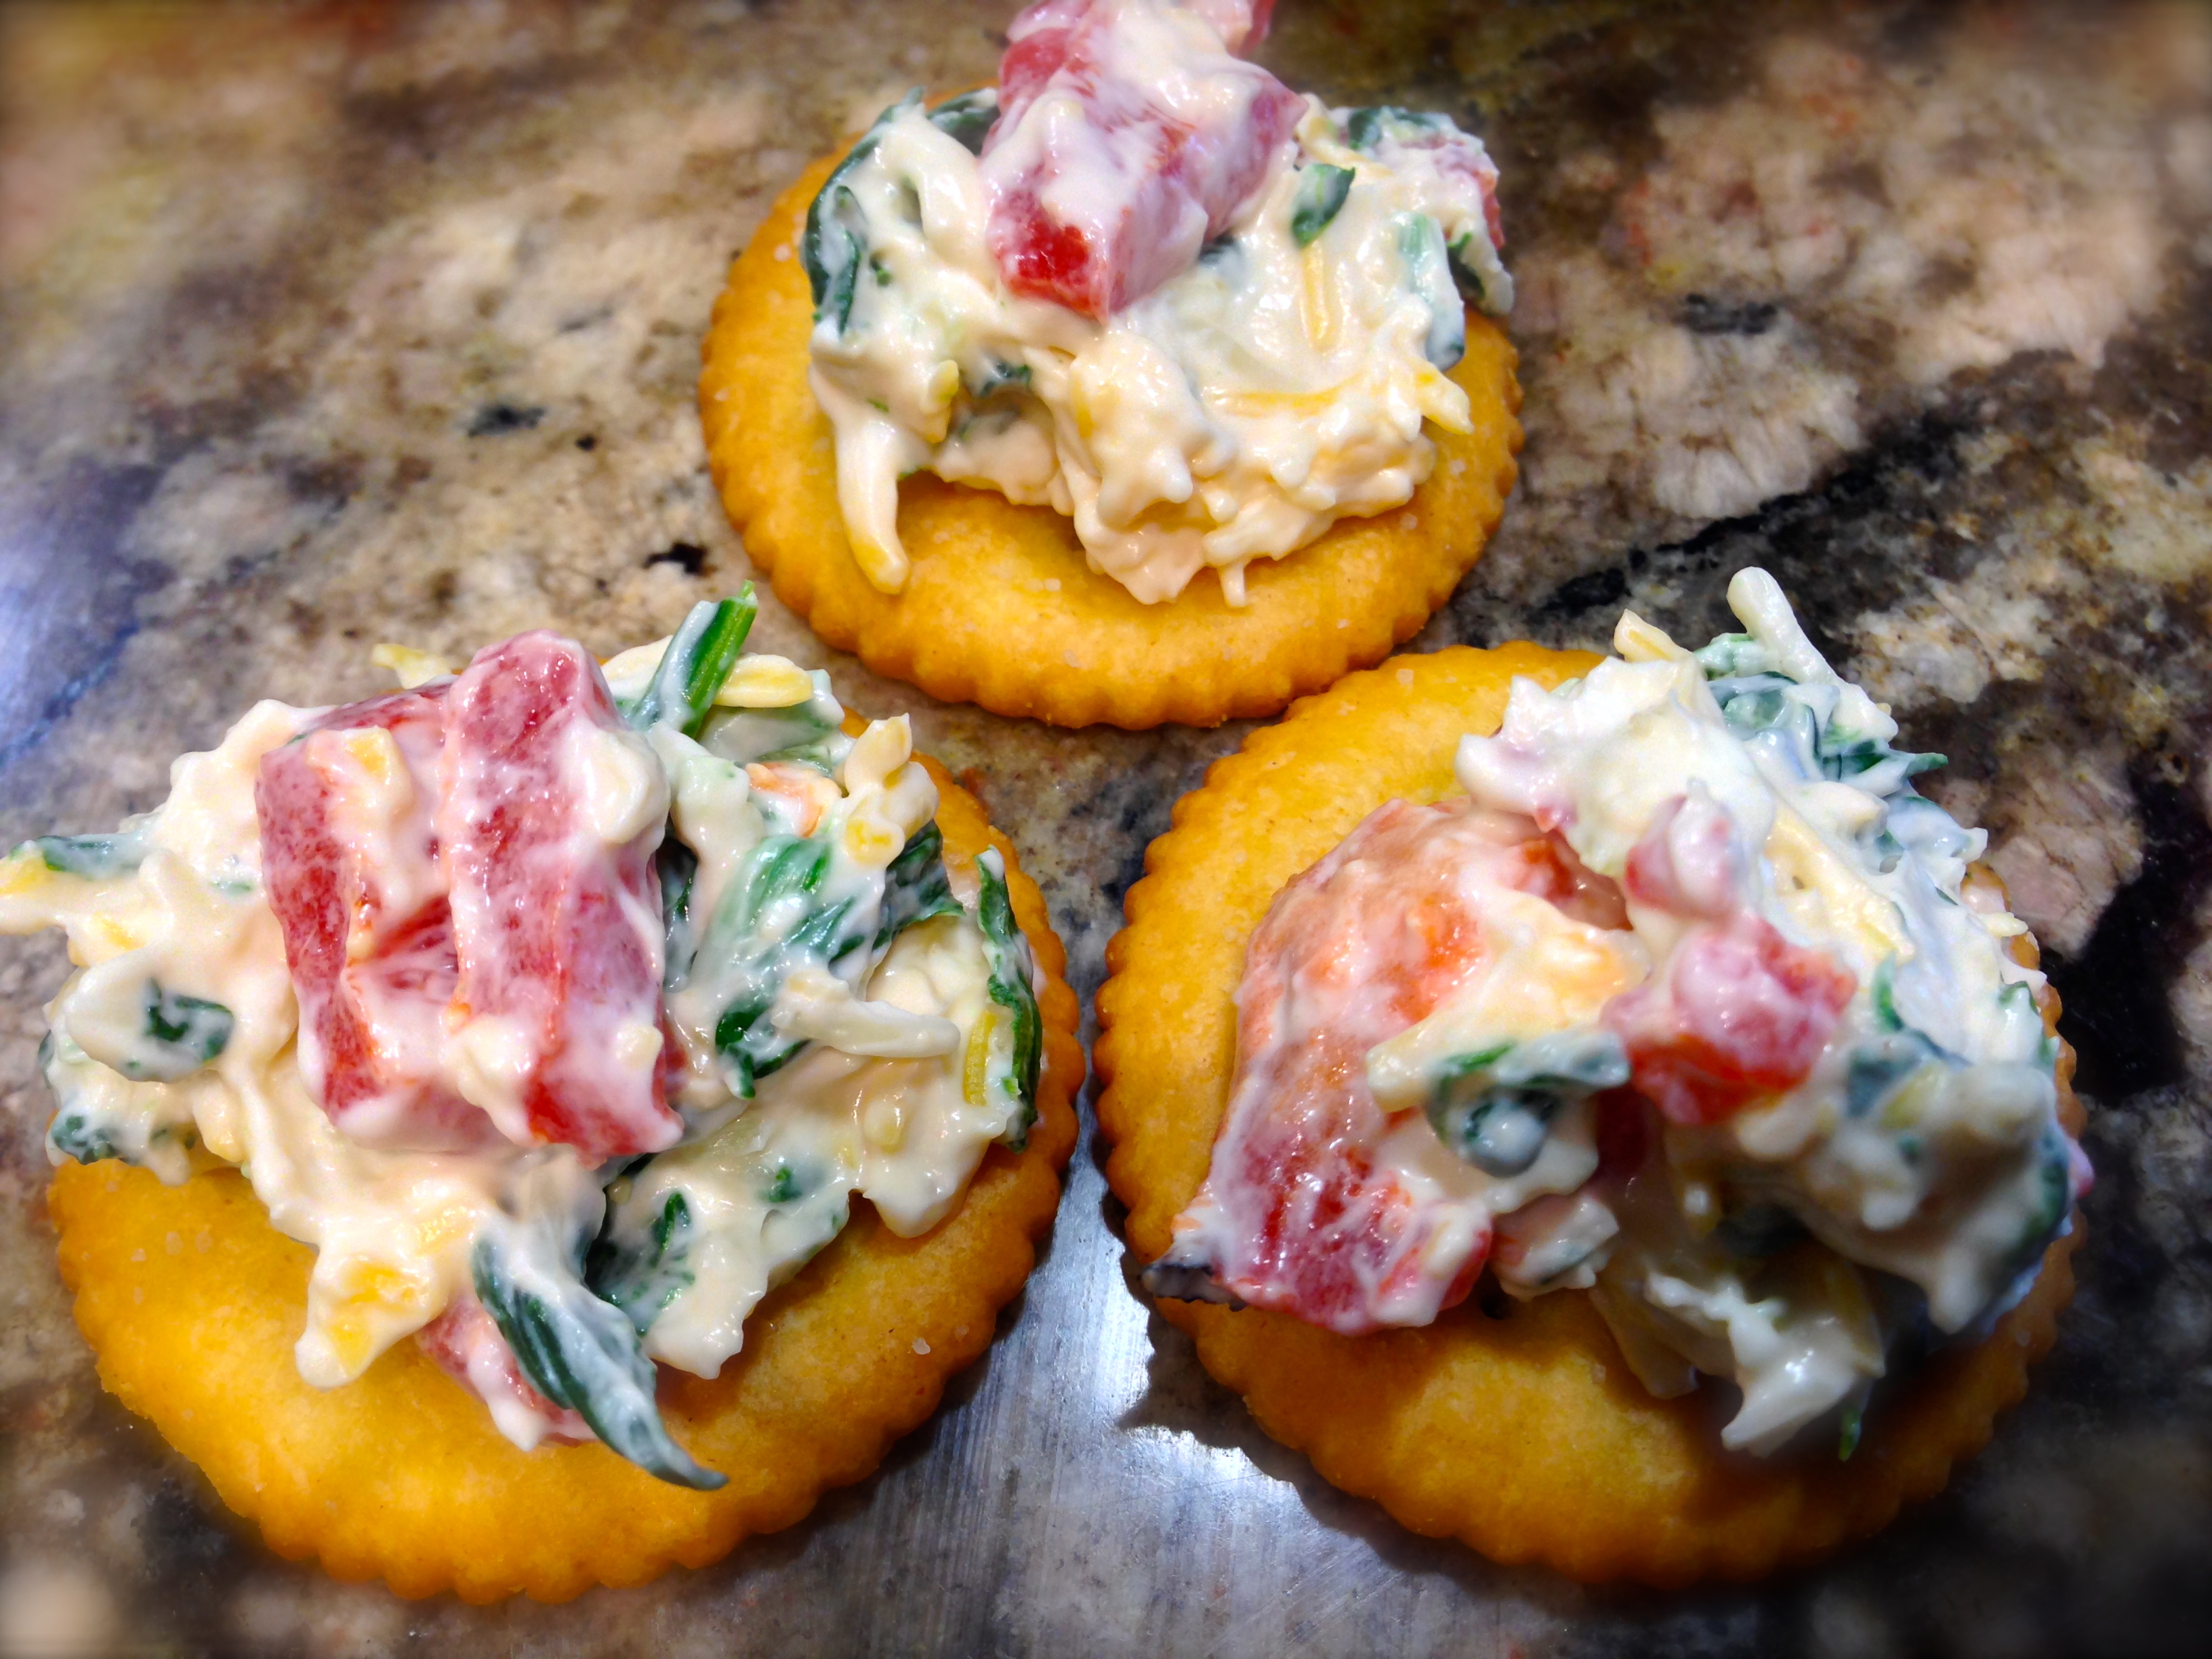
Shrimp Dip Ingredients

The result was flavorful, meaty chunks of shrimp in the dip. That combined with the other seasonings set the dip over the top. And once you let the dip sit (I made mine the day before) the flavors become more fully developed and the dip is out of this world. I remember tasting it the next day and then going back for a couple more spoonfuls because it was so delicious.

Lesson Learned 2 – Shrimp cooks really fast: Once I put the shrimp in the pan I cooked them on medium high heat for 2 minutes on one side and about 2 minutes on the second side. Now remember I was using jumbo shrimp. If you use smaller shrimp the cook time may be a little less.

When the shrimp is cooked it will be loosely curled. If the shrimp is tightly curled you’ve overcooked it and it will be tough. Shrimp is like calamari – it gets tough when you overcook it. So don’t let it worry you if you think the cooking time is short. If the shrimp has a nice light coral color and is loosely curled you’ve cooked it perfectly.

Lesson Learned 3 – This recipe tastes the best when it’s made the day before: When I made this dip I tasted it right after I made it and it was good. But when I tasted it the next day I thought the flavor was over the top. I actually saved some of this dip and made a sandwich out of it, it was that good. And it disappeared quickly at the gathering where I served it. So do yourself a favor – let this one sit for a day. You won’t regret it!

Lesson Learned 4 – Another key factor in the flavor is pimento cheese: If you’ve never had pimento cheese you’ll see it has a slight kick to it. That combined with the horseradish gives the dip some zip. The zip is ever so slight so don’t worry about people not being able to eat it because it’s too spicy. You could also use a sharp cheddar, but I don’t think it will provide the depth of flavor that the pimento cheese does. I found it in the specialty cheese section in my local supermarket. If you don’t see it, ask for it. I’ll bet it’s there you just never noticed it.

Preparing, seasoning and cooking the shrimp from scratch makes all the difference in this recipe. I am anxious to hear your thoughts on this one. Make it and let me know what you think. You won’t be disappointed.

The Best Ever Shrimp Dip (No Lie)...

  • Servings: Party Size
  • Difficulty: Easy
  • Print

INGREDIENTS:

1 – 16 ounce bag frozen raw peeled and de-veined large/jumbo shrimp, thawed

1 -2 Tbs. garlic infused olive oil

1/4 tsp. Old Bay seasoning

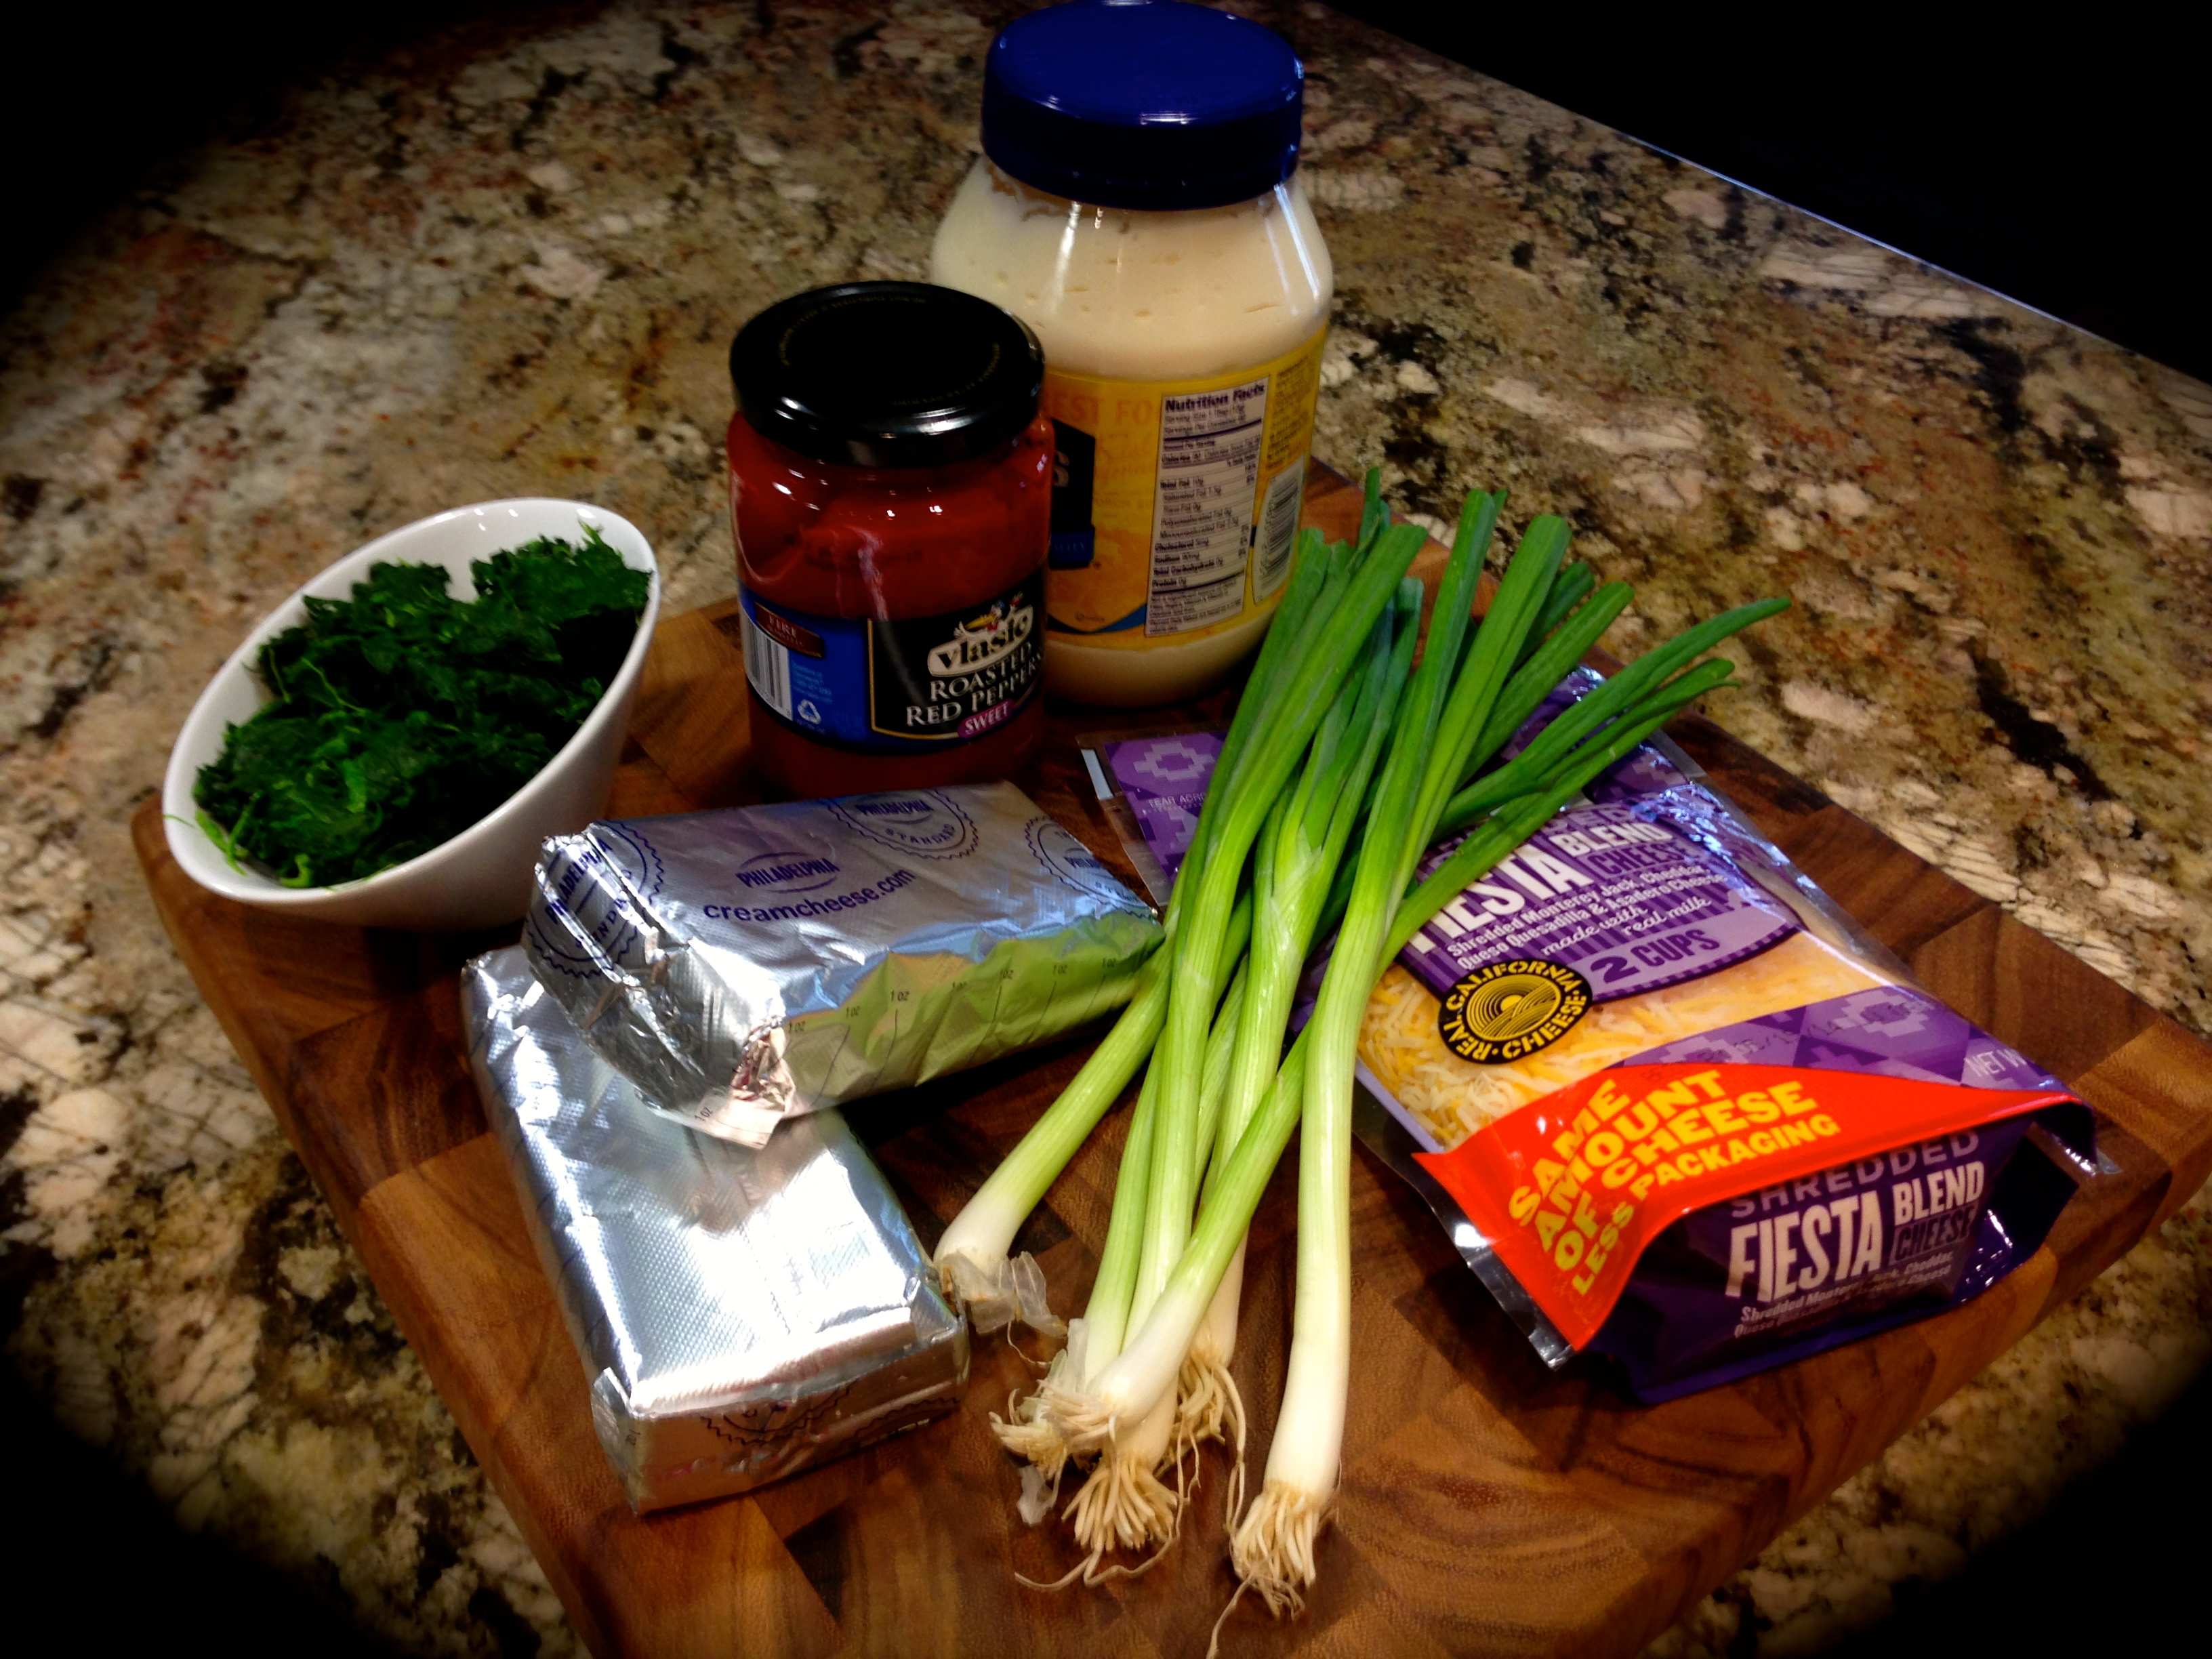
1 – 8 ounce package of cream cheese, softened

1 heaping Tbs. horseradish

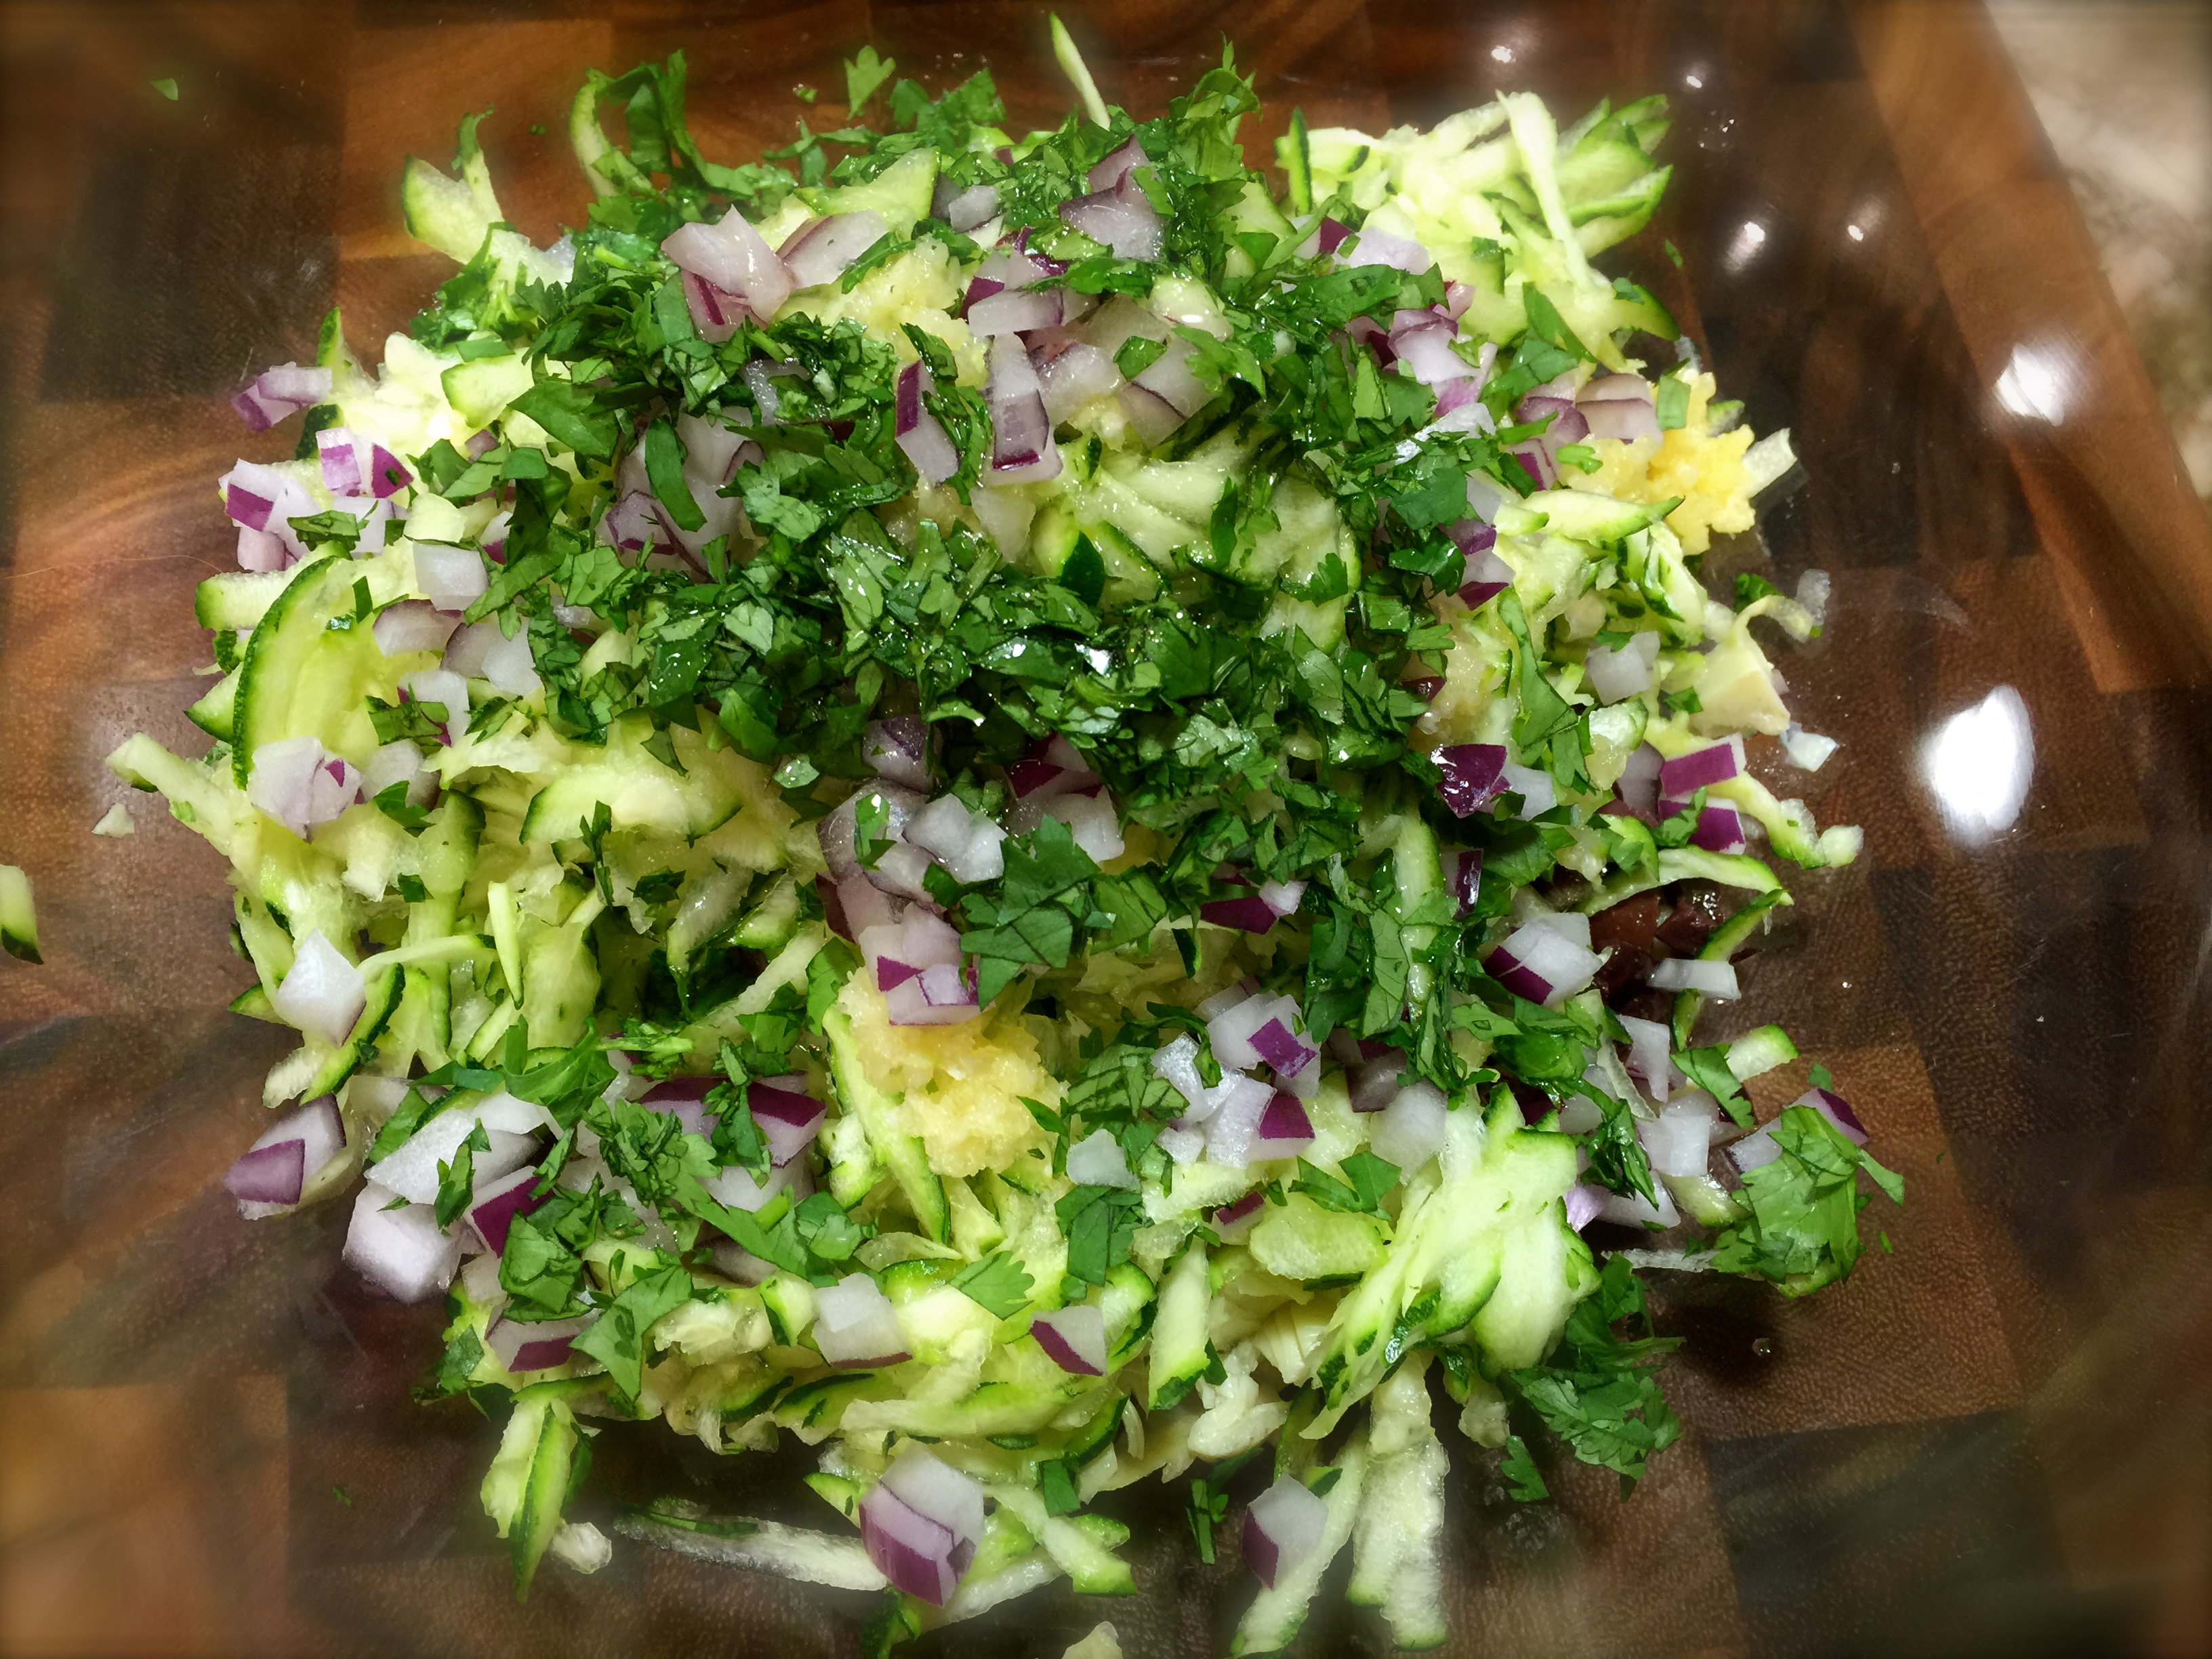
1 Tbs. shallots, minced

1 cup pimento cheese

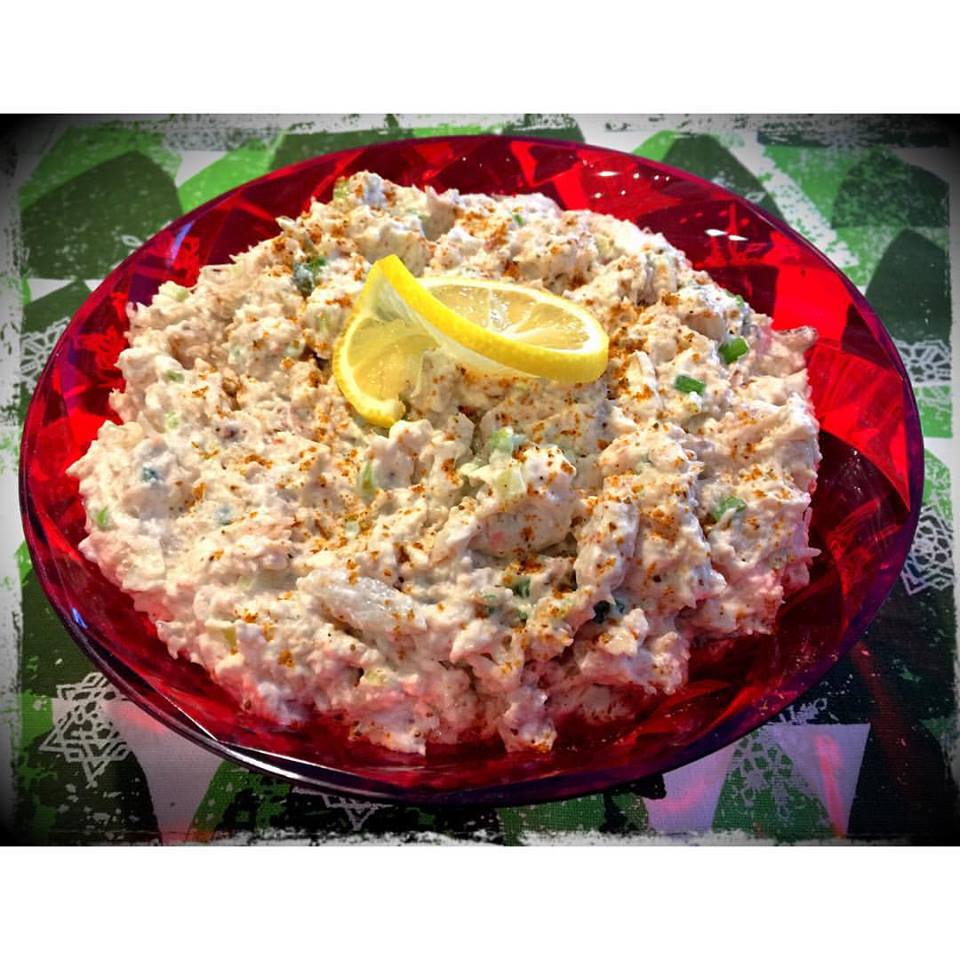
1 Tbs. chopped Italian parsley for garnish, optional

DIRECTIONS:

Thaw the shrimp. Remove any remaining shells on the flesh of the shrimp. Cut the tails off (or you can keep it on, basically it’s your choice). In a medium sized bowl combine the shrimp, olive oil and Old Bay seasoning. Stir to make sure all of the shrimp is coated with the oil and seasoning.

On medium heat cook the shrimp for 2 minutes on one side and 1 1/2 -2 minutes on the other. The shrimp is done when it gets a soft coral color and is loosely curled. Cool the shrimp and cut it into small chunks.

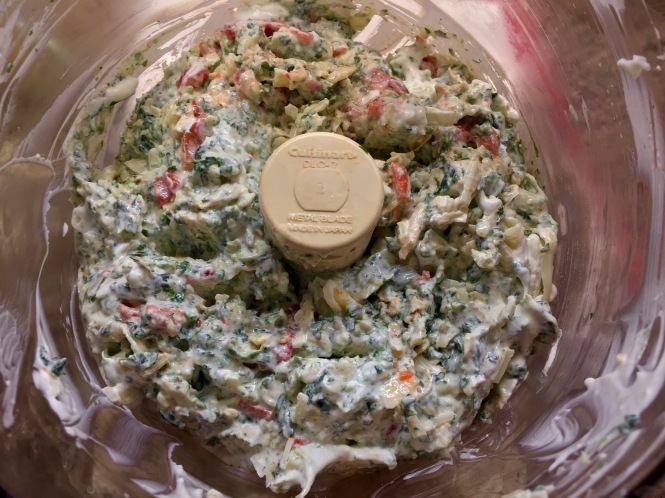
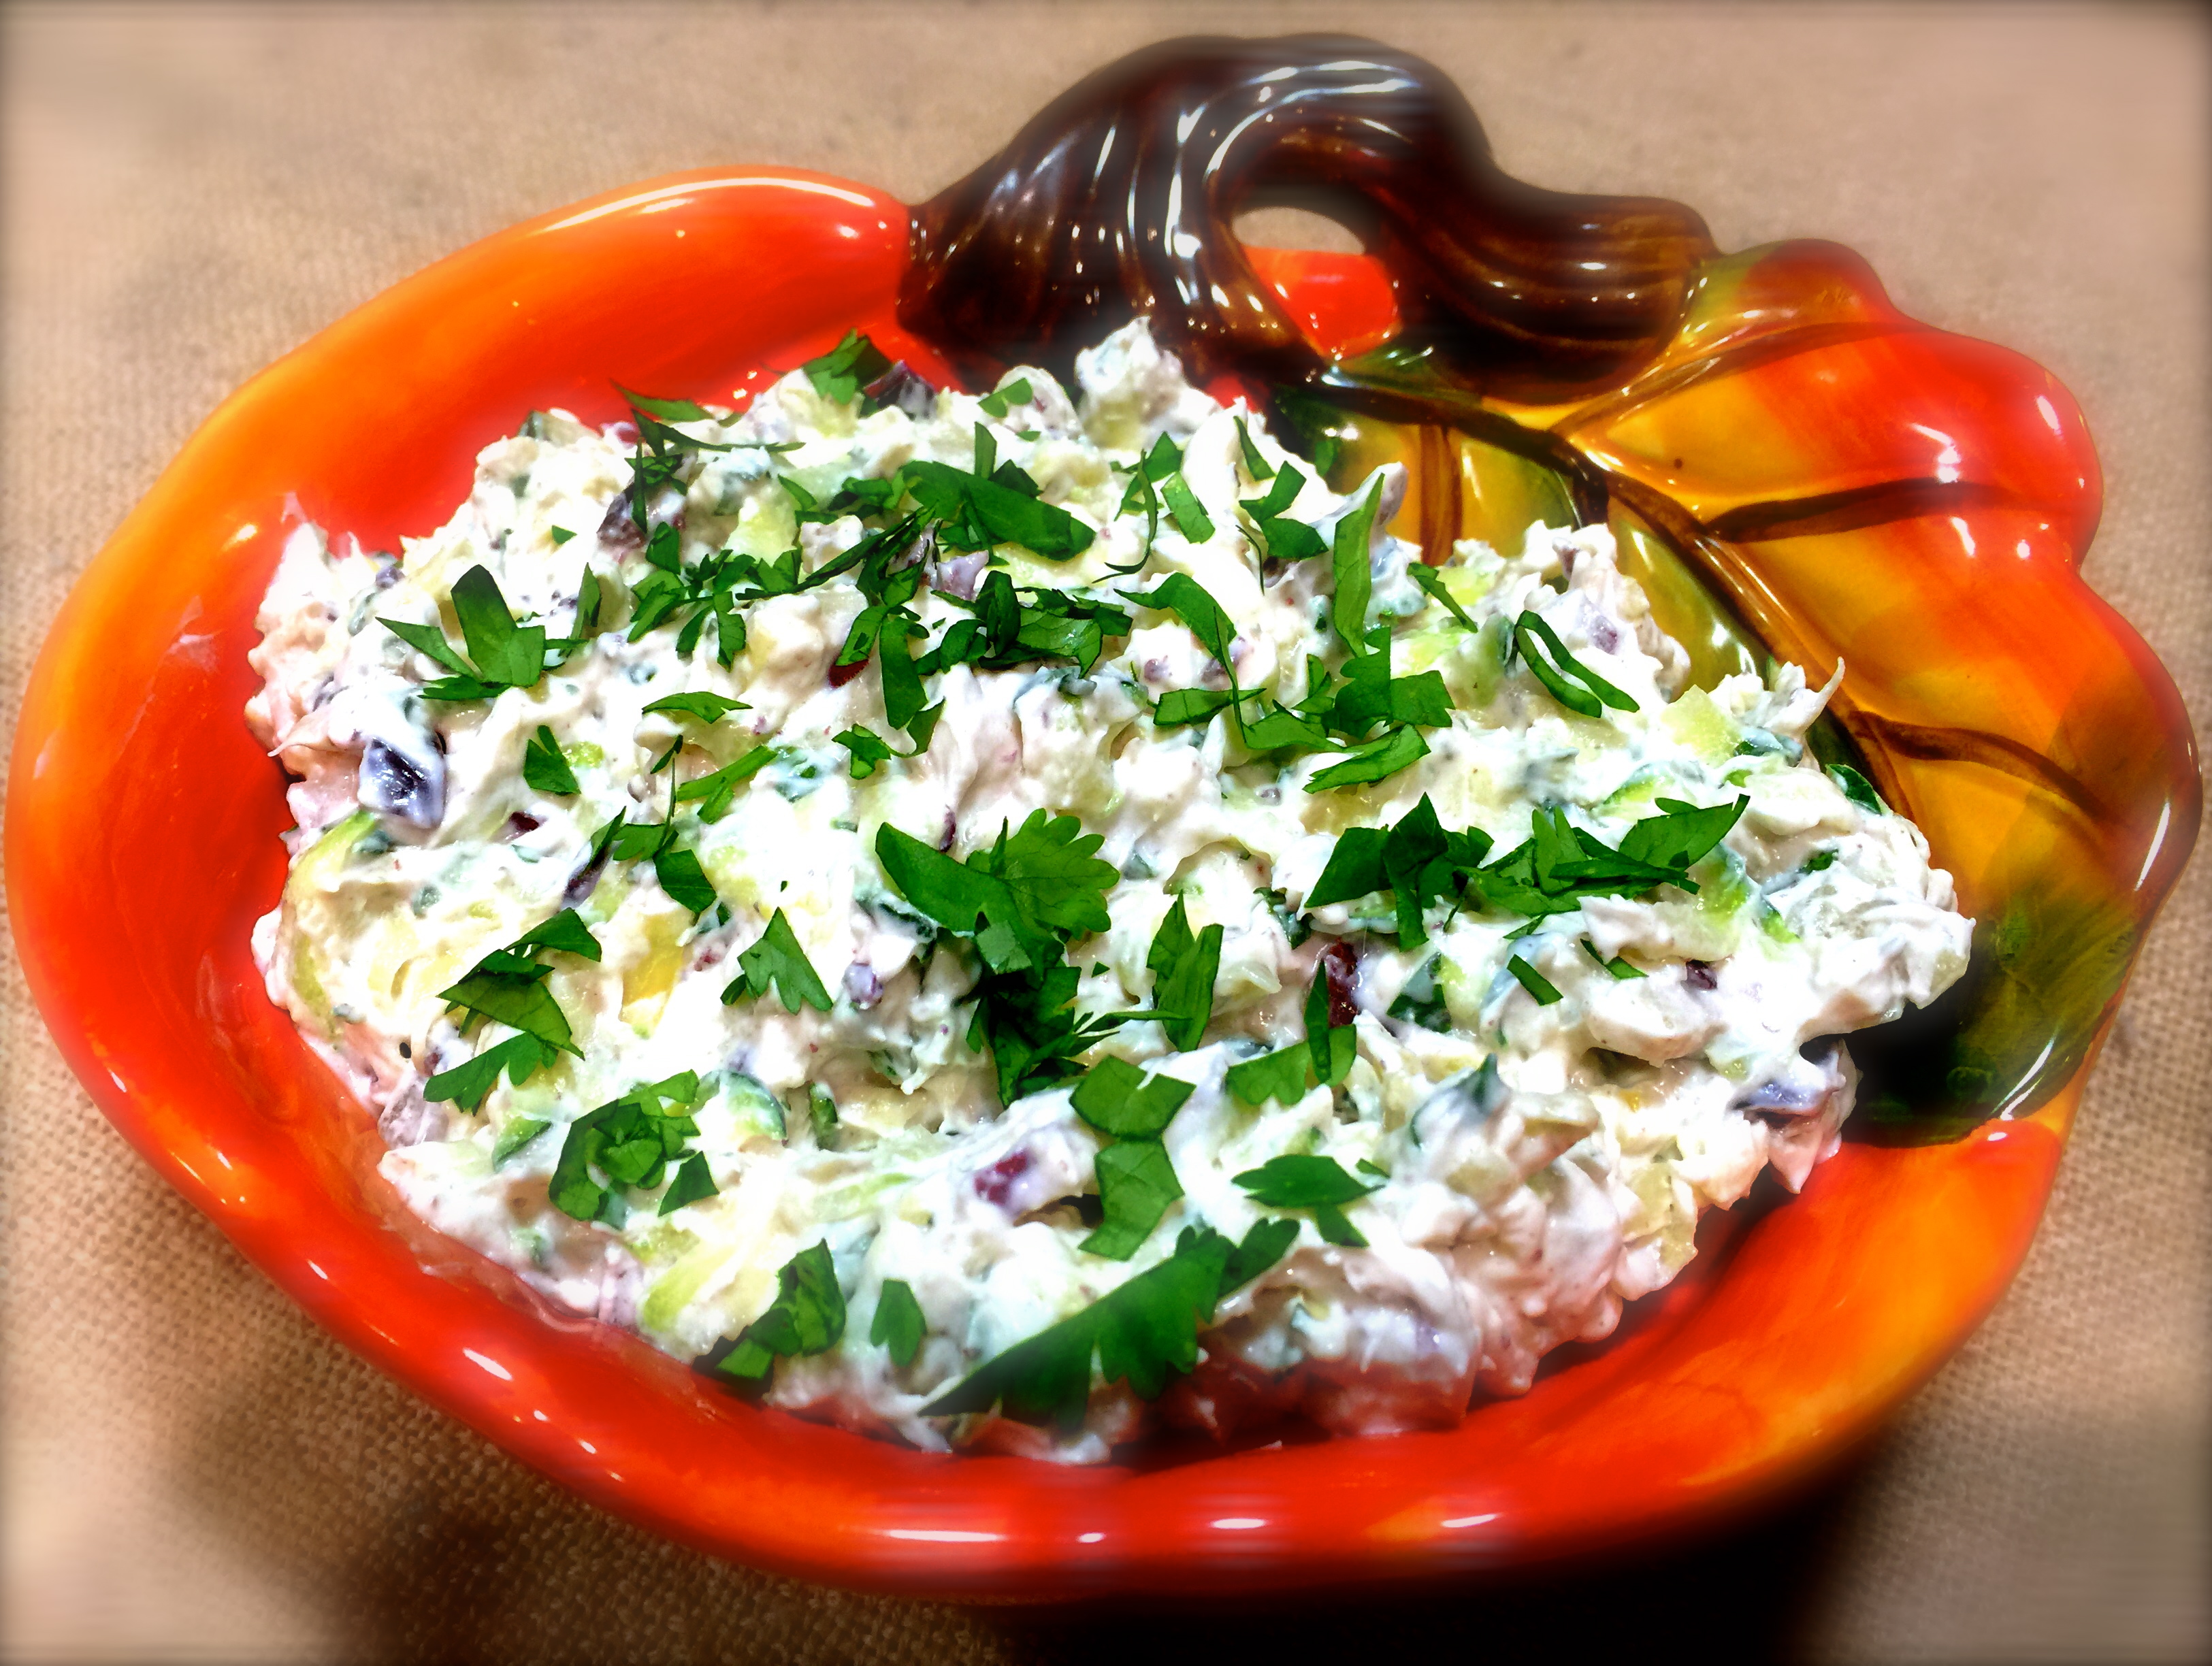
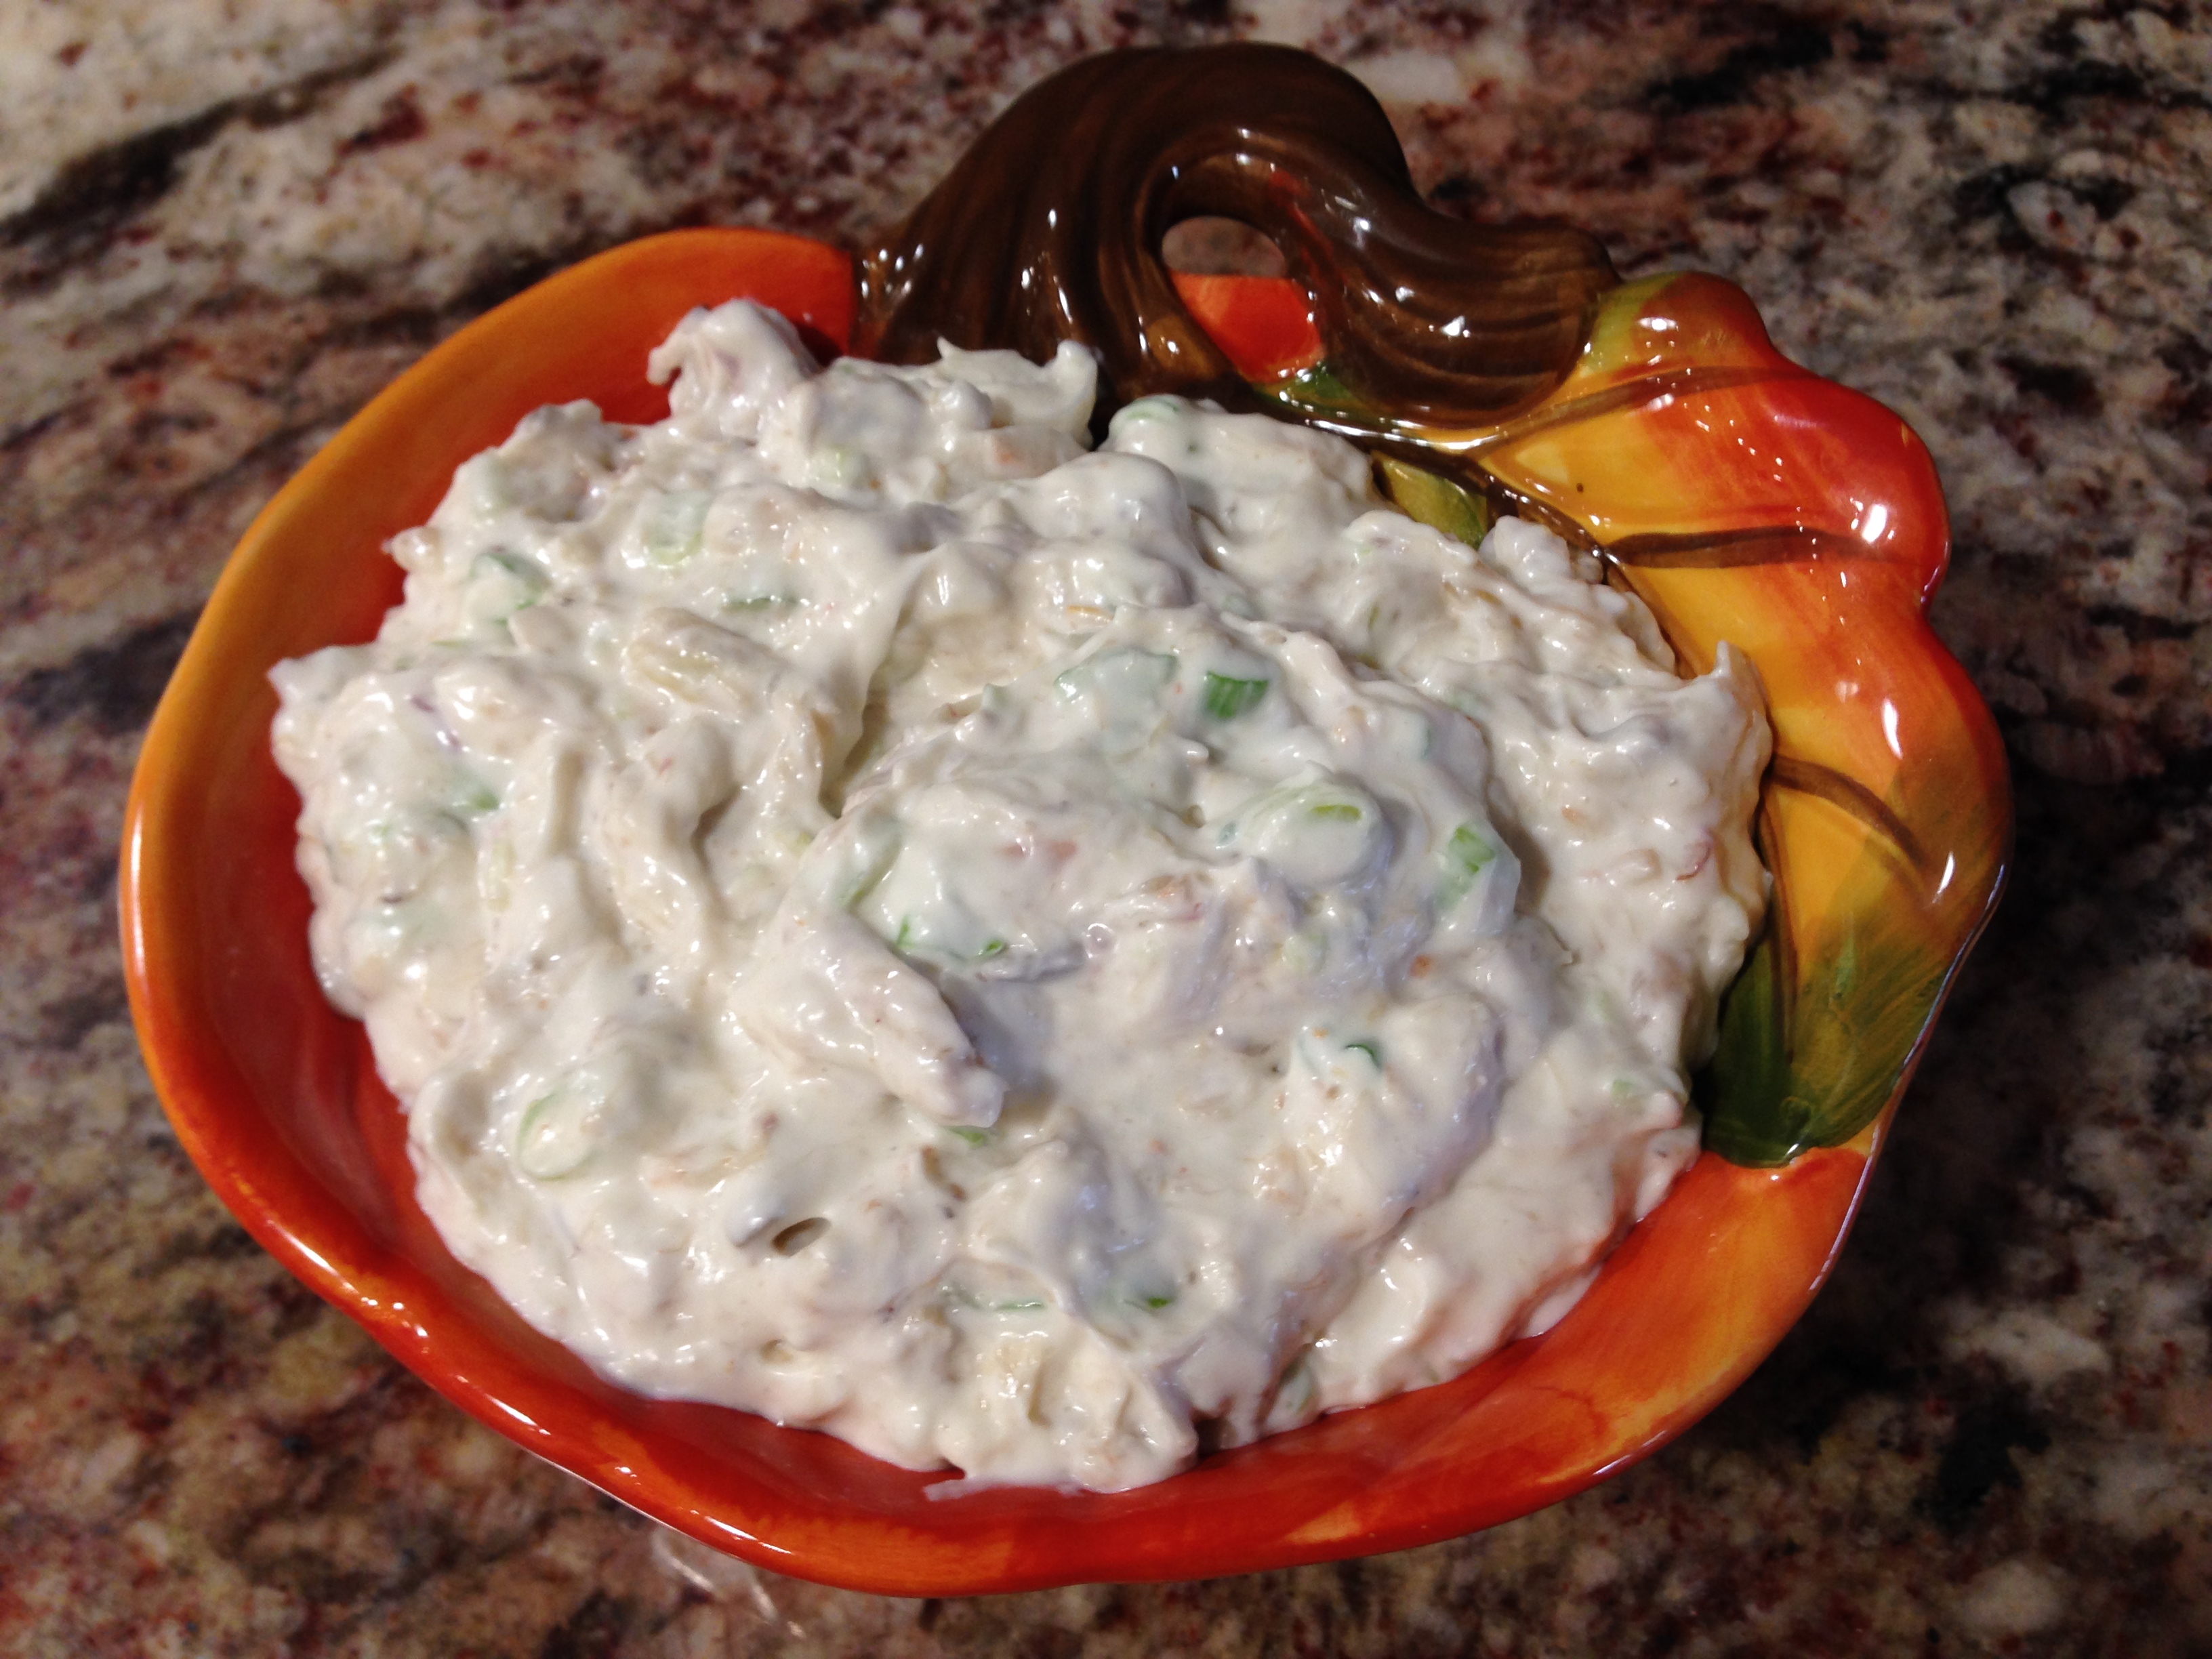
In a separate bowl combine the cream cheese, horse radish, shallots, and pimento cheese. Add the shrimp. Stir until well combined. Refrigerate overnight. (you can serve immediately or chill for a short period of time but overnight is the ideal). Garnish and serve with crackers, chips or veggies.


Tangy Bacon Cheddar Yogurt Dip…

Fall is just about here. I can already see the difference in the angle of the sun that brings about darkness much earlier. You can feel the change in the air. But there’s still some time to fire up the old grill and have a late Summer party with great appetizers and good ole BBQ.

I’ve had a lot of practice making appetizers this Summer as my condo association hosts a happy hour every Thursday and although you’re not obligated to bring anything I like to use it as my recipe tester event. So last Thursday I made this dip and it was a hit.

Nothing very difficult about this one. It’s super easy, has tons of flavor and goes well with cocktails. So let’s talk tangy bacon cheddar yogurt dip…

Lesson Learned 1: Make this as tangy as you like. In my experience light heat is the most effective when making a recipe for a crowd. You can never judge the heat quotient of your guests so it’s best to give it just a little zip to a recipe so the greater majority of people will eat it. But if you know you’ve got a group that loves spicy, feel free to add as much heat as you like. It’s all up to you.

Lesson Learned 2: Used precooked bacon as a shortcut. I found a package of Boar’s Head precooked bacon and I used it when I made this recipe. It is a great time saver, you eliminate the grease and mess you get cooking bacon and the flavor is just the same. So if you’re really looking to cut your prep time, try that. If not, cooking bacon the old fashioned way is perfectly fine.

Lesson Learned 3: Serve this with veggie straws. I’m not sure how I got the idea to use veggie straws but they were the perfect compliment to the dip. I think people just get tired of the usual potato or nacho chips and this was a welcome change. They also lend themselves well to scooping some dip on the straw which makes this appetizer great finger food.

Lesson Learned 4: As with any dip, make it ahead of time. I know I’ve said this time and time again, but dips, cheese balls and the like always taste better when you give the ingredients time to get acquainted. So make this dip a few hours ahead of time and let it chill in the refrigerator before serving. The dip always tastes better a few hours after its had time to chill.

What I like about this appetizer is it’s quick and easy. You don’t have to spend a lot of time on this one and your guests will love it. Try it at your next get together. Enjoy!

Tangy Bacon Cheddar Yogurt Dip

  • Servings: Party Size
  • Difficulty: Super Easy
  • Print

INGREDIENTS:

6 bacon slices, cooked, crumbled and divided

1/2 cup low fat Greek yogurt

1/2 cup sour cream

1 tsp. garlic salt

1-2 tsp. hot sauce

2/3 cup sharp cheddar cheese, shredded

2 Tbs. chives, divided

1 package veggie straws

DIRECTIONS:

In a medium bowl combine yogurt, sour cream and garlic salt. Add hot sauce to taste. Stir in cheese and 1 1/2 Tbs. of chives. Add all but about 1 Tbs. of crumbled bacon. Stir to combine.

Transfer the dip to a serving bowl. Cover and chill for at least 1 hour. To serve garnish with reserved bacon crumbles and chives. Serve with veggie straws.

Shrimp Dip…

Graduation parties and summer cookouts boast of fun and food. And if you’re in the position to be hosting one, you’re probably thinking about what you can do that is delicious but easy to make. That way you can spend more time with your guests and less time in the kitchen.

This recipe fits the bill. It’s a really easy dip that takes no time to make and is loaded with flavor. Serve it with a combination of chips, pretzels and crackers for an appetizer that looks casual but tastes decadent.

So let’s talk shrimp dip…

Lesson Learned 1 – Use LOTS of shrimp: I used a 12 oz. bag of frozen cooked and deveined shrimp. I thawed the shrimp in the refrigerator overnight and then chopped it up into small bite sized pieces. I kept a couple of shrimp to garnish the top of the dip (of course you don’t have to do that) and all the rest went into the dip. My point being this is a shrimp dip – the more shrimp the better.

If you’re lucky like I was you can catch the shrimp on sale. The twelve ounce bag only cost me $7.99 so I got a deal. Keep a look out for sales on the frozen shrimp if you’re looking to keep the cost down on this dip. I already had all the other ingredients in my refrigerator and pantry except the celery so I was able to splurge a little with the shrimp.

Lesson Learned 2 – If your celery stalks still have the green leaves on them use them as well: For this particular recipe all you really need is one medium sized celery stalk chopped. Normally you can buy individual stalks at the grocery store instead of buying a whole head of celery. When I only need a little celery I always try to buy a stalk that has some leaves on it. Those leaves chopped up and put into the dip add additional depth of flavor. So don’t be afraid to use them as well.

Lesson Learned 3 – If you can, make this recipe the day before: Like almost any dish, the more the ingredients are acquainted directly relates to upping the wow factor of the flavor. So it is with this dish. It is such an easy dish to make that it shouldn’t be too difficult to make it the day before and let it sit overnight in the refrigerator. But if you’re in a rush and need something quick, you can serve this the same day and it will still be very good.

The recipe itself is very straightforward so there’s not a lot of lessons learned to share with it. Just follow the directions, use some creativity in your presentation (you can dress it up with a combination of chips, pretzels and crackers) and watch it disappear. This one is a no brainer. Try it and tell me what you think.

Shrimp Dip...

  • Servings: Multiple
  • Difficulty: Easy
  • Print

INGREDIENTS:

1 – 8 oz. package of cream cheese, room temperature

1 – 12 oz. package of frozen cooked and deveined medium sized shrimp, thawed and chopped

1/2 cup mayonnaise

1/4 tsp. garlic fleur de sel (you can substitute garlic salt)

juice of 1/2 lemon

1 lemon slice for garnish, optional

1/4 cup celery, chopped (one medium sized stalk)

1/4 cup scallions, chopped

1/8 tsp. paprika, for garnish, optional (you can also use some sprigs of fresh herbs like thyme)

Crackers, potato chips and/or pretzels for serving

DIRECTIONS:

With an electric mixer, beat the cream cheese until fluffy. Add the mayo, lemon juice and fleur de sel. Mix to thoroughly combine. With a wooden spoon stir in the shrimp, celery and scallions.

Place mixture in a serving dish. Garnish with paprika and a lemon slice or some sprigs of lemon thyme. Serve with pretzels, chips and/or crackers. (If making the day before wait to garnish the dip until you’re ready to serve.)

cut shrimp into small bite sized chunks

serving suggestion with fresh thyme sprigs as garnish


SaveSave

SaveSave

SaveSave

SaveSave

SaveSave

SaveSave

SaveSave

SaveSave

SaveSave

SaveSave

SaveSave

SaveSave

SaveSave

SaveSave

SaveSave

SaveSave

SaveSave

SaveSave

SaveSave

SaveSave

SaveSave

SaveSave

SaveSave

SaveSave

SaveSave

SaveSave

SaveSave

Spinach Artichoke Red Pepper Dip…

Let’s face it. Once the football season is over there is definitely a sports vacuum. Major league baseball is just starting to tune up at spring training, college basketball still has over a month before the NCAA tournament, the next major in tennis is not until May, and everything else just seems to be a bunch of noise. And during this time I think back to some of the major highlights of recent sporting events. In my mind, nothing can surpass what the Chicago Cubs did last year but this past Super Bowl was no slouch of a game either. Then I started thinking about my Super Bowl party this past year and what I served and I thought, wow, I never posted this recipe!

This recipe was so much fun. I wanted what I served to be easy and fun and allow me to spend time with my guests and not in the kitchen. I decided to serve this dip along with a hot crab dip for appetizers. Dinner consisted of slow cooker bbq pulled chicken sandwiches with cole slaw  and sliced tomatoes. The meal was a hit and this appetizer was the star of the show!

So let’s talk spinach artichoke red pepper dip…

Lesson Learned 1 – If you want to impress your guests, make this appetizer: This recipe couldn’t be any easier and boy does it impress. You basically combine the ingredients in stages in the food processor, put it in the carved-out bread bowl, bake it and the oven does all the rest. I was amazed at how great it looks and above and beyond that, it is absolutely delicious. It is a fabulous appetizer to serve at any party!

Lesson Learned 2 – Take your time when carving out the bread bowl: I used an artisan sour dough bread that I bought at the grocery store. You start out by cutting the opening on top of the bread. Make it large enough so you can stuff the bread but not too large that you cut off a lot of the bread. Then take a paring knife and begin cutting out the inside and under the sides. Take your time so that you don’t cut to close to the crust on any side. You want at least about 1 inch of bread at the bottom. You can do a little less than that on the sides. And make sure you save what you cut out. You can cut that into cubes and serve it as one of the sides with the warm dip. Yum!

Carved Out Bread Bowl

Carved Out Bread Bowl

Lesson Learned 3 – Combine your ingredients in stages in the food processor: Your food processor will be your best friend for this recipe. But don’t mix everything all at the same time. Some ingredients you will want mixed until smooth, other ingredients you will want chunky. Follow the process in the recipe and you will get the correct consistency for this dip.

The correct consistency for the dip

The correct consistency for the dip

Lesson Learned 3 – Garnish is your best kept secret: Are you always looking for ways to make your dish look more professional? Well look no further. Let garnish be your best friend. This appetizer baked in a bread bowl is pretty impressive on its own but what set the presentation over the top was cutting up some flat leaf parsley and garnishing the bread bowl and the accompaniments with the parsley once they were on the platter. You could also dice up some jalapeños and sprinkle them on top of the dip. Since I actually included them in the dip I chose not to use them as a garnish this time. But diced jalapeños are also an option. Garnish tends to make the colors in your food pop and in general makes every dish look more professional. So don’t forget the garnish.

Lesson Learned 4 – Did you ever hear of a Daikon? When looking at things I could serve with this dip, one recipe that I saw suggested daikon. I had never heard of daikon before. I googled it and found out that is part of the radish family. I’d never seen it at the store and so I thought if any store would have it, Whole Foods would. Well I was right. Whole Foods had it. Daikon sort of looks somewhat like a white carrot but they are not parsnips. Anyhow, they are a great side for this dip. Just cut them in rounds like you would a radish. And after I found them at Whole Foods I also found them at my local supermarket, so just look for them and try them.

Make this appetizer for your next party. I guarantee you it will be a hit! Enjoy.

Spinach Artichoke Red Pepper Dip...

  • Servings: 20-30
  • Difficulty: Easy
  • Print

INGREDIENTS:

Spinach Artichoke Red Pepper Dip
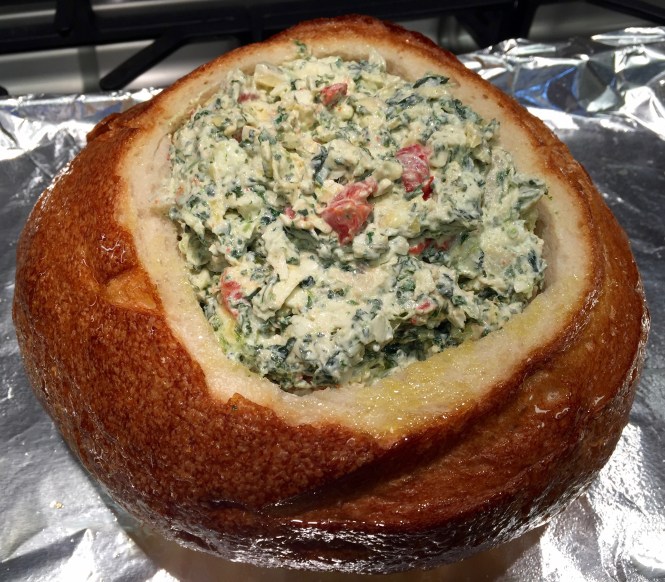
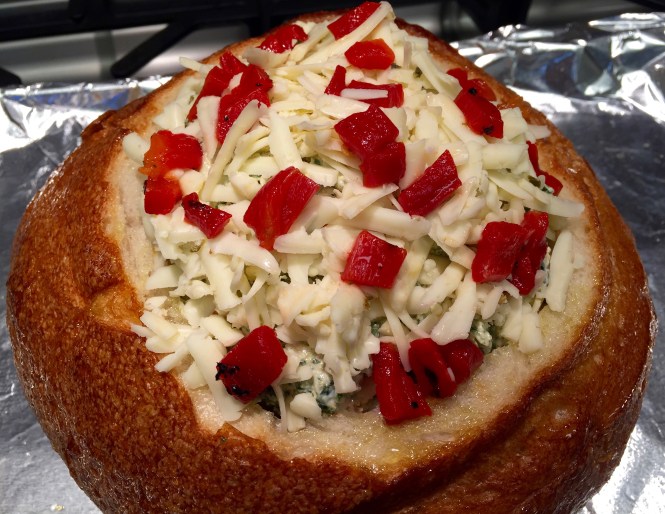
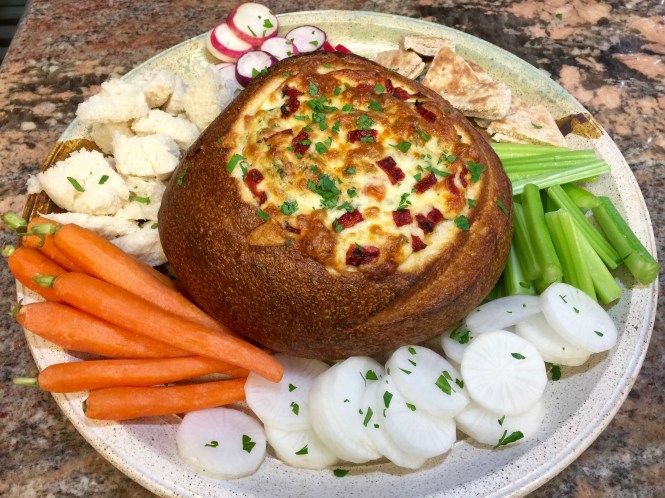
1 large round sourdough bread

4 ounces cream cheese, room temperature

1/2 cup mayonnaise

1/2 cup sour cream

1 small jalapeño, seeded and chopped

1 clove garlic, chopped

1 10 ounce box of frozen spinach, thawed and squeezed dry in a towel

1 cup marinated artichokes, rinsed and drained

1/4 cup + 2 Tb. chopped Italian parsley

1/2 cup roasted red pepper, chopped and divided

1 1/2 cups pepper jack cheese, divided

Salt and pepper to taste

Garlic infused olive oil for brushing the bread

Crackers, baby carrots, red radishes, daikon, celery and bread cubes, for serving

DIRECTIONS:

Preheat the oven to 400 degrees. Cut a thin slice from the top of the bread. With a paring knife cut out the exposed inside to about 1 inch from the bottom and at least 1/2 inch from the sides. Cut the extracted bread into cubes and use for serving later.

Combine the cream cheese, mayo, sour cream, chopped jalapeños and garlic in the food processor and process until smooth. Add the spinach and artichokes and pulse until chunky. Add the parsley, all but 1 Tbs. of the red pepper, 1 1/4 cup cheese and salt and pepper and pulse until just combined.

Spoon the mixture into the bread bowl. Top with the remaining cheese and red pepper. Place the bread on a baking sheet. Brush the bread with olive oil. Bake 25-30 minutes.

Serve with crackers, veggies and crudités. Garnish with chopped flat leaf parsley.

Pulse for a chunky consistency

Pulse for a chunky consistency

Correct consistency of the dip

The correct consistency of the dip

Fill the bread bowl

Spoon into the bread bowl. Brush the bread with olive oil.

Garnish with cheese and red pepper

Add more cheese and roasted red pepper on top

Spinach Artichoke Red Pepper Dip

Serving Suggestion

Zucchini Artichoke Olive Dip…

This past weekend a farewell party was being hosted for a co-worker who is moving to New York City. We were all asked, if we wanted, to bring something for the table. I knew I would be working all day the day before and the day of the party so I wanted to bring something that was not necessarily the usual faire and that I could make ahead. I decided on this recipe.

dip ingredientsThis is what Rachel Ray would call a chop and drop recipe. All the work is in the chopping and once that’s done you just stir the ingredients all together and refrigerate it. It’s a perfect make-a-head appetizer for any party.

So let’s talk zucchini artichoke olive dip:

Lesson Learned 1 – Make sure your cream cheese is room temperature: This is a pretty hearty dip, almost a spread, so it’s important the cream cheese be room temperature, otherwise you’ll never get the ingredients completely blended. If the cream cheese is room temperature it mixes easily and you want to make sure everything is thoroughly combined as you have raw garlic and onion in this dip. You certainly don’t want concentrated clumps of raw onion or garlic anywhere.  The only way you’ll achieve that is with room temperature cream cheese.

zucchini artichoke olive dip

Lesson Learned 2 – any kind of olives will do: I had kalamata olives in the refrigerator, but you can use pimento stuffed olives or black olives, a combination of olives or whatever you prefer or have on hand. Be sure to add only 1/4 cup of finely chopped olives to begin with and then taste the dip when it’s all mixed. Olives tend to have a lot of salt in them and you don’t want to overpower the dip by adding too many. You can always add more if you think the dip needs more.

zucchini artichoke olive dip

Lesson Learned 3 – refrigerate this dip for at least 4 hours: This is the kind of dip that tastes even better if all the ingredients get well acquainted, so keep it in the refrigerator for at least 4 hours, although overnight is preferable.

garlic-press-and-sliceLesson Learned 4 – Use a garlic press to mince the garlic: Since you are adding raw garlic, it’s important that it be finely minced. The best way I’ve found to do that is with a garlic press. If you chop by hand you run the risk of having a larger chunk(s) of raw garlic somewhere in the dip. Using a press minces the garlic evenly and allows for it to be thoroughly incorporated into the other ingredients.

Lesson Learned 5 – Start out by using only a small amount of fresh cilantro: Cilantro has a very strong flavor but it also adds depth of flavor to this dip. I recommend starting out by adding only 2 tablespoons of finely minced fresh cilantro. After you taste the dip, if you feel it needs more cilantro you can always add it. I found 2 tablespoons to be more than enough.

Lesson Learned 6 – Squeeze the excess water out of the shredded zucchini: Zucchini, like cucumbers, has a lot of water in it. You don’t want a runny dip so it’s important to squeeze the excess water out. I just took handfuls and squeezed them over the sink until no water dripped out. You can wrap the zucchini in a towel and squeeze the water out that way as well. But, if you have clean hands it’s so much easier just using your hands and you’re not left with a dirty dishtowel.

This is so easy to make and it has a slightly different combination of ingredients than most artichoke dips. Try it at your next party. It’s sure to be a hit!

Zucchini Artichoke Olive Dip…

  • Servings: 30
  • Difficulty: Easy
  • Print

INGREDIENTS

2 packages of cream cheese (8 oz. each), room temperature

3 cups shredded zucchini (2 medium sized zucchini)

1 jar marinated artichokes drained and chopped (you can add more if you like)

1/4 cup finely chopped olives (I used kalamata olives)

4 large garlic cloves, minced

3 Tbs. finely chopped red onion

2 Tbs. minced fresh cilantro

2 Tbs. lime juice (1 medium sized lime)

2 Tbs. good olive oil (I used garlic infused olive oil)

Appetizer crackers or a french bread baguette, sliced.

DIRECTIONS: 

Combine all of the ingredients except the crackers and/or sliced baguette into a large bowl. Combine thoroughly. Refrigerate for a minimum of 4 hours, overnight is preferable.

Serve with appetizer crackers or a french bread baguette, sliced.

Zucchini Artichoke Olive Dip

Dip-etty Do Dah…

Macy’s Thanksgiving Day Parade – check. Football games – check. Thanksgiving dinner reservation – check. Santa Claus is coming to town – check. And so it begins (although one would argue that it began some time ago), the Christmas season is upon us. Time for the insanity of gift buying, decorating, baking, holiday parties and the annual fear of whether you will survive yet another holiday season. The pressure is on to have your house look like a picture posted on Pinterest, your home filled with home-baked goodies and your gifts wrapped with a professional flair. No wonder so many people say bah humbug at this time of year.

But it doesn’t have to be all that bad, especially if you get a little help from your friends. So let me introduce myself, I am your holiday friend. Now I can’t decorate your home or purchase and wrap your gifts, but I can give you some great great recipes that I have either tested or used over the years to help you with some food decisions for your parties and family gatherings.

Creamy Spinach and Red Pepper Dip Ingredients

Creamy Spinach and Red Pepper Dip Ingredients

I already started with a great holiday recipe for a crab dip in a previous post, but just in case you missed it just click here and it will take you to that blog with a link to the recipe. Today I was challenged to make something for a pot luck we are having at work (I work at Crate and Barrel and we will be at the store in full force this holiday weekend) and I wanted to make something that could be enjoyed by all, especially since we have quite a few vegetarians on staff. I have a great recipe for holiday meatballs, which I will share some time within the upcoming days, but I knew that would not fit the bill. So once again I journeyed to Pinterest and did a search for cold dips. There I found a great recipe for Creamy Spinach and Red Pepper Dip from the tastykitchen.com website. The ingredients fit the bill and the rest was history.

As always, with recipes I try from other sites, I do my self-claimed rating and lessons learned in the hopes that if I made any mistakes or learned any valuable lessons while making the recipe it will help you make it perfectly on your first try. This one was relatively simple so definitely something to keep in your hip pocket if you need to bring something to a party or want an appetizer for a holiday meal.

Recipe Rating: A – the ingredients are simple, fresh and the recipe is easy to make. The most work you have to do is chopping the green onions and the roasted red peppers.

Lesson Learned 1: This is something I already knew but if you don’t it could definitely save you time and aggravation. The recipe calls for a 10 oz. package of frozen spinach. I was surprised how long it took for the spinach to thaw. I put it in the refrigerator the day before and then put it out on the counter this morning and left it there until 1:00 p.m. After thoroughly draining it (which really requires you to put the spinach in a towel and squeeze until no water comes out at all) I noticed there was still some ice particles in the spinach. So I separated the leaves, put them between two paper towels and pressed down on them. A lot of water still came out. The lesson here is to make sure it is thoroughly defrosted and as totally dry as possible (it will take longer than you think). Otherwise you will have a runny dip.

Lesson Learned 2: The recipe does not call for it but I added a pinch of salt at the end. After tasting it, it seemed like it was lacking a little something and the salt brightened up the flavor. Once it sits for a while, the flavors will be even more dynamic.

Lesson Learned 3: I am a big fan of roasting my own red peppers, but the roasted red peppers in a jar are just as good and a great time saver. So no need to do the process on the stove, just buy a jar and chop them up.

Lesson Learned 4: The recipe says that the prep time is only 3 minutes. I’m not sure what speedy chef decided that but by the time you assemble all the ingredients, do the chopping and mix the dip, I would say it takes about 10-15 minutes of your time. The nice thing about this recipe is that it serves 30 so for a large crowd like I have at work this is a great and inexpensive recipe to make.

Lesson Learned 5: This is a easy, flavorful recipe and the green of the spinach and the red of the roasted red pepper also provides the traditional holiday colors for which we have become accustomed – a nice decorative touch to your table.

So, get ready to deck the halls with this recipe. It is easy, colorful, impressive and will actually give you time to focus your energies on other things during the upcoming holiday season. Enjoy!

Creamy Spinach and Red Pepper Dip

Creamy Spinach and Red Pepper Dip

Get Your Holiday Crab On…

SINCE ORIGINALLY POSTING THIS RECIPE I’VE BEEN ASKED TO INCLUDE THE RECIPE IN THE BLOG AND I’VE TWEAKED IT SLIGHTLY FROM THE ORIGINAL. SO I WILL REPOST THE BLOG, WITH THE LINK TO THE ORIGINAL RECIPE AS WELL AS A PRINTABLE RECIPE ON THIS BLOG:

I stumbled on this one quite by accident. I was looking for a make-ahead appetizer recipe to bring to a friend’s house. All I could seem to find on Pinterest were appetizers best served hot and I wanted something I could make on Friday to bring to an event on Sunday. Somehow I stumbled on this recipe from justapinch.com called crab dip to make ahead. It sounded like it would fit the bill, so I decided to try it.

The challenge for me was finding some good crab meat. The last time I bought lump crab meat was from Costco and it was full of shells and very salty, even after I rinsed it thoroughly. This time I went to a local grocery store called Sprouts and found an 16 oz.can of crabmeat. When I opened it up, much to my surprise, it was a can of crab claw meat. The meat was tender, there were no shells and a slight rinse was all the meat needed. The dip took about 20 minutes to prepare and the recipe says it serves ten but I think it will serve more than that.

My rating of the recipe: A++++. This recipe is fabulous, easy to make and definitely one that tastes better once the flavors have had a chance to meld, so definitely make it ahead of time. This recipe would be a great addition to any holiday gathering.

Lessons Learned:

1. The recipe calls for 1/2 pound or 6 ounces of crab meat. I put in approximately 16 ounces. The more crab the better. There’s nothing worse than a crab dip where you can barely see or taste the crab.

Make Ahead Crab Dip

Make Ahead Crab Dip

2. The recipe includes adding unflavored gelatin to the mixture, the purpose being to keep the dip from getting too runny once it sits out for a while. I added it and would recommend it. The dip stayed nice and firm and you never taste the gelatin.

3. The original recipe also calls for either cream of shrimp or cream of mushroom soup. If anyone can tell me where to find cream of shrimp soup I would certainly like to know. I went to four different grocery stores and no on carried it. The cream of mushroom soup worked very well, but I would like to try it with cream of shrimp soup.

4. Everyone who tasted it loved it. You will be asked to share this recipe, I guarantee it.

Quite a few times I talked about the joy of trying a recipe and having it turn out perfectly the first time. This is one of those recipes. I was so excited to bring it with me to my friend’s house. Unfortunately the evening got canceled. My co-workers wound up being the recipients of my culinary success. Already four of them have asked for the recipe.

Holiday Crab Dip

  • Servings: 25-30
  • Difficulty: Easy
  • Print
INGREDIENTS:

1/2 – 1pound crab meat (I used a 16 ounce can)

1 8 oz package cream cheese

1 can cream of mushroom soup (I used the brand with roasted garlic)

1 packet unflavored gelatin

1/2 cup mayonnaise

1/2 cup (4 stalks) green onion, chopped fine

1/2 cup (1 1/2 large stalks) celery, chopped fine

1/8 tsp. salt

1 package cocktail pumpernickel bread and/or party crackers

Old Bay for garnish.

DIRECTIONS:

Open the can of crab meat and drain. By hand, clean the crab meat and remove any remaining shells or cartilage. Set aside.

Cut the cream cheese into smaller chunks. In a medium saucepan combine soup and cream cheese. Stir occasionally until cream cheese has melted. Add gelatin and stir to combine. Stir in the mayonnaise until combined. At no time let the mixture come to a boil.

Once combined, take the mixture off the heat and stir in the onions and celery. Add the crab meat and fold in gently until combined.

But crab mixture into a bowl and refrigerate for at least 6 hours (overnight is best). Put in a serving bowl and garnish with a sprinkle of Old Bay and a lemon slice. Serve with cocktail pumpernickel slices or cracker.

Holiday Crab Dip